10 KiB
Establish an SSH connection between Windows and Linux
Use the open source tool, PuTTY to establish an SSH connection from a
Windows machine to a Linux system.

The secure shell protocol (SSH) is the most common method for controlling remote machines over the command line in the Linux world. SSH is a true Linux original, and it is also gaining popularity in the Windows world. There is even official Windows documentation for SSH, which covers controlling Windows machines using OpenSSH.
This article describes how to establish an SSH connection from a Windows machine to a Fedora 33 Linux system using the popular open source tool PuTTY.
Ways to use SSH
SSH uses a client-server architecture, where an SSH client establishes a connection to an SSH server. The SSH server is usually running as a system daemon, so it is often called SSHD. You can hardly find a Linux distribution that does not come with the SSH daemon. In Fedora 33, the SSH daemon is installed but not activated.
You can use SSH to control almost any Linux machine, whether it's running as a virtual machine or as a physical device on your network. A common use case is the headless configuration of embedded devices, including the Raspberry Pi. SSH can also be used to tunnel other network services. Because SSH traffic is encrypted, you can use SSH as a transport layer for any protocol that does not provide encryption by default.
In this article, I'll explain four ways to use SSH: 1. how to configure the SSH daemon on the Linux side, 2. how to set up a remote console connection, 3. how to copy files over the network, and 4. how to tunnel a certain protocol over SSH.
1. Configure SSHD
The Linux system (Fedora 33 in my case) acts as the SSH server that allows the PuTTY SSH client to connect. First, check the daemon's SSH configuration. The configuration file is located at /etc/ssh/sshd_config and contains a lot of switches that can be activated by commenting out related lines:
#       $OpenBSD: sshd_config,v 1.100 2016/08/15 12:32:04 naddy Exp $

# This is the sshd server system-wide configuration file.  See
# sshd_config(5) for more information.

# This sshd was compiled with PATH=/usr/local/sbin:/usr/sbin:/sbin:/usr/local/bin:/usr/bin:/bin

# The strategy used for options in the default sshd_config shipped with
# OpenSSH is to specify options with their default value where
# possible, but leave them commented.  Uncommented options override the
# default value.

Include /etc/ssh/sshd_config.d/*.conf

#Port 22
#AddressFamily any
#ListenAddress 0.0.0.0
#ListenAddress ::
The default configuration, where no line is uncommented, should work for this example. Check whether the SSH daemon is already running by typing systemctl status sshd:
$ systemctl status sshd
● sshd.service - OpenSSH server daemon
   Loaded: loaded (/usr/lib/systemd/system/sshd.service; enabled; vendor preset: enabled)
   Active: active (running) since Fri 2018-06-22 11:12:05 UTC; 2 years 11 months ago
     Docs: man:sshd(8)
           man:sshd_config(5)
 Main PID: 577 (sshd)
    Tasks: 1 (limit: 26213)
   CGroup: /system.slice/sshd.service
           └─577 /usr/sbin/sshd -D -oCiphers=[aes256-gcm@openssh.com][5],chacha20-[...]
If it's inactive, start it with the systemctl start sshd command.
2. Set up a remote console
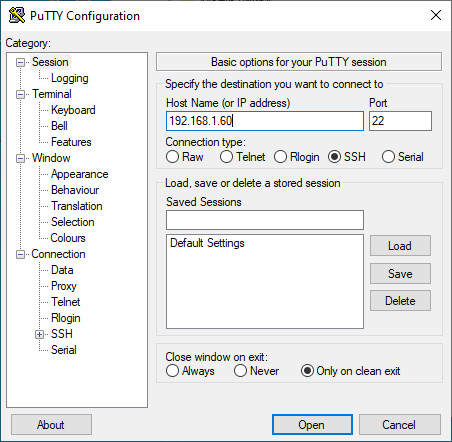
On Windows, download the PuTTY installer, then install and open it. You should see a window like this:
(Stephan Avenwedde, CC BY-SA 4.0)
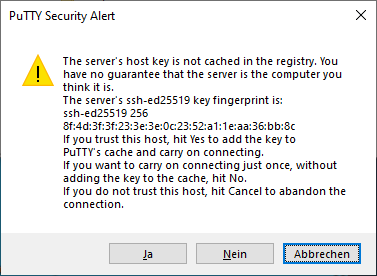
In the Host Name (or IP address) input field, enter the connection information for your Linux system. In this example, I set up a Fedora 33 virtual machine with a bridged network adapter that I can use to contact the system at the IP address 192.168.1.60. Click Open, and a window like this should open:
(Stephan Avenwedde, CC BY-SA 4.0)
This is an SSH security mechanism to prevent a man-in-the-middle attack. The fingerprint in the message should match the key on the Linux system at /etc/ssh/ssh_host_ed25519_key.pub.. PuTTY prints the key as an MD5 hash. To check its authenticity, switch to the Linux system, open a command shell, and enter:
`ssh-keygen -l -E md5 -f /etc/ssh/ssh_host_ed25519_key.pub`
The output should match the fingerprint shown by PuTTY:
$ ssh-keygen -l -E md5 -f /etc/ssh/ssh_host_ed25519_key.pub
256 MD5:E4:5F:01:05:D0:F7:DC:A6:32 no comment (ED25519)
Confirm the PuTTY Security Alert by clicking Yes. The host system's fingerprint is now in PuTTYs trust list, which is located in the Windows registry under:
`HKEY_CURRENT_USER\SOFTWARE\SimonTatham\PuTTY\SshHostKeys`
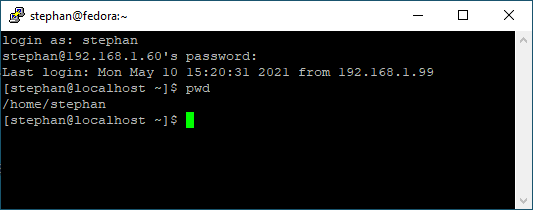
Enter your correct login credentials, and you should be on the console in your home directory:
(Stephan Avenwedde, CC BY-SA 4.0)
3. Copy files over the network
In addition to the remote console, you can use PuTTY to transfer files via SSH. Look in the installation folder under C:\\Program Files (x86)\\PuTTY and find pscp.exe. You can use this to copy files to and from a Linux system.
Open a command prompt with Windows + R and enter cmd. Copy the file MyFile.txt from your Linux user home directory to your Windows home directory by entering:
`C:\"Program Files (x86)"\PuTTY\pscp.exe stephan@192.168.1.60:/home/stephan/MyFile.txt .`
To copy a file from the Windows home directory to the Linux user home directory, enter:
`C:\"Program Files (x86)"\PuTTY\pscp.exe MyFile.txt stephan@192.168.1.60:/home/stephan/`
As you may have already figured out, the copy command's general structure is:
`pscp.exe <source> <target>`
4. Tunnel a protocol
Imagine you have a Linux machine that is running an HTTP-based service for some arbitrary application. You want to access this HTTP service from your Windows machine over the internet. Of course, you cannot expose the related TCP port to the public because:
- The server is running HTTP, not HTTPS
- There is no user management nor login at all
At first glance, it looks like an impossible task to set up this architecture without producing a horrible security flaw. But SSH makes it relatively easy to set up a safe solution for this scenario.
I will demonstrate this procedure with my software project Pythonic. Running as a container, Pythonic exposes two TCP ports: TCP port 7000 (main editor) and TCP port 8000 (the code-server source-code editor).
To install Pythonic on a Linux machine, run:
podman pull pythonicautomation/pythonic
podman run -d -p 7000:7000 -p 8000:8000 pythonic
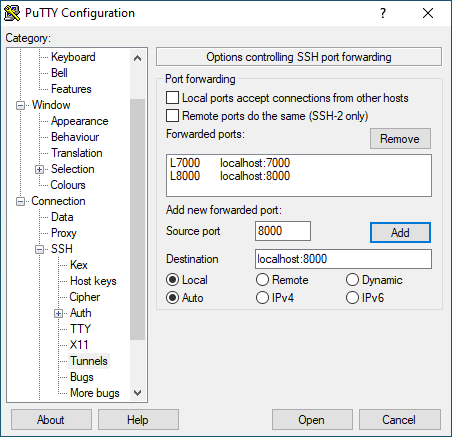
Switch to your Windows machine, open PuTTY, and navigate to Connection -> SSH -> Tunnels. Add the two TCP ports you want to forward:
- Source:
7000/ Destination:localhost:7000 - Source:
8000/ Destination:localhost:8000
(Stephan Avenwedde, CC BY-SA 4.0)
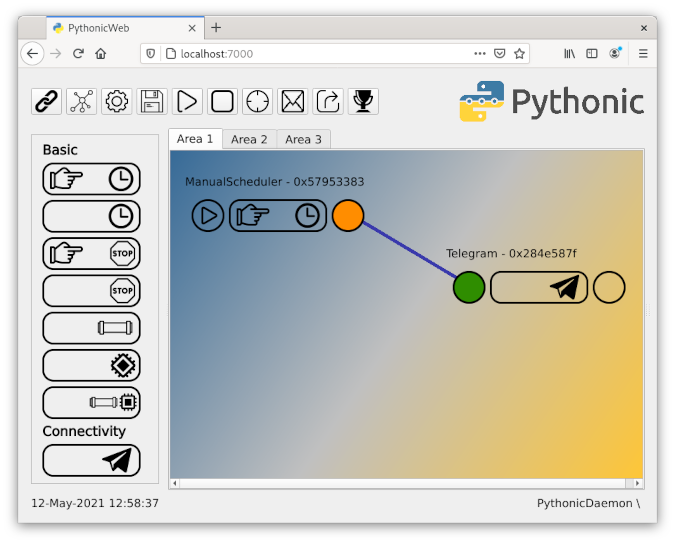
Then go back to the Session section, and establish an SSH connection as you did before. Open a browser and navigate to http://localhost:7000; you should see a screen like this:
(Stephan Avenwedde, CC BY-SA 4.0)
You have successfully configured port forwarding!
Warning: If you expose TCP Port 22 to the public, don't use easy-to-guess login credentials. You will receive login attempts from all over the world trying to access your Linux machine with common, standard credentials. Instead, permit only known clients to log in. This login restriction can be achieved using public-key cryptography, which uses a key pair in which the public key is stored on the SSH host machine, and the private key remains at the client.
Debugging
If you are struggling to connect to your Linux machine, you can follow the processes in your SSH daemon with:
`journalctl -f -u sshd`
This is how an ordinary log-in process looks like with LogLevel DEBUG :
(Stephan Avenwedde, CC BY-SA 4.0)
Learn more
This article barely scratched the surface about ways to use SSH. If you are looking for information about a specific use case, you can probably find it among the tons of SSH tutorials on the internet. I use PuTTY heavily at work because its easy configuration and good interoperability between operating systems make it a Swiss Army knife tool for connectivity solutions.
via: https://opensource.com/article/21/6/ssh-windows
作者:Stephan Avenwedde 选题:lujun9972 译者:译者ID 校对:校对者ID
