18 KiB
Build a to-do list app in React with hooks
Learn to build React apps using functional components and state
management.

React is one of the most popular and simple JavaScript libraries for building user interfaces (UIs) because it allows you to create reusable UI components.
Components in React are independent, reusable pieces of code that serve as building blocks for an application. React functional components are JavaScript functions that separate the presentation layer from the business logic. According to the React docs, a simple, functional component can be written like:
function Welcome(props) {
  return <h1>Hello, {props.name}</h1>;
}
React functional components are stateless. Stateless components are declared as functions that have no state and return the same markup, given the same props. State is managed in components with hooks, which were introduced in React 16.8. They enable the management of state and the lifecycle of functional components. There are several built-in hooks, and you can also create custom hooks.
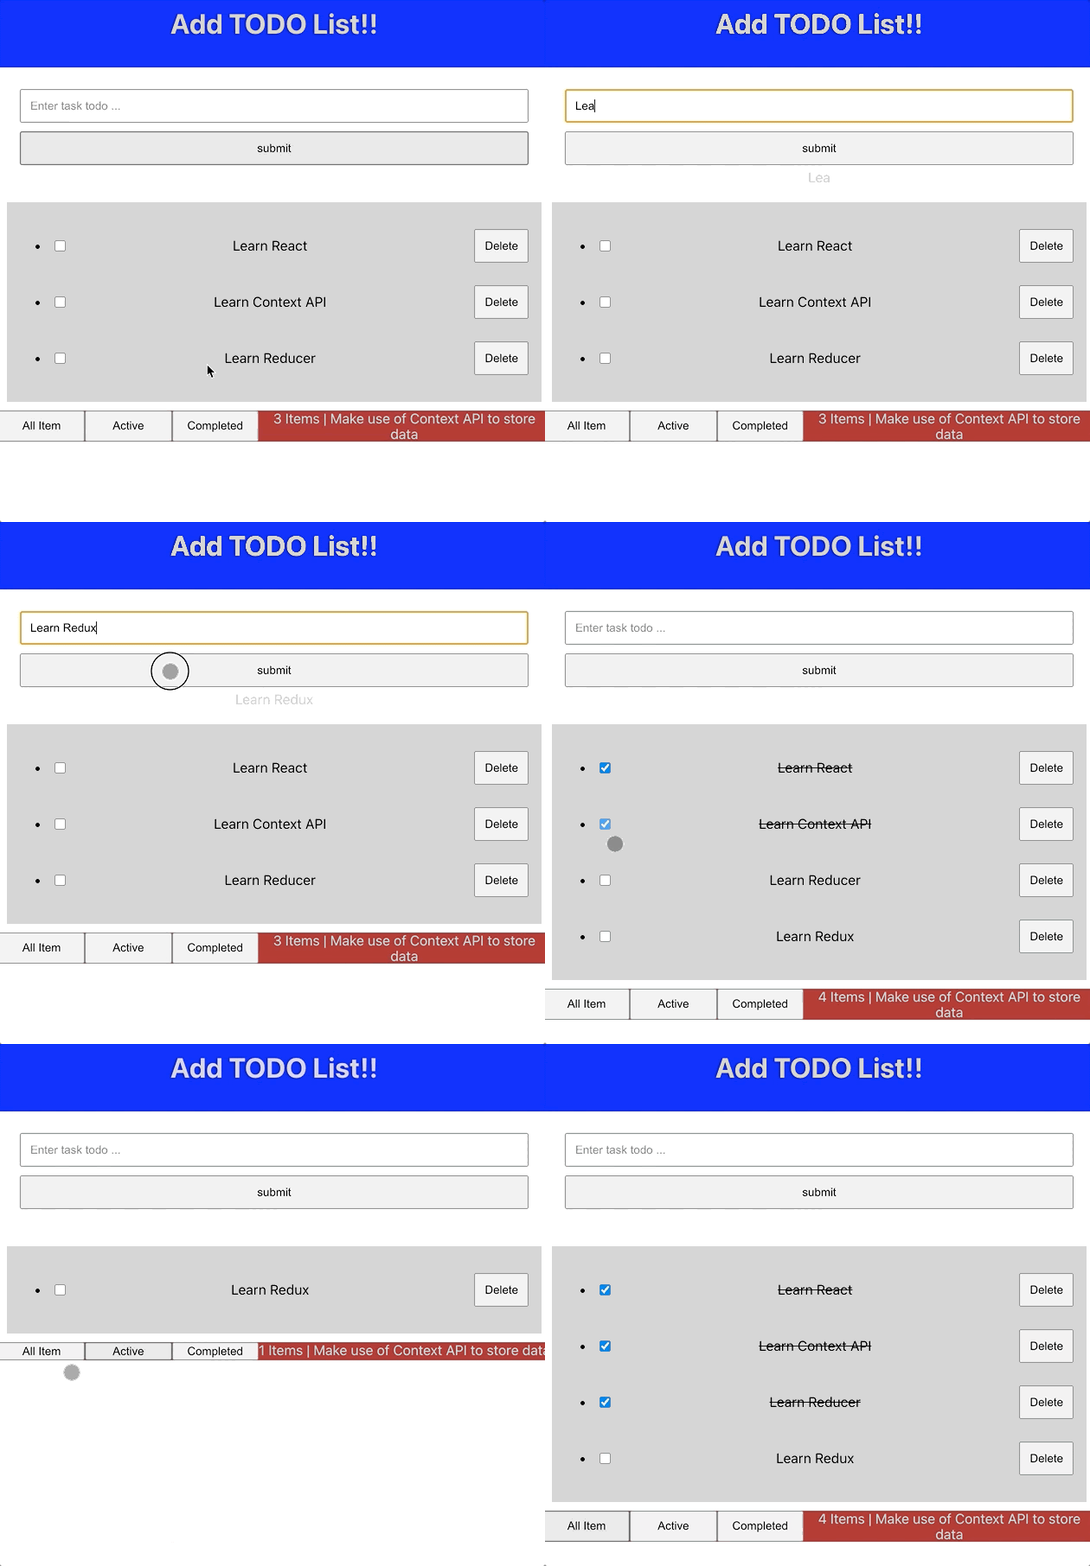
This article explains how to build a simple to-do app in React using functional components and state management. The complete code for this app is available on GitHub and CodeSandbox. When you're finished with this tutorial, the app will look like this:
(Jaivardhan Kumar, CC BY-SA 4.0)
Prerequisites
- To build locally, you must have Node.js v10.16 or higher, yarn v1.20.0 or higher, and npm 5.6
- Basic knowledge of JavaScript
- Basic understanding of React would be a plus
Create a React app
Create React App is an environment that allows you to start building a React app. Along with this tutorial, I used a TypeScript template for adding static type definitions. TypeScript is an open source language that builds on JavaScript:
`npx create-react-app todo-app-context-api --template typescript`
npx is a package runner tool; alternatively, you can use yarn:
`yarn create react-app todo-app-context-api --template typescript`
After you execute this command, you can navigate to the directory and run the app:
cd todo-app-context-api
yarn start
You should see the starter app and the React logo which is generated by boilerplate code. Since you are building your own React app, you will be able to modify the logo and styles to meet your needs.
Build the to-do app
The to-do app can:
- Add an item
- List items
- Mark items as completed
- Delete items
- Filter items based on status (e.g., completed, all, active)
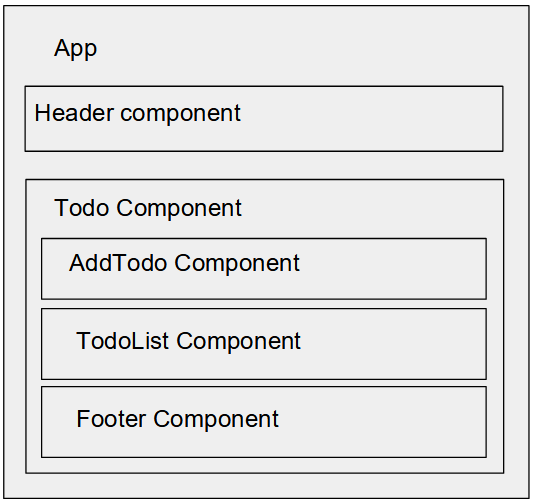
(Jaivardhan Kumar, CC BY-SA 4.0)
The header component
Create a directory called components and add a file named Header.tsx:
mkdir components
cd  components
vi  Header.tsx
Header is a functional component that holds the heading:
const Header: React.FC = () => {
    return (
        <div className="header">
            <h1>
                Add TODO List!!
            </h1>
        </div>
        )
}
The AddTodo component
The AddTodo component contains a text box and a button. Clicking the button adds an item to the list.
Create a directory called todo under the components directory and add a file named AddTodo.tsx:
mkdir todo
cd todo
vi AddTodo.tsx
AddTodo is a functional component that accepts props. Props allow one-way passing of data, i.e., only from parent to child components:
const AddTodo: React.FC<AddTodoProps> = ({ todoItem, updateTodoItem, addTaskToList }) => {
    const submitHandler = (event: SyntheticEvent) => {
        event.preventDefault();
        addTaskToList();
    }
    return (
        <form className="addTodoContainer" onSubmit={submitHandler}>
            <div  className="controlContainer">
                <input className="controlSpacing" style={{flex: 1}} type="text" value={todoItem?.text ?? ''} onChange={(ev) => updateTodoItem(ev.target.value)} placeholder="Enter task todo ..." />
                <input className="controlSpacing" style={{flex: 1}} type="submit" value="submit" />
            </div>
            <div>
                <label>
                    <span style={{ color: '#ccc', padding: '20px' }}>{todoItem?.text}</span>
                </label>
            </div>
        </form>
    )
}
You have created a functional React component called AddTodo that takes props provided by the parent function. This makes the component reusable. The props that need to be passed are:
- todoItem: An empty item state
- updateToDoItem: A helper function to send callbacks to the parent as the user types
- addTaskToList: A function to add an item to a to-do list
There are also some styling and HTML elements, like form, input, etc.
The TodoList component
The next component to create is the TodoList. It is responsible for listing the items in the to-do state and providing options to delete and mark items as complete.
TodoList will be a functional component:
const TodoList: React.FC = ({ listData, removeItem, toggleItemStatus }) => {
    return listData.length > 0 ? (
        <div className="todoListContainer">
            { listData.map((lData) => {
                return (
                    <ul key={lData.id}>
                        <li>
                            <div className="listItemContainer">
                                <input type="checkbox" style={{ padding: '10px', margin: '5px' }} onChange={() => toggleItemStatus(lData.id)} checked={lData.completed}/>
                                <span className="listItems" style={{ textDecoration: lData.completed ? 'line-through' : 'none', flex: 2 }}>{lData.text}</span>
                                <button type="button" className="listItems" onClick={() => removeItem(lData.id)}>Delete</button>
                            </div>
                        </li>
                    </ul>
                )
            })}
        </div>
    ) : (<span> No Todo list exist </span >)
}
The TodoList is also a reusable functional React component that accepts props from parent functions. The props that need to be passed are:
- listData: A list of to-do items with IDs, text, and completed properties
- removeItem: A helper function to delete an item from a to-do list
- toggleItemStatus: A function to toggle the task status from completed to not completed and vice versa
There are also some styling and HTML elements (like lists, input, etc.).
Footer component
Footer will be a functional component; create it in the components directory as follows:
cd ..

const Footer: React.FC = ({item = 0, storage, filterTodoList}) => {
    return (
        <div className="footer">
            <button type="button" style={{flex:1}} onClick={() => filterTodoList(ALL_FILTER)}>All Item</button>
            <button type="button" style={{flex:1}} onClick={() => filterTodoList(ACTIVE_FILTER)}>Active</button>
            <button type="button" style={{flex:1}} onClick={() => filterTodoList(COMPLETED_FILTER)}>Completed</button>
            <span style={{color: '#cecece', flex:4, textAlign: 'center'}}>{item} Items | Make use of {storage} to store data</span>
        </div>
    );
}
It accepts three props:
- item: Displays the number of items
- storage: Displays text
- filterTodoList: A function to filter tasks based on status (active, completed, all items)
Todo component: Managing state with contextApi and useReducer
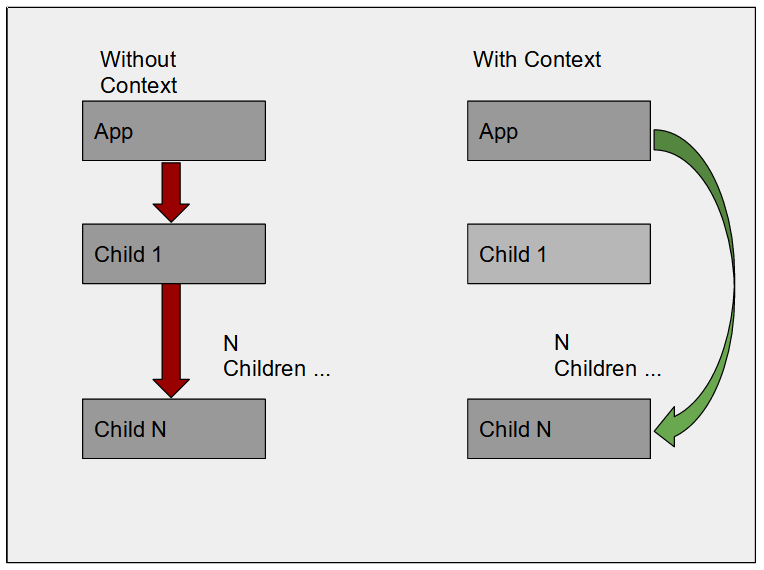
(Jaivardhan Kumar, CC BY-SA 4.0)
Context provides a way to pass data through the component tree without having to pass props down manually at every level. ContextApi and useReducer can be used to manage state by sharing it across the entire React component tree without passing it as a prop to each component in the tree.
Now that you have the AddTodo, TodoList, and Footer components, you need to wire them.
Use the following built-in hooks to manage the components' state and lifecycle:
- useState: Returns the stateful value and updater function to update the state
- useEffect: Helps manage lifecycle in functional components and perform side effects
- useContext: Accepts a context object and returns current context value
- useReducer: Like useState, it returns the stateful value and updater function, but it is used instead of useState when you have complex state logic (e.g., multiple sub-values or if the new state depends on the previous one)
First, use contextApi and useReducer hooks to manage the state. For separation of concerns, add a new directory under components called contextApiComponents:
mkdir contextApiComponents
cd contextApiComponents
Create TodoContextApi.tsx:
const defaultTodoItem: TodoItemProp = { id: Date.now(), text: '', completed: false };

const TodoContextApi: React.FC = () => {
    const { state: { todoList }, dispatch } = React.useContext(TodoContext);
    const [todoItem, setTodoItem] = React.useState(defaultTodoItem);
    const [todoListData, setTodoListData] = React.useState(todoList);

    React.useEffect(() => {
        setTodoListData(todoList);
    }, [todoList])

    const updateTodoItem = (text: string) => {
        setTodoItem({
            id: Date.now(),
            text,
            completed: false
        })
    }
    const addTaskToList = () => {
        dispatch({
            type: ADD_TODO_ACTION,
            payload: todoItem
        });
        setTodoItem(defaultTodoItem);
    }
    const removeItem = (id: number) => {
        dispatch({
            type: REMOVE_TODO_ACTION,
            payload: { id }
        })
    }
    const toggleItemStatus = (id: number) => {
        dispatch({
            type: UPDATE_TODO_ACTION,
            payload: { id }
        })
    }
    const filterTodoList = (type: string) => {
        const filteredList = FilterReducer(todoList, {type});
        setTodoListData(filteredList)

    }

    return (
        <>
            <AddTodo todoItem={todoItem} updateTodoItem={updateTodoItem} addTaskToList={addTaskToList} />
            <TodoList listData={todoListData} removeItem={removeItem} toggleItemStatus={toggleItemStatus} />
            <Footer item={todoListData.length} storage="Context API" filterTodoList={filterTodoList} />
        </>
    )
}
This component includes the AddTodo, TodoList, and Footer components and their respective helper and callback functions.
To manage the state, it uses contextApi, which provides state and dispatch methods, which, in turn, updates the state. It accepts a context object. (You will create the provider for the context, called contextProvider, next).
` const { state: { todoList }, dispatch } = React.useContext(TodoContext);`
TodoProvider
Add TodoProvider, which creates context and uses a useReducer hook. The useReducer hook takes a reducer function along with the initial values and returns state and updater functions (dispatch).
- Create the context and export it. Exporting it will allow it to be used by any child component to get the current state using the hook useContext: [code]
export const TodoContext = React.createContext({} as TodoContextProps);
  * Create **ContextProvider** and export it: [code] const TodoProvider : React.FC = (props) => {
    const [state, dispatch] = React.useReducer(TodoReducer, {todoList: []});
    const value = {state, dispatch}
    return (
        <TodoContext.Provider value={value}>
            {props.children}
        </TodoContext.Provider>
    )
}
- Context data can be accessed by any React component in the hierarchy directly with the useContext hook if you wrap the parent component (e.g., TodoContextApi) or the app itself with the provider (e.g., TodoProvider): [code] <TodoProvider> <TodoContextApi /> </TodoProvider>
* In the **TodoContextApi** component, use the **useContext** hook to access the current context value: [code]`const { state: { todoList }, dispatch } = React.useContext(TodoContext)`
TodoProvider.tsx:
type TodoContextProps = {
    state : {todoList: TodoItemProp[]};
    dispatch: ({type, payload}: {type:string, payload: any}) => void;
}

export const TodoContext = React.createContext({} as TodoContextProps);

const TodoProvider : React.FC = (props) => {
    const [state, dispatch] = React.useReducer(TodoReducer, {todoList: []});
    const value = {state, dispatch}
    return (
        <TodoContext.Provider value={value}>
            {props.children}
        </TodoContext.Provider>
    )
}
Reducers
A reducer is a pure function with no side effects. This means that for the same input, the expected output will always be the same. This makes the reducer easier to test in isolation and helps manage state. TodoReducer and FilterReducer are used in the components TodoProvider and TodoContextApi.
Create a directory named reducers under src and create a file there named TodoReducer.tsx:
const TodoReducer = (state: StateProps = {todoList:[]}, action: ActionProps) => {
    switch(action.type) {
        case ADD_TODO_ACTION:
            return { todoList: [...state.todoList, action.payload]}
        case REMOVE_TODO_ACTION:
            return { todoList: state.todoList.length ? state.todoList.filter((d) => d.id !== action.payload.id) : []};
        case UPDATE_TODO_ACTION:
            return { todoList: state.todoList.length ? state.todoList.map((d) => {
                if(d.id === action.payload.id) d.completed = !d.completed;
                return d;
            }): []}
        default:
            return state;
    }
}
Create a FilterReducer to maintain the filter's state:
const FilterReducer =(state : TodoItemProp[] = [], action: ActionProps) => {
    switch(action.type) {
        case ALL_FILTER:
            return state;
        case ACTIVE_FILTER:
            return state.filter((d) => !d.completed);
        case COMPLETED_FILTER:
            return state.filter((d) => d.completed);
        default:
            return state;
    }
}
You have created all the required components. Next, you will add the Header and TodoContextApi components in App, and TodoContextApi with TodoProvider so that all children can access the context.
function App() {
  return (
    <div className="App">
      <Header />
      <TodoProvider>
              <TodoContextApi />
      </TodoProvider>
    </div>
  );
}
Ensure the App component is in index.tsx within ReactDom.render. ReactDom.render takes two arguments: React Element and an ID of an HTML element. React Element gets rendered on a web page, and the id indicates which HTML element will be replaced by the React Element:
ReactDOM.render(
   <App />,
  document.getElementById('root')
);
Conclusion
You have learned how to build a functional app in React using hooks and state management. What will you do with it?
via: https://opensource.com/article/21/3/react-app-hooks
作者:Jaivardhan Kumar 选题:lujun9972 译者:译者ID 校对:校对者ID


