12 KiB
Build a printer UI for Raspberry Pi with XML and Java
TotalCross makes it quick to build user interfaces for embedded
applications.

Creating a GUI from scratch is a very time consuming process, dealing with all the positions and alignments in hard code can be really tough for some programmers. In this article, I demonstrate how to speed up this process using XML.
This project uses TotalCross as the target framework. TotalCross is an open source, cross-platform software development kit (SDK) developed to create GUIs for embedded devices faster. TotalCross provides Java's development benefits without needing to run Java on a device because it uses its own bytecode and virtual machine (TC bytecode and TCVM) for performance enhancement.
I also use Knowcode-XML, an open source XML parser for the TotalCross framework, which converts XML files into TotalCross components.
Project requirements
To reproduce this project, you need:
- KnowCode-XML
- VSCode or VSCodium
- An Android development environment
- TotalCross plugin for VSCode
- Java 11 or greater for your development platform (Linux, Mac, or Windows)
- Git
Building the embedded application
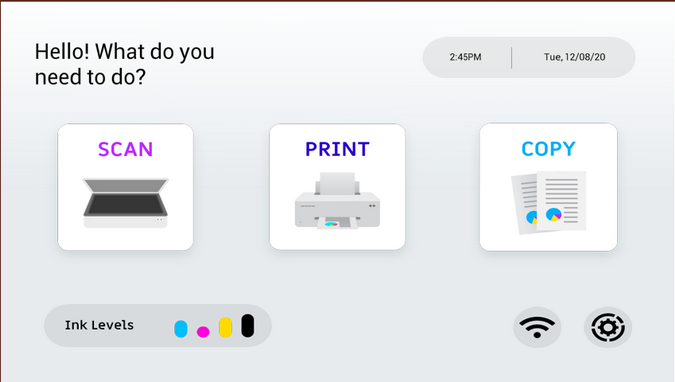
This application consists of an embedded GUI with basic print functionalities, such as scan, print, and copy.
(Edson Holanda Teixeira Jr, CC BY-SA 4.0)
Several steps are required to create this GUI, including generating the GUI with Android-XML and then using the Knowcode-XML parser to run it on the TotalCross Framework.
1. Generate the Android XML
For creating the XML file, first create a simple Android screen, and then customize it. If you don't know how to write Android-XM, or you just want a headstart, you can download this application’s XML from this GitHub project. This project also contains the images you need to render the GUI.
2. Adjust the XML
After generating the XML files, you need to make some fine adjustments to make sure everything is aligned, with the right proportions, and has the correct path to the images.
Add the XML layouts to the Layouts folder and all the assets to the Drawable folder. Then you can start to customize the XML.
For example, if you want to change an XML object's background, change the android:background attribute:
`android:background="@drawable/scan"`
You can change the object's position with tools:layout_editor_absoluteX and tools:layout_editor_absoluteY:
tools:layout_editor_absoluteX="830dp"
tools:layout_editor_absoluteY="511dp"
Change the object's size with android:layout_width and android:layout_height:
android:layout_width="70dp"
android:layout_height="70dp"
If you want to put text on an object, you can use android:textSize, android:text, android:textStyle, and android:textColor:
android:textStyle="bold"
android:textColor="#000000"
android:textSize="20dp"
android:text="2:45PM"
Here is an example of a complete XML object:
    <ImageButton
           android:id="@+id/ImageButton"
           android:layout_width="70dp"
           android:layout_height="70dp"
           tools:layout_editor_absoluteX="830dp"
           tools:layout_editor_absoluteY="511dp"
           android:background="@drawable/home_config" />
3. Run the GUI on TotalCross
After you make all the XML adjustments, it's time to run it on TotalCross. Create a new project on the TotalCross extension and add the XML and Drawable folders to the Main folder. If you're not sure how to create a TotalCross project, see our get started guide.
After configuring the environment, use totalcross.knowcode.parse.XmlContainerFactory and import totalcross.knowcode.parse.XmlContainerLayout to use the XML GUI on the TotalCross framework. You can find more information about using KnowCode-XML on its GitHub page.
4. Add transitions
This project's smooth transition effect is created by the SlidingNavigator class, which uses TotalCross' ControlAnimation class to slide from one screen to the other.
Call SlidingNavigator on the XMLpresenter class:
`new SlidingNavigator(this).present(HomePresenter.class);`
Implement the present function on the SlidingNavigator class:
public void present(Class<? extends XMLPresenter> presenterClass)
         throws [InstantiationException][16], [IllegalAccessException][17] {
      final XMLPresenter presenter = cache.containsKey(presenterClass) ? cache.get(presenterClass)
            : presenterClass.newInstance();
      if (!cache.containsKey(presenterClass)) {
         cache.put(presenterClass, presenter);
      }

      if (presenters.isEmpty()) {
         window.add(presenter.content, LEFT, TOP, FILL, FILL);
      } else {
         XMLPresenter previous = presenters.lastElement();

         window.add(presenter.content, AFTER, TOP, SCREENSIZE, SCREENSIZE, previous.content);
PathAnimation in animation control creates the sliding animation from one screen to another:
         PathAnimation.create(previous.content, -Settings.screenWidth, 0, new ControlAnimation.AnimationFinished() {
            @Override
            public void onAnimationFinished(ControlAnimation anim) {
               window.remove(previous.content);
            }
         }, 1000).with(PathAnimation.create(presenter.content, 0, 0, new ControlAnimation.AnimationFinished() {
            @Override
            public void onAnimation Finished(Control Animation anim) {
               presenter.content.setRect(LEFT, TOP, FILL, FILL);
            }
         }, 1000)).start();
      }
      presenter.setNavigator(this);
      presenters.push(presenter);
      presenter.bind2();
      if (presenter.isFirstPresent) {
         presenter.onPresent();
         presenter.isFirstPresent = false;
      }
5. Load spinners
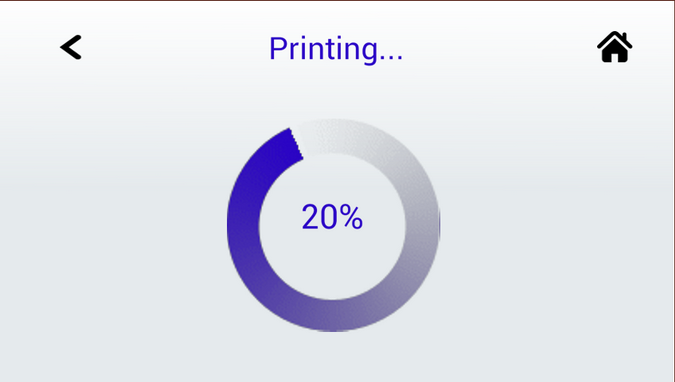
Another nice feature in the printer application is the loading screen animation that shows progress. It includes text and a spinning animation.
(Edson Holanda Teixeira Jr, CC BY-SA 4.0)
Implement this feature by adding a timer and a timer listener to update the progress label, then call the function spinner.start(). All of the animations are auto-generated by TotalCross and KnowCode:
public void startSpinner() {
        time = content.addTimer(500);
        content.addTimerListener((e) -> {
            try {
                progress(); // Updates the Label
            } catch (InstantiationException | IllegalAccessException e1) {
                // TODO Auto-generated catch block
                e1.printStackTrace();
            }
        });
        Spinner spinner = (Spinner) ((XmlContainerLayout) content).getControlByID("@+id/spinner");
        spinner.start();
    }
The spinner is instantiated as a reference to the XmlContainerLayout spinner described in the XML file:
<ProgressBar
android:id="@+id/spinner"
android:layout_width="362dp"
android:layout_height="358dp"
tools:layout_editor_absoluteX="296dp"
tools:layout_editor_absoluteY="198dp"
   android:indeterminateTint="#2B05C7"
style="?android:attr/progressBarStyle" />
6. Build the application
It's time to build the application. You can see and change the target systems in pom.xml. Make sure the Linux Arm target is available.
If you are using VSCode, press F1 on the keyboard, select TotalCross: Package and wait for the package to finish. Then you can see the installation files in the Target folder.
7. Deploy and run the application on Raspberry Pi
To deploy the application on a Raspberry Pi 4 with the SSH protocol, press F1 on the keyboard. Select TotalCross: Deploy&Run and provide information about your SSH connection: User, IP, Password, and Application Path.
(Edson Holanda Teixeira Jr, CC BY-SA 4.0)
(Edson Holanda Teixeira Jr, CC BY-SA 4.0)
(Edson Holanda Teixeira Jr, CC BY-SA 4.0)
(Edson Holanda Teixeira Jr, CC BY-SA 4.0)
(Edson Holanda Teixeira Jr, CC BY-SA 4.0)
Here's what the application looks like running on the machine.
What's next?
KnowCode makes it easier to create and manage your application screens using Java. Knowcode-XML translates your XML into a TotalCross GUI that in turn generates the binary to run on your Raspberry Pi.
Combining KnowCode technology with TotalCross enables you to create embedded applications faster. Find out what else you can do by accessing our embedded samples on GitHub and editing your own application.
If you have questions, need help, or just want to interact with other embedded GUI developers, feel free to join our Telegram group to discuss embedded applications on any framework.
via: https://opensource.com/article/21/3/raspberry-pi-totalcross
作者:Edson Holanda Teixeira Junior 选题:lujun9972 译者:译者ID 校对:校对者ID


