9.4 KiB
Installing Nextcloud 20 on Fedora Linux with Podman
Nowadays, many open source projects offer container images for easy deployment. This is very handy when running a home server or lab environment. A previous Fedora Magazine article covered installing Nextcloud from the source package. This article explains how you can run Nextcloud on Fedora 33 as a container deployment with Podman.
What is Nextcloud?
Nextcloud started in 2016 as a fork of Owncloud. Since then, it evolved into a full-fledged collaboration software offering file-, calendar-, and contact-syncing, plus much more. You can run a simple Kanban Board in it or write documents collaboratively. Nextcloud is fully open source under the AGPLv3 License and can be used for private or commercial use alike.
What is Podman?
Podman is a container engine for developing, managing, and running OCI Containers on your Linux System. It offers a wide variety of features like rootless mode, cgroupv2 support, pod management, and it can run daemonless. Furthermore, you are getting a Docker compatible API for further development. It is available by default on Fedora Workstation and ready to be used.
In case you need to install podman, run:
sudo dnf install podman
Designing the Deployment
Every deployment needs a bit of preparation. Sure, you can simply start a container and start using it, but that wouldn’t be so much fun. A well-thought and designed deployment should be easy to understand and offer some kind of flexibility.
Container / Images
First, you need to choose the proper container images for the deployment. This is quite easy for Nextcloud, since it offers already a pretty good documentation for container deployments. Nextcloud supports two variations: Nextcloud Apache httpd (which is fully self-contained) and Nextcloud php-fpm (which needs an additional nginx container).
In both cases, you also need to provide a database, which can be MariaDB (recommended) or PostgreSQL (also supported). This article uses the Apache httpd + MariaDB installation.
Volumes
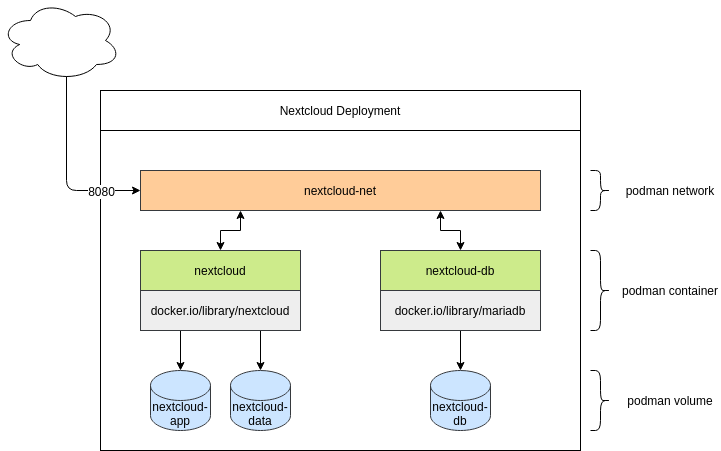
Running a container does not persist data you create during the runtime. You perform updates by recreating the container. Therefore, you will need some volumes for the database and the Nextcloud files. Nextcloud also recommends you put the “data” folder in a separate volume. So you will end up with three volumes:
- nextcloud-app
- nextcloud-data
- nextcloud-db
Network
Lastly, you need to consider networking. One of the benefits of containers is that you can re-create your deployment as it may look like in production. Network segmentation is a very common practice and should be considered for a container deployment, too. This tutorial will not add advanced features like network load balancing or security segmentation. You will need only one network which you will use to publish the ports for Nextcloud. Creating a network also provides the dnsname plugin, which will allow container communication based on container names.
The picture
Now that every single element is prepared, you can put these together and get a really nice understanding of how the development will look.
Run, Nextcloud, Run
Now you have prepared all of the ingredients and you can start running the commands to deploy Nextcloud. All commands can be used for root-privileged or rootless deployments. This article will stick to rootless deployments.
Sart with the network:
# Creating a new network
$ podman network create nextcloud-net

# Listing all networks
$ podman network ls

# Inspecting a network
$ podman network inspect nextcloud-net
As you can see in the last command, you created a DNS zone with the name “dns.podman”. All containers created in this network are reachable via “CONTAINER_NAME.dns.podman”.
Next, optionally prepare your volumes. This step can be skipped, since Podman will create named volumes on demand, if they do not exist. Podman supports named volumes, which it creates in special locations, so you don’t need to take care of SELinux or alike.
# Creating the volumes
$ podman volume create nextcloud-app
$ podman volume create nextcloud-data
$ podman volume create nextcloud-db

# Listing volumes
$ podman volume ls

# Inspecting volumes (this also provides the full path)
$ podman volume inspect nextcloud-app
Network and volumes are done. Now provide the containers.
First, you need the database. According to the MariaDB image documentation, you need to provide some additional environment variables,. Additionally, you need to attach the created volume, connect the network, and provide a name for the container. Most of the values will be needed in the next commands again. (Note that you should replace DB_USER_PASSWORD and DB_ROOT_PASSWORD with unique passwords.)
# Deploy Mariadb
$ podman run --detach
  --env MYSQL_DATABASE=nextcloud
  --env MYSQL_USER=nextcloud
  --env MYSQL_PASSWORD=DB_USER_PASSWORD
  --env MYSQL_ROOT_PASSWORD=DB_ROOT_PASSWORD
  --volume nextcloud-db:/var/lib/mysql
  --network nextcloud-net
  --restart on-failure
  --name nextcloud-db
  docker.io/library/mariadb:10

# Check running containers
$ podman container ls
After the successful start of your new MariaDB container, you can deploy Nextcloud itself. (Note that you should replace DB_USER_PASSWORD with the password you used in the previous step. Replace NC_ADMIN and NC_PASSWORD with the username and password you want to use for the Nextcloud administrator account.)
# Deploy Nextcloud
$ podman run --detach
  --env MYSQL_HOST=nextcloud-db.dns.podman
  --env MYSQL_DATABASE=nextcloud
  --env MYSQL_USER=nextcloud
  --env MYSQL_PASSWORD=DB_USER_PASSWORD
  --env NEXTCLOUD_ADMIN_USER=NC_ADMIN
  --env NEXTCLOUD_ADMIN_PASSWORD=NC_PASSWORD
  --volume nextcloud-app:/var/www/html
  --volume nextcloud-data:/var/www/html/data
  --network nextcloud-net
  --restart on-failure
  --name nextcloud
  --publish 8080:80
  docker.io/library/nextcloud:20

# Check running containers
$ podman container ls
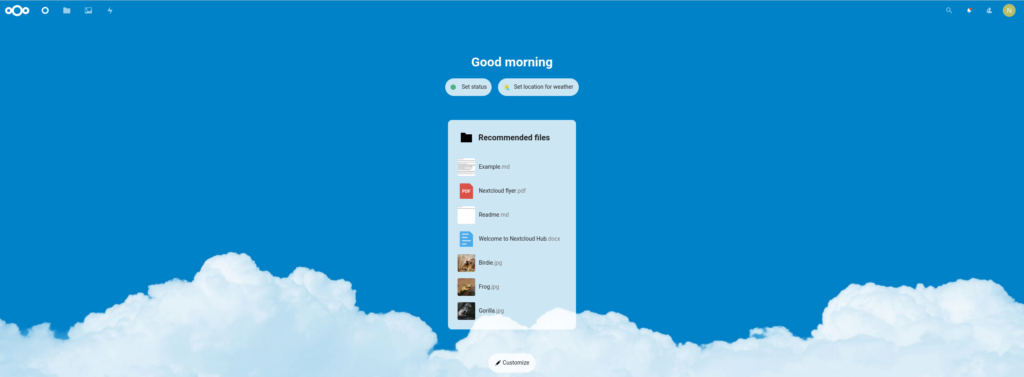
Now that the two containers are running, you can configure your containers. Open your browser and point to “localhost:8080” (or another host name or IP address if it is running on a different server).
The first load may take some time (30 seconds) or even report “unable to load”. This is coming from Nextcloud, which is preparing the first run. In that case, wait a minute or two. Nextcloud will prompt for a username and password.
Enter the user name and password you used previously.
Now you are ready to go and experience Nextcloud for testing, development ,or your home server.
Update
If you want to update one of the containers, you need to pull the new image and re-create the containers.
# Update mariadb
$ podman pull mariadb:10
$ podman stop nextcloud-db
$ podman rm nextcloud-db
$ podman run --detach
  --env MYSQL_DATABASE=nextcloud
  --env MYSQL_USER=nextcloud
  --env MYSQL_PASSWORD=DB_USER_PASSWORD
  --env MYSQL_ROOT_PASSWORD=DB_ROOT_PASSWORD
  --volume nextcloud-db:/var/lib/mysql
  --network nextcloud-net
  --restart on-failure
  --name nextcloud-db
  docker.io/library/mariadb:10
Updating the Nextcloud container works exactly the same.
# Update Nextcloud

$ podman pull nextcloud:20
$ podman stop nextcloud
$ podman rm nextcloud
$ podman run --detach
  --env MYSQL_HOST=nextcloud-db.dns.podman
  --env MYSQL_DATABASE=nextcloud
  --env MYSQL_USER=nextcloud
  --env MYSQL_PASSWORD=DB_USER_PASSWORD
  --env NEXTCLOUD_ADMIN_USER=NC_ADMIN
  --env NEXTCLOUD_ADMIN_PASSWORD=NC_PASSWORD
  --volume nextcloud-app:/var/www/html
  --volume nextcloud-data:/var/www/html/data
  --network nextcloud-net
  --restart on-failure
  --name nextcloud
  --publish 8080:80
  docker.io/library/nextcloud:20
That’s it; your Nextcloud installation is up-to-date again.
Conclusion
Deploying Nextcloud with Podman is quite easy. After just a couple of minutes, you will have a very handy collaboration software, offering filesync, calendar, contacts, and much more. Check out apps.nextcloud.com, which will extend the features even further.
via: https://fedoramagazine.org/nextcloud-20-on-fedora-linux-with-podman/


