9.0 KiB
Run Linux apps on your Chromebook
Run all the Linux apps you want using Crostini on your Chromebook.

Chromebooks have been a game-changer for PreK-12 school systems, enabling them to purchase low-cost laptop computers for students, teachers, and administrators to use. While Chromebooks have always been powered by a Linux-based operating system (Chrome OS), until recently, there was no way to run most Linux apps on one. But that changed when Google released Crostini, a virtual machine that allows Chromebooks to run Linux (Beta).
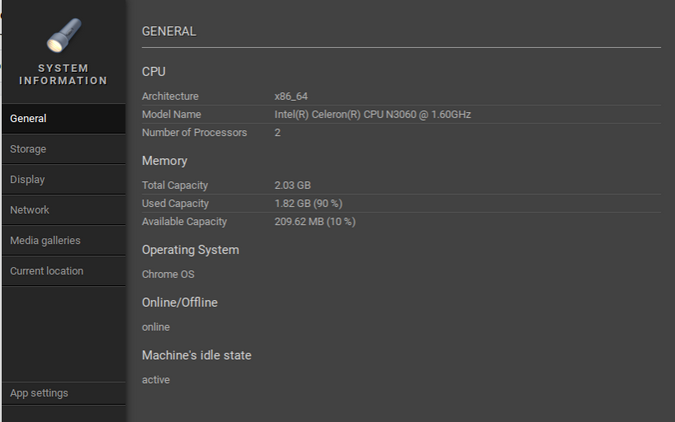
Most Chromebooks released after 2019 and some earlier models can run Crostini and Linux (Beta). Check this list of supported devices to see if your Chromebook is on it. Fortunately, my Acer Chromebook 15 with 2GB RAM and an Intel Celeron processor is supported.
(Don Watkins, CC BY-SA 4.0)
I recommend using a Chromebook with 4GB RAM and more disk space if you plan to install a lot of Linux applications.
Set up Linux (Beta)
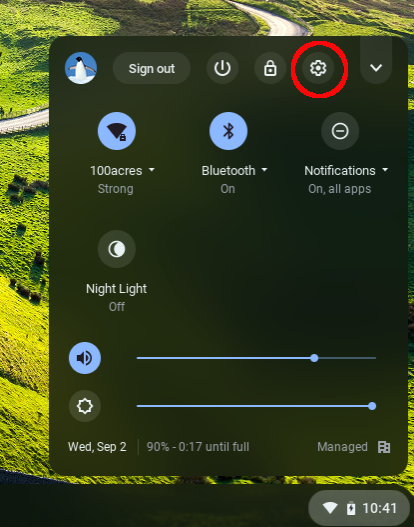
After you sign into your Chromebook, "mouse over" to the lower-right corner of the screen where the clock is displayed, and left-click there. A panel will open with options at the top (from left to right) to sign out, shut down, lock, and open Settings. Choose the Settings icon.
(Don Watkins, CC BY-SA 4.0)
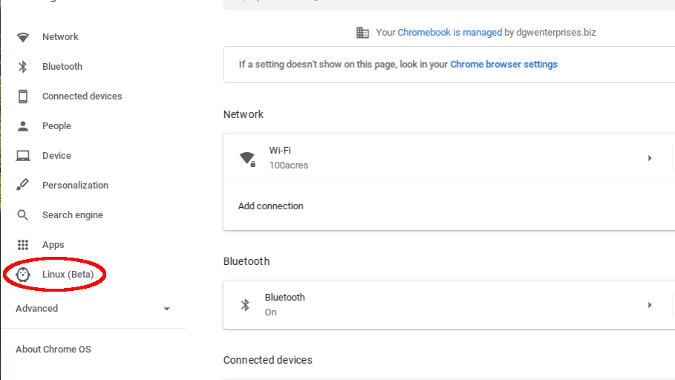
Look on the left side of the Settings panel, and you will see Linux (Beta) listed.
(Don Watkins, CC BY-SA 4.0)
Click on Linux (Beta), and the main panel will change to present an option to launch it. Click the Turn on button.
![Turn on Linux (Beta)][9]
(Don Watkins, CC BY-SA 4.0)
It will start the process of setting up a Linux environment on your Chromebook.
![Setting up Linux (Beta)][10]
(Don Watkins, CC BY-SA 4.0)
Next, you will be prompted to enter a Username and the size you want your Linux installation to be.
![Setting up Linux (Beta)][11]
(Don Watkins, CC BY-SA 4.0)
It takes a few minutes to install Linux on your Chromebook.
![Installing Linux (Beta)][12]
(Don Watkins, CC BY-SA 4.0)
After the installation completes, you can use Linux on your Chromebook. The menu bar on the bottom of your Chromebook's display has a shortcut to a terminal, a text-based interface you can use to interact with Linux.
![Linux Beta terminal][13]
(Don Watkins, CC BY-SA 4.0)
You can use [common Linux commands][14] like ls, lscpu, and top to see more of your environment. You can install applications using sudo apt install.
Install your first Linux application
Being able to install and run free and open source software on a Chromebook can be a real winner for financially constrained school districts.
The first application I recommend installing is the [Mu editor][15] for Python. Install it by entering the following into your terminal:
`$ sudo apt install mu-editor`
It takes a bit over five minutes to install, but in the end, you'll have access to a really good Python editor for students and anyone else who wants to learn Python.
I've had great success using [Mu and Python as a learning tool][16]. For example, I have taught my students to write code for Python's turtle module and execute it to create graphics. I was disappointed that I wasn't able to use Mu with a [BBC:Microbit][17] open hardware board. Even though the Microbit connects to USB and there is USB support in the Chromebook's Linux virtual environment, I couldn't make it work.
![Mu editor][18]
(Don Watkins, CC BY-SA 4.0)
Once you've installed an application, it will show up in a special Linux Apps menu, which you can see on the lower-right of this screenshot.
![Linux Apps menu][19]
(Don Watkins, CC BY-SA 4.0)
Install other applications
You can install more than just a programming language and code editor. In fact, you can install most of your favorite open source applications.
For example, you can install the LibreOffice suite with:
`$ sudo apt install libreoffice`
The open source audio software [Audacity][20] is one of my other favorite classroom applications. My Chromebook's microphone works with Audacity, making it easy to create podcasts or edit free sounds from [Wikimedia Commons][21]. It's easy to install Audacity on a Chromebook—with the Crostini virtual environment running, open the terminal and enter:
`$ sudo apt install audacity`
Then launch Audacity from the command line or look for it in the Linux Apps section of the Chromebook menu.
![Audacity][22]
(Don Watkins, CC BY-SA 4.0)
I also easily installed [TuxMath][23] and [TuxType][24], a couple of great applications for education. I was even able to install and run the image editor [GIMP][25]. All the Linux applications come from Debian Linux repositories.
![GIMP][26]
(Don Watkins, CC BY-SA 4.0)
Share files
There is a utility within Linux (Beta) to back up and restore your files. You can also share files between your Linux (Beta) virtual machine and your Chromebook by opening the Files app on the Chromebook and right-clicking on the folder you want to share. You can choose to share all of your Chromebook files or create a special folder for shared files. While you are in the Linux virtual machine, you can access this folder by browsing to /mnt/chromeos.
![Sharing files][27]
(Don Watkins, CC BY-SA 4.0)
Learn more
The [documentation][28] for Linux (Beta) is very complete, so read it thoroughly to learn more about its capabilities. Some key takeaways from the documentation are:
- Cameras are not yet supported.
- Android devices are supported over USB.
- Hardware acceleration is not yet supported.
- You can access the microphone.
Are you using Linux applications on your Chromebook? Tell us all about it in the comments!
via: https://opensource.com/article/20/9/linux-chromebook
作者:Don Watkins 选题:lujun9972 译者:译者ID 校对:校对者ID
[9]: https://opensource.com/sites/default/files/uploads/chromebook-launch-linux-beta.png (Turn on Linux (Beta)) [10]: https://opensource.com/sites/default/files/uploads/chromebook-setup-linux-beta_0.png (Setting up Linux (Beta)) [11]: https://opensource.com/sites/default/files/uploads/chromebook-linux-beta-username.png (Setting up Linux (Beta)) [12]: https://opensource.com/sites/default/files/uploads/chromebook-linux-beta-install.png (Installing Linux (Beta)) [13]: https://opensource.com/sites/default/files/uploads/chromebook-linux-terminal.png (Linux (Beta) terminal) [14]: https://opensource.com/downloads/linux-common-commands-cheat-sheet [15]: https://codewith.mu [16]: https://opensource.com/article/20/9/teaching-python-mu [17]: https://opensource.com/article/19/8/getting-started-bbc-microbit [18]: https://opensource.com/sites/default/files/uploads/chromebook-mu.png (Mu editor) [19]: https://opensource.com/sites/default/files/uploads/chromebook-linux-apps.png (Linux Apps menu) [20]: https://www.audacityteam.org/ [21]: https://commons.wikimedia.org/wiki/Commons:Free_media_resources/Sound [22]: https://opensource.com/sites/default/files/uploads/chromebook-audacity.png (Audacity) [23]: https://sourceforge.net/projects/tuxmath/ [24]: https://sourceforge.net/projects/tuxtype/ [25]: https://www.gimp.org/ [26]: https://opensource.com/sites/default/files/uploads/chromebook-gimp.png (GIMP) [27]: https://opensource.com/sites/default/files/uploads/chromebook-linux-share-files.png (Sharing files) [28]: https://support.google.com/chromebook/answer/9145439?p=chromebook_linuxapps&b=banon-signed-mpkeys&visit_id=637346541887671598-1548999339&rd=1


