sources/tech/20210903 Install ONLYOFFICE Docs on Fedora Linux with Podman and connect it with Nextcloud.md
8.7 KiB
Install ONLYOFFICE Docs on Fedora Linux with Podman and connect it with Nextcloud
Photo by Chris Leggat on Unsplash
If you need a reliable office suite for online editing and collaboration within your sync & share platform, you can try ONLYOFFICE Docs. In this tutorial, we learn how to install it on your Fedora Linux with Podman and discover the ONLYOFFICE-Nextcloud integration.
What is ONLYOFFICE Docs
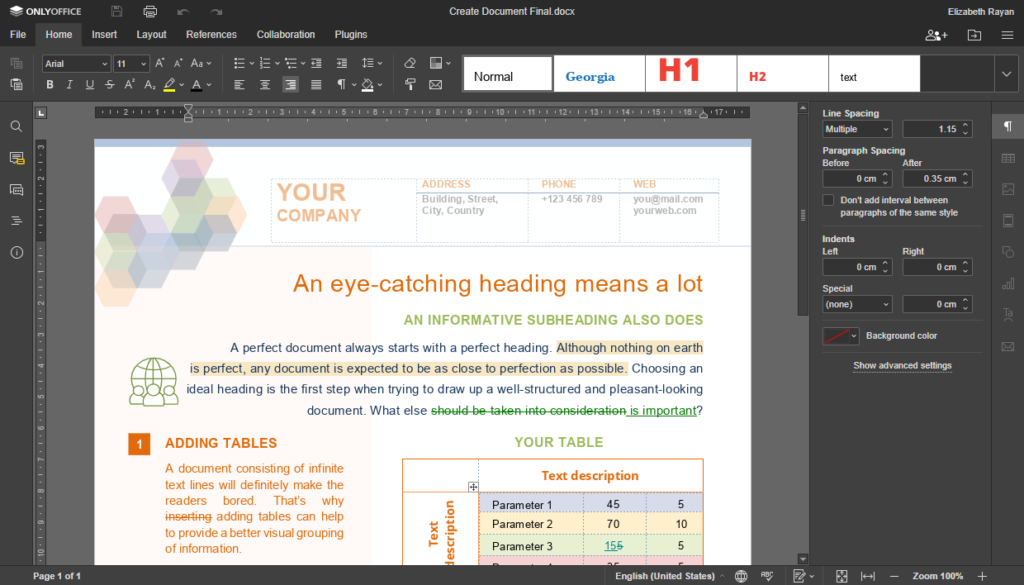
ONLYOFFICE Docs (Document Server) is an open-source office suite distributed under GNU AGPL v3.0. It is comprised of web-based viewers and collaborative editors for text documents, spreadsheets, and presentations. The suite is highly compatible with OOXML formats (docx, xlsx, pptx).
A brief features overview includes:
- Full set of editing and styling tools, operations with fonts and styles, paragraph and text formatting.
- Inserting and customizing all kinds of objects: shapes, charts, text art, text boxes, etc.
- Academic formatting and navigation: endnotes, footnotes, table of contents, bookmarks.
- Content Controls for creating digital forms and templates.
- Extending functionality with plugins, building your own plugins using API.
- Collaborative features: real-time and paragraph-locking co-editing modes, review and track changes, comments and mentions, integrated chat, version history.
- Flexible access permissions: edit, view, comment, fill forms, review, restriction on copying, downloading, and printing, custom filter for spreadsheets.
You can integrate ONLYOFFICE Docs with various cloud services such as Nextcloud, ownCloud, Seafile, Alfresco, Plone, etc. What’s more, developers can embed the editors into their own solutions.
You can also use the suite together with ONLYOFFICE Groups, a free open-source collaboration platform distributed under Apache 2.0. The complete solution is available as ONLYOFFICE Workspace.
What is Podman
Podman is a daemonless container engine for developing, managing, and running OCI containers on your Linux system. Users can run containers either as root or in rootless mode.
It is available by default on Fedora Workstation. If it’s not the case, install podman with the command:
sudo dnf install podman
What you need for ONLYOFFICE Docs installation
- CPU: single core 2 GHz or better
- RAM: 2 GB or more
- HDD: at least 40 GB of free space
- At least 4 GB of swap
Install and run ONLYOFFICE Docs
Start with the following commands for the root-privileged deployment. This creates directories for mounting from the container to the host system:
$ sudo mkdir -p /app/onlyoffice/DocumentServer/logs \
 /app/onlyoffice/DocumentServer/data \
 /app/onlyoffice/DocumentServer/lib \
 /app/onlyoffice/DocumentServer/db
Now mount these directories via podman. When prompted, select the image from docker.io):
$ sudo podman run -i -t -d -p 80:80 -p 443:443 --restart=always \
 -v /app/onlyoffice/DocumentServer/logs:/var/log/onlyoffice:Z \
 -v /app/onlyoffice/DocumentServer/data:/var/www/onlyoffice/Data:Z \
 -v /app/onlyoffice/DocumentServer/lib:/var/lib/onlyoffice:Z \
 -v /app/onlyoffice/DocumentServer/db:/var/lib/postgresql:Z \
 -u root onlyoffice/documentserver:latest
Please note that rootless deployment is NOT recommended for ONLYOFFICE Docs.
To check that ONLYOFFICE is working correctly, run:
$ sudo podman exec $(sudo podman ps -q) sudo supervisorctl start ds:example
Then, open http://localhost/welcome and click the word “here” in the line Once started the example will be available here. Or look for the orange “button” that says “GO TO TEST EXAMPLE”. This opensthe test example where you can create a document.
Alternatively, to install ONLYOFFICE Docs, you can build an image in podman:
$ git clone https://github.com/ONLYOFFICE/Docker-DocumentServer.git
$ cd Docker-DocumentServer/
$ sudo podman build --tag oods6.2.0:my -f ./Dockerfile
Or build an image from the Docker file in buildah (you need root access):
$ buildah bud --tag oods6.2.0buildah:mybuildah -f ./Dockerfile
Activate HTTPS
To secure the application via SSL basically two things are needed:
- Private key (.key)
- SSL certificate (.crt)
So you need to create and install the following files:
/app/onlyoffice/DocumentServer/data/certs/onlyoffice.key
/app/onlyoffice/DocumentServer/data/certs/onlyoffice.crt
You can get certificates in several ways depending on your requirements: buy from certification centers, request from Let’s Encrypt, or create a self-signed certificate through OpenSSL (note that self-signed certificates are not recommended for production use).
Secure ONLYOFFICE Docs switching to the HTTPS protocol:
$ sudo mkdir /app/onlyoffice/DocumentServer/data/certs
$ sudo cp onlyoffice.crt /app/onlyoffice/DocumentServer/data/certs/
$ sudo cp onlyoffice.key /app/onlyoffice/DocumentServer/data/certs/
$ sudo chown -R 100108:100111 /app/onlyoffice/DocumentServer/data/certs/
# find the podman container id
$ sudo podman ps -a
# restart the container to use the new certificate
$ sudo podman restart {container_id}
Now you can integrate ONLYOFFICE Docs with the platform you already use and start working with your documents.
ONLYOFFICE-Nextcloud integration example
To connect ONLYOFFICE Docs and Nextcloud (or any other DMS), you need a connector. This is an integration app that functions like a bridge between two services.
In case you’re new to Nextcloud, you can install it with Podman following this tutorial.
If you already have Nextcloud installed, you just need to install and activate the connector. Do this with the following steps:
- launch your Nextcloud as an admin,
- click your user icon in the upper right corner,
- switch to + Apps,
- find ONLYOFFICE in the list of available applications in the section “Office & text”,
- click the Download and enable button.
ONLYOFFICE now appears in the Active apps section and you can go ahead with the configuration.
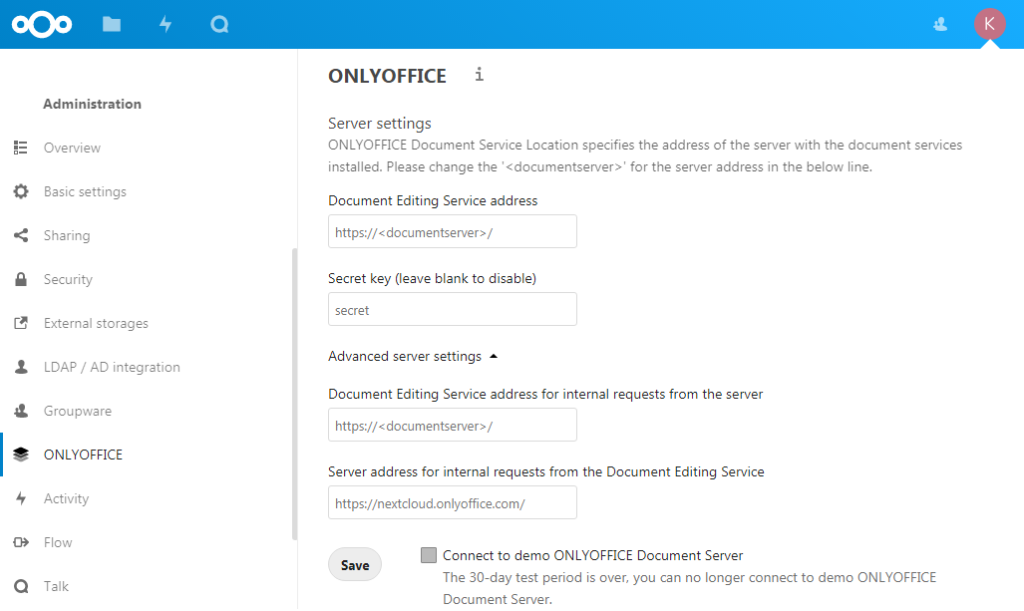
Select your user icon again in the upper right corner -> Settings -> Administration -> ONLYOFFICE. On the settings page, you can configure:
- The address of the machine with ONLYOFFICE installed
- Secret key (JWT that protects docs from unauthorized access)
- ONLYOFFICE and Nextcloud addresses for internal requests
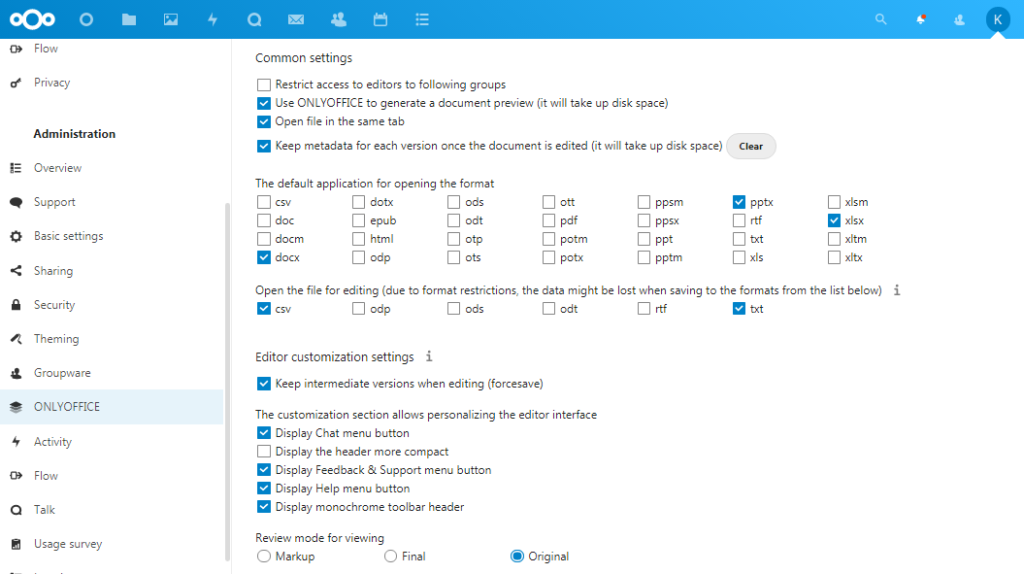
You can also adjust additional settings which are not mandatory but will make your user experience more comfortable:
- Restrict access to the editors to user groups
- Enable/disable the Open file in the same tab option
- Select file formats that will be opened by default with ONLYOFFICE
- Customize editor interface
- Enable watermarking
Conclusion
Installing ONLYOFFICE Docs on Fedora Linux with Podman is quite easy. It will give you a powerful office suite for integration into any Document Managemet System.
via: https://fedoramagazine.org/instal-onlyoffice-docs-on-fedora-linux-with-podman/
作者:kseniya_fedoruk 选题:lujun9972 译者:译者ID 校对:校对者ID


