42 KiB
tranlating by xiaow6 Git in 2016
Git had a huge year in 2016, with five feature releases¹ ( v2.7 through v2.11 ) and sixteen patch releases². 189 authors³ contributed 3,676 commits⁴ to master, which is up 15%⁵ over 2015! In total, 1,545 files were changed with 276,799 lines added and 100,973 lines removed⁶.
However, commit counts and LOC are pretty terrible ways to measure productivity. Until deep learning develops to the point where it can qualitatively grok code, we’re going to be stuck with human judgment as the arbiter of productivity.
With that in mind, I decided to put together a retrospective of sorts that covers changes improvements made to six of my favorite Git features over the course of the year. This article is pretty darn long for a Medium post, so I will forgive you if you want to skip ahead to a feature that particularly interests you:
- Rounding out the
[git worktree][25]command - More convenient
[git rebase][26]options - Dramatic performance boosts for
[git lfs][27] - Experimental algorithms and better defaults for
[git diff][28] [git submodules][29]with less suck- Nifty enhancements to
[git stash][30]
Before we begin, note that many operating systems ship with legacy versions of Git, so it’s worth checking that you’re on the latest and greatest. If running git --version from your terminal returns anything less than Git v2.11.0, head on over to Atlassian's quick guide to upgrade or install Git on your platform of choice.
[Citation needed]
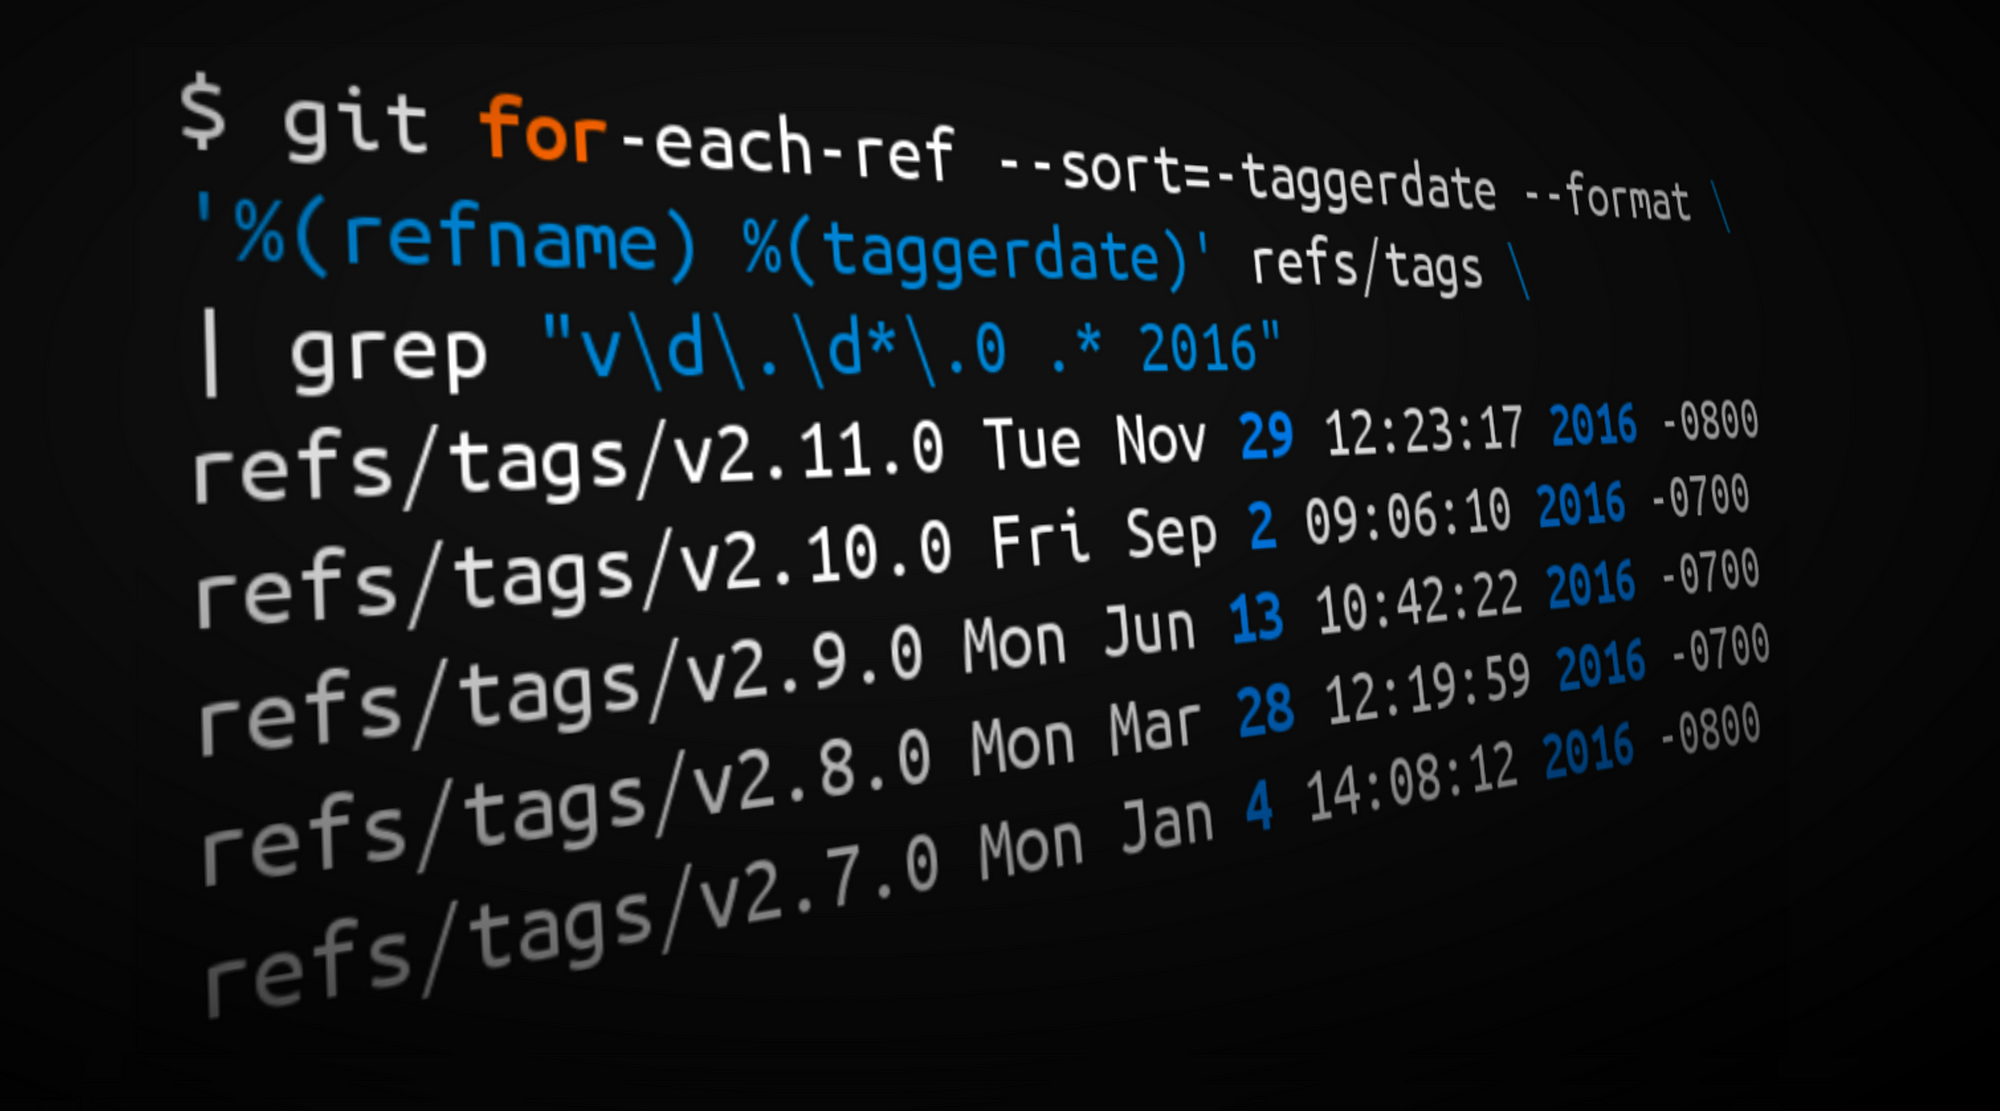
One more quick stop before we jump into the qualitative stuff: I thought I’d show you how I generated the statistics from the opening paragraph (and the rather over-the-top cover image). You can use the commands below to do a quick year in review for your own repositories as well!
¹ Tags from 2016 matching the form vX.Y.0
$ git for-each-ref --sort=-taggerdate --format \
'%(refname) %(taggerdate)' refs/tags | grep "v\d\.\d*\.0 .* 2016"
² Tags from 2016 matching the form vX.Y.Z
$ git for-each-ref --sort=-taggerdate --format '%(refname) %(taggerdate)' refs/tags | grep "v\d\.\d*\.[^0] .* 2016"
³ Commits by author in 2016
$ git shortlog -s -n --since=2016-01-01 --until=2017-01-01
⁴ Count commits in 2016
$ git log --oneline --since=2016-01-01 --until=2017-01-01 | wc -l
⁵ ... and in 2015
$ git log --oneline --since=2015-01-01 --until=2016-01-01 | wc -l
⁶ Net LOC added/removed in 2016
$ git diff --shortstat `git rev-list -1 --until=2016-01-01 master` \
 `git rev-list -1 --until=2017-01-01 master`
The commands above were are run on Git’s master branch, so don’t represent any unmerged work on outstanding branches. If you use these command, remember that commit counts and LOC are not metrics to live by. Please don’t use them to rate the performance of your teammates!
And now, on with the retrospective…
Rounding out Git worktrees
The git worktree command first appeared in Git v2.5 but had some notable enhancements in 2016. Two valuable new features were introduced in v2.7 — the list subcommand, and namespaced refs for bisecting — and the lock/unlock subcommands were implemented in v2.10.
What’s a worktree again?
The [git worktree][49] command lets you check out and work on multiple repository branches in separate directories simultaneously. For example, if you need to make a quick hotfix but don't want to mess with your working copy, you can check out a new branch in a new directory with:
$ git worktree add -b hotfix/BB-1234 ../hotfix/BB-1234
Preparing ../hotfix/BB-1234 (identifier BB-1234)
HEAD is now at 886e0ba Merged in bedwards/BB-13430-api-merge-pr (pull request #7822)
Worktrees aren’t just for branches. You can check out multiple tags as different worktrees in order to build or test them in parallel. For example, I created worktrees from the Git v2.6 and v2.7 tags in order to examine the behavior of different versions of Git:
$ git worktree add ../git-v2.6.0 v2.6.0
Preparing ../git-v2.6.0 (identifier git-v2.6.0)
HEAD is now at be08dee Git 2.6
$ git worktree add ../git-v2.7.0 v2.7.0
Preparing ../git-v2.7.0 (identifier git-v2.7.0)
HEAD is now at 7548842 Git 2.7
$ git worktree list
/Users/kannonboy/src/git         7548842 [master]
/Users/kannonboy/src/git-v2.6.0  be08dee (detached HEAD)
/Users/kannonboy/src/git-v2.7.0  7548842 (detached HEAD)
$ cd ../git-v2.7.0 && make
You could use the same technique to build and run different versions of your own applications side-by-side.
Listing worktrees
The git worktree list subcommand (introduced in Git v2.7) displays all of the worktrees associated with a repository:
$ git worktree list
/Users/kannonboy/src/bitbucket/bitbucket       37732bd [master]
/Users/kannonboy/src/bitbucket/staging         d5924bc [staging]
/Users/kannonboy/src/bitbucket/hotfix-1234     37732bd [hotfix/1234]
Bisecting worktrees
[git bisect][50] is a neat Git command that lets you perform a binary search of your commit history. It's usually used to find out which commit introduced a particular regression. For example, if a test is failing on the tip commit of my master branch, I can use git bisect to traverse the history of my repository looking for the commit that first broke it:
$ git bisect start
# indicate the last commit known to be passing the tests
# (e.g. the latest release tag)
$ git bisect good v2.0.0
# indicate a known broken commit (e.g. the tip of master)
$ git bisect bad master
# tell git bisect a script/command to run; git bisect will
# find the oldest commit between "good" and "bad" that causes
# this script to exit with a non-zero status
$ git bisect run npm test
Under the hood, bisect uses refs to track the good and bad commits used as the upper and lower bounds of the binary search range. Unfortunately for worktree fans, these refs were stored under the generic .git/refs/bisectnamespace, meaning that git bisect operations that are run in different worktrees could interfere with each other.
As of v2.7, the bisect refs have been moved to.git/worktrees/$worktree_name/refs/bisect, so you can run bisect operations concurrently across multiple worktrees.
Locking worktrees
When you’re finished with a worktree, you can simply delete it and then run git worktree prune or wait for it to be garbage collected automatically. However, if you're storing a worktree on a network share or removable media, then it will be cleaned up if the worktree directory isn't accessible during pruning — whether you like it or not! Git v2.10 introduced the git worktree lock and unlock subcommands to prevent this from happening:
# to lock the git-v2.7 worktree on my USB drive
$ git worktree lock /Volumes/Flash_Gordon/git-v2.7 --reason \
"In case I remove my removable media"
# to unlock (and delete) the worktree when I'm finished with it
$ git worktree unlock /Volumes/Flash_Gordon/git-v2.7
$ rm -rf /Volumes/Flash_Gordon/git-v2.7
$ git worktree prune
The --reason flag lets you leave a note for your future self, describing why the worktree is locked. git worktree unlock and lock both require you to specify the path to the worktree. Alternatively, you can cd to the worktree directory and run git worktree lock . for the same effect.
More Git rebase options
In March, Git v2.8 added the ability to interactively rebase whilst pulling with a git pull --rebase=interactive. Conversely, June's Git v2.9 release implemented support for performing a rebase exec without needing to drop into interactive mode via git rebase -x.
Re-wah?
Before we dive in, I suspect there may be a few readers who aren’t familiar or completely comfortable with the rebase command or interactive rebasing. Conceptually, it’s pretty simple, but as with many of Git’s powerful features, the rebase is steeped in some complex-sounding terminology. So, before we dive in, let’s quickly review what a rebase is.
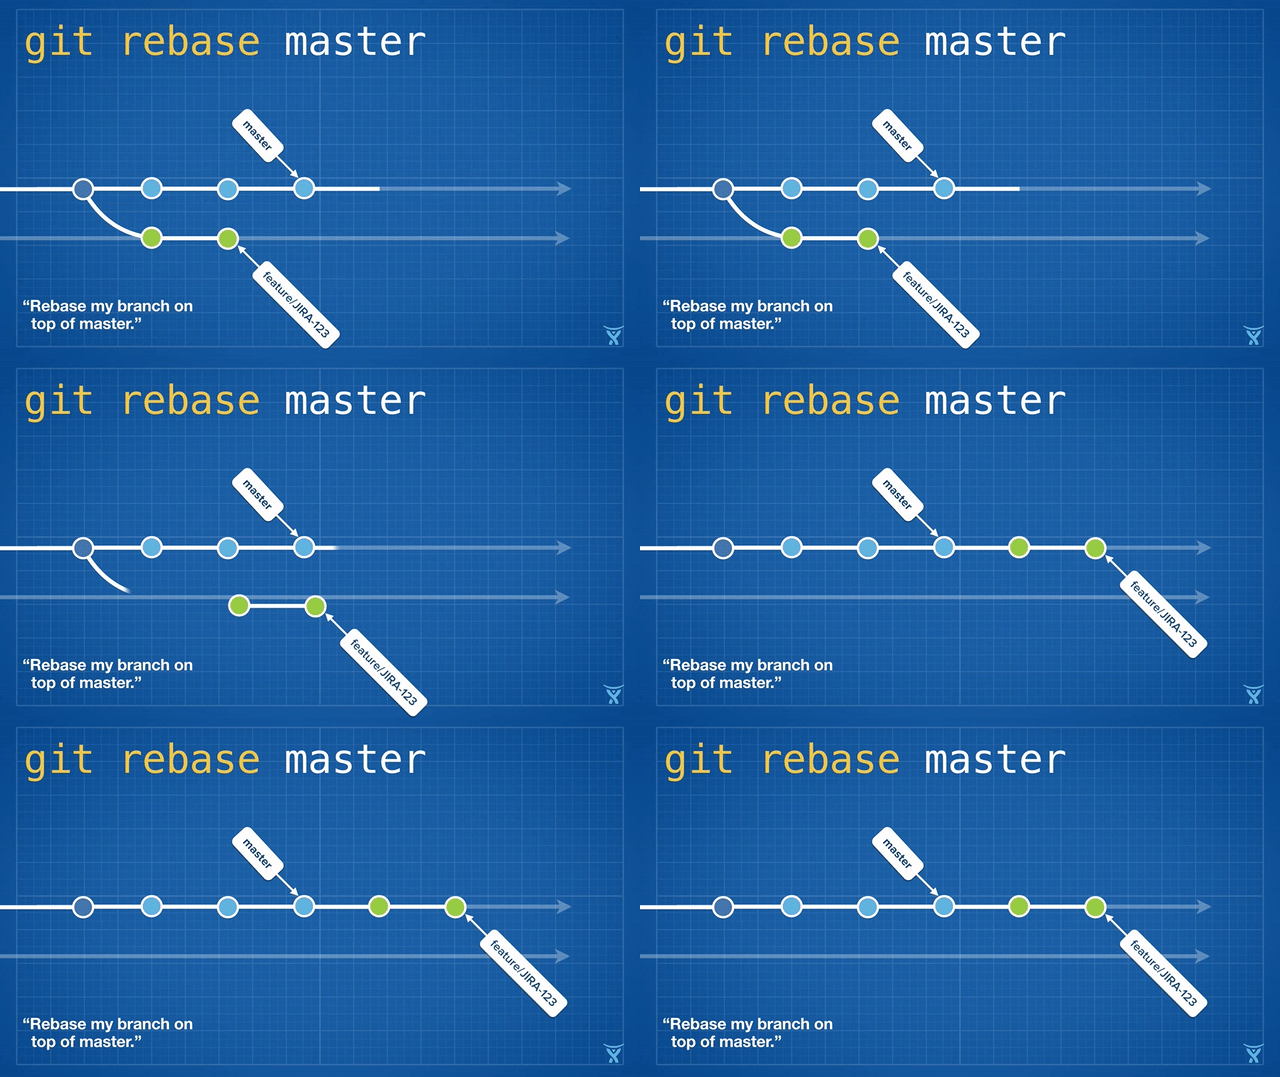
Rebasing means rewriting one or more commits on a particular branch. The git rebase command is heavily overloaded, but the name rebase originates from the fact that it is often used to change a branch's base commit (the commit that you created the branch from).
Conceptually, rebase unwinds the commits on your branch by temporarily storing them as a series of patches, and then reapplying them in order on top of the target commit.
Rebasing a feature branch on master (git rebase master) is a great way to "freshen" your feature branch with the latest changes from master. For long-lived feature branches, regular rebasing minimizes the chance and severity of conflicts down the road.
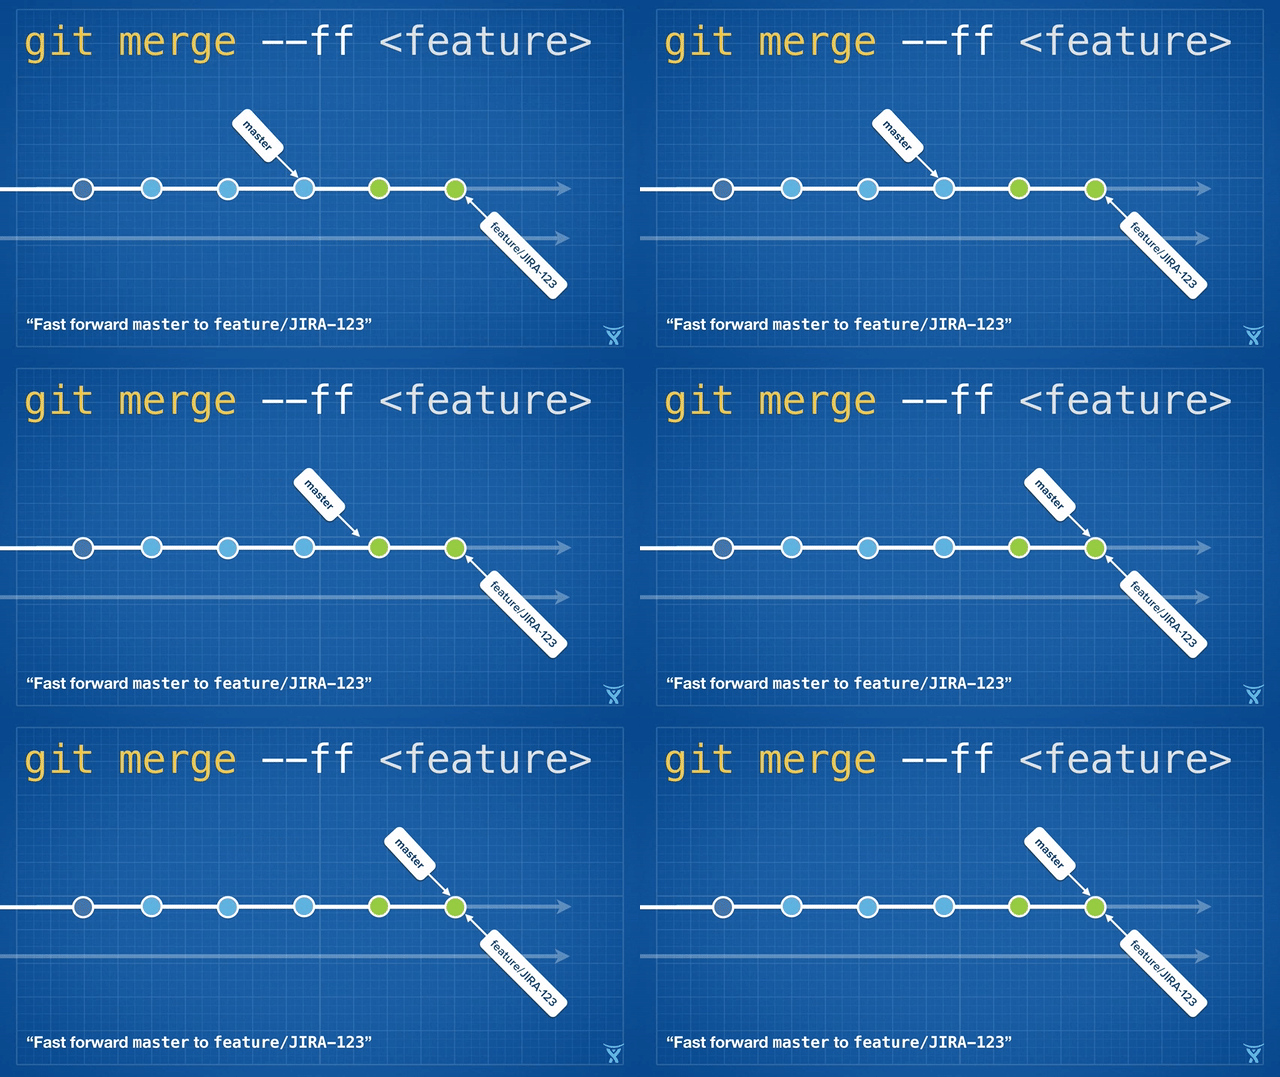
Some teams also choose to rebase immediately before merging their changes onto master in order to achieve a fast-forward merge (git merge --ff <feature> ). Fast-forwarding merges your commits onto master by simply making the master ref point at the tip of your rewritten branch without creating a merge commit:
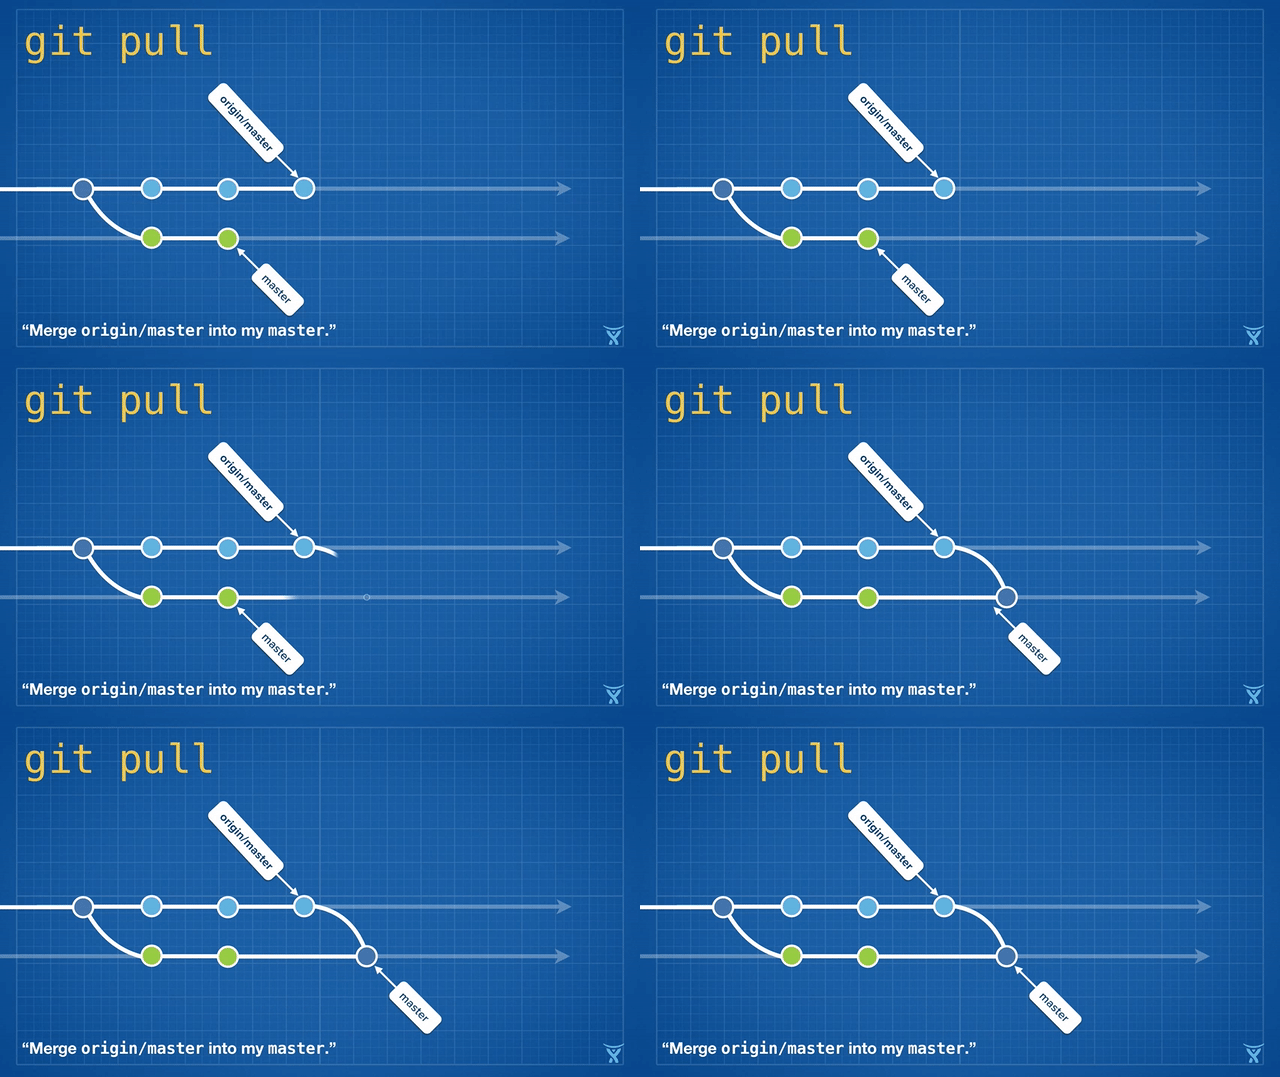
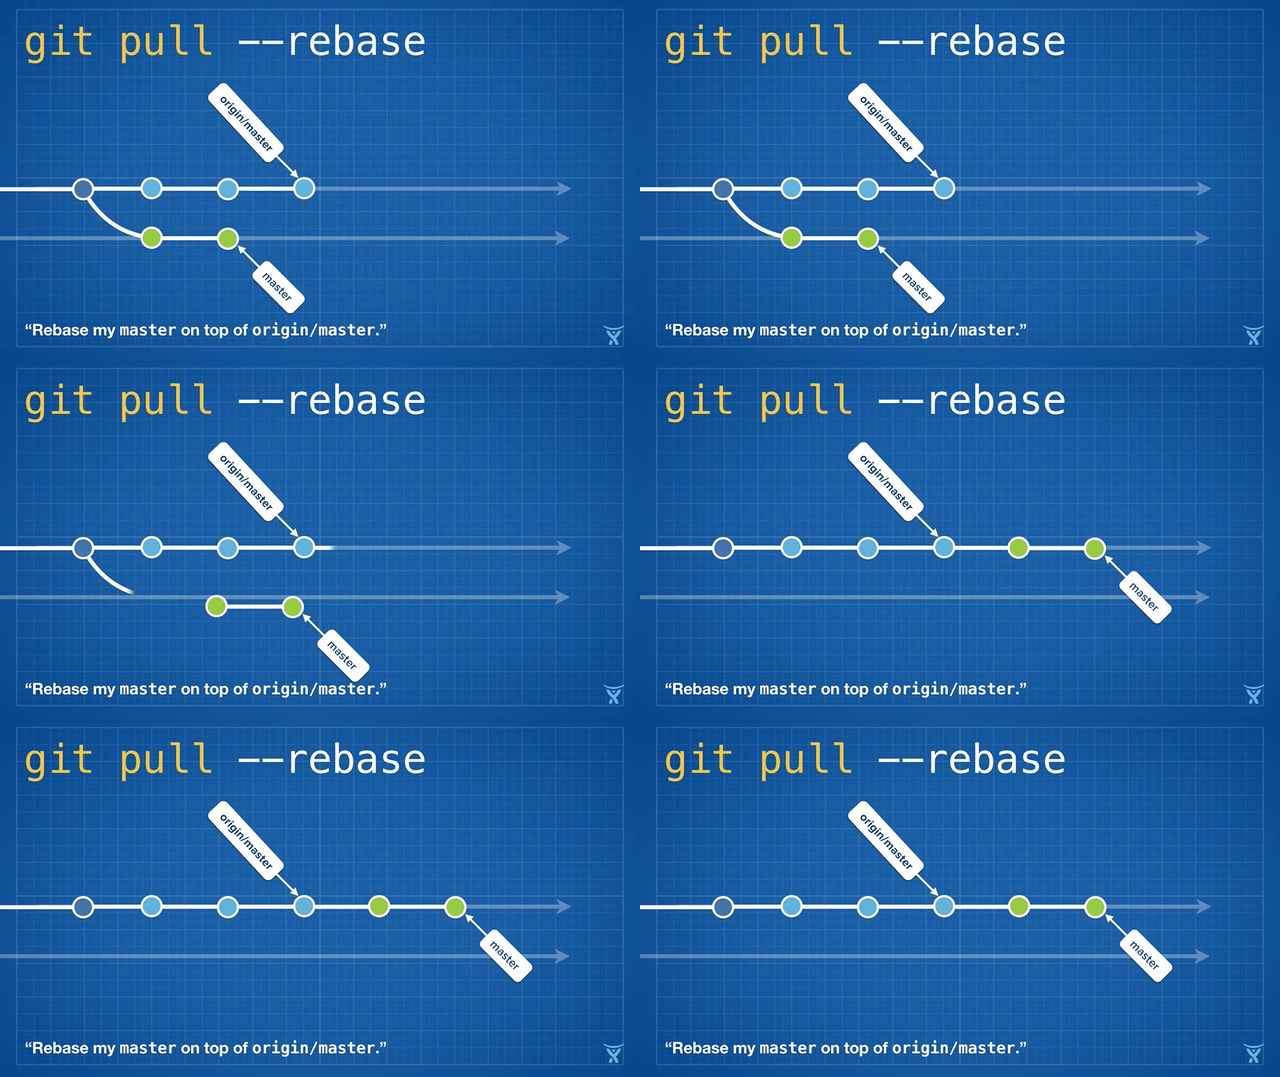
Rebasing is so convenient and powerful that it has been baked into some other common Git commands, such as git pull. If you have some unpushed changes on your local master branch, running git pull to pull your teammates' changes from the origin will create an unnecessary merge commit:
This is kind of messy, and on busy teams, you’ll get heaps of these unnecessary merge commits. git pull --rebase rebases your local changes on top of your teammates' without creating a merge commit:
This is pretty neat! Even cooler, Git v2.8 introduced a feature that lets you rebase interactively whilst pulling.
Interactive rebasing
Interactive rebasing is a more powerful form of rebasing. Like a standard rebase, it rewrites commits, but it also gives you a chance to modify them interactively as they are reapplied onto the new base.
When you run git rebase --interactive (or git pull --rebase=interactive), you'll be presented with a list of commits in your text editor of choice:
$ git rebase master --interactive
pick 2fde787 ACE-1294: replaced miniamalCommit with string in test
pick ed93626 ACE-1294: removed pull request service from test
pick b02eb9a ACE-1294: moved fromHash, toHash and diffType to batch
pick e68f710 ACE-1294: added testing data to batch email file
# Rebase f32fa9d..0ddde5f onto f32fa9d (4 commands)
#
# Commands:
# p, pick = use commit
# r, reword = use commit, but edit the commit message
# e, edit = use commit, but stop for amending
# s, squash = use commit, but meld into previous commit
# f, fixup = like "squash", but discard this commit's log message
# x, exec = run command (the rest of the line) using shell
# d, drop = remove commit
#
# These lines can be re-ordered; they are executed from top to
# bottom.
#
# If you remove a line here THAT COMMIT WILL BE LOST.
Notice that each commit has the word pick next to it. That's rebase-speak for, "Keep this commit as-is." If you quit your text editor now, it will perform a normal rebase as described in the last section. However, if you change pick to edit or one of the other rebase commands, rebase will let you mutate the commit before it is reapplied! There are several available rebase commands:
reword: Edit the commit message.edit: Edit the files that were committed.squash: Combine the commit with the previous commit (the one above it in the file), concatenating the commit messages.fixup: Combine the commit with the commit above it, and uses the previous commit's log message verbatim (this is handy if you created a second commit for a small change that should have been in the original commit, i.e., you forgot to stage a file).exec: Run an arbitrary shell command (we'll look at a neat use-case for this later, in the next section).drop: This kills the commit.
You can also reorder commits within the file, which changes the order in which they’re reapplied. This is handy if you have interleaved commits that are addressing different topics and you want to use squash or fixup to combine them into logically atomic commits.
Once you’ve set up the commands and saved the file, Git will iterate through each commit, pausing at each reword and edit for you to make your desired changes and automatically applying any squash, fixup, exec, and drop commands for you.
Non-interactive exec
When you rebase, you’re essentially rewriting history by applying each of your new commits on top of the specified base. git pull --rebase can be a little risky because depending on the nature of the changes from the upstream branch, you may encounter test failures or even compilation problems for certain commits in your newly created history. If these changes cause merge conflicts, the rebase process will pause and allow you to resolve them. However, changes that merge cleanly may still break compilation or tests, leaving broken commits littering your history.
However, you can instruct Git to run your project’s test suite for each rewritten commit. Prior to Git v2.9, you could do this with a combination of git rebase −−interactive and the exec command. For example, this:
$ git rebase master −−interactive −−exec=”npm test”
…would generate an interactive rebase plan that invokes npm test after rewriting each commit, ensuring that your tests still pass:
pick 2fde787 ACE-1294: replaced miniamalCommit with string in test
exec npm test
pick ed93626 ACE-1294: removed pull request service from test
exec npm test
pick b02eb9a ACE-1294: moved fromHash, toHash and diffType to batch
exec npm test
pick e68f710 ACE-1294: added testing data to batch email file
exec npm test
# Rebase f32fa9d..0ddde5f onto f32fa9d (4 command(s))
In the event that a test fails, rebase will pause to let you fix the tests (and apply your changes to that commit):
291 passing
1 failing
1) Host request “after all” hook:
Uncaught Error: connect ECONNRESET 127.0.0.1:3001
…
npm ERR! Test failed.
Execution failed: npm test
You can fix the problem, and then run
        git rebase −−continue
This is handy, but needing to do an interactive rebase is a bit clunky. As of Git v2.9, you can perform a non-interactive rebase exec, with:
$ git rebase master -x “npm test”
Just replace npm test with make, rake, mvn clean install, or whatever you use to build and test your project.
A word of warning
Just like in the movies, rewriting history is risky business. Any commit that is rewritten as part of a rebase will have it’s SHA-1 ID changed, which means that Git will treat it as a totally different commit. If rewritten history is mixed with the original history, you’ll get duplicate commits, which can cause a lot of confusion for your team.
To avoid this problem, you only need to follow one simple rule:
Never rebase a commit that you’ve already pushed!
Stick to that and you’ll be fine.
Performance boosts for Git LFS
Git is a distributed version control system, meaning the entire history of the repository is transferred to the client during the cloning process. For projects that contain large files — particularly large files that are modified regularly _ — _ the initial clone can be expensive, as every version of every file has to be downloaded by the client. Git LFS (Large File Storage) is a Git extension developed by Atlassian, GitHub, and a few other open source contributors that reduces the impact of large files in your repository by downloading the relevant versions of them lazily. Specifically, large files are downloaded as needed during the checkout process rather than during cloning or fetching.
Alongside Git’s five huge releases in 2016, Git LFS had four feature-packed releases of its own: v1.2 through v1.5. You could write a retrospective series on Git LFS in its own right, but for this article, I’m going to focus on one of the most important themes tackled in 2016: speed. A series of improvements to both Git and Git LFS have greatly improved the performance of transferring files to and from the server.
Long-running filter processes
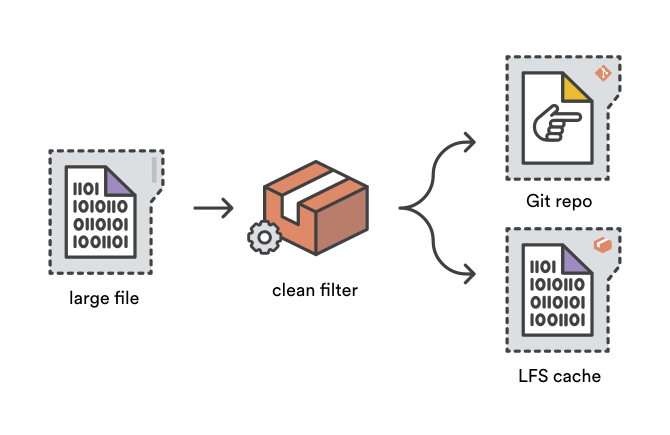
When you git add a file, Git's system of clean filters can be used to transform the file’s contents before being written to the Git object store. Git LFS reduces your repository size by using a clean filter to squirrel away large file content in the LFS cache and adds a tiny “pointer” file to the Git object store instead.
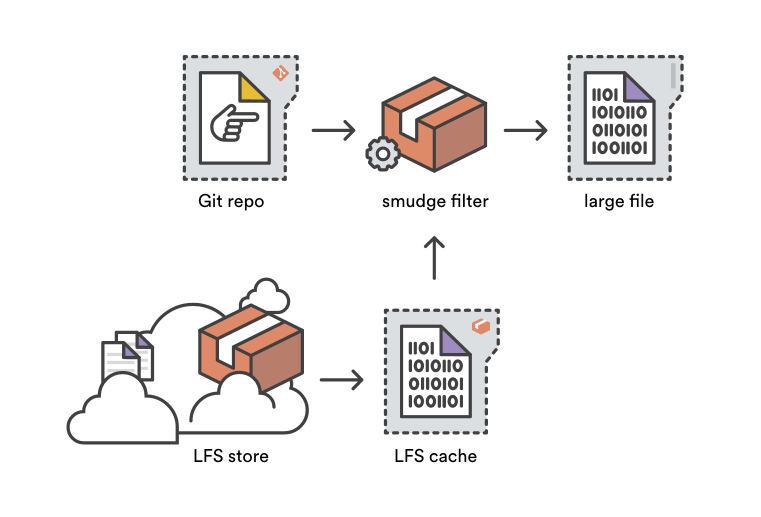
Smudge filters are the opposite of clean filters — hence the name. When file content is read from the Git object store during a git checkout, smudge filters have a chance to transform it before it’s written to the user’s working copy. The Git LFS smudge filter transforms pointer files by replacing them with the corresponding large file, either from your LFS cache or by reading through to your Git LFS store on Bitbucket.
Traditionally, smudge and clean filter processes were invoked once for each file that was being added or checked out. So, a project with 1,000 files tracked by Git LFS invoked the git-lfs-smudge command 1,000 times for a fresh checkout! While each operation is relatively quick, the overhead of spinning up 1,000 individual smudge processes is costly.
As of Git v2.11 (and Git LFS v1.5), smudge and clean filters can be defined as long-running processes that are invoked once for the first filtered file, then fed subsequent files that need smudging or cleaning until the parent Git operation exits. Lars Schneider, who contributed long-running filters to Git, neatly summarized the impact of the change on Git LFS performance:
The filter process is 80x faster on macOS and 58x faster on Windows for the test repo with 12k files. On Windows, that means the tests runs in 57 seconds instead of 55 minutes!
That’s a seriously impressive performance gain!
Specialized LFS clones
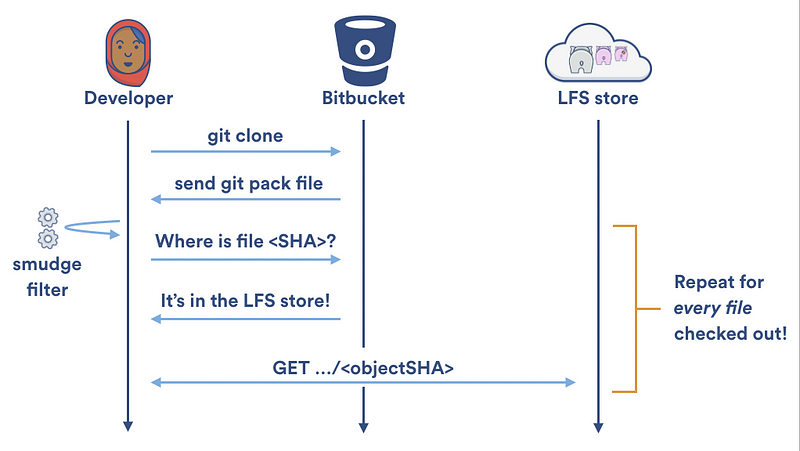
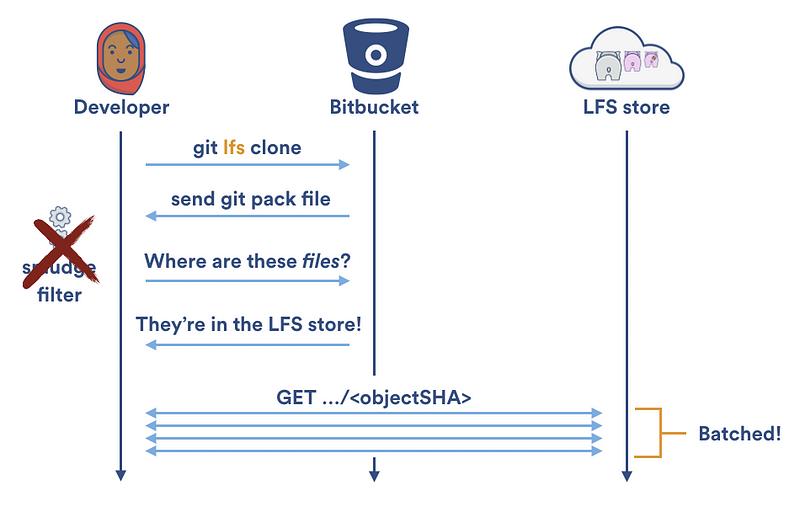
Long-running smudge and clean filters are great for speeding up reads and writes to the local LFS cache, but they do little to speed up transferring of large objects to and from your Git LFS server. Each time the Git LFS smudge filter can’t find a file in the local LFS cache, it has to make two HTTP calls to retrieve it: one to locate the file and one to download it. During a git clone, your local LFS cache is empty, so Git LFS will naively make two HTTP calls for every LFS tracked file in your repository:
Fortunately, Git LFS v1.2 shipped the specialized [git lfs clone][51] command. Rather than downloading files one at a time; git lfs clone disables the Git LFS smudge filter, waits until the checkout is complete, and then downloads any required files as a batch from the Git LFS store. This allows downloads to be parallelized and halves the number of required HTTP requests:
Custom Transfer Adapters
As discussed earlier, Git LFS shipped support for long running filter processes in v1.5. However, support for another type of pluggable process actually shipped earlier in the year. Git LFS v1.3 included support for pluggable transfer adapters so that different Git LFS hosting services could define their own protocols for transferring files to and from LFS storage.
As of the end of 2016, Bitbucket is the only hosting service to implement their own Git LFS transfer protocol via the Bitbucket LFS Media Adapter. This was done to take advantage of a unique feature of Bitbucket’s LFS storage API called chunking. Chunking means large files are broken down into 4MB chunks before uploading or downloading.

Chunking gives Bitbucket’s Git LFS support three big advantages:
- Parallelized downloads and uploads. By default, Git LFS transfers up to three files in parallel. However, if only a single file is being transferred (which is the default behavior of the Git LFS smudge filter), it is transferred via a single stream. Bitbucket’s chunking allows multiple chunks from the same file to be uploaded or downloaded simultaneously, often dramatically improving transfer speed.
- Resumable chunk transfers. File chunks are cached locally, so if your download or upload is interrupted, Bitbucket’s custom LFS media adapter will resume transferring only the missing chunks the next time you push or pull.
- Deduplication. Git LFS, like Git itself, is content addressable; each LFS file is identified by a SHA-256 hash of its contents. So, if you flip a single bit, the file’s SHA-256 changes and you have to re-upload the entire file. Chunking allows you to re-upload only the sections of the file that have actually changed. To illustrate, imagine we have a 41MB spritesheet for a video game tracked in Git LFS. If we add a new 2MB layer to the spritesheet and commit it, we’d typically need to push the entire new 43MB file to the server. However, with Bitbucket’s custom transfer adapter, we only need to push ~7Mb: the first 4MB chunk (because the file’s header information will have changed) and the last 3MB chunk containing the new layer we’ve just added! The other unchanged chunks are skipped automatically during the upload process, saving a huge amount of bandwidth and time.
Customizable transfer adapters are a great feature for Git LFS, as they allow different hosts to experiment with optimized transfer protocols to suit their services without overloading the core project.
Better git diff algorithms and defaults
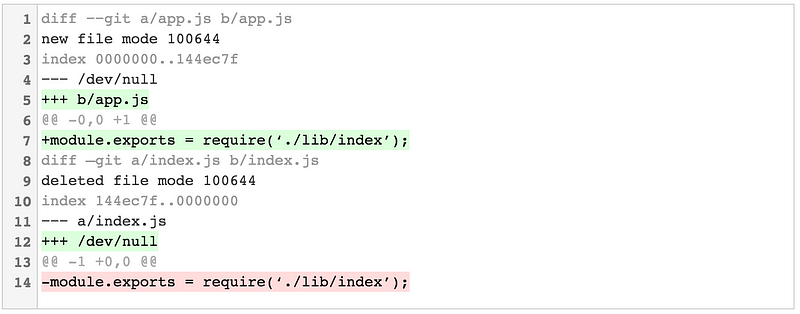
Unlike some other version control systems, Git doesn’t explicitly store the fact that files have been renamed. For example, if I edited a simple Node.js application and renamed index.js to app.js and then ran git diff, I’d get back what looks like a file deletion and an addition:
I guess moving or renaming a file is technically just a delete followed by an add, but this isn’t the most human-friendly way to show it. Instead, you can use the -M flag to instruct Git to attempt to detect renamed files on the fly when computing a diff. For the above example, git diff -M gives us:
The similarity index on the second line tells us how similar the content of the files compared was. By default, -M will consider any two files that are more than 50% similar. That is, you need to modify less than 50% of their lines to make them identical as a renamed file. You can choose your own similarity index by appending a percentage, i.e., -M80%.
As of Git v2.9, the git diff and git log commands will both detect renames by default as if you'd passed the -M flag. If you dislike this behavior (or, more realistically, are parsing the diff output via a script), then you can disable it by explicitly passing the −−no-renames flag.
Verbose Commits
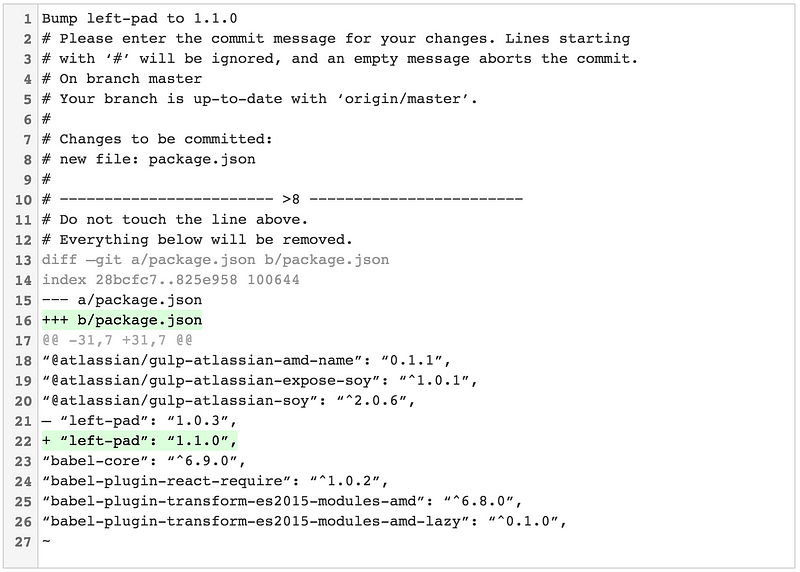
Do you ever invoke git commit and then stare blankly at your shell trying to remember all the changes you just made? The verbose flag is for you!
Instead of:
Ah crap, which dependency did I just rev?
# Please enter the commit message for your changes. Lines starting
# with ‘#’ will be ignored, and an empty message aborts the commit.
# On branch master
# Your branch is up-to-date with ‘origin/master’.
#
# Changes to be committed:
# new file: package.json
#
…you can invoke git commit −−verbose to view an inline diff of your changes. Don’t worry, it won’t be included in your commit message:
The −−verbose flag isn’t new, but as of Git v2.9 you can enable it permanently with git config --global commit.verbose true.
Experimental Diff Improvements
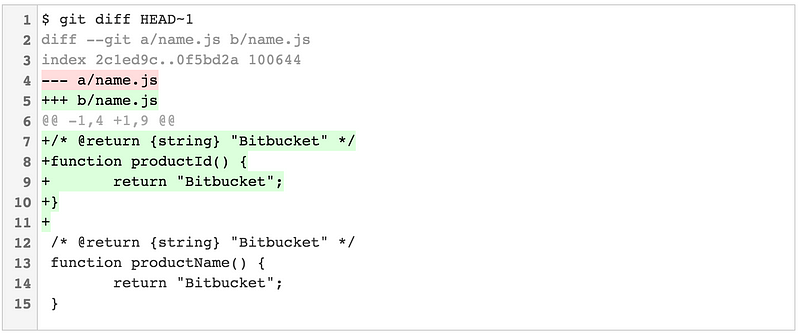
git diff can produce some slightly confusing output when the lines before and after a modified section are the same. This can happen when you have two or more similarly structured functions in a file. For a slightly contrived example, imagine we have a JS file that contains a single function:
/* @return {string} "Bitbucket" */
function productName() {
  return "Bitbucket";
}
Now imagine we’ve committed a change that prepends another function that does something similar:
/* @return {string} "Bitbucket" */
function productId() {
  return "Bitbucket";
}
/* @return {string} "Bitbucket" */
function productName() {
  return "Bitbucket";
}
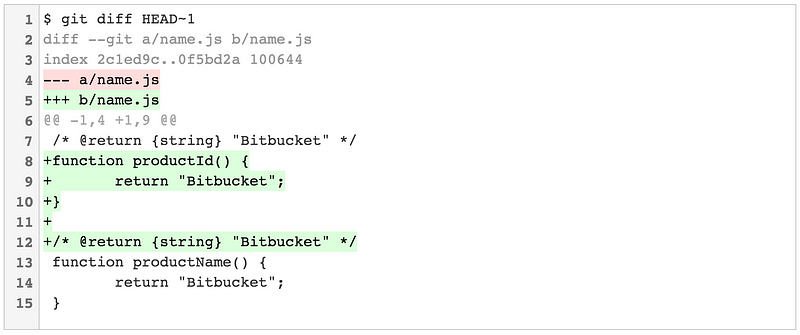
You’d expect git diff to show the top five lines as added, but it actually incorrectly attributes the very first line to the original commit:
The wrong comment is included in the diff! Not the end of the world, but the couple of seconds of cognitive overhead from the Whaaat? every time this happens can add up.
In December, Git v2.11 introduced a new experimental diff option, --indent-heuristic, that attempts to produce more aesthetically pleasing diffs:
Under the hood, --indent-heuristic cycles through the possible diffs for each change and assigns each a “badness” score. This is based on heuristics like whether the diff block starts and ends with different levels of indentation (which is aesthetically bad) and whether the diff block has leading and trailing blank lines (which is aesthetically pleasing). Then, the block with the lowest badness score is output.
This feature is experimental, but you can test it out ad-hoc by applying the --indent-heuristic option to any git diff command. Or, if you like to live on the bleeding edge, you can enable it across your system with:
$ git config --global diff.indentHeuristic true
Submodules with less suck
Submodules allow you to reference and include other Git repositories from inside your Git repository. This is commonly used by some projects to manage source dependencies that are also tracked in Git, or by some companies as an alternative to a monorepo containing a collection of related projects.
Submodules get a bit of a bad rap due to some usage complexities and the fact that it’s reasonably easy to break them with an errant command.
However, they do have their uses and are, I think, still the best choice for vendoring dependencies. Fortunately, 2016 was a great year to be a submodule user, with some significant performance and feature improvements landing across several releases.
Parallelized fetching
When cloning or fetching a repository, appending the --recurse-submodulesoption means any referenced submodules will be cloned or updated, as well. Traditionally, this was done serially, with each submodule being fetched one at a time. As of Git v2.8, you can append the --jobs=n option to fetch submodules in n parallel threads.
I recommend configuring this option permanently with:
$ git config --global submodule.fetchJobs 4
…or whatever degree of parallelization you choose to use.
Shallow submodules
Git v2.9 introduced the git clone -−shallow-submodules flag. It allows you to grab a full clone of your repository and then recursively shallow clone any referenced submodules to a depth of one commit. This is useful if you don’t need the full history of your project’s dependencies.
For example, consider a repository with a mixture of submodules containing vendored dependencies and other projects that you own. You may wish to clone with shallow submodules initially and then selectively deepen the few projects you want to work with.
Another scenario would be configuring a continuous integration or deployment job. Git needs the super repository as well as the latest commit from each of your submodules in order to actually perform the build. However, you probably don’t need the full history for every submodule, so retrieving just the latest commit will save you both time and bandwidth.
Submodule alternates
The --reference option can be used with git clone to specify another local repository as an alternate object store to save recopying objects over the network that you already have locally. The syntax is:
$ git clone --reference <local repo> <url>
As of Git v2.11, you can use the --reference option in combination with --recurse-submodules to set up submodule alternates pointing to submodules from another local repository. The syntax is:
$ git clone --recurse-submodules --reference <local repo> <url>
This can potentially save a huge amount of bandwidth and local disk but it will fail if the referenced local repository does not have all the required submodules of the remote repository that you’re cloning from.
Fortunately, the handy --reference-if-able option will fail gracefully and fall back to a normal clone for any submodules that are missing from the referenced local repository:
$ git clone --recurse-submodules --reference-if-able \
<local repo> <url>
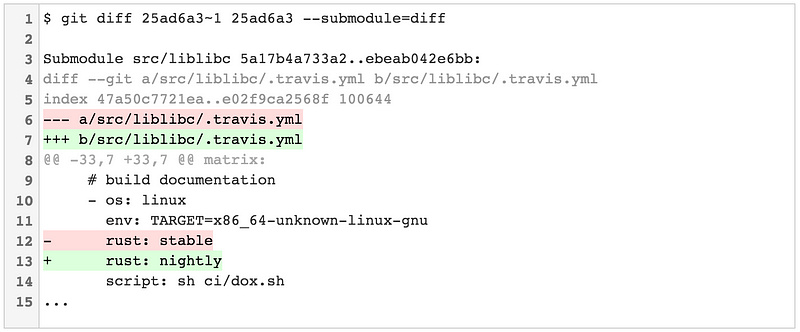
Submodule diffs
Prior to Git v2.11, Git had two modes for displaying diffs of commits that updated your repository’s submodules:
git diff --submodule=short displays the old commit and new commit from the submodule referenced by your project (this is also the default if you omit the --submodule option altogether):
git diff --submodule=log is slightly more verbose, displaying the summary line from the commit message of any new or removed commits in the updated submodule:
Git v2.11 introduces a third much more useful option: --submodule=diff. This displays a full diff of all changes in the updated submodule:
Nifty enhancements to git stash
Unlike submodules, [git stash][52] is almost universally beloved by Git users. git stash temporarily shelves (or stashes ) changes you've made to your working copy so you can work on something else, and then come back and re-apply them later on.
Autostash
If you’re a fan of git rebase, you might be familiar with the --autostashoption. It automatically stashes any local changes made to your working copy before rebasing and reapplies them after the rebase is completed.
$ git rebase master --autostash
Created autostash: 54f212a
HEAD is now at 8303dca It's a kludge, but put the tuple from the database in the cache.
First, rewinding head to replay your work on top of it...
Applied autostash.
This is handy, as it allows you to rebase from a dirty worktree. There’s also a handy config flag named rebase.autostash to make this behavior the default, which you can enable globally with:
$ git config --global rebase.autostash true
rebase.autostash has actually been available since Git v1.8.4, but v2.7 introduces the ability to cancel this flag with the --no-autostash option. If you use this option with unstaged changes, the rebase will abort with a dirty worktree warning:
$ git rebase master --no-autostash
Cannot rebase: You have unstaged changes.
Please commit or stash them.
Stashes as Patches
Speaking of config flags, Git v2.7 also introduces stash.showPatch. The default behavior of git stash show is to display a summary of your stashed files.
$ git stash show
package.json | 2 +-
1 file changed, 1 insertion(+), 1 deletion(-)
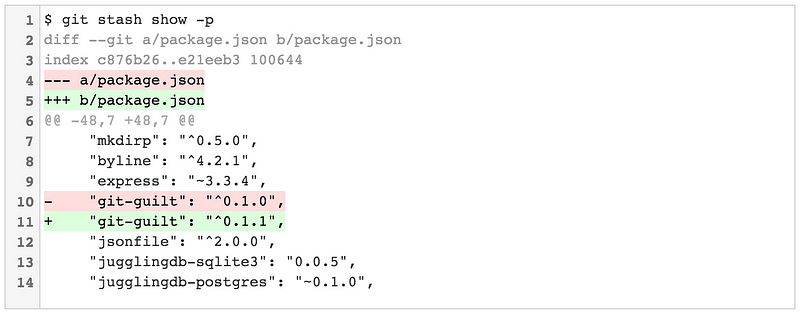
Passing the -p flag puts git stash show into "patch mode," which displays the full diff:
stash.showPatch makes this behavior the default. You can enable it globally with:
$ git config --global stash.showPatch true
If you enable stash.showPatch but then decide you want to view just the file summary, you can get the old behavior back by passing the --stat option instead.
$ git stash show --stat
package.json | 2 +-
1 file changed, 1 insertion(+), 1 deletion(-)
As an aside: --no-patch is a valid option but it doesn't negate stash.showPatch as you'd expect. Instead, it gets passed along to the underlying git diff command used to generate the patch, and you'll end up with no output at all!
Simple Stash IDs
If you’re a git stash fan, you probably know that you can shelve multiple sets of changes, and then view them with git stash list:
$ git stash list
stash@{0}: On master: crazy idea that might work one day
stash@{1}: On master: desperate samurai refactor; don't apply
stash@{2}: On master: perf improvement that I forgot I stashed
stash@{3}: On master: pop this when we use Docker in production
However, you may not know why Git’s stashes have such awkward identifiers (stash@{1}, stash@{2}, etc.) and may have written them off as "just one of those Git idiosyncrasies." It turns out that like many Git features, these weird IDs are actually a symptom of a very clever use (or abuse) of the Git data model.
Under the hood, the git stash command actually creates a set of special commit objects that encode your stashed changes and maintains a reflogthat holds references to these special commits. This is why the output from git stash list looks a lot like the output from the git reflog command. When you run git stash apply stash@{1}, you're actually saying, “Apply the commit at position 1 from the stash reflog.”
As of Git v2.11, you no longer have to use the full stash@{n} syntax. Instead, you can reference stashes with a simple integer indicating their position in the stash reflog:
$ git stash show 1
$ git stash apply 1
$ git stash pop 1
And so forth. If you’d like to learn more about how stashes are stored, I wrote a little bit about it in this tutorial.
</2016> <2017>
And we’re done. Thanks for reading! I hope you enjoyed reading this behemoth as much as I enjoyed spelunking through Git’s source code, release notes, and man pages to write it. If you think I missed anything big, please leave a comment or let me know on Twitter and I'll endeavor to write a follow-up piece.
As for what’s next for Git, that’s up to the maintainers and contributors (which could be you!). With ever-increasing adoption, I’m guessing that simplification, improved UX, and better defaults will be strong themes for Git in 2017. As Git repositories get bigger and older, I suspect we’ll also see continued focus on performance and improved handling of large files, deep trees, and long histories.
If you’re into Git and excited to meet some of the developers behind the project, consider coming along to Git Merge in Brussels in a few weeks time. I’m speaking there! But more importantly, many of the developers who maintain Git will be in attendance for the conference and the annual Git Contributors Summit, which will likely drive much of the direction for the year ahead.
Or if you can’t wait ’til then, head over to Atlassian’s excellent selection of Git tutorials for more tips and tricks to improve your workflow.
_If you scrolled to the end looking for the footnotes from the first paragraph, please jump to the _ [Citation needed]_ _ section for the commands used to generate the stats. Gratuitous cover image generated using _ instaco.de _ ❤️
via: https://hackernoon.com/git-in-2016-fad96ae22a15#.t5c5cm48f
作者:Tim Pettersen 译者:译者ID 校对:校对者ID
