8.1 KiB
Building a Linux-based HPC system on the Raspberry Pi with Ansible
Create a high-performance computing cluster with low-cost hardware and open source software.
In my previous article for Opensource.com, I introduced the OpenHPC project, which aims to accelerate innovation in high-performance computing (HPC). This article goes a step further by using OpenHPC's capabilities to build a small HPC system. To call it an HPC system might sound bigger than it is, so maybe it is better to say this is a system based on the Cluster Building Recipes published by the OpenHPC project.
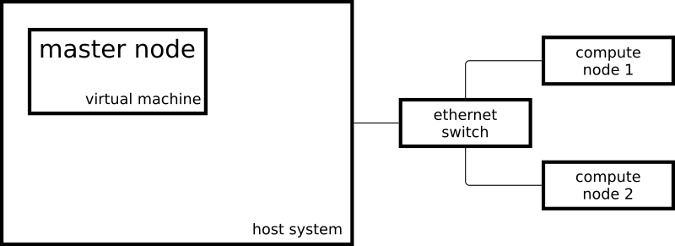
The resulting cluster consists of two Raspberry Pi 3 systems acting as compute nodes and one virtual machine acting as the master node:
My master node is running CentOS on x86_64 and my compute nodes are running a slightly modified CentOS on aarch64.
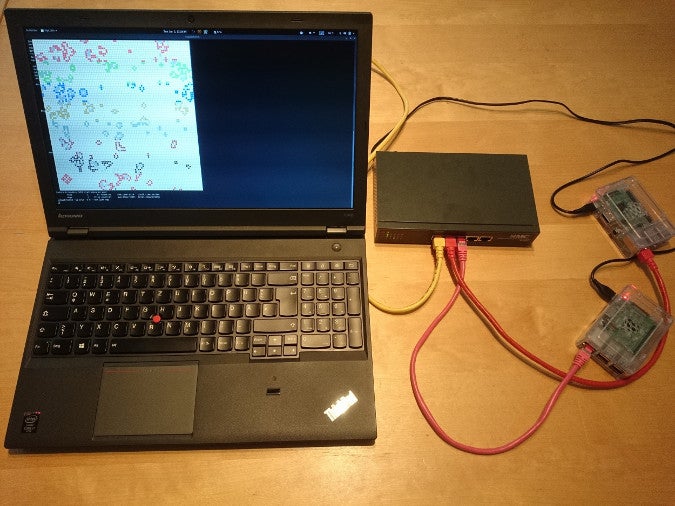
This is what the setup looks in real life:
To set up my system like an HPC system, I followed some of the steps from OpenHPC's Cluster Building Recipes install guide for CentOS 7.4/aarch64 + Warewulf + Slurm (PDF). This recipe includes provisioning instructions using Warewulf; because I manually installed my three systems, I skipped the Warewulf parts and created an Ansible playbook for the steps I took.
Once my cluster was set up by the Ansible playbooks, I could start to submit jobs to my resource manager. The resource manager, Slurm in my case, is the instance in the cluster that decides where and when my jobs are executed. One possibility to start a simple job on the cluster is:
[ohpc@centos01 ~]$ srun hostname
calvin
If I need more resources, I can tell Slurm that I want to run my command on eight CPUs:
[ohpc@centos01 ~]$ srun -n 8 hostname
hobbes
hobbes
hobbes
hobbes
calvin
calvin
calvin
calvin
In the first example, Slurm ran the specified command (hostname) on a single CPU, and in the second example Slurm ran the command on eight CPUs. One of my compute nodes is named calvin and the other is named hobbes; that can be seen in the output of the above commands. Each of the compute nodes is a Raspberry Pi 3 with four CPU cores.
Another way to submit jobs to my cluster is the command sbatch, which can be used to execute scripts with the output written to a file instead of my terminal.
[ohpc@centos01 ~]$ cat script1.sh
#!/bin/sh
date
hostname
sleep 10
date
[ohpc@centos01 ~]$ sbatch script1.sh
Submitted batch job 101
This will create an output file called slurm-101.out with the following content:
Mon 11 Dec 16:42:31 UTC 2017
calvin
Mon 11 Dec 16:42:41 UTC 2017
To demonstrate the basic functionality of the resource manager, simple and serial command line tools are suitable—but a bit boring after doing all the work to set up an HPC-like system.
A more interesting application is running an Open MPI parallelized job on all available CPUs on the cluster. I'm using an application based on Game of Life, which was used in a video called "Running Game of Life across multiple architectures with Red Hat Enterprise Linux." In addition to the previously used MPI-based Game of Life implementation, the version now running on my cluster colors the cells for each involved host differently. The following script starts the application interactively with a graphical output:
$ cat life.mpi
#!/bin/bash

module load gnu6 openmpi3

if [[ "$SLURM_PROCID" != "0" ]]; then
    exit
fi

mpirun ./mpi_life -a -p -b
I start the job with the following command, which tells Slurm to allocate eight CPUs for the job:
$ srun -n 8 --x11 life.mpi
For demonstration purposes, the job has a graphical interface that shows the current result of the calculation:
The position of the red cells is calculated on one of the compute nodes, and the green cells are calculated on the other compute node. I can also tell the Game of Life program to color the cell for each used CPU (there are four per compute node) differently, which leads to the following output:
Thanks to the installation recipes and the software packages provided by OpenHPC, I was able to set up two compute nodes and a master node in an HPC-type configuration. I can submit jobs to my resource manager, and I can use the software provided by OpenHPC to start MPI applications utilizing all my Raspberry Pis' CPUs.
To learn more about using OpenHPC to build a Raspberry Pi cluster, please attend Adrian Reber's talks at DevConf.cz 2018, January 26-28, in Brno, Czech Republic, and at the CentOS Dojo 2018, on February 2, in Brussels.
About the author
 Adrian Reber - Adrian is a Senior Software Engineer at Red Hat and is migrating processes at least since 2010. He started to migrate processes in a high performance computing environment and at some point he migrated so many processes that he got a PhD for that and since he joined Red Hat he started to migrate containers. Occasionally he still migrates single processes and is still interested in high performance computing topics.More about me
via: https://opensource.com/article/18/1/how-build-hpc-system-raspberry-pi-and-openhpc
作者:Adrian Reber 译者:译者ID 校对:校对者ID


