mirror of
https://github.com/LCTT/TranslateProject.git
synced 2025-02-28 01:01:09 +08:00
359 lines
16 KiB
Markdown
359 lines
16 KiB
Markdown
Samba 系列(十一):如何配置并集成 iRedMail 服务到 Samba4 AD DC 中
|
||
=========================================================
|
||
|
||
|
||
在本教程中,将学习如何修改提供邮件服务的 iRedMail 主要守护进程,相应地,[Postfix 用于邮件传输,Dovecot 将邮件传送到帐户邮箱][4],以便将它们集成到 [Samba4 AD 域控制器][5]中。
|
||
|
||
将 iRedMail 集成到 Samba4 AD DC 中,你将得到以下好处:通过 Samba AD DC 得到用户身份验证、管理和状态,在 AD 组和 Roundcube 中的全局 LDAP 地址簿的帮助下创建邮件列表。
|
||
|
||
### 要求
|
||
|
||
1. [在 CentOS 7 中为 Samba4 AD 集成安装 iRedMail][1]
|
||
|
||
### 第一步:准备 iRedMail 系统用于 Samba4 AD 集成
|
||
|
||
1、 在第一步中,你需要[为你的机器分配一个静态的 IP 地址][6]以防你使用的是由 DHCP 服务器提供的动态 IP 地址。
|
||
|
||
运行 [ifconfig 命令][7]列出你的机器网络接口名,并对正确的网卡发出 [nmtui-edit][8] 命令,使用自定义 IP 设置编辑正确的网络接口。
|
||
|
||
root 权限运行 nmtui-edit 命令。
|
||
|
||
```
|
||
# ifconfig
|
||
# nmtui-edit eno16777736
|
||
```
|
||
|
||
[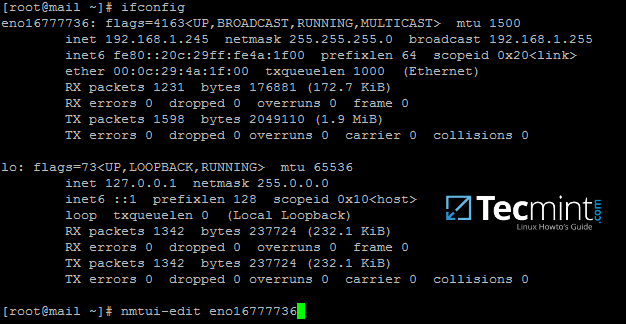][9]
|
||
|
||
*找出网络接口名*
|
||
|
||
2、 在打开要编辑的网络接口后,添加正确的静态 IP 设置,确保添加了 Samba4 AD DC 的 DNS 服务器 IP 地址以及你的域的名字,以便从机器查询 realm。使用以下截图作为指导。
|
||
|
||
[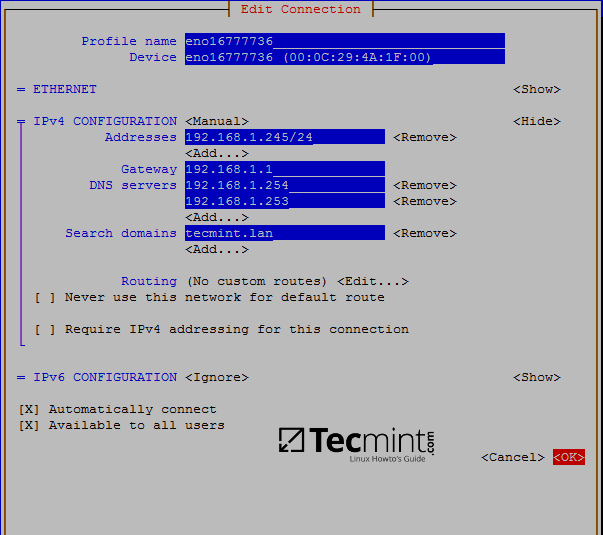][10]
|
||
|
||
*配置网络设置*
|
||
|
||
3、 在你完成配置网络接口后,重启网络进程使更改生效,并对域名以及 samba 4 域控制器的 FQDN 使用 ping 命令测试。
|
||
|
||
```
|
||
# systemctl restart network.service
|
||
# cat /etc/resolv.conf # 验证 DNS 解析器配置是否对域解析使用了正确的 DNS 服务器 IP
|
||
# ping -c2 tecmint.lan # ping 域名
|
||
# ping -c2 adc1 # ping 第一个 AD DC
|
||
# ping -c2 adc2 # Ping 第二个 AD DC
|
||
```
|
||
[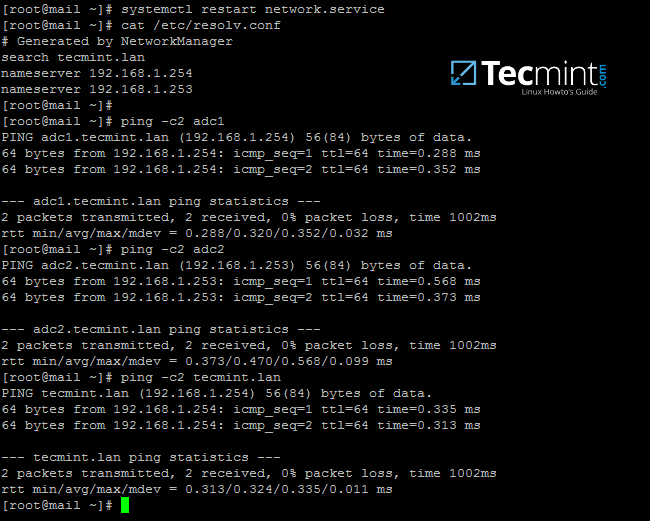][11]
|
||
|
||
*验证网络 DNS 配置*
|
||
|
||
4、 接下来,用下面的命令安装 `ntpdate` 包,与域控制器同步时间,并请求 samba4 机器的 NTP 服务器:
|
||
|
||
```
|
||
# yum install ntpdate
|
||
# ntpdate -qu tecmint.lan # querry domain NTP servers
|
||
# ntpdate tecmint.lan # Sync time with the domain
|
||
```
|
||
|
||
[][12]
|
||
|
||
*与 Samba NTP 服务器同步时间*
|
||
|
||
5、 你或许想要本地时间自动与 samba AD 时间服务器同步。为了实现这个设置,通过运行 [crontab -e 命令][13]并追加下面的行添加一条计划任务。
|
||
|
||
```
|
||
0 */1 * * * /usr/sbin/ntpdate tecmint.lan > /var/log/ntpdate.lan 2>&1
|
||
```
|
||
|
||
[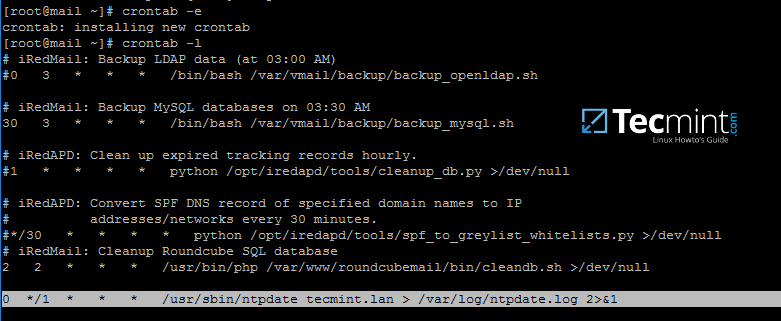][14]
|
||
|
||
*自动与 Samba NTP 同步时间*
|
||
|
||
### 第二步:为 iRedMail 集成准备 Samba4 AD DC
|
||
|
||
6、 现在,如[这篇][16]教程所述进入一台[安装了 RSAT 工具的 Windows 机器][15]管理 Samba4 AD。
|
||
|
||
打开 DNS 管理器,转到你的域转发查找区并添加新的 A 记录、MX记录还有 PTR 记录指向你的 iRedMail 系统的 IP 地址。使用以下截图作为指导。
|
||
|
||
添加一条 A 记录(相应地用 iRedMail 机器的名字和 IP 替换)。
|
||
|
||
[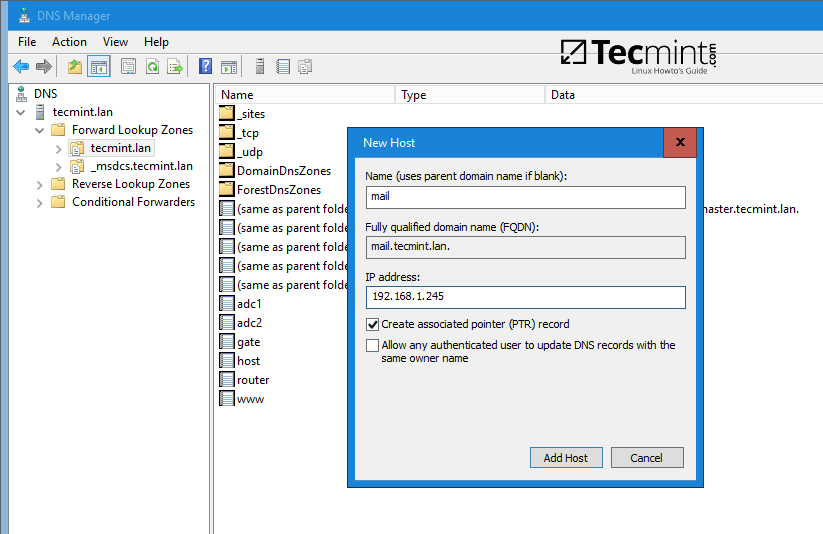][17]
|
||
|
||
*为 iRedMail 创建 DNS A 记录*
|
||
|
||
添加 MX 记录(将子域留空,优先级为 10)。
|
||
|
||
[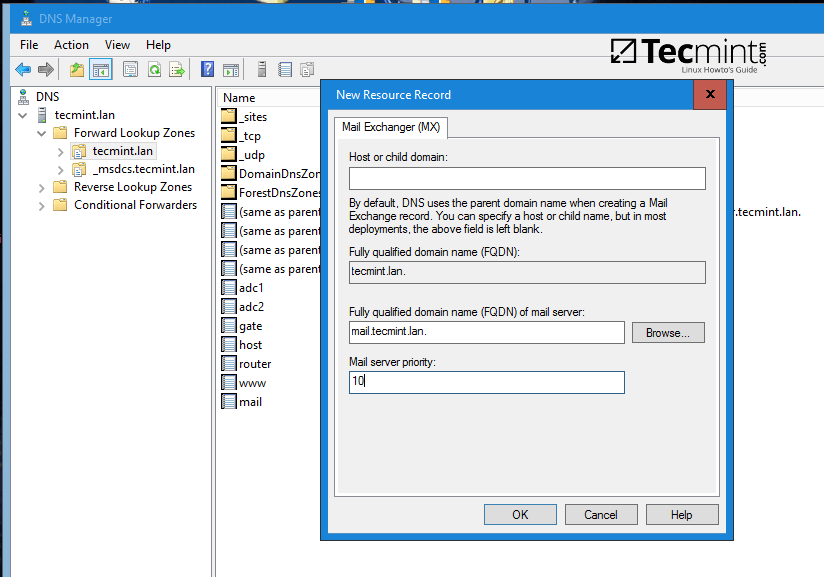][18]
|
||
|
||
*为 iRedMail 创建 DNS MX 记录*
|
||
|
||
在反向查找区域(相应地替换 iRedMail 服务器的 IP 地址)添加 PTR 记录。如果你尚未为域控制器配置反向区域,请阅读以下教程:[从 Windows 管理 Samba4 DNS 组策略][2]
|
||
|
||
[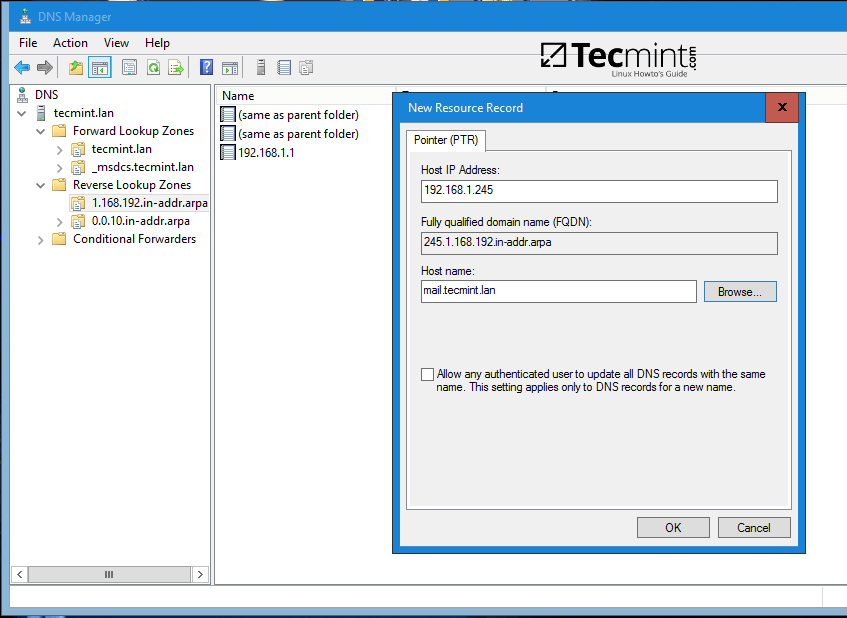][19]
|
||
|
||
*为 iRedMail 创建 DNS PTR 记录*
|
||
|
||
7、添加了使邮件服务器正常运行的基本 DNS 记录后,请进入 iRedMail 机器,安装 bind-utils 软件包,并按如下建议查询新添加的邮件记录。
|
||
|
||
Samba4 AD DC DNS 应该会响应之前添加的 DNS 记录。
|
||
|
||
```
|
||
# yum install bind-utils
|
||
# host tecmint.lan
|
||
# host mail.tecmint.lan
|
||
# host 192.168.1.245
|
||
```
|
||
|
||
[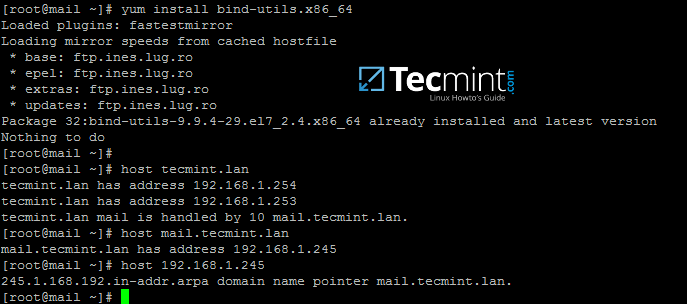][20]
|
||
|
||
*安装 Bind 并查询邮件记录*
|
||
|
||
在一台 Windows 机器上,打开命令行窗口并使用 [nslookup 命令][21]查询上面的邮件服务器记录。
|
||
|
||
8、 作为最后一个先决要求,在 Samba4 AD DC 中创建一个具有最小权限的新用户帐户,并使用名称 vmail, 为此用户选择一个强密码, 并确保该用户的密码永不过期。
|
||
|
||
vmail 帐户将被 iRedMail 服务用来查询 Samba4 AD DC LDAP 数据库并拉取电子邮件帐户。
|
||
|
||
要创建 vmail 账户,如截图所示,使用加入了已安装 RSAT 工具域的 Windows 机器上的 ADUC 图形化工具,或者按照先前主题中那样用 [samba-tool 命令行][3]直接在域控制器中运行。
|
||
|
||
在本指导中,我们会使用上面提到的第一种方法。
|
||
|
||
[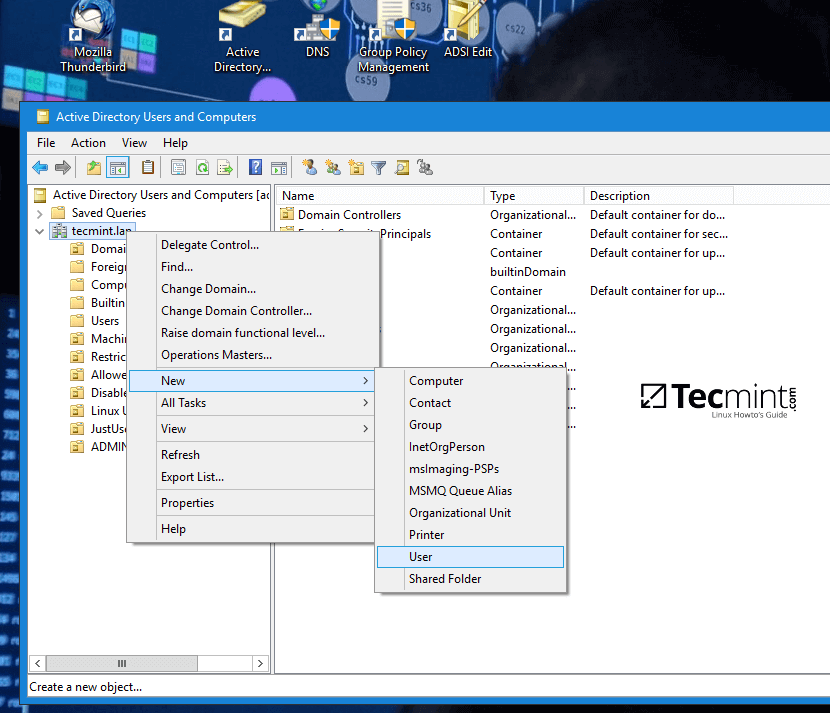][22]
|
||
|
||
*AD 用户和计算机*
|
||
|
||
[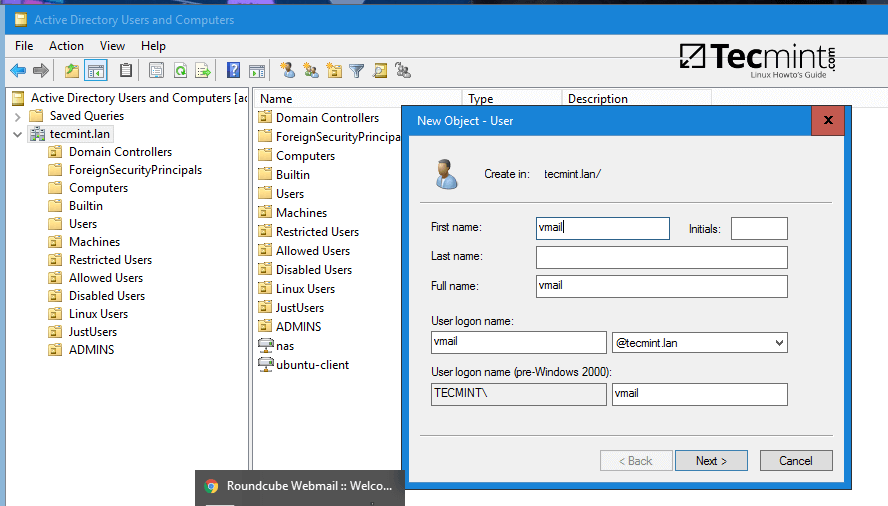][23]
|
||
|
||
*为 iRedMail 创建新的用户*
|
||
|
||
[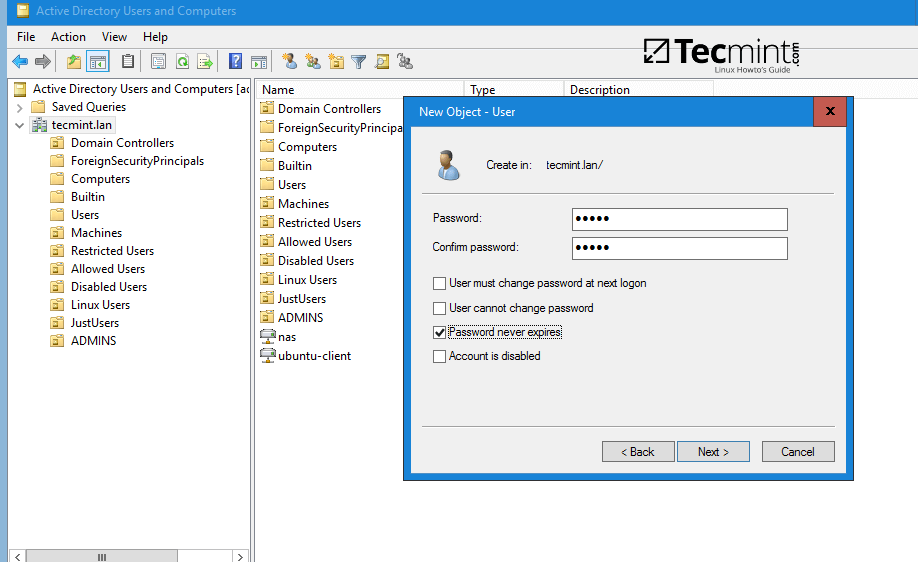][24]
|
||
|
||
*为用户设置强密码*
|
||
|
||
9、 在 iRedMail 系统中,用下面的命令测试 vmail 用户能够查询 Samba4 AD DC LDAP 数据库。返回的结果应该是你的域的对象总数, 如下截图所示。
|
||
|
||
```
|
||
# ldapsearch -x -h tecmint.lan -D 'vmail@tecmint.lan' -W -b 'cn=users,dc=tecmint,dc=lan'
|
||
```
|
||
|
||
注意:相应地替换域名以及 Samba4 AD 的 LDAP dn (`cn=users,dc=tecmint,dc=lan`)。
|
||
|
||
[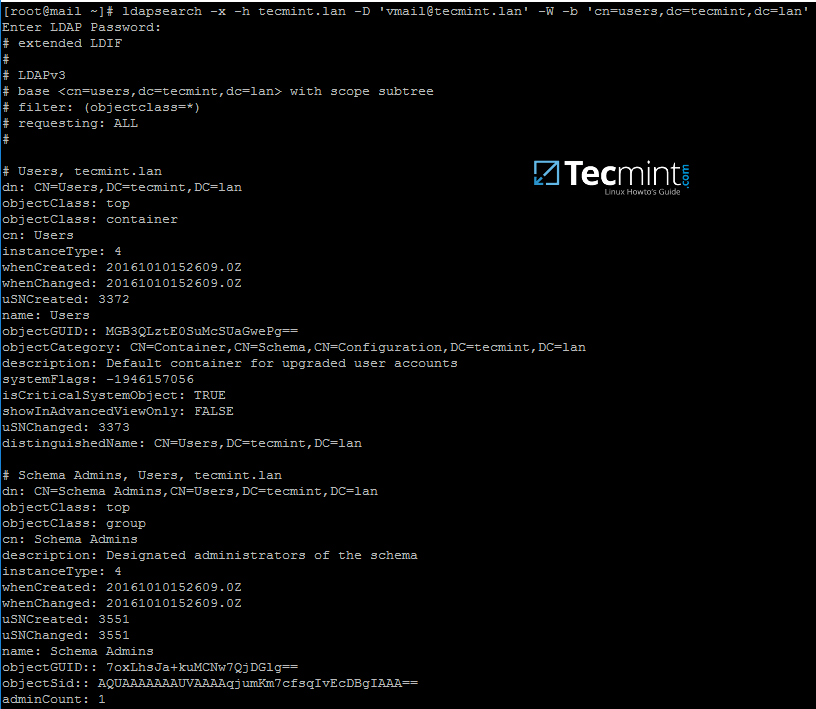][25]
|
||
|
||
*查询 Samba4 AD DC LDAP*
|
||
|
||
### 第三步:将 iRedMail 服务集成到 Samba4 AD DC 中
|
||
|
||
10、 现在是时候修改 iRedMail 服务(Postfix、Dovecot 和 Roundcube)以便为邮箱帐户查询 Samba4 域控制器。
|
||
|
||
第一个要修改的服务是 MTA 代理,Postfix。执行以下命令禁用一系列的 MTA 设置,添加你的域名到 Postfix 本地域以及邮箱域中,并使用 Dovecot 代理发送已接收的邮件到用户邮箱中。
|
||
|
||
```
|
||
# postconf -e virtual_alias_maps=' '
|
||
# postconf -e sender_bcc_maps=' '
|
||
# postconf -e recipient_bcc_maps= ' '
|
||
# postconf -e relay_domains=' '
|
||
# postconf -e relay_recipient_maps=' '
|
||
# postconf -e sender_dependent_relayhost_maps=' '
|
||
# postconf -e smtpd_sasl_local_domain='tecmint.lan' #用你自己的域替换
|
||
# postconf -e virtual_mailbox_domains='tecmint.lan' #用你自己的域替换
|
||
# postconf -e transport_maps='hash:/etc/postfix/transport'
|
||
# postconf -e smtpd_sender_login_maps='proxy:ldap:/etc/postfix/ad_sender_login_maps.cf' # 检查 SMTP 发送者
|
||
# postconf -e virtual_mailbox_maps='proxy:ldap:/etc/postfix/ad_virtual_mailbox_maps.cf' # 检查本地邮件帐户
|
||
# postconf -e virtual_alias_maps='proxy:ldap:/etc/postfix/ad_virtual_group_maps.cf' # 检查本地邮件列表
|
||
# cp /etc/postfix/transport /etc/postfix/transport.backup # 备份 transport 配置
|
||
# echo "tecmint.lan dovecot" > /etc/postfix/transport # 添加带 dovecot transport 的域
|
||
# cat /etc/postfix/transport # 验证 transport 文件
|
||
# postmap hash:/etc/postfix/transport
|
||
```
|
||
|
||
11、 接下来,用你最喜欢的文本编辑器创建 Postfix 的 `/etc/postfix/ad_sender_login_maps.cf` 配置文件,并添加下面的配置。
|
||
|
||
```
|
||
server_host = tecmint.lan
|
||
server_port = 389
|
||
version = 3
|
||
bind = yes
|
||
start_tls = no
|
||
bind_dn = vmail@tecmint.lan
|
||
bind_pw = ad_vmail_account_password
|
||
search_base = dc=tecmint,dc=lan
|
||
scope = sub
|
||
query_filter = (&(userPrincipalName=%s)(objectClass=person)(!(userAccountControl:1.2.840.113556.1.4.803:=2)))
|
||
result_attribute= userPrincipalName
|
||
debuglevel = 0
|
||
```
|
||
|
||
12、 使用下面的配置创建 `/etc/postfix/ad_virtual_mailbox_maps.cf`。
|
||
|
||
```
|
||
server_host = tecmint.lan
|
||
server_port = 389
|
||
version = 3
|
||
bind = yes
|
||
start_tls = no
|
||
bind_dn = vmail@tecmint.lan
|
||
bind_pw = ad_vmail_account_password
|
||
search_base = dc=tecmint,dc=lan
|
||
scope = sub
|
||
query_filter = (&(objectclass=person)(userPrincipalName=%s))
|
||
result_attribute= userPrincipalName
|
||
result_format = %d/%u/Maildir/
|
||
debuglevel = 0
|
||
```
|
||
|
||
13、 使用下面的配置创建 `/etc/postfix/ad_virtual_group_maps.cf`。
|
||
|
||
```
|
||
server_host = tecmint.lan
|
||
server_port = 389
|
||
version = 3
|
||
bind = yes
|
||
start_tls = no
|
||
bind_dn = vmail@tecmint.lan
|
||
bind_pw = ad_vmail_account_password
|
||
search_base = dc=tecmint,dc=lan
|
||
scope = sub
|
||
query_filter = (&(objectClass=group)(mail=%s))
|
||
special_result_attribute = member
|
||
leaf_result_attribute = mail
|
||
result_attribute= userPrincipalName
|
||
debuglevel = 0
|
||
```
|
||
|
||
替换上面三个配置文件中的 `server_host`、`bind_dn`、`bind_pw` 和 `search_base` 以反应你自己域的设置。
|
||
|
||
14、 接下来,打开 Postfix 主配置文件,通过在下面的行前添加 `#` 注释,搜索并禁用 iRedAPD 的 `check_policy_service` 和 `smtpd_end_of_data_restrictions`。
|
||
|
||
```
|
||
# nano /etc/postfix/main.cf
|
||
```
|
||
|
||
注释下面的行:
|
||
|
||
```
|
||
#check_policy_service inet:127.0.0.1:7777
|
||
#smtpd_end_of_data_restrictions = check_policy_service inet:127.0.0.1:7777
|
||
```
|
||
|
||
15、 现在,通过执行一系列查询,验证 Postfix 是否使用现有的域用户和域组绑定到 Samba AD,如以下示例所示。
|
||
|
||
结果应与下面的截图类似。
|
||
|
||
```
|
||
# postmap -q tecmint_user@tecmint.lan ldap:/etc/postfix/ad_virtual_mailbox_maps.cf
|
||
# postmap -q tecmint_user@tecmint.lan ldap:/etc/postfix/ad_sender_login_maps.cf
|
||
# postmap -q linux_users@tecmint.lan ldap:/etc/postfix/ad_virtual_group_maps.cf
|
||
```
|
||
|
||
[][26]
|
||
|
||
*验证 Postfix 绑定到了 Samba AD*
|
||
|
||
相应替换 AD 用户及组帐户。同样,确保你使用的 AD 组已被分配了一些成员。
|
||
|
||
16、 在下一步中修改 Dovecot 配置文件以查询 Samba4 AD DC。打开 `/etc/dovecot/dovecot-ldap.conf` 文件并添加下面的行。
|
||
|
||
```
|
||
hosts = tecmint.lan:389
|
||
ldap_version = 3
|
||
auth_bind = yes
|
||
dn = vmail@tecmint.lan
|
||
dnpass = ad_vmail_password
|
||
base = dc=tecmint,dc=lan
|
||
scope = subtree
|
||
deref = never
|
||
user_filter = (&(userPrincipalName=%u)(objectClass=person)(!(userAccountControl:1.2.840.113556.1.4.803:=2)))
|
||
pass_filter = (&(userPrincipalName=%u)(objectClass=person)(!(userAccountControl:1.2.840.113556.1.4.803:=2)))
|
||
pass_attrs = userPassword=password
|
||
default_pass_scheme = CRYPT
|
||
user_attrs = =home=/var/vmail/vmail1/%Ld/%Ln/Maildir/,=mail=maildir:/var/vmail/vmail1/%Ld/%Ln/Maildir/
|
||
```
|
||
|
||
Samba4 AD 帐户的邮箱将会存储在 `/var/vmail/vmail1/your_domain.tld/your_domain_user/Maildir/` 中。
|
||
|
||
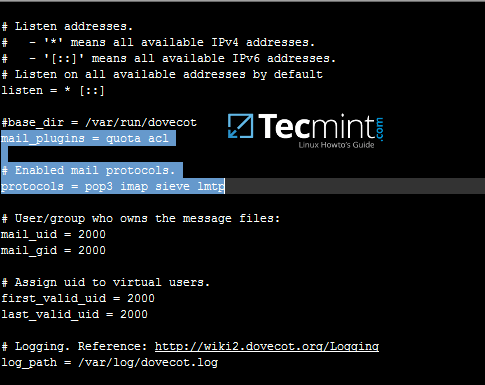
17、 确保 dovecot 的主配置文件中启用了 pop3 和 imap 协议。打开 `/etc/dovecot/dovecot.conf` 验证是否启用了 `quota` 和 `acl` 邮件插件,并检查这些值是否存在。
|
||
|
||
[][27]
|
||
|
||
*在 Dovecot 中启用 POP3 和 IMAP*
|
||
|
||
18、 可选地,如果要将全局硬配额设置为每个域用户的最大不超过 500 MB 存储,请在 `/etc/dovecot/dovecot.conf` 文件中添加以下行。
|
||
|
||
```
|
||
quota_rule = *:storage=500M
|
||
```
|
||
|
||
19、 最后,为了使目前这些更改生效,用 root 权限执行下面的命令重启并验证 Postfix 和 Dovecot 守护进程的状态。
|
||
|
||
```
|
||
# systemctl restart postfix dovecot
|
||
# systemctl status postfix dovecot
|
||
```
|
||
|
||
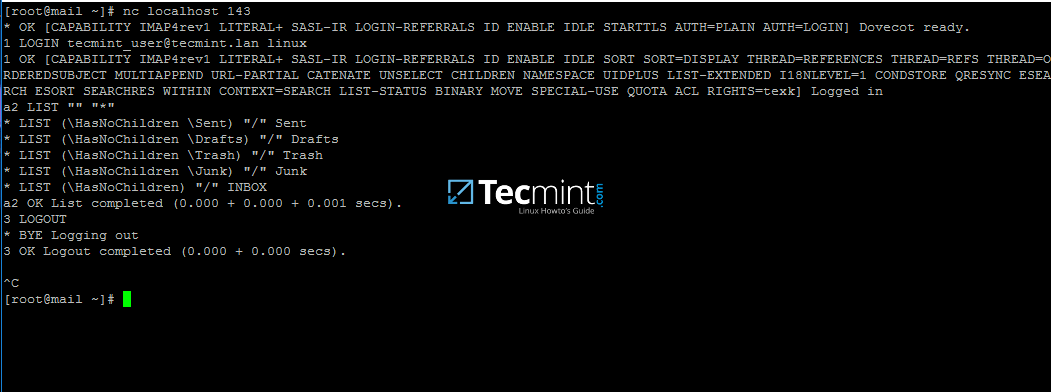
20、 为了使用 IMAP 协议从命令行测试邮件服务器配置,请使用 telnet 或 [netcat 命令][28],如下所示。
|
||
|
||
```
|
||
# nc localhost 143
|
||
a1 LOGIN ad_user@your_domain.tld ad_user_password
|
||
a2 LIST “” “*”
|
||
a3 LOGOUT
|
||
```
|
||
|
||
[][29]
|
||
|
||
*测试 iRedMail 配置*
|
||
|
||
如果你可以使用 Samba4 用户帐户从命令行执行 IMAP 登录,那么 iRedMail 服务器似乎已经准备好发送和接收 AD 帐户的邮件。
|
||
|
||
在下一个教程中将讨论如何将 Roundcube webmail 与 Samba4 AD DC 集成,并启用全局 LDAP 地址簿,自定义 Roudcube,从浏览器访问 Roundcube Web 界面,并禁用某些不需要的 iRedMail 服务。
|
||
|
||
--------------------------------------------------------------------------------
|
||
|
||
作者简介:
|
||
|
||
我是一个电脑上瘾的家伙,开源和基于 linux 的系统软件的粉丝,在 Linux 发行版桌面、服务器和 bash 脚本方面拥有大约4年的经验。
|
||
|
||
-----
|
||
|
||
via: https://www.tecmint.com/integrate-iredmail-to-samba4-ad-dc-on-centos-7/
|
||
|
||
作者:[Matei Cezar][a]
|
||
译者:[geekpi](https://github.com/geekpi)
|
||
校对:[wxy](https://github.com/wxy)
|
||
|
||
本文由 [LCTT](https://github.com/LCTT/TranslateProject) 原创编译,[Linux中国](https://linux.cn/) 荣誉推出
|
||
|
||
[a]:https://www.tecmint.com/author/cezarmatei/
|
||
[1]:https://linux.cn/article-8567-1.html
|
||
[2]:https://linux.cn/article-8258-1.html
|
||
[3]:https://linux.cn/article-8070-1.html
|
||
[4]:https://www.tecmint.com/setup-postfix-mail-server-and-dovecot-with-mariadb-in-centos/
|
||
[5]:https://linux.cn/article-8065-1.html
|
||
[6]:https://linux.cn/article-3977-1.html
|
||
[7]:https://www.tecmint.com/ifconfig-command-examples/
|
||
[8]:https://linux.cn/article-5410-1.html
|
||
[9]:https://www.tecmint.com/wp-content/uploads/2017/05/Find-Network-Interface-Name.png
|
||
[10]:https://www.tecmint.com/wp-content/uploads/2017/05/Configure-Network-Settings.png
|
||
[11]:https://www.tecmint.com/wp-content/uploads/2017/05/Verify-Network-DNS-Configuration.png
|
||
[12]:https://www.tecmint.com/wp-content/uploads/2017/05/Sync-Time-with-Samba-NTP-Server.png
|
||
[13]:https://www.tecmint.com/11-cron-scheduling-task-examples-in-linux/
|
||
[14]:https://www.tecmint.com/wp-content/uploads/2017/05/Auto-Sync-Time-with-Samba-NTP.png
|
||
[15]:https://linux.cn/article-8097-1.html
|
||
[16]:https://linux.cn/article-8097-1.html
|
||
[17]:https://www.tecmint.com/wp-content/uploads/2017/05/Create-DNS-A-Record-for-iRedMail.png
|
||
[18]:https://www.tecmint.com/wp-content/uploads/2017/05/Create-DNS-MX-Record-for-iRedMail.png
|
||
[19]:https://www.tecmint.com/wp-content/uploads/2017/05/Create-DNS-PTR-Record-for-iRedMail.png
|
||
[20]:https://www.tecmint.com/wp-content/uploads/2017/05/Install-Bind-and-Query-Mail-Records.png
|
||
[21]:https://www.tecmint.com/8-linux-nslookup-commands-to-troubleshoot-dns-domain-name-server/
|
||
[22]:https://www.tecmint.com/wp-content/uploads/2017/05/Active-Directory-Users-and-Computers.png
|
||
[23]:https://www.tecmint.com/wp-content/uploads/2017/05/Create-New-User-for-iRedMail.png
|
||
[24]:https://www.tecmint.com/wp-content/uploads/2017/05/Set-Strong-Password-for-User.png
|
||
[25]:https://www.tecmint.com/wp-content/uploads/2017/05/Query-Samba4-AD-DC-LDAP.png
|
||
[26]:https://www.tecmint.com/wp-content/uploads/2017/05/Verify-Postfix-Binding-to-Samba-AD.png
|
||
[27]:https://www.tecmint.com/wp-content/uploads/2017/05/Enable-Pop3-Imap-in-Dovecot.png
|
||
[28]:https://www.tecmint.com/check-remote-port-in-linux/
|
||
[29]:https://www.tecmint.com/wp-content/uploads/2017/05/Test-iRedMail-Configuration.png
|
||
[30]:https://www.tecmint.com/author/cezarmatei/
|
||
[31]:https://www.tecmint.com/10-useful-free-linux-ebooks-for-newbies-and-administrators/
|
||
[32]:https://www.tecmint.com/free-linux-shell-scripting-books/
|