mirror of
https://github.com/LCTT/TranslateProject.git
synced 2025-01-07 22:11:09 +08:00
300 lines
12 KiB
Markdown
300 lines
12 KiB
Markdown
translting----geekpi
|
||
|
||
Integrate CentOS 7 to Samba4 AD from Commandline – Part 14
|
||
============================================================
|
||
|
||
This guide will show you how you can integrate a CentOS 7 Server with no Graphical User Interface to [Samba4 Active Directory Domain Controller][3] from command line using Authconfig software.
|
||
|
||
This type of setup provides a single centralized account database held by Samba and allows the AD users to authenticate to CentOS server across the network infrastructure.
|
||
|
||
#### Requirements
|
||
|
||
1. [Create an Active Directory Infrastructure with Samba4 on Ubuntu][1]
|
||
|
||
2. [CentOS 7.3 Installation Guide][2]
|
||
|
||
### Step 1: Configure CentOS for Samba4 AD DC
|
||
|
||
1. Before starting to join CentOS 7 Server into a Samba4 DC you need to assure that the network interface is properly configured to query domain via DNS service.
|
||
|
||
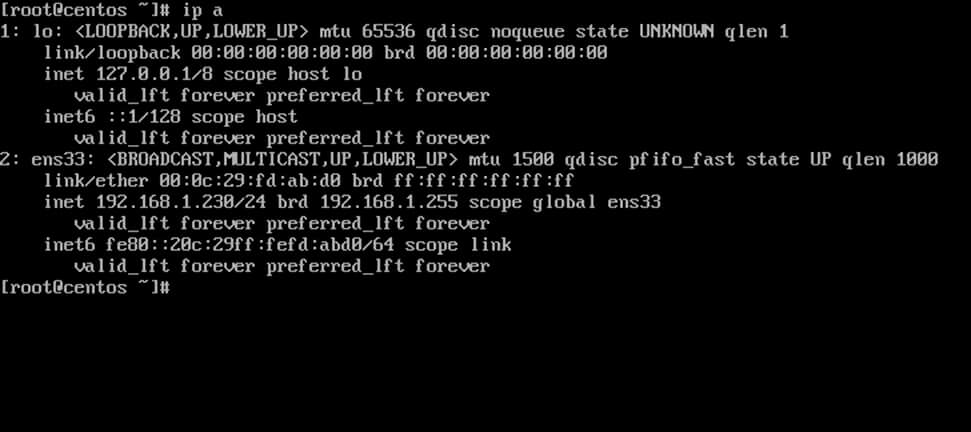
Run [ip address][4] command to list your machine network interfaces and choose the specific NIC to edit by issuing nmtui-edit command against the interface name, such as ens33 in this example, as illustrated below.
|
||
|
||
```
|
||
# ip address
|
||
# nmtui-edit ens33
|
||
```
|
||
[][5]
|
||
|
||
List Network Interfaces
|
||
|
||
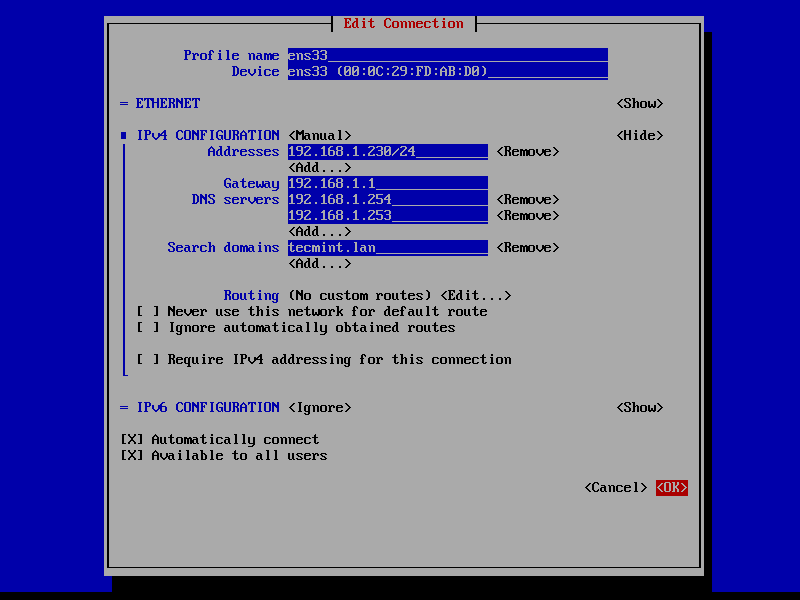
2. Once the network interface is opened for editing, add the static IPv4 configurations best suited for your LAN and make sure you setup Samba AD Domain Controllers IP addresses for the DNS servers.
|
||
|
||
Also, append the name of your domain in search domains filed and navigate to OK button using [TAB] key to apply changes.
|
||
|
||
The search domains filed assures that the domain counterpart is automatically appended by DNS resolution (FQDN) when you use only a short name for a domain DNS record.
|
||
|
||
[][6]
|
||
|
||
Configure Network Interface
|
||
|
||
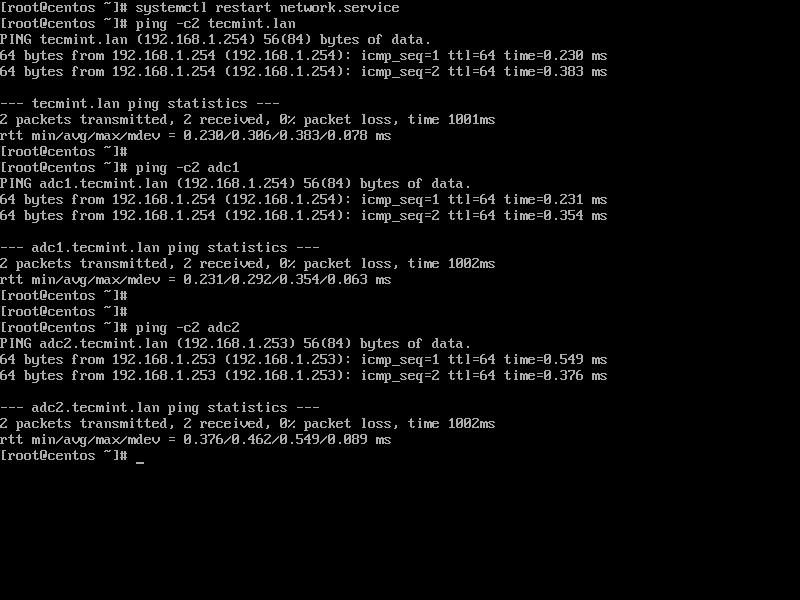
3. Finally, restart the network daemon to apply changes and test if DNS resolution is properly configured by issuing series of ping commands against the domain name and domain controllers short names as shown below.
|
||
|
||
```
|
||
# systemctl restart network.service
|
||
# ping -c2 tecmint.lan
|
||
# ping -c2 adc1
|
||
# ping -c2 adc2
|
||
```
|
||
[][7]
|
||
|
||
Verify DNS Resolution on Domain
|
||
|
||
4. Also, configure your machine hostname and reboot the machine to properly apply the settings by issuing the following commands.
|
||
|
||
```
|
||
# hostnamectl set-hostname your_hostname
|
||
# init 6
|
||
```
|
||
|
||
Verify if hostname was correctly applied with the below commands.
|
||
|
||
```
|
||
# cat /etc/hostname
|
||
# hostname
|
||
```
|
||
|
||
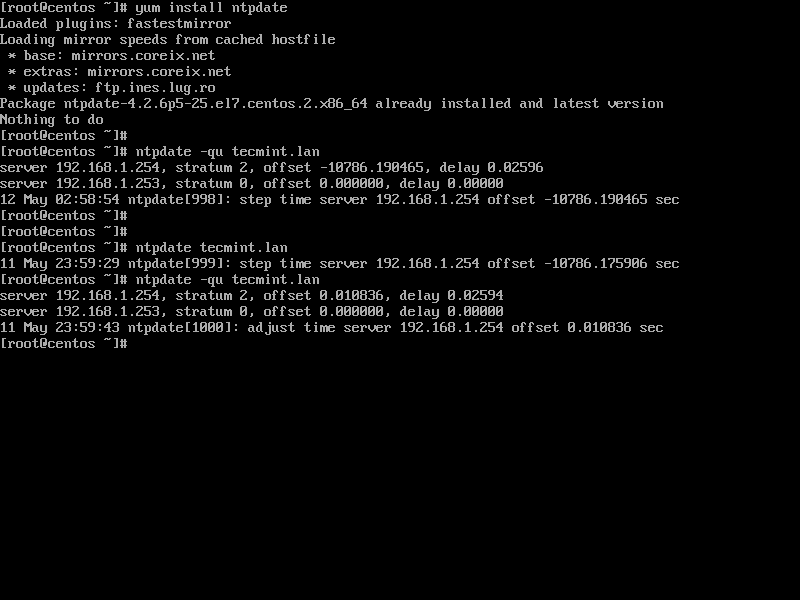
5. Finally, sync local time with Samba4 AD DC by issuing the below commands with root privileges.
|
||
|
||
```
|
||
# yum install ntpdate
|
||
# ntpdate domain.tld
|
||
```
|
||
[][8]
|
||
|
||
Sync Time with Samba4 AD DC
|
||
|
||
### Step 2: Join CentOS 7 Server to Samba4 AD DC
|
||
|
||
6. To join CentOS 7 server to Samba4 Active Directory, first install the following packages on your machine from an account with root privileges.
|
||
|
||
```
|
||
# yum install authconfig samba-winbind samba-client samba-winbind-clients
|
||
```
|
||
|
||
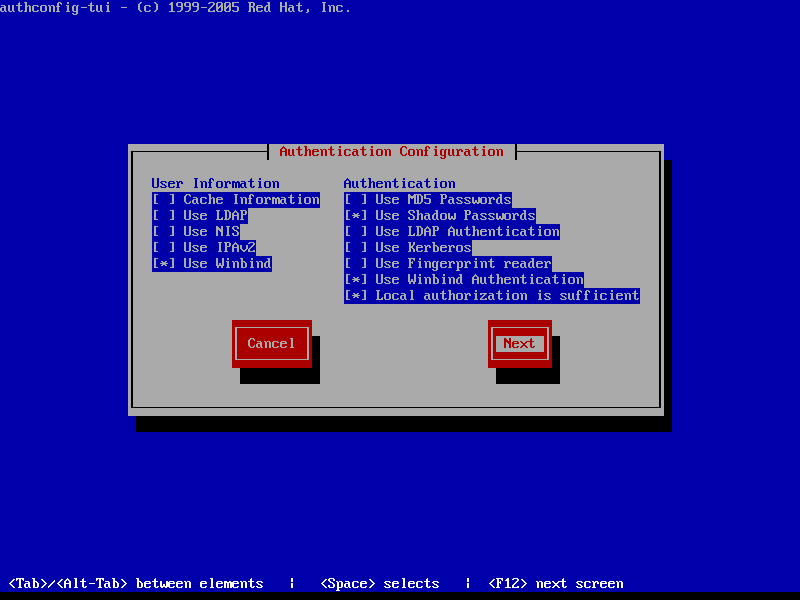
7. In order to integrate CentOS 7 server to a domain controller run authconfig-tui graphical utility with root privileges and use the below configurations as described below.
|
||
|
||
```
|
||
# authconfig-tui
|
||
```
|
||
|
||
At the first prompt screen choose:
|
||
|
||
* On User Information:
|
||
* Use Winbind
|
||
|
||
* On Authentication tab select by pressing [Space] key:
|
||
* Use Shadow Password
|
||
|
||
* Use Winbind Authentication
|
||
|
||
* Local authorization is sufficient
|
||
|
||
[][9]
|
||
|
||
Authentication Configuration
|
||
|
||
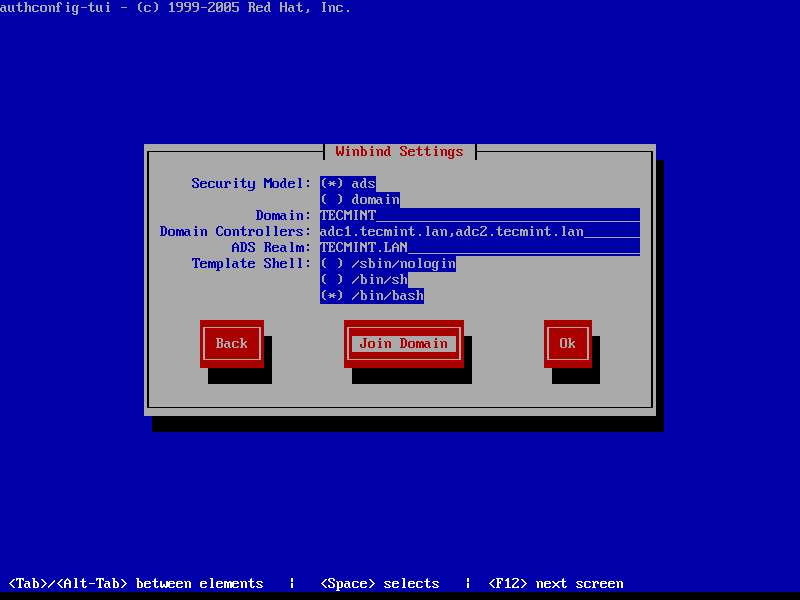
8. Hit Next to continue to the Winbind Settings screen and configure as illustrated below:
|
||
|
||
* Security Model: ads
|
||
|
||
* Domain = YOUR_DOMAIN (use upper case)
|
||
|
||
* Domain Controllers = domain machines FQDN (comma separated if more than one)
|
||
|
||
* ADS Realm = YOUR_DOMAIN.TLD
|
||
|
||
* Template Shell = /bin/bash
|
||
|
||
[][10]
|
||
|
||
Winbind Settings
|
||
|
||
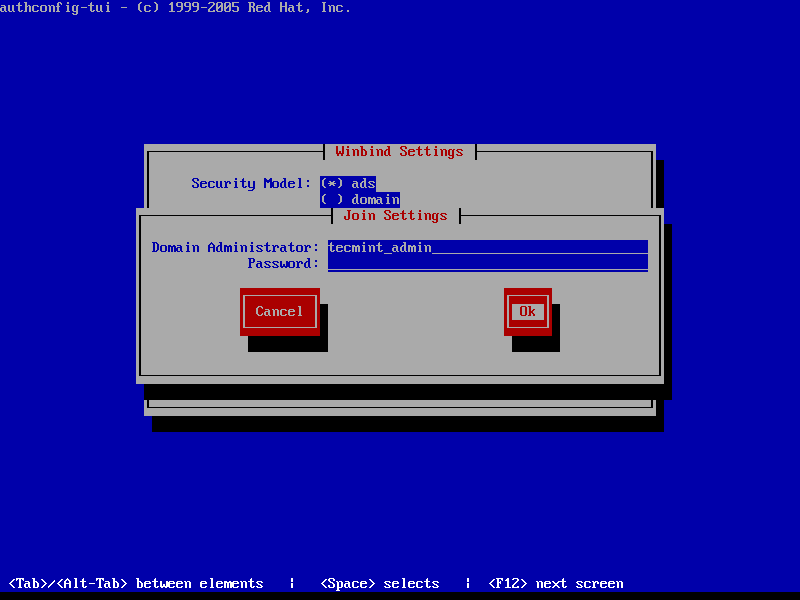
9. To perform domain joining navigate to Join Domain button using [tab] key and hit [Enter] key to join domain.
|
||
|
||
At the next screen prompt, add the credentials for a Samba4 AD account with elevated privileges to perform the machine account joining into AD and hit OK to apply settings and close the prompt.
|
||
|
||
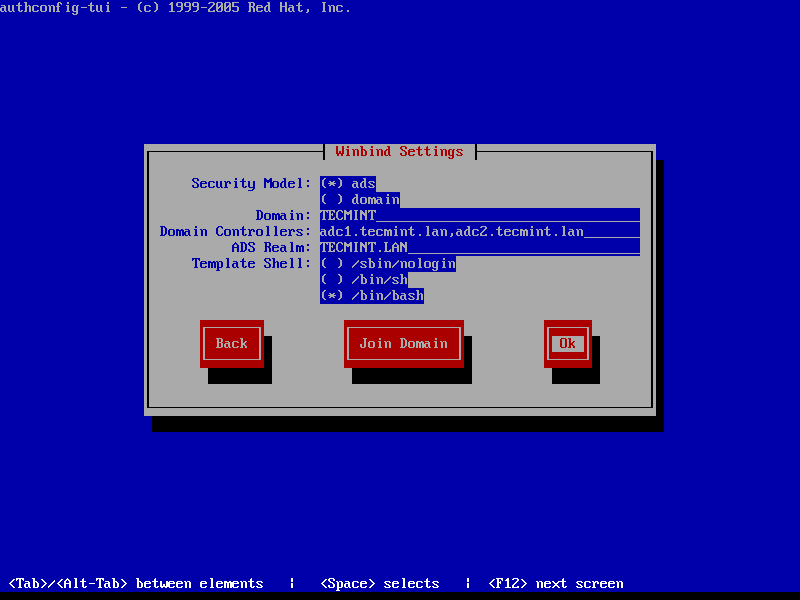
Be aware that when you type the user password, the credentials won’t be shown in the password screen. On the remaining screen hit OK again to finish domain integration for CentOS 7 machine.
|
||
|
||
[][11]
|
||
|
||
Join Domain to Samba4 AD DC
|
||
|
||
[][12]
|
||
|
||
Confirm Winbind Settings
|
||
|
||
To force adding a machine into a specific Samba AD Organizational Unit, get your machine exact name using hostname command and create a new Computer object in that OU with the name of your machine.
|
||
|
||
The best way to add a new object into a Samba4 AD is by using ADUC tool from a Windows machine integrated into the domain with [RSAT tools installed][13] on it.
|
||
|
||
Important: An alternate method of joining a domain is by using authconfig command line which offers extensive control over the integration process.
|
||
|
||
However, this method is prone to errors do to its numerous parameters as illustrated on the below command excerpt. The command must be typed into a single long line.
|
||
|
||
```
|
||
# authconfig --enablewinbind --enablewinbindauth --smbsecurity ads --smbworkgroup=YOUR_DOMAIN --smbrealm YOUR_DOMAIN.TLD --smbservers=adc1.yourdomain.tld --krb5realm=YOUR_DOMAIN.TLD --enablewinbindoffline --enablewinbindkrb5 --winbindtemplateshell=/bin/bash--winbindjoin=domain_admin_user --update --enablelocauthorize --savebackup=/backups
|
||
```
|
||
|
||
10. After the machine has been joined to domain, verify if winbind service is up and running by issuing the below command.
|
||
|
||
```
|
||
# systemctl status winbind.service
|
||
```
|
||
|
||
11. Then, check if CentOS machine object has been successfully created in Samba4 AD. Use AD Users and Computers tool from a Windows machine with RSAT tools installed and navigate to your domain Computers container. A new AD computer account object with name of your CentOS 7 server should be listed in the right plane.
|
||
|
||
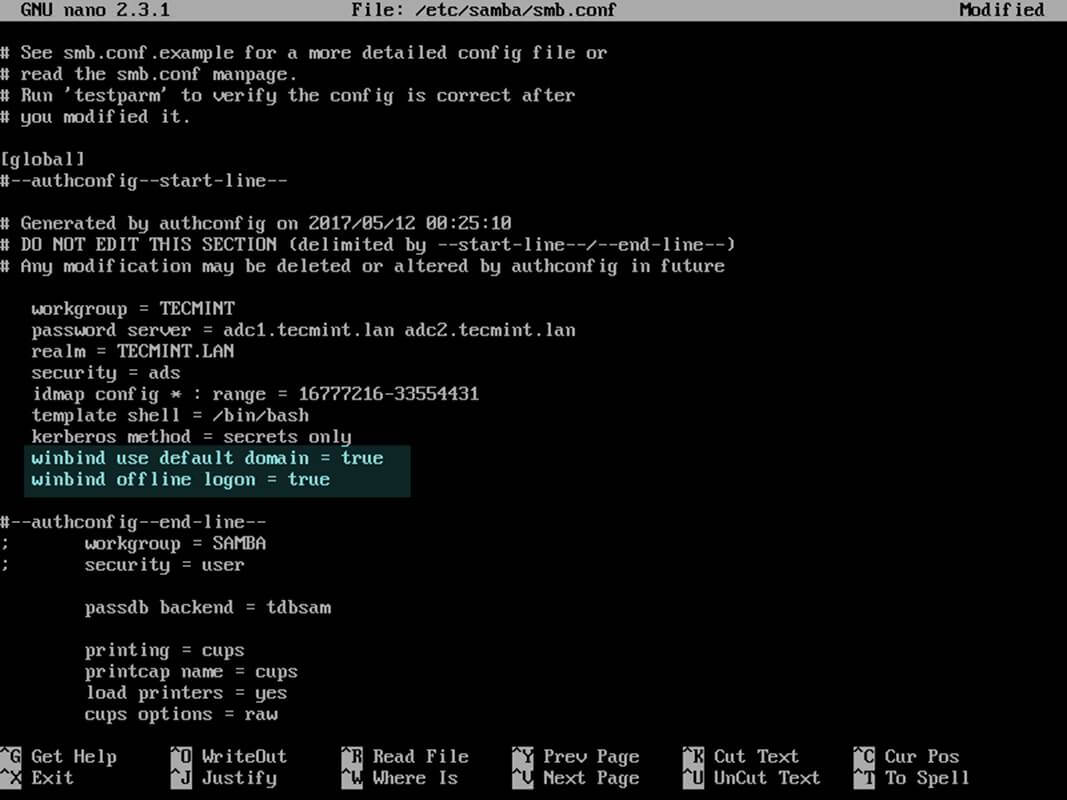
12. Finally, tweak the configuration by opening samba main configuration file (/etc/samba/smb.conf) with a text editor and append the below lines at the end of the [global]configuration block as illustrated below:
|
||
|
||
```
|
||
winbind use default domain = true
|
||
winbind offline logon = true
|
||
```
|
||
[][14]
|
||
|
||
Configure Samba
|
||
|
||
13. In order to create local homes on the machine for AD accounts at their first logon run the below command.
|
||
|
||
```
|
||
# authconfig --enablemkhomedir --update
|
||
```
|
||
|
||
14. Finally, restart Samba daemon to reflect changes and verify domain joining by performing a logon on the server with an AD account. The home directory for the AD account should be automatically created.
|
||
|
||
```
|
||
# systemctl restart winbind
|
||
# su - domain_account
|
||
```
|
||
[][15]
|
||
|
||
Verify Domain Joining
|
||
|
||
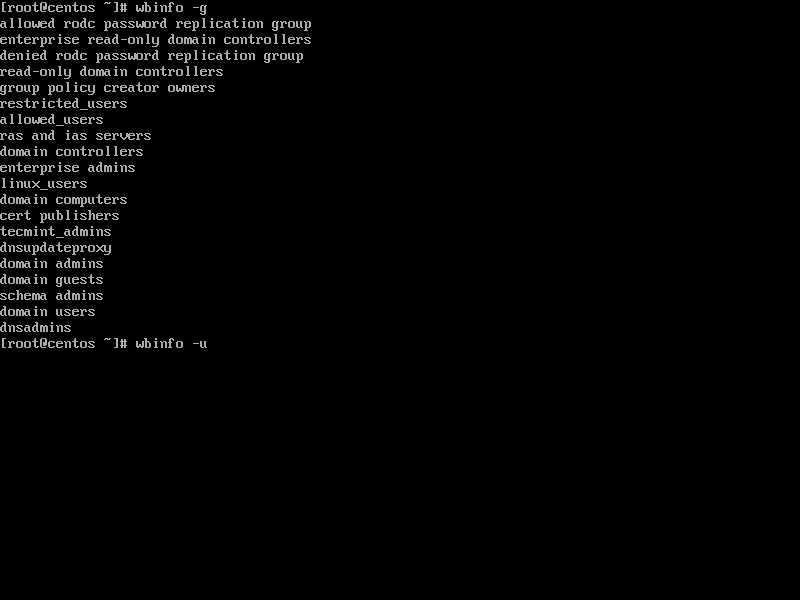
15. List the domain users or domain groups by issuing one of the following commands.
|
||
|
||
```
|
||
# wbinfo -u
|
||
# wbinfo -g
|
||
```
|
||
[][16]
|
||
|
||
List Domain Users and Groups
|
||
|
||
16. To get info about a domain user run the below command.
|
||
|
||
```
|
||
# wbinfo -i domain_user
|
||
```
|
||
[][17]
|
||
|
||
List Domain User Info
|
||
|
||
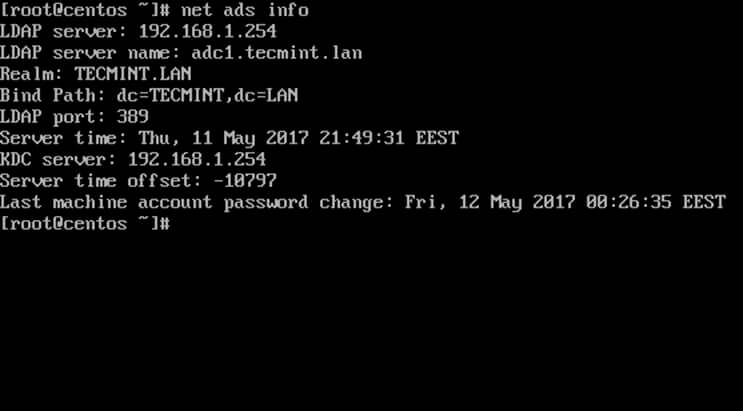
17. To display summary domain info issue the following command.
|
||
|
||
```
|
||
# net ads info
|
||
```
|
||
[][18]
|
||
|
||
List Domain Summary
|
||
|
||
### Step 3: Login to CentOS with a Samba4 AD DC Account
|
||
|
||
18. To authenticate with a domain user in CentOS, use one of the following command line syntaxes.
|
||
|
||
```
|
||
# su - ‘domain\domain_user’
|
||
# su - domain\\domain_user
|
||
```
|
||
|
||
Or use the below syntax in case winbind use default domain = true parameter is set to samba configuration file.
|
||
|
||
```
|
||
# su - domain_user
|
||
# su - domain_user@domain.tld
|
||
```
|
||
|
||
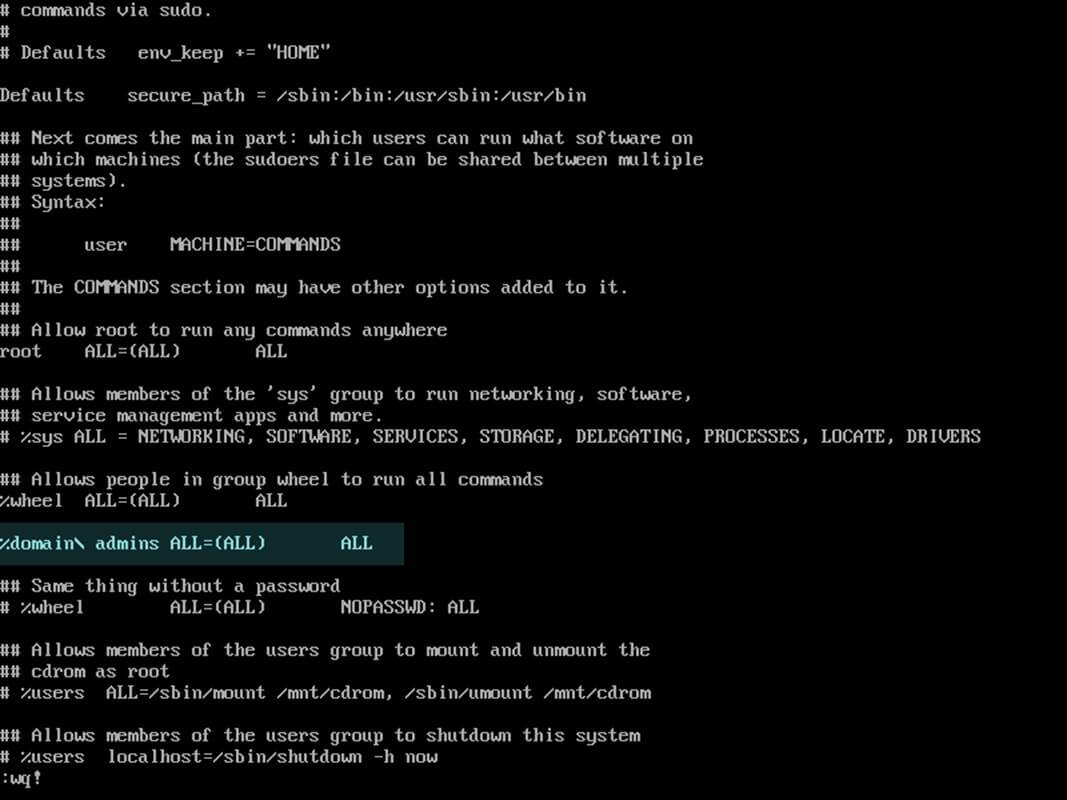
19. In order to add root privileges for a domain user or group, edit sudoers file using visudocommand and add the following lines as illustrated on the below screenshot.
|
||
|
||
```
|
||
YOUR_DOMAIN\\domain_username ALL=(ALL:ALL) ALL #For domain users
|
||
%YOUR_DOMAIN\\your_domain\ group ALL=(ALL:ALL) ALL #For domain groups
|
||
```
|
||
|
||
Or use the below excerpt in case winbind use default domain = true parameter is set to samba configuration file.
|
||
|
||
```
|
||
domain_username ALL=(ALL:ALL) ALL #For domain users
|
||
%your_domain\ group ALL=(ALL:ALL) ALL #For domain groups
|
||
```
|
||
[][19]
|
||
|
||
Grant Root Privileges on Domain Users
|
||
|
||
20. The following series of commands against a Samba4 AD DC can also be useful for troubleshooting purposes:
|
||
|
||
```
|
||
# wbinfo -p #Ping domain
|
||
# wbinfo -n domain_account #Get the SID of a domain account
|
||
# wbinfo -t #Check trust relationship
|
||
```
|
||
|
||
21. To leave the domain run the following command against your domain name using a domain account with elevated privileges. After the machine account has been removed from the AD, reboot the machine to revert changes before the integration process.
|
||
|
||
```
|
||
# net ads leave -w DOMAIN -U domain_admin
|
||
# init 6
|
||
```
|
||
|
||
That’s all! Although this procedure is mainly focused on joining a CentOS 7 server to a Samba4 AD DC, the same steps described here are also valid for integrating a CentOS server into a Microsoft Windows Server 2012 Active Directory.
|
||
|
||
--------------------------------------------------------------------------------
|
||
|
||
作者简介:
|
||
|
||
Matei Cezar
|
||
I'am a computer addicted guy, a fan of open source and linux based system software, have about 4 years experience with Linux distributions desktop, servers and bash scripting.
|
||
|
||
------------------
|
||
|
||
via: https://www.tecmint.com/integrate-centos-7-to-samba4-active-directory/
|
||
|
||
作者:[Matei Cezar ][a]
|
||
译者:[译者ID](https://github.com/译者ID)
|
||
校对:[校对者ID](https://github.com/校对者ID)
|
||
|
||
本文由 [LCTT](https://github.com/LCTT/TranslateProject) 原创编译,[Linux中国](https://linux.cn/) 荣誉推出
|
||
|
||
[a]:https://www.tecmint.com/author/cezarmatei/
|
||
[1]:https://www.tecmint.com/install-samba4-active-directory-ubuntu/
|
||
[2]:https://www.tecmint.com/centos-7-3-installation-guide/
|
||
[3]:https://www.tecmint.com/install-samba4-active-directory-ubuntu/
|
||
[4]:https://www.tecmint.com/ip-command-examples/
|
||
[5]:https://www.tecmint.com/wp-content/uploads/2017/07/List-Network-Interfaces.jpg
|
||
[6]:https://www.tecmint.com/wp-content/uploads/2017/07/Configure-Network-Interface.png
|
||
[7]:https://www.tecmint.com/wp-content/uploads/2017/07/Verify-DNS-Resolution-on-Domain.png
|
||
[8]:https://www.tecmint.com/wp-content/uploads/2017/07/Sync-Time-with-Samba4-AD-DC.png
|
||
[9]:https://www.tecmint.com/wp-content/uploads/2017/07/Authentication-Configuration.png
|
||
[10]:https://www.tecmint.com/wp-content/uploads/2017/07/Winbind-Settings.png
|
||
[11]:https://www.tecmint.com/wp-content/uploads/2017/07/Join-Domain-to-Samba4-AD-DC.png
|
||
[12]:https://www.tecmint.com/wp-content/uploads/2017/07/Confirm-Winbind-Settings.png
|
||
[13]:https://www.tecmint.com/manage-samba4-ad-from-windows-via-rsat/
|
||
[14]:https://www.tecmint.com/wp-content/uploads/2017/07/Configure-Samba.jpg
|
||
[15]:https://www.tecmint.com/wp-content/uploads/2017/07/Verify-Domain-Joining.jpg
|
||
[16]:https://www.tecmint.com/wp-content/uploads/2017/07/List-Domain-Users-and-Groups.png
|
||
[17]:https://www.tecmint.com/wp-content/uploads/2017/07/List-Domain-User-Info.jpg
|
||
[18]:https://www.tecmint.com/wp-content/uploads/2017/07/List-Domain-Summary.jpg
|
||
[19]:https://www.tecmint.com/wp-content/uploads/2017/07/Grant-Root-Privileges-on-Domain-Users.jpg
|
||
[20]:https://www.tecmint.com/author/cezarmatei/
|
||
[21]:https://www.tecmint.com/10-useful-free-linux-ebooks-for-newbies-and-administrators/
|
||
[22]:https://www.tecmint.com/free-linux-shell-scripting-books/
|