mirror of
https://github.com/LCTT/TranslateProject.git
synced 2025-01-22 23:00:57 +08:00
301 lines
11 KiB
Markdown
301 lines
11 KiB
Markdown
了解 7z 命令开关(一)
|
||
============================================================
|
||
|
||
7z 无疑是一个功能强大的强大的归档工具(声称提供最高的压缩比)。在 HowtoForge 中,我们已经[已经讨论过][9]如何安装和使用它。但讨论仅限于你可以使用该工具提供的“功能字母”来使用基本功能。
|
||
|
||
在本教程中,我们将扩展对这个工具的说明,我们会讨论一些 7z 提供的“开关”。 但在继续之前,需要说明的是,本教程中提到的所有说明和命令都已在 Ubuntu 16.04 LTS 上进行了测试。
|
||
|
||
**注意**:我们将使用以下截图中显示的文件来执行使用 7zip 的各种操作。
|
||
|
||
[
|
||

|
||
][10]
|
||
|
||
### 包含文件
|
||
|
||
7z 工具允许你有选择地将文件包含在归档中。可以使用 `-i` 开关来使用此功能。
|
||
|
||
语法:
|
||
|
||
```
|
||
-i[r[-|0]]{@listfile|!wildcard}
|
||
```
|
||
|
||
比如,如果你想在归档中只包含 “.txt” 文件,你可以使用下面的命令:
|
||
|
||
```
|
||
$ 7z a ‘-i!*.txt’ include.7z
|
||
```
|
||
|
||
这是输出:
|
||
|
||
[
|
||

|
||
][11]
|
||
|
||
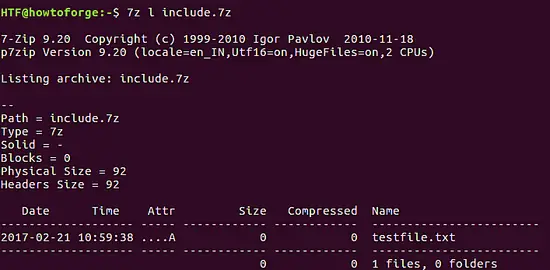
现在,检查新创建的归档是否只包含 “.txt” 文件,你可以使用下面的命令:
|
||
|
||
```
|
||
$ 7z l include.7z
|
||
```
|
||
|
||
这是输出:
|
||
|
||
[
|
||

|
||
][12]
|
||
|
||
在上面的截图中,你可以看到 “testfile.txt” 已经包含到归档中了。
|
||
|
||
### 排除文件
|
||
|
||
如果你想要,你可以排除不想要的文件。可以使用 `-x` 开关做到。
|
||
|
||
语法:
|
||
|
||
```
|
||
-x[r[-|0]]]{@listfile|!wildcard}
|
||
```
|
||
|
||
比如,如果你想在要创建的归档中排除 “abc.7z” ,你可以使用下面的命令:
|
||
|
||
```
|
||
$ 7z a ‘-x!abc.7z’ exclude.7z
|
||
```
|
||
|
||
这是输出:
|
||
|
||
[
|
||

|
||
][13]
|
||
|
||
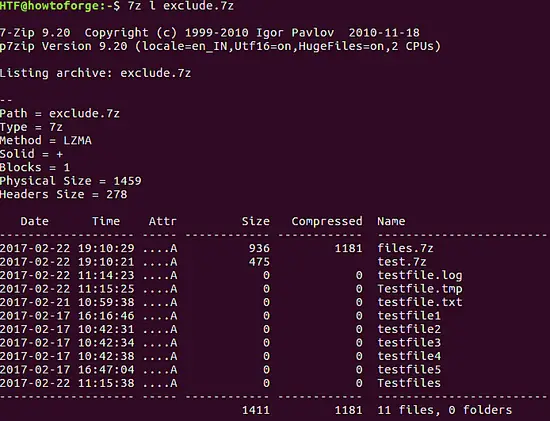
要检查最后的归档是否排除了 “abc.7z”, 你可以使用下面的命令:
|
||
|
||
```
|
||
$ 7z l exclude.7z
|
||
```
|
||
|
||
这是输出:
|
||
|
||
[
|
||

|
||
][14]
|
||
|
||
上面的截图中,你可以看到 “abc.7z” 已经从新的归档中排除了。
|
||
|
||
**专业提示**:假设任务是排除以 “t” 开头的所有 .7z 文件,并且包含以字母 “a” 开头的所有 .7z 文件。这可以通过以下方式组合 `-i` 和 `-x` 开关来实现:
|
||
|
||
```
|
||
$ 7z a '-x!t*.7z' '-i!a*.7z' combination.7z
|
||
```
|
||
|
||
### 设置归档密码
|
||
|
||
7z 同样也支持用密码保护你的归档文件。这个功能可以使用 `-p` 开关来实现。
|
||
|
||
```
|
||
$ 7z a [archive-filename] -p[your-password] -mhe=[on/off]
|
||
```
|
||
|
||
**注意**:`-mhe` 选项用来启用或者禁用归档头加密(默认是“off”)。
|
||
|
||
例子:
|
||
|
||
```
|
||
$ 7z a password.7z -pHTF -mhe=on
|
||
```
|
||
|
||
无需多说,当你解压密码保护的归档时,工具会向你询问密码。要解压一个密码保护的文件,使用 `e` 功能字母。下面是例子:
|
||
|
||
```
|
||
$ 7z e password.7z
|
||
```
|
||
|
||
[
|
||

|
||
][15]
|
||
|
||
### 设置输出目录
|
||
|
||
工具同样支持解压文件到你选择的目录中。这可以使用 `-o` 开关。无需多说,这个开关只在含有 `e` 或者 `x` 功能字母的时候有用。
|
||
|
||
```
|
||
$ 7z [e/x] [existing-archive-filename] -o[path-of-directory]
|
||
```
|
||
|
||
比如,假设下面命令工作在当前的工作目录中:
|
||
|
||
```
|
||
$ 7z e output.7z -ohow/to/forge
|
||
```
|
||
|
||
如 `-o` 开关的值所指的那样,它的目标是解压文件到 ./how/to/forge 中。
|
||
|
||
这是输出:
|
||
|
||
[
|
||

|
||
][16]
|
||
|
||
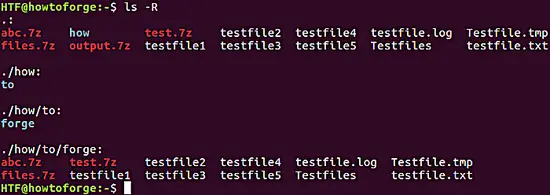
在上面的截图中,你可以看到归档文件的所有内容都已经解压了。但是在哪里?要检查文件是否被解压到 ./how/to/forge,我们可以使用 `ls -R` 命令。
|
||
|
||
[
|
||

|
||
][17]
|
||
|
||
在上面的截图中,我们可以看到 .7z 中的内容都被解压到 ./how/to/forge 中。
|
||
|
||
### 创建多个卷
|
||
|
||
借助 7z 工具,你可以为归档创建多个卷(较小的子档案)。当通过网络或 USB 传输大文件时,这是非常有用的。可以使用 `-v` 开关使用此功能。这个开关需要指定子档案的大小。
|
||
|
||
我们可以以字节(b)、千字节(k)、兆字节(m)和千兆字节(g)指定子档案大小。
|
||
|
||
```
|
||
$ 7z a [archive-filename] [files-to-archive] -v[size-of-sub-archive1] -v[size-of-sub-archive2] ....
|
||
```
|
||
|
||
让我们用一个例子来理解这个。请注意,我们将使用一个新的目录来执行 `-v` 开关的操作。
|
||
|
||
这是目录内容的截图:
|
||
|
||
[
|
||

|
||
][18]
|
||
|
||
现在,我们运行下面的命令来为一个归档文件创建多个卷(每个大小 100b):
|
||
|
||
```
|
||
7z a volume.7z * -v100b
|
||
```
|
||
|
||
这是截图:
|
||
|
||
[
|
||

|
||
][19]
|
||
|
||
现在,要查看创建的子归档,使用 `ls` 命令。
|
||
|
||
[
|
||

|
||
][20]
|
||
|
||
如下截图所示,一共创建四个卷 - volume.7z.001、volume.7z.002、volume.7z.003 和 volume.7z.004
|
||
|
||
**注意**:你可以使用 .7z.001 归档文件来解压。但是,要这么做,其他所有的卷都应该在同一个目录内。
|
||
|
||
### 设置归档的压缩级别
|
||
|
||
7z 允许你设置归档的压缩级别。这个功能可以使用 `-m` 开关。7z 中有不同的压缩级别,比如:`-mx0`、`-mx1`、`-mx3`、`-mx5`、`-mx7` 和 `-mx9`。
|
||
|
||
这是这些压缩级别的简要说明:
|
||
|
||
- `mx0` = 完全不压缩 - 只是复制文件到归档中。
|
||
- `mx1` = 消耗最少时间,但是压缩最小。
|
||
- `mx3` = 比 `-mx1` 好。
|
||
- `mx5` = 这是默认级别 (常规压缩)。
|
||
- `mx7` = 最大化压缩。
|
||
- `mx9` = 极端压缩。
|
||
|
||
**注意**:关于这些压缩级别的更多信息,阅读[这里][8]。
|
||
|
||
```
|
||
$ 7z a [archive-filename] [files-to-archive] -mx=[0,1,3,5,7,9]
|
||
```
|
||
|
||
例如,我们在目录中有一堆文件和文件夹,我们每次尝试使用不同的压缩级别进行压缩。作为一个例子,这是当使用压缩级别 “0” 时创建存档时使用的命令。
|
||
|
||
```
|
||
$ 7z a compression(-mx0).7z * -mx=0
|
||
```
|
||
|
||
相似地,其他命令也这样执行。
|
||
|
||
以下是输出档案(使用 “ls” 命令生成)的列表,其名称表示其创建中使用的压缩级别,输出中的第五列显示压缩级别对其大小的影响。
|
||
|
||
[
|
||

|
||
][21]
|
||
|
||
### 显示归档的技术信息
|
||
|
||
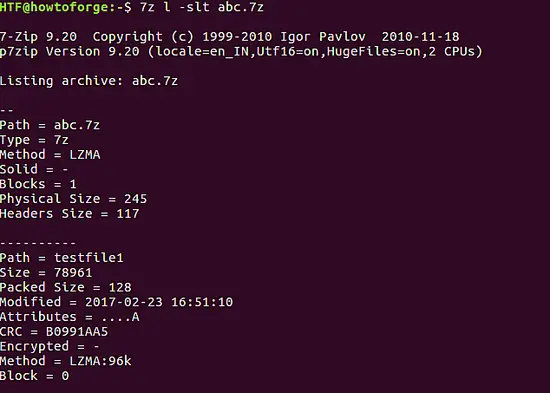
如果需要,7z 还可以在标准输出中显示归档的技术信息 - 类型、物理大小、头大小等。可以使用 `-slt` 开关使用此功能。 此开关仅适用于带有 `l` 功能字母的情况下。
|
||
|
||
```
|
||
$ 7z l -slt [archive-filename]
|
||
```
|
||
|
||
比如:
|
||
|
||
```
|
||
$ 7z l -slt abc.7z
|
||
```
|
||
|
||
这是输出:
|
||
|
||
[
|
||

|
||
][22]
|
||
|
||
### 指定创建归档的类型
|
||
|
||
如果你想要创建一个非 7z 的归档文件(这是默认的创建类型),你可以使用 `-t` 开关来指定。
|
||
|
||
```
|
||
$ 7z a -t[specify-type-of-archive] [archive-filename] [file-to-archive]
|
||
```
|
||
|
||
下面的例子展示创建了一个 .zip 文件:
|
||
|
||
```
|
||
7z a -tzip howtoforge *
|
||
```
|
||
|
||
输出的文件是 “howtoforge.zip”。要交叉验证它的类型,使用 `file` 命令:
|
||
|
||
[
|
||

|
||
][23]
|
||
|
||
因此,howtoforge.zip 的确是一个 ZIP 文件。相似地,你可以创建其他 7z 支持的归档。
|
||
|
||
### 总结
|
||
|
||
你将会认识到, 7z 的 “功能字母” 以及 “开关” 的知识可以让你充分利用这个工具。我们还没有完成开关的部分 - 其余部分将在第 2 部分中讨论。
|
||
|
||
--------------------------------------------------------------------------------
|
||
|
||
via: https://www.howtoforge.com/tutorial/understanding-7z-command-switches/
|
||
|
||
作者:[Himanshu Arora][a]
|
||
译者:[geekpi](https://github.com/geekpi)
|
||
校对:[wxy](https://github.com/wxy)
|
||
|
||
本文由 [LCTT](https://github.com/LCTT/TranslateProject) 原创编译,[Linux中国](https://linux.cn/) 荣誉推出
|
||
|
||
[a]:https://www.howtoforge.com/tutorial/understanding-7z-command-switches/
|
||
[1]:https://www.howtoforge.com/tutorial/understanding-7z-command-switches/#include-files
|
||
[2]:https://www.howtoforge.com/tutorial/understanding-7z-command-switches/#exclude-files
|
||
[3]:https://www.howtoforge.com/tutorial/understanding-7z-command-switches/#set-password-for-your-archive
|
||
[4]:https://www.howtoforge.com/tutorial/understanding-7z-command-switches/#set-output-directory
|
||
[5]:https://www.howtoforge.com/tutorial/understanding-7z-command-switches/#creating-multiple-volumes
|
||
[6]:https://www.howtoforge.com/tutorial/understanding-7z-command-switches/#set-compression-level-of-archive
|
||
[7]:https://www.howtoforge.com/tutorial/understanding-7z-command-switches/#display-technical-information-of-archive
|
||
[8]:http://askubuntu.com/questions/491223/7z-ultra-settings-for-zip-format
|
||
[9]:https://www.howtoforge.com/tutorial/how-to-install-and-use-7zip-file-archiver-on-ubuntu-linux/
|
||
[10]:https://www.howtoforge.com/images/understanding_7z_command_switches_part_i/big/ls.png
|
||
[11]:https://www.howtoforge.com/images/understanding_7z_command_switches_part_i/big/include.png
|
||
[12]:https://www.howtoforge.com/images/understanding_7z_command_switches_part_i/big/includelist.png
|
||
[13]:https://www.howtoforge.com/images/understanding_7z_command_switches_part_i/big/exclude.png
|
||
[14]:https://www.howtoforge.com/images/understanding_7z_command_switches_part_i/big/excludelist.png
|
||
[15]:https://www.howtoforge.com/images/understanding_7z_command_switches_part_i/big/password.png
|
||
[16]:https://www.howtoforge.com/images/understanding_7z_command_switches_part_i/big/output.png
|
||
[17]:https://www.howtoforge.com/images/understanding_7z_command_switches_part_i/big/ls_-R.png
|
||
[18]:https://www.howtoforge.com/images/understanding_7z_command_switches_part_i/big/volumels.png
|
||
[19]:https://www.howtoforge.com/images/understanding_7z_command_switches_part_i/big/volume.png
|
||
[20]:https://www.howtoforge.com/images/understanding_7z_command_switches_part_i/big/volumels2.png
|
||
[21]:https://www.howtoforge.com/images/understanding_7z_command_switches_part_i/big/compression.png
|
||
[22]:https://www.howtoforge.com/images/understanding_7z_command_switches_part_i/big/slt.png
|
||
[23]:https://www.howtoforge.com/images/understanding_7z_command_switches_part_i/big/type.png
|