mirror of
https://github.com/LCTT/TranslateProject.git
synced 2025-01-22 23:00:57 +08:00
395 lines
16 KiB
Markdown
395 lines
16 KiB
Markdown
Convert files at the command line with Pandoc
|
||
======
|
||
|
||
This guide shows you how to use Pandoc to convert your documents into many different file formats
|
||
|
||

|
||
|
||
Pandoc is a command-line tool for converting files from one markup language to another. Markup languages use tags to annotate sections of a document. Commonly used markup languages include Markdown, ReStructuredText, HTML, LaTex, ePub, and Microsoft Word DOCX.
|
||
|
||
In plain English, [Pandoc][1] allows you to convert a bunch of files from one markup language into another one. Typical examples include converting a Markdown file into a presentation, LaTeX, PDF, or even ePub.
|
||
|
||
This article will explain how to produce documentation in multiple formats from a single markup language (in this case Markdown) using Pandoc. It will guide you through Pandoc installation, show how to create several types of documents, and offer tips on how to write documentation that is easy to port to other formats. It will also explain the value of using meta-information files to create a separation between the content and the meta-information (e.g., author name, template used, bibliographic style, etc.) of your documentation.
|
||
|
||
### Installation and requirements
|
||
|
||
Pandoc is installed by default in most Linux distributions. This tutorial uses pandoc-2.2.3.2 and pandoc-citeproc-0.14.3. If you don't intend to generate PDFs, those two packages are enough. However, I recommend installing texlive as well, so you have the option to generate PDFs.
|
||
|
||
To install these programs on Linux, type the following on the command line:
|
||
|
||
```
|
||
sudo apt-get install pandoc pandoc-citeproc texlive
|
||
```
|
||
|
||
You can find [installation instructions][2] for other platforms on Pandoc's website.
|
||
|
||
I highly recommend installing [pandoc][3][-crossref][3], a "filter for numbering figures, equations, tables, and cross-references to them." The easiest option is to download a [prebuilt executable][4], but you can install it from Haskell's package manager, cabal, by typing:
|
||
|
||
```
|
||
cabal update
|
||
cabal install pandoc-crossref
|
||
```
|
||
|
||
Consult pandoc-crossref's GitHub repository if you need additional Haskell [installation information][5].
|
||
|
||
### Some examples
|
||
|
||
I'll demonstrate how Pandoc works by explaining how to produce three types of documents:
|
||
|
||
* A website from a LaTeX file containing math formulas
|
||
* A Reveal.js slideshow from a Markdown file
|
||
* A contract agreement document that mixes Markdown and LaTeX
|
||
|
||
|
||
|
||
#### Create a website with math formulas
|
||
|
||
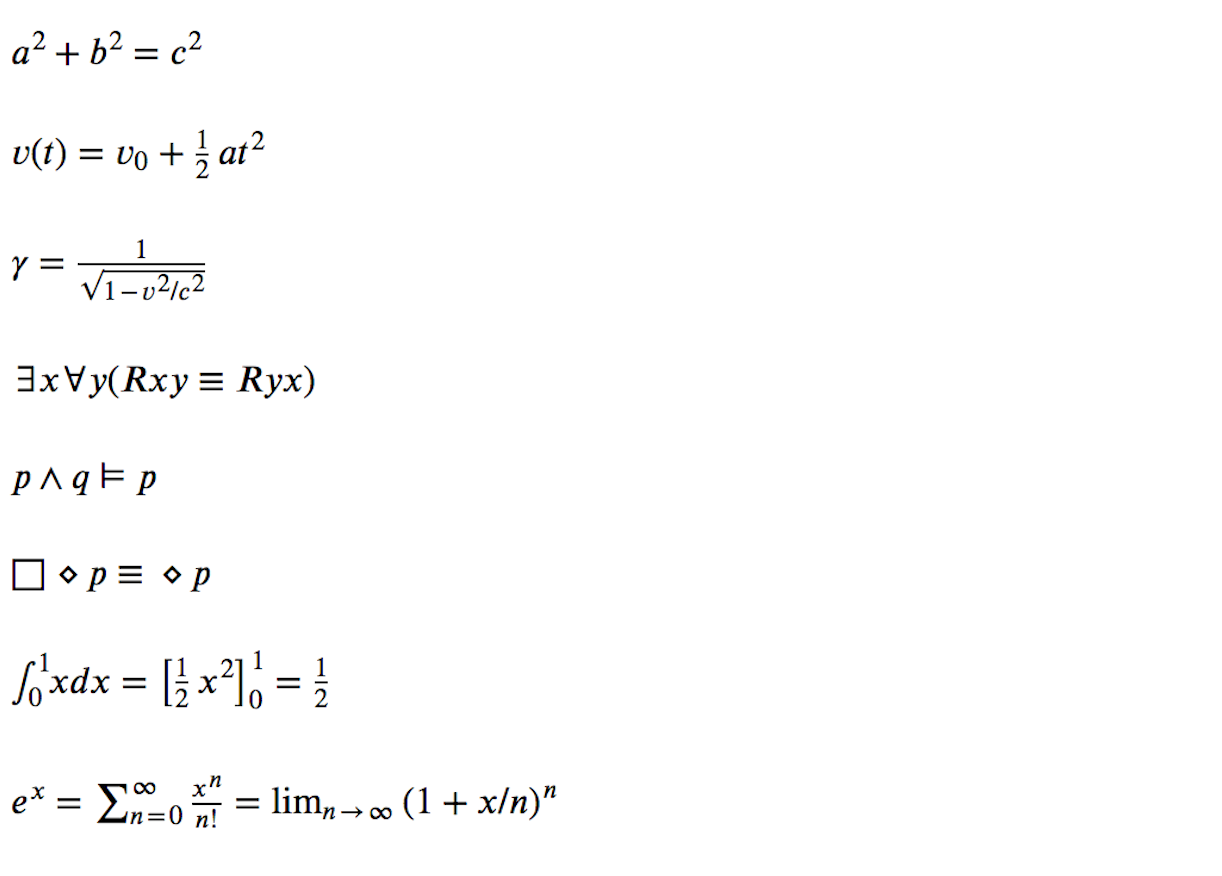
One of the ways Pandoc excels is displaying math formulas in different output file formats. For instance, let's generate a website from a LaTeX document (named math.tex) containing some math symbols (written in LaTeX).
|
||
|
||
The math.tex document looks like:
|
||
|
||
```
|
||
% Pandoc math demos
|
||
|
||
$a^2 + b^2 = c^2$
|
||
|
||
$v(t) = v_0 + \frac{1}{2}at^2$
|
||
|
||
$\gamma = \frac{1}{\sqrt{1 - v^2/c^2}}$
|
||
|
||
$\exists x \forall y (Rxy \equiv Ryx)$
|
||
|
||
$p \wedge q \models p$
|
||
|
||
$\Box\diamond p\equiv\diamond p$
|
||
|
||
$\int_{0}^{1} x dx = \left[ \frac{1}{2}x^2 \right]_{0}^{1} = \frac{1}{2}$
|
||
|
||
$e^x = \sum_{n=0}^\infty \frac{x^n}{n!} = \lim_{n\rightarrow\infty} (1+x/n)^n$
|
||
```
|
||
|
||
Convert the LaTeX document into a website named mathMathML.html by entering the following command:
|
||
|
||
```
|
||
pandoc math.tex -s --mathml -o mathMathML.html
|
||
```
|
||
|
||
The flag **-s** tells Pandoc to generate a standalone website (instead of a fragment, so it will include the head and body HTML tags), and the **–mathml** flag forces Pandoc to convert the math in LaTeX to MathML, which can be rendered by modern browsers.
|
||
|
||

|
||
|
||
Take a look at the [website result][6] and the [code][7]; the code repository contains a Makefile to make things even simpler.
|
||
|
||
#### Make a Reveal.js slideshow
|
||
|
||
It's easy to generate simple presentations from a Markdown file using Pandoc. The slides contain top-level slides and nested slides underneath. The presentation can be controlled from the keyboard, and you can jump from one top-level slide to the next top-level slide or show the nested slides on a per-top-level basis. This structure is typical in HTML-based presentation frameworks.
|
||
|
||
Let's create a slide document named SLIDES (see the [code repository][8]). First, add the slides' meta-information (e.g., title, author, and date) prepended by the **%** symbol:
|
||
|
||
```
|
||
% Case Study
|
||
% Kiko Fernandez Reyes
|
||
% Sept 27, 2017
|
||
```
|
||
|
||
This meta-information also creates the first slide. To add more slides, declare top-level slides using Markdown heading H1 (line 5 in the example below, [heading 1 in Markdown][9] , designated by).
|
||
|
||
For example, if we want to create a presentation with the title Case Study that starts with a top-level slide titled Wine Management System, write:
|
||
|
||
```
|
||
% Case Study
|
||
% Kiko Fernandez Reyes
|
||
% Sept 27, 2017
|
||
|
||
# Wine Management System
|
||
```
|
||
|
||
To put content (such as slides that explain a new management system and its implementation) inside this top-level section, use a Markdown header H2. Let's add two more slides (lines 7 and 14 below, [heading 2 in Markdown][9], designated by **##** ):
|
||
|
||
* The first second-level slide has the title Idea and shows an image of the Swiss flag
|
||
* The second second-level slide has the title Implementation
|
||
|
||
|
||
|
||
```
|
||
% Case Study
|
||
% Kiko Fernandez Reyes
|
||
% Sept 27, 2017
|
||
|
||
# Wine Management System
|
||
|
||
## <img src="img/SwissFlag.png" style="vertical-align:middle"/> Idea
|
||
|
||
## Implementation
|
||
```
|
||
|
||
We now have a top-level slide ( **# Wine Management System** ) that contains two slides ( **## Idea** and **## Implementation** ).
|
||
|
||
Let's put some content in these two slides using incremental bulleted lists by creating a Markdown list prepended by the symbol **>**. Continuing from above, add two items in the first slide (lines 9–10 below) and five items in the second slide (lines 16–20):
|
||
|
||
```
|
||
% Case Study
|
||
% Kiko Fernandez Reyes
|
||
% Sept 27, 2017
|
||
|
||
# Wine Management System
|
||
|
||
## <img src="img/SwissFlag.png" style="vertical-align:middle"/> Idea
|
||
|
||
>- Swiss love their **wine** and cheese
|
||
>- Create a *simple* wine tracker system
|
||
|
||

|
||
|
||
## Implementation
|
||
|
||
>- Bottles have a RFID tag
|
||
>- RFID reader (emits and read signal)
|
||
>- **Raspberry Pi**
|
||
>- **Server (online shop)**
|
||
>- Mobile app
|
||
```
|
||
|
||
We added an image of the Matterhorn mountain. Your slides can be improved by using plain Markdown or adding plain HTML.
|
||
|
||
To generate the slides, Pandoc needs to point to the Reveal.js library, so it must be in the same folder as the SLIDES file. The command to generate the slides is:
|
||
|
||
```
|
||
pandoc -t revealjs -s --self-contained SLIDES \
|
||
-V theme=white -V slideNumber=true -o index.html
|
||
```
|
||
|
||

|
||
|
||
The above Pandoc command uses the following flags:
|
||
|
||
* **-t revealjs** specifies we are going to output a **revealjs** presentation
|
||
* **-s** tells Pandoc to generate a standalone document
|
||
* **\--self-contained** produces HTML with no external dependencies
|
||
* **-V** sets the following variables:
|
||
– **theme=white** sets the theme of the slideshow to **white**
|
||
– **slideNumber=true** shows the slide number
|
||
* **-o index.html** generates the slides in the file named **index.html**
|
||
|
||
|
||
|
||
To make things simpler and avoid typing this long command, create the following Makefile:
|
||
|
||
```
|
||
all: generate
|
||
|
||
generate:
|
||
pandoc -t revealjs -s --self-contained SLIDES \
|
||
-V theme=white -V slideNumber=true -o index.html
|
||
|
||
clean: index.html
|
||
rm index.html
|
||
|
||
.PHONY: all clean generate
|
||
```
|
||
|
||
You can find all the code in [this repository][8].
|
||
|
||
#### Make a multi-format contract
|
||
|
||
Let's say you are preparing a document and (as things are nowadays) some people want it in Microsoft Word format, others use free software and would like an ODT, and others need a PDF. You do not have to use OpenOffice nor LibreOffice to generate the DOCX or PDF file. You can create your document in Markdown (with some bits of LaTeX if you need advanced formatting) and generate any of these file types.
|
||
|
||
As before, begin by declaring the document's meta-information (title, author, and date):
|
||
|
||
```
|
||
% Contract Agreement for Software X
|
||
% Kiko Fernandez-Reyes
|
||
% August 28th, 2018
|
||
```
|
||
|
||
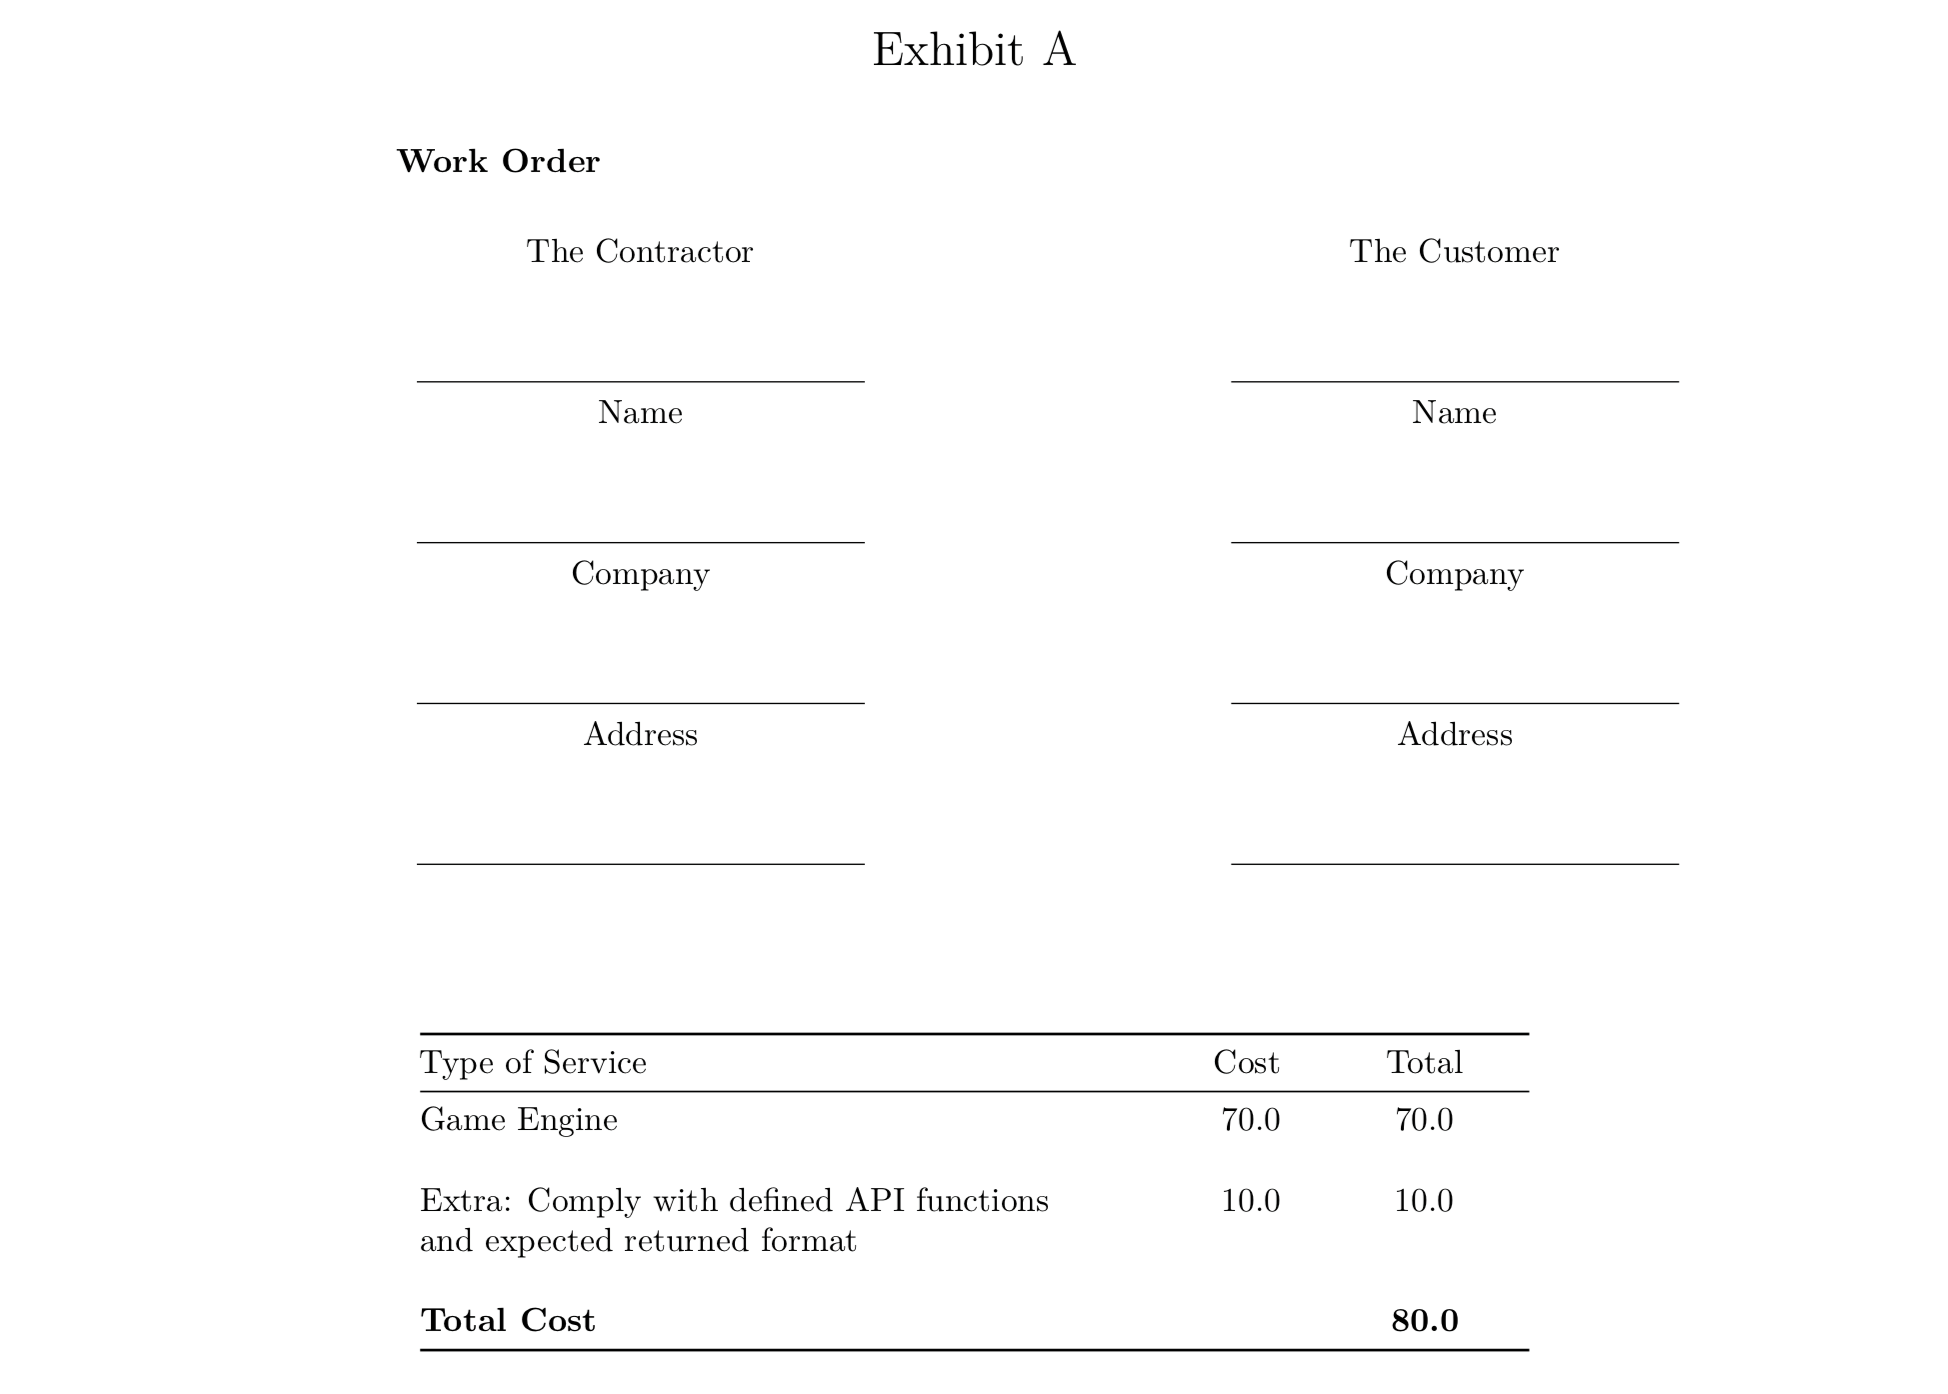
Then write the document in Markdown (and add LaTeX if you require advanced formatting). For example, create a table that needs fixed separation space (declared in LaTeX with **\hspace{3cm}** ) and a line where a client and a contractor should sign (declared in LaTeX with **\hrulefill** ). After that, add a table written in Markdown.
|
||
|
||
Here's what the document will look like:
|
||
|
||

|
||
|
||
The code to create this document is:
|
||
|
||
```
|
||
% Contract Agreement for Software X
|
||
% Kiko Fernandez-Reyes
|
||
% August 28th, 2018
|
||
|
||
...
|
||
|
||
### Work Order
|
||
|
||
\begin{table}[h]
|
||
\begin{tabular}{ccc}
|
||
The Contractor & \hspace{3cm} & The Customer \\
|
||
& & \\
|
||
& & \\
|
||
\hrulefill & \hspace{3cm} & \hrulefill \\
|
||
%
|
||
Name & \hspace{3cm} & Name \\
|
||
& & \\
|
||
& & \\
|
||
\hrulefill & \hspace{3cm} & \hrulefill \\
|
||
...
|
||
\end{tabular}
|
||
\end{table}
|
||
|
||
\vspace{1cm}
|
||
|
||
+--------------------------------------------|----------|-------------+
|
||
| Type of Service | Cost | Total |
|
||
+:===========================================+=========:+:===========:+
|
||
| Game Engine | 70.0 | 70.0 |
|
||
| | | |
|
||
+--------------------------------------------|----------|-------------+
|
||
| | | |
|
||
+--------------------------------------------|----------|-------------+
|
||
| Extra: Comply with defined API functions | 10.0 | 10.0 |
|
||
| and expected returned format | | |
|
||
+--------------------------------------------|----------|-------------+
|
||
| | | |
|
||
+--------------------------------------------|----------|-------------+
|
||
| **Total Cost** | | **80.0** |
|
||
+--------------------------------------------|----------|-------------+
|
||
```
|
||
|
||
To generate the three different output formats needed for this document, write a Makefile:
|
||
|
||
```
|
||
DOCS=contract-agreement.md
|
||
|
||
all: $(DOCS)
|
||
pandoc -s $(DOCS) -o $(DOCS:md=pdf)
|
||
pandoc -s $(DOCS) -o $(DOCS:md=docx)
|
||
pandoc -s $(DOCS) -o $(DOCS:md=odt)
|
||
|
||
clean:
|
||
rm *.pdf *.docx *.odt
|
||
|
||
.PHONY: all clean
|
||
```
|
||
|
||
Lines 4–7 contain the commands to generate the different outputs.
|
||
|
||
If you have several Markdown files and want to merge them into one document, issue a command with the files in the order you want them to appear. For example, when writing this article, I created three documents: an introduction document, three examples, and some advanced uses. The following tells Pandoc to merge these files together in the specified order and produce a PDF named document.pdf.
|
||
|
||
```
|
||
pandoc -s introduction.md examples.md advanced-uses.md -o document.pdf
|
||
```
|
||
|
||
### Templates and meta-information
|
||
|
||
Writing a complex document is no easy task. You need to stick to a set of rules that are independent from your content, such as using a specific template, writing an abstract, embedding specific fonts, and maybe even declaring keywords. All of this has nothing to do with your content: simply put, it is meta-information.
|
||
|
||
Pandoc uses templates to generate different output formats. There is a template for LaTeX, another for ePub, etc. These templates have unfulfilled variables that are set with the meta-information given to Pandoc. To find out what meta-information is available in a Pandoc template, type:
|
||
|
||
```
|
||
pandoc -D FORMAT
|
||
```
|
||
|
||
For example, the template for LaTeX would be:
|
||
|
||
```
|
||
pandoc -D latex
|
||
```
|
||
|
||
Which outputs something along these lines:
|
||
|
||
```
|
||
$if(title)$
|
||
\title{$title$$if(thanks)$\thanks{$thanks$}$endif$}
|
||
$endif$
|
||
$if(subtitle)$
|
||
\providecommand{\subtitle}[1]{}
|
||
\subtitle{$subtitle$}
|
||
$endif$
|
||
$if(author)$
|
||
\author{$for(author)$$author$$sep$ \and $endfor$}
|
||
$endif$
|
||
$if(institute)$
|
||
\providecommand{\institute}[1]{}
|
||
\institute{$for(institute)$$institute$$sep$ \and $endfor$}
|
||
$endif$
|
||
\date{$date$}
|
||
$if(beamer)$
|
||
$if(titlegraphic)$
|
||
\titlegraphic{\includegraphics{$titlegraphic$}}
|
||
$endif$
|
||
$if(logo)$
|
||
\logo{\includegraphics{$logo$}}
|
||
$endif$
|
||
$endif$
|
||
|
||
\begin{document}
|
||
```
|
||
|
||
As you can see, there are **title** , **thanks** , **author** , **subtitle** , and **institute** template variables (and many others are available). These are easily set using YAML metablocks. In lines 1–5 of the example below, we declare a YAML metablock and set some of those variables (using the contract agreement example above):
|
||
|
||
```
|
||
---
|
||
title: Contract Agreement for Software X
|
||
author: Kiko Fernandez-Reyes
|
||
date: August 28th, 2018
|
||
---
|
||
|
||
(continue writing document as in the previous example)
|
||
```
|
||
|
||
This works like a charm and is equivalent to the previous code:
|
||
|
||
```
|
||
% Contract Agreement for Software X
|
||
% Kiko Fernandez-Reyes
|
||
% August 28th, 2018
|
||
```
|
||
|
||
However, this ties the meta-information to the content; i.e., Pandoc will always use this information to output files in the new format. If you know you need to produce multiple file formats, you better be careful. For example, what if you need to produce the contract in ePub and in HTML, and the ePub and HTML need specific and different styling rules?
|
||
|
||
Let's consider the cases:
|
||
|
||
* If you simply try to embed the YAML variable **css: style-epub.css** , you would be excluding the one from the HTML version. This does not work.
|
||
* Duplicating the document is obviously not a good solution either, as changes in one version would not be in sync with the other copy.
|
||
* You can add variables to the Pandoc command line as follows:
|
||
|
||
|
||
|
||
```
|
||
pandoc -s -V css=style-epub.css document.md document.epub
|
||
pandoc -s -V css=style-html.css document.md document.html
|
||
```
|
||
|
||
My opinion is that it is easy to overlook these variables from the command line, especially when you need to set tens of these (which can happen in complex documents). Now, if you put them all together under the same roof (a meta.yaml file), you only need to update or create a new meta-information file to produce the desired output. You would then write:
|
||
|
||
```
|
||
pandoc -s meta-pub.yaml document.md document.epub
|
||
pandoc -s meta-html.yaml document.md document.html
|
||
```
|
||
|
||
This is a much cleaner version, and you can update all the meta-information from a single file without ever having to update the content of your document.
|
||
|
||
### Wrapping up
|
||
|
||
With these basic examples, I have shown how Pandoc can do a really good job at converting Markdown documents into other formats.
|
||
|
||
--------------------------------------------------------------------------------
|
||
|
||
via: https://opensource.com/article/18/9/intro-pandoc
|
||
|
||
作者:[Kiko Fernandez-Reyes][a]
|
||
选题:[lujun9972](https://github.com/lujun9972)
|
||
译者:[译者ID](https://github.com/译者ID)
|
||
校对:[校对者ID](https://github.com/校对者ID)
|
||
|
||
本文由 [LCTT](https://github.com/LCTT/TranslateProject) 原创编译,[Linux中国](https://linux.cn/) 荣誉推出
|
||
|
||
[a]: https://opensource.com/users/kikofernandez
|
||
[1]: https://pandoc.org/
|
||
[2]: http://pandoc.org/installing.html
|
||
[3]: https://hackage.haskell.org/package/pandoc-crossref
|
||
[4]: https://github.com/lierdakil/pandoc-crossref/releases/tag/v0.3.2.1
|
||
[5]: https://github.com/lierdakil/pandoc-crossref#installation
|
||
[6]: http://pandoc.org/demo/mathMathML.html
|
||
[7]: https://github.com/kikofernandez/pandoc-examples/tree/master/math
|
||
[8]: https://github.com/kikofernandez/pandoc-examples/tree/master/slides
|
||
[9]: https://daringfireball.net/projects/markdown/syntax#header
|