mirror of
https://github.com/LCTT/TranslateProject.git
synced 2025-02-28 01:01:09 +08:00
171 lines
7.4 KiB
Markdown
171 lines
7.4 KiB
Markdown
如何使用 fail2ban 防御 SSH 服务器的暴力破解攻击
|
||
================
|
||
|
||
对于SSH服务的常见的攻击就是暴力破解攻击——远程攻击者通过不同的密码来无限次地进行登录尝试。当然SSH可以设置使用非密码验证验证方式来对抗这种攻击,例如[公钥验证][1]或者[双重验证][2]。将不同的验证方法的优劣处先放在一边,如果我们必须使用密码验证方式怎么办?你是如何保护你的 SSH 服务器免遭暴力破解攻击的呢?
|
||
|
||
[fail2ban][3] 是 Linux 上的一个著名的入侵保护的开源框架,它会监控多个系统的日志文件(例如:/var/log/auth.log 或者 /var/log/secure)并根据检测到的任何可疑的行为自动触发不同的防御动作。事实上,fail2ban 在防御对SSH服务器的暴力密码破解上非常有用。
|
||
|
||
在这篇指导教程中,我会演示**如何安装并配置 fail2ban 来保护 SSH 服务器以避免来自远程IP地址的暴力攻击**。
|
||
|
||
###在linux上安装Fail2ban
|
||
|
||
为了在CentOS 或 RHEL上安装fail2ban,首先[设置EPEL仓库][4],然后运行以下命令。
|
||
|
||
$ sudo yum install fail2ban
|
||
|
||
在Fedora上安装fail2ban,简单地运行以下命令:
|
||
|
||
$ sudo yum install fail2ban
|
||
|
||
在ubuntu,Debian 或 Linux Mint上安装fail2ban:
|
||
|
||
$ sudo apt-get install fail2ban
|
||
|
||
### 为SSH服务器配置Fail2ban
|
||
|
||
现在你已经准备好了通过配置 fail2ban 来加强你的SSH服务器。你需要编辑其配置文件 /etc/fail2ban/jail.conf。 在配置文件的“[DEFAULT]”区,你可以在此定义所有受监控的服务的默认参数,另外在特定服务的配置部分,你可以为每个服务(例如SSH,Apache等)设置特定的配置来覆盖默认的参数配置。
|
||
|
||
在针对服务的监狱区(在[DEFAULT]区后面的地方),你需要定义一个[ssh-iptables]区,这里用来定义SSH相关的监狱配置。真正的禁止IP地址的操作是通过iptables完成的。
|
||
|
||
下面是一个包含“ssh-iptables”监狱配置的/etc/fail2ban/jail.conf的文件样例。当然根据你的需要,你也可以指定其他的应用监狱。
|
||
|
||
$ sudo vi /etc/fail2ban/jail.local
|
||
|
||
```
|
||
[DEFAULT]
|
||
# 以空格分隔的列表,可以是 IP 地址、CIDR 前缀或者 DNS 主机名
|
||
# 用于指定哪些地址可以忽略 fail2ban 防御
|
||
ignoreip = 127.0.0.1 172.31.0.0/24 10.10.0.0/24 192.168.0.0/24
|
||
|
||
# 客户端主机被禁止的时长(秒)
|
||
bantime = 86400
|
||
|
||
# 客户端主机被禁止前允许失败的次数
|
||
maxretry = 5
|
||
|
||
# 查找失败次数的时长(秒)
|
||
findtime = 600
|
||
|
||
mta = sendmail
|
||
|
||
[ssh-iptables]
|
||
enabled = true
|
||
filter = sshd
|
||
action = iptables[name=SSH, port=ssh, protocol=tcp]
|
||
sendmail-whois[name=SSH, dest=your@email.com, sender=fail2ban@email.com]
|
||
# Debian 系的发行版
|
||
logpath = /var/log/auth.log
|
||
# Red Hat 系的发行版
|
||
logpath = /var/log/secure
|
||
# ssh 服务的最大尝试次数
|
||
maxretry = 3
|
||
```
|
||
|
||
根据上述配置,fail2ban会自动禁止在最近10分钟内有超过3次访问尝试失败的任意IP地址。一旦被禁,这个IP地址将会在24小时内一直被禁止访问 SSH 服务。这个事件也会通过sendemail发送邮件通知。
|
||
|
||
一旦配置文件准备就绪,按照以下方式重启fail2ban服务。
|
||
|
||
在 Debian, Ubuntu 或 CentOS/RHEL 6:
|
||
|
||
$ sudo service fail2ban restart
|
||
|
||
在 Fedora 或 CentOS/RHEL 7:
|
||
|
||
$ sudo systemctl restart fail2ban
|
||
|
||
为了验证fail2ban成功运行,使用参数'ping'来运行fail2ban-client 命令。 如果fail2ban服务正常运行,你可以看到“pong(嘭)”作为响应。
|
||
|
||
$ sudo fail2ban-client ping
|
||
Server replied: pong
|
||
|
||
### 测试 fail2ban 保护SSH免遭暴力破解攻击
|
||
|
||
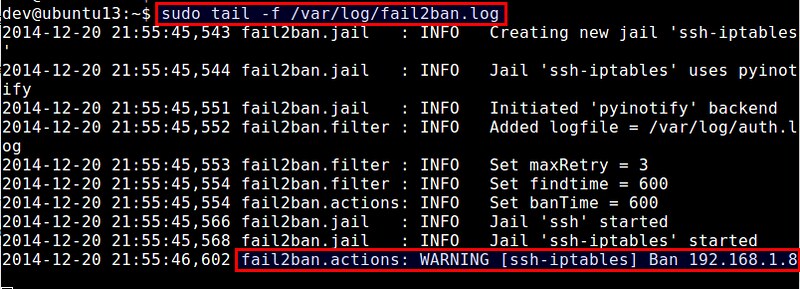
为了测试fail2ban是否能正常工作,尝试通过使用错误的密码来用SSH连接到服务器模拟一个暴力破解攻击。与此同时,监控 /var/log/fail2ban.log,该文件记录在fail2ban中发生的任何敏感事件。
|
||
|
||
$ sudo tail -f /var/log/fail2ban.log
|
||
|
||

|
||
|
||
根据上述的日志文件,Fail2ban通过检测IP地址的多次失败登录尝试,禁止了一个IP地址192.168.1.8。
|
||
|
||
###检查fail2ban状态并解禁被锁住的IP地址
|
||
|
||
由于fail2ban的“ssh-iptables”监狱使用iptables来阻塞问题IP地址,你可以通过以下方式来检测当前iptables来验证禁止规则。
|
||
|
||
$ sudo iptables --list -n
|
||
|
||
```
|
||
Chain INPUT (policy ACCEPT)
|
||
target prot opt source destination
|
||
fail2ban-SSH tcp -- 0.0.0.0/0 0.0.0.0/0 tcp dpt:22
|
||
|
||
Chain FORWARD (policy ACCEPT)
|
||
target prot opt source destination
|
||
|
||
Chain OUTPUT (policy ACCEPT)
|
||
target prot opt source destination
|
||
|
||
Chain fail2ban-SSH (1 references)
|
||
target prot opt source destination
|
||
DROP all -- 192.168.1.8 0.0.0.0/0
|
||
RETURN all -- 0.0.0.0/0 0.0.0.0/0
|
||
```
|
||
|
||
如果你想要从fail2ban中解锁某个IP地址,你可以使用iptables命令:
|
||
|
||
$ sudo iptables -D fail2ban-SSH -s 192.168.1.8 -j DROP
|
||
|
||
当然你可以使用上述的iptables命令手动地检验和管理fail2ban的IP阻塞列表,但实际上有一个适当的方法就是使用fail2ban-client命令行工具。这个命令不仅允许你对"ssh-iptables"监狱进行管理,同时也是一个标准的命令行接口,可以管理其他类型的fail2ban监狱。
|
||
|
||
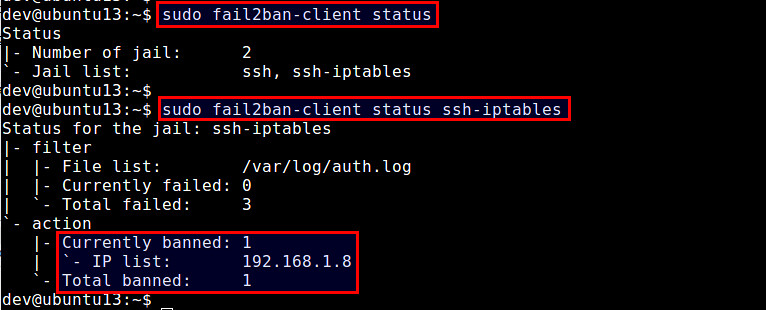
为了检验fail2ban状态(会显示出当前活动的监狱列表):
|
||
|
||
$ sudo fail2ban-client status
|
||
|
||
为了检验一个特定监狱的状态(例如ssh-iptables):
|
||
|
||
$ sudo fail2ban-client status ssh-iptables
|
||
|
||
上面的命令会显示出被禁止IP地址列表。
|
||
|
||

|
||
|
||
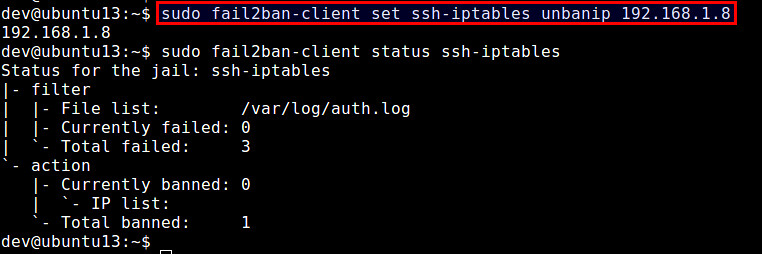
为了解锁特定的IP地址:
|
||
|
||
$ sudo fail2ban-client set ssh-iptables unbanip 192.168.1.8
|
||
|
||

|
||
|
||
注意,如果你停止了Fail2ban 服务,那么所有的IP地址都会被解锁。当你重启 Fail2ban,它会从/etc/log/secure(或 /var/log/auth.log)中找到异常的IP地址列表,如果这些异常地址的发生时间仍然在禁止时间内,那么Fail2ban会重新将这些IP地址禁止。
|
||
|
||
### 设置 Fail2ban 自动启动
|
||
|
||
一旦你成功地测试了fail2ban之后,最后一个步骤就是在你的服务器上让其在开机时自动启动。在基于Debian的发行版中,fail2ban已经默认让自动启动生效。在基于Red-Hat的发行版中,按照下面的方式让自动启动生效。
|
||
|
||
在 CentOS/RHEL 6中:
|
||
|
||
$ sudo chkconfig fail2ban on
|
||
|
||
在 Fedora 或 CentOS/RHEL 7:
|
||
|
||
$ sudo systemctl enable fail2ban
|
||
|
||
### 总结
|
||
|
||
在该教程中,我演示了如何安装并配置fail2ban来保护一个SSH服务器。当然fail2ban可以缓解暴力密码攻击,但是请注意,这并不能保护SSH服务器避免来自复杂的分布式暴力破解组织,这些攻击者通过使用成千上万个机器控制的IP地址来绕过fail2ban的防御机制。
|
||
|
||
-----------
|
||
|
||
via: http://xmodulo.com/how-to-protect-ssh-server-from-brute-force-attacks-using-fail2ban.html
|
||
|
||
作者:[Dan Nanni][a]
|
||
译者:[theo-l](https://github.com/theo-l)
|
||
校对:[wxy](https://github.com/wxy)
|
||
|
||
本文由 [LCTT](https://github.com/LCTT/TranslateProject) 原创翻译,[Linux中国](http://linux.cn/) 荣誉推出
|
||
|
||
[a]:http://xmodulo.com/author/nanni
|
||
[1]:http://xmodulo.com/how-to-force-ssh-login-via-public-key-authentication.html
|
||
[2]:http://xmodulo.com/two-factor-authentication-ssh-login-linux.html
|
||
[3]:http://www.fail2ban.org/
|
||
[4]:http://linux.cn/article-2324-1.html
|