mirror of
https://github.com/LCTT/TranslateProject.git
synced 2025-02-28 01:01:09 +08:00
393 lines
21 KiB
Markdown
393 lines
21 KiB
Markdown
GHLandy Translated
|
||
|
||
LFCS系列第二讲:如何安装和使用纯文本编辑器vi/vim
|
||
|
||
================================================================================
|
||
|
||
几个月前, Linux 基金会发起了 LFCS (Linux Foundation Certified System administrator,Linux 基金会认证系统管理员)认证,以帮助世界各地的人来验证他们能够在 Linux 系统上做基本的中间系统管理任务:如系统支持,第一手的故障诊断和处理,以及何时向上游支持团队提出问题的智能决策。
|
||
|
||

|
||
|
||
在 Linux 中学习 vi 编辑器
|
||
|
||
请简要看看一下视频,里边介绍了 Linux 基金会认证的程序。
|
||
|
||
注:youtube 视频
|
||
|
||
<iframe width="720" height="405" frameborder="0" allowfullscreen="allowfullscreen" src="//www.youtube.com/embed/Y29qZ71Kicg"></iframe>
|
||
|
||
这篇文章是《十个教程》系列的第二部分,在这个部分,我们会介绍 vi/vim 基本的文件编辑操作,帮助读者理解编辑器中的三个模式,这是LFCS认证考试中必须掌握的。
|
||
|
||
### 使用 vi/vim 执行基本的文件编辑操作 ###
|
||
|
||
vi 是为 Unix 而生的第一个全屏文本编辑器。它的设计小巧简单,对于仅仅使用过诸如 NotePad++ 或 gedit 等图形界面的文本编辑器的用户来说,使用起来可能存在一些困难。
|
||
|
||
为了使用 vi,我们必须首先理解这个强大的程序操作中的三种模式,方便我们后边学习这个强大的文本处理软件的相关操作。
|
||
|
||
请注意,大多数的现代 Linux 发行版都集成了 vi 的变种——— vim(Vi IMproved,VI 的改进),相比于 vi,它有更多新功能。所以,我们会在本教程中交替使用 vi 和 vim。
|
||
|
||
如果你的发行版还没有安装 vim,你可以通过以下方法来安装:
|
||
|
||
- Ubuntu 及其衍生版:apt-get update && apt-get install vim
|
||
- 以 Red-Hat 为基础的发行版:yum update && yum install vim
|
||
- openSUSE :zypper update && zypper install vim
|
||
|
||
### 我为什么要学习 vi ###
|
||
|
||
至少有以下两个理由:
|
||
|
||
1.因为它是 POSIX 标准的一部分,所以不管你使用什么发行版 vi 总是可用的。
|
||
|
||
2.vi 基本不消耗多少系统资源,并且允许我们仅仅通过键盘来完成任何可能的任务。
|
||
|
||
此外,vi 有的非常丰富的内置帮助手册,程序打开后就可以通过 :help 命令来查看。这个内置帮助手册比 vi/vim 的 man 页面包含了更多信息。
|
||
|
||

|
||
|
||
vi Man 页面
|
||
|
||
#### 启动 vi ####
|
||
|
||
可以通过在命令提示符下输入 vi 来启动。
|
||
|
||

|
||
|
||
使用 vi 编辑器
|
||
|
||
然后按下字母 i,你就可以开始输入了。或者通过下面的方法来启动 vi:
|
||
|
||
# vi filename
|
||
|
||
这样会打开一个名为 filename 的 buffer(稍后详细介绍 buffer),在你编辑完成之后就可以存储在磁盘中了。
|
||
|
||
#### 理解 vi 的三个模式 ####
|
||
|
||
1.在命令模式中,vi 允许用户浏览该文件并输入由一个或多个字母组成简短的、大小写敏感的 vi 命令。这些命令的大部分都可以增加一个前缀数字表示执行次数。
|
||
|
||
比如:yy(或Y) 复制当前的整行,3yy(或3Y) 复制当前整行和下边紧接着的两行(总共3行)。通过 Esc 键可以随时进入命令模式(而不管当前工作在什么模式下)。事实上,在命令模式下,键盘上所有的输入都被解释为命令而非文本,这往往使得初学者困惑不已。
|
||
|
||
2.在末行模式中,我们可以处理文件(包括保存当前文件和运行外部程序)。我们必须在命令模式下输入一个冒号(:),才能进入这个模式,紧接着是需要使用的末行模式下的命令。执行之后 vi 自动回到命令模式。
|
||
|
||
3.在文本输入模式(通常使用字母 i 进入这个模式)中,我们可以随意输入文本。大多数的键入将以文本形式输出到屏幕(一个重要的例外是Esc键,它将退出文本编辑模式并回到命令模式)。
|
||
|
||

|
||
|
||
vi 文本插入模式
|
||
|
||
#### vi 命令 ####
|
||
|
||
下面的表格列出常用的 vi 命令。文件版本的命令可以通过添加叹号的命令强制执行(如,:q! 命令强制退出编辑器而不保存文件)。
|
||
|
||
注:表格
|
||
<table cellspacing="0" border="0">
|
||
<colgroup width="290">
|
||
</colgroup>
|
||
<colgroup width="781">
|
||
</colgroup>
|
||
<tbody>
|
||
<tr>
|
||
<td bgcolor="#999999" height="19" align="LEFT" style="border: 1px solid #000000;"><b><span style="font-size: small;"> 关键命令</span></b></td>
|
||
<td bgcolor="#999999" align="LEFT" style="border: 1px solid #000000;"><b><span style="font-size: small;"> 描述</span></b></td>
|
||
</tr>
|
||
<tr class="alt">
|
||
<td height="18" align="LEFT" style="border: 1px solid #000000;"><span style="font-family: Courier New;"> h 或 ←</span></td>
|
||
<td align="LEFT" style="border: 1px solid #000000;"> 光标左移一个字符</td>
|
||
</tr>
|
||
<tr>
|
||
<td height="18" align="LEFT" style="border: 1px solid #000000;"><span style="font-family: Courier New;"> j 或 ↓</span></td>
|
||
<td align="LEFT" style="border: 1px solid #000000;"> 光标下移一行</td>
|
||
</tr>
|
||
<tr class="alt">
|
||
<td height="18" align="LEFT" style="border: 1px solid #000000;"><span style="font-family: Courier New;"> k 或 ↑</span></td>
|
||
<td align="LEFT" style="border: 1px solid #000000;"> 光标上移一行</td>
|
||
</tr>
|
||
<tr>
|
||
<td height="18" align="LEFT" style="border: 1px solid #000000;"><span style="font-family: Courier New;"> l (小写 L) 或 →</span></td>
|
||
<td align="LEFT" style="border: 1px solid #000000;"> 光标右移一个字符</td>
|
||
</tr>
|
||
<tr class="alt">
|
||
<td height="18" align="LEFT" style="border: 1px solid #000000;"><span style="font-family: Courier New;"> H</span></td>
|
||
<td align="LEFT" style="border: 1px solid #000000;"> 光标移至屏幕顶行</td>
|
||
</tr>
|
||
<tr>
|
||
<td height="18" align="LEFT" style="border: 1px solid #000000;"><span style="font-family: Courier New;"> L</span></td>
|
||
<td align="LEFT" style="border: 1px solid #000000;"> 光标移至屏幕末行</td>
|
||
</tr>
|
||
<tr class="alt">
|
||
<td height="18" align="LEFT" style="border: 1px solid #000000;"><span style="font-family: Courier New;"> G</span></td>
|
||
<td align="LEFT" style="border: 1px solid #000000;"> 光标移至文件末行</td>
|
||
</tr>
|
||
<tr>
|
||
<td height="18" align="LEFT" style="border: 1px solid #000000;"><span style="font-family: Courier New;"> w</span></td>
|
||
<td align="LEFT" style="border: 1px solid #000000;"> 光标右移一个词</td>
|
||
</tr>
|
||
<tr class="alt">
|
||
<td height="18" align="LEFT" style="border: 1px solid #000000;"><span style="font-family: Courier New;"> b</span></td>
|
||
<td align="LEFT" style="border: 1px solid #000000;"> 光标左移一个词</td>
|
||
</tr>
|
||
<tr>
|
||
<td height="18" align="LEFT" style="border: 1px solid #000000;"><span style="font-family: Courier New;"> 0 (零)</span></td>
|
||
<td align="LEFT" style="border: 1px solid #000000;"> 光标移至行首</td>
|
||
</tr>
|
||
<tr class="alt">
|
||
<td height="18" align="LEFT" style="border: 1px solid #000000;"><span style="font-family: Courier New;"> ^</span></td>
|
||
<td align="LEFT" style="border: 1px solid #000000;"> 光标移至当前行第一个非空格字符</td>
|
||
</tr>
|
||
<tr>
|
||
<td height="18" align="LEFT" style="border: 1px solid #000000;"><span style="font-family: Courier New;"> $</span></td>
|
||
<td align="LEFT" style="border: 1px solid #000000;"> 光标移至当前行行尾</td>
|
||
</tr>
|
||
<tr class="alt">
|
||
<td height="18" align="LEFT" style="border: 1px solid #000000;"><span style="font-family: Courier New;"> Ctrl-B</span></td>
|
||
<td align="LEFT" style="border: 1px solid #000000;"> 向后翻页</td>
|
||
</tr>
|
||
<tr>
|
||
<td height="18" align="LEFT" style="border: 1px solid #000000;"><span style="font-family: Courier New;"> Ctrl-F</span></td>
|
||
<td align="LEFT" style="border: 1px solid #000000;"> 向前翻页</td>
|
||
</tr>
|
||
<tr class="alt">
|
||
<td height="18" align="LEFT" style="border: 1px solid #000000;"><span style="font-family: Courier New;"> i</span></td>
|
||
<td align="LEFT" style="border: 1px solid #000000;"> 在光标所在位置插入文本</td>
|
||
</tr>
|
||
<tr>
|
||
<td height="18" align="LEFT" style="border: 1px solid #000000;"><span style="font-family: Courier New;"> I (大写 i)</span></td>
|
||
<td align="LEFT" style="border: 1px solid #000000;"> 在当前行首插入文本</td>
|
||
</tr>
|
||
<tr class="alt">
|
||
<td height="18" align="LEFT" style="border: 1px solid #000000;"><span style="font-family: Courier New;"> J (大写 j)</span></td>
|
||
<td align="LEFT" style="border: 1px solid #000000;"> 将下一行与当前行合并(下一行上移到当前行)</td>
|
||
</tr>
|
||
<tr>
|
||
<td height="18" align="LEFT" style="border: 1px solid #000000;"><span style="font-family: Courier New;"> a</span></td>
|
||
<td align="LEFT" style="border: 1px solid #000000;"> 在光标所在位置后追加文本</td>
|
||
</tr>
|
||
<tr class="alt">
|
||
<td height="18" align="LEFT" style="border: 1px solid #000000;"><span style="font-family: Courier New;"> o (小写 O)</span></td>
|
||
<td align="LEFT" style="border: 1px solid #000000;"> 在当前行下边插入空白行</td>
|
||
</tr>
|
||
<tr>
|
||
<td height="18" align="LEFT" style="border: 1px solid #000000;"><span style="font-family: Courier New;"> O (大写 o)</span></td>
|
||
<td align="LEFT" style="border: 1px solid #000000;"> 在当前行上边插入空白行</td>
|
||
</tr>
|
||
<tr class="alt">
|
||
<td height="18" align="LEFT" style="border: 1px solid #000000;"><span style="font-family: Courier New;"> r</span></td>
|
||
<td align="LEFT" style="border: 1px solid #000000;"> 替换光标所在位置的字符</td>
|
||
</tr>
|
||
<tr>
|
||
<td height="18" align="LEFT" style="border: 1px solid #000000;"><span style="font-family: Courier New;"> R</span></td>
|
||
<td align="LEFT" style="border: 1px solid #000000;"> 光标所在位置覆盖插入文本</td>
|
||
</tr>
|
||
<tr class="alt">
|
||
<td height="18" align="LEFT" style="border: 1px solid #000000;"><span style="font-family: Courier New;"> x</span></td>
|
||
<td align="LEFT" style="border: 1px solid #000000;"> 删除光标所在位置的字符</td>
|
||
</tr>
|
||
<tr>
|
||
<td height="18" align="LEFT" style="border: 1px solid #000000;"><span style="font-family: Courier New;"> X</span></td>
|
||
<td align="LEFT" style="border: 1px solid #000000;"> 立即删除光标所在位置之前(左边)的一个字符</td>
|
||
</tr>
|
||
<tr class="alt">
|
||
<td height="18" align="LEFT" style="border: 1px solid #000000;"><span style="font-family: Courier New;"> dd</span></td>
|
||
<td align="LEFT" style="border: 1px solid #000000;"> 剪切当前整行文本(为了之后进行粘贴)</td>
|
||
</tr>
|
||
<tr>
|
||
<td height="20" align="LEFT" style="border: 1px solid #000000;"><span style="font-family: Courier New;"> D</span></td>
|
||
<td align="LEFT" style="border: 1px solid #000000;"> 剪切光标所在位置到行末的文本(该命令等效于 d$)</td>
|
||
</tr>
|
||
<tr class="alt">
|
||
<td height="20" align="LEFT" style="border: 1px solid #000000;"><span style="font-family: Courier New;"> yX</span></td>
|
||
<td align="LEFT" style="border: 1px solid #000000;"> 给 X 命令一个移动长度,复制适当数量的字符、单词或者从光标开始到一定数量的行</td>
|
||
</tr>
|
||
<tr>
|
||
<td height="18" align="LEFT" style="border: 1px solid #000000;"><span style="font-family: Courier New;"> yy 或 Y</span></td>
|
||
<td align="LEFT" style="border: 1px solid #000000;"> 复制当前整行</td>
|
||
</tr>
|
||
<tr class="alt">
|
||
<td height="18" align="LEFT" style="border: 1px solid #000000;"><span style="font-family: Courier New;"> p</span></td>
|
||
<td align="LEFT" style="border: 1px solid #000000;"> 粘贴在光标所在位置之后(下一行)</td>
|
||
</tr>
|
||
<tr>
|
||
<td height="18" align="LEFT" style="border: 1px solid #000000;"><span style="font-family: Courier New;"> P</span></td>
|
||
<td align="LEFT" style="border: 1px solid #000000;"> 粘贴在光标所在位置之前(上一行)</td>
|
||
</tr>
|
||
<tr class="alt">
|
||
<td height="18" align="LEFT" style="border: 1px solid #000000;"><span style="font-family: Courier New;"> . (句点)</span></td>
|
||
<td align="LEFT" style="border: 1px solid #000000;"> 重复最后一个命令</td>
|
||
</tr>
|
||
<tr>
|
||
<td height="18" align="LEFT" style="border: 1px solid #000000;"><span style="font-family: Courier New;"> u</span></td>
|
||
<td align="LEFT" style="border: 1px solid #000000;"> 撤销最后一个命令</td>
|
||
</tr>
|
||
<tr class="alt">
|
||
<td height="18" align="LEFT" style="border: 1px solid #000000;"><span style="font-family: Courier New;"> U</span></td>
|
||
<td align="LEFT" style="border: 1px solid #000000;"> 撤销最后一行的最后一个命令,只有光标仍在最后一行才能执行。</td>
|
||
</tr>
|
||
<tr>
|
||
<td height="18" align="LEFT" style="border: 1px solid #000000;"><span style="font-family: Courier New;"> n</span></td>
|
||
<td align="LEFT" style="border: 1px solid #000000;"> 在查找中跳到下一个匹配项</td>
|
||
</tr>
|
||
<tr class="alt">
|
||
<td height="18" align="LEFT" style="border: 1px solid #000000;"><span style="font-family: Courier New;"> N</span></td>
|
||
<td align="LEFT" style="border: 1px solid #000000;"> 在查找中跳到前一个匹配项</td>
|
||
</tr>
|
||
<tr>
|
||
<td height="18" align="LEFT" style="border: 1px solid #000000;"><span style="font-family: Courier New;"> :n</span></td>
|
||
<td align="LEFT" style="border: 1px solid #000000;"> 下一个文件,编辑多个指定文件时,该命令加载下一个文件。</td>
|
||
</tr>
|
||
<tr class="alt">
|
||
<td height="20" align="LEFT" style="border: 1px solid #000000;"> :e file</td>
|
||
<td align="LEFT" style="border: 1px solid #000000;"> 加载新文件来替代当前文件</td>
|
||
</tr>
|
||
<tr>
|
||
<td height="20" align="LEFT" style="border: 1px solid #000000;"> :r file</td>
|
||
<td align="LEFT" style="border: 1px solid #000000;"> 将新文件的内容插入到光标所在位置的下一行</td>
|
||
</tr>
|
||
<tr class="alt">
|
||
<td height="18" align="LEFT" style="border: 1px solid #000000;"><span style="font-family: Courier New;"> :q</span></td>
|
||
<td align="LEFT" style="border: 1px solid #000000;"> 退出并放弃更改</td>
|
||
</tr>
|
||
<tr>
|
||
<td height="20" align="LEFT" style="border: 1px solid #000000;"> :w file</td>
|
||
<td align="LEFT" style="border: 1px solid #000000;"> 将当期打开的buffer保存为file。如果是追加到已存在的文件中,则使用 :w >> file 命令</td>
|
||
</tr>
|
||
<tr class="alt">
|
||
<td height="18" align="LEFT" style="border: 1px solid #000000;"><span style="font-family: Courier New;"> :wq</span></td>
|
||
<td align="LEFT" style="border: 1px solid #000000;"> 保存当前文件的内容并退出。等效于 x! 和 ZZ</td>
|
||
</tr>
|
||
<tr>
|
||
<td height="20" align="LEFT" style="border: 1px solid #000000;"> :r! command</td>
|
||
<td align="LEFT" style="border: 1px solid #000000;"> 执行 command 命令,并将命令的输出插入到光标所在位置的下一行</td>
|
||
</tr>
|
||
</tbody>
|
||
</table>
|
||
|
||
#### vi 选项 ####
|
||
|
||
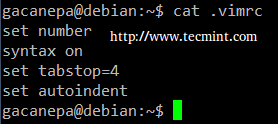
下列选项将会在启动 Vim 的时候进行加载(需要写入到~/.vimrc文件):
|
||
|
||
# echo set number >> ~/.vimrc
|
||
# echo syntax on >> ~/.vimrc
|
||
# echo set tabstop=4 >> ~/.vimrc
|
||
# echo set autoindent >> ~/.vimrc
|
||
|
||

|
||
|
||
vi编辑器选项
|
||
|
||
- set number 当 vi 打开或新建文件时,显示行号。
|
||
- syntax on 打开语法高亮(对应多个文件扩展名),以便源码文件和配置文件更具可读性。
|
||
- set tabstop=4 设置制表符间距为 4 个空格(默认为 8)。
|
||
- set autoindent 将前一行的缩进应用于下一行。
|
||
|
||
#### 查找和替换 ####
|
||
|
||
vi 具有通过查找将光标移动到(在单独一行或者整个文件中的)指定位置。它还可自动或者通过用户确认来执行文本替换。
|
||
|
||
a) 在行内查找。f 命令在当前行查找指定字符,并将光标移动到指定字符出现的位置。
|
||
|
||
例如,命令 fh 会在本行中将光标实例字母h出现的位置。注意,字母 f 和你要查找的字符都不会出现在屏幕上,但是当你按下回车的时候,要查找的字符会被高亮显示。
|
||
|
||
比如,以下是在命令模式按下 f4 之后的结果。
|
||
|
||

|
||
|
||
在 vi 中查找字符。
|
||
|
||
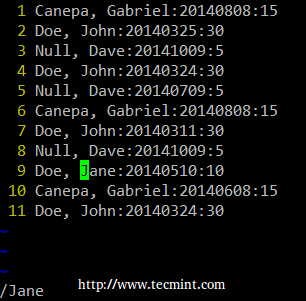
b) 在整个文件内查找。使用 / 命令,紧接着需要查找的单词或短语。这个查找可以通过使用 n 命令或者 N 重复查找上一个查找的字符串。以下是在命令模式键入 /Jane 的查找结果。
|
||
|
||

|
||
|
||
在vi中查找字符
|
||
|
||
c) vi 通过使用命令来完成多行或者整个文件的替换操作(类似于 sed)。我们可以使用以下命令,使得整个文件中的单词 “old” 替换为 “young”。
|
||
|
||
:%s/old/young/g
|
||
|
||
**注意**:冒号位于命令的最前面。
|
||
|
||

|
||
|
||
vi 的查找和替换
|
||
|
||
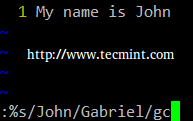
冒号 (:) 进入末行模式,在本例中 s 表示替换,% 是从第一行到最后一行的表示方式(也可以使用 nm 表示范围,即第 n 行到第 m 行),old 是查找模式,young 是用来替换的文本,g 表示在每个查找出来的字符串都进行替换。
|
||
|
||
另外,在命令最后增加一个 c,可以在每一个匹配项替换前进行确认。
|
||
|
||
:%s/old/young/gc
|
||
|
||
将就文本替换为新文本前,vi/vim 会想我们显示一下信息:
|
||
|
||

|
||
|
||
vi 中替换字符串
|
||
|
||
- y: 执行替换(yes)
|
||
- n: 跳过这个匹配字符的替换并转到下一个(no)
|
||
- a: 在当前匹配字符及后边的相同项全部执行替换
|
||
- q 或 Esc: 取消替换
|
||
- l (小写 L): 执行本次替换并退出
|
||
- Ctrl-e, Ctrl-y: 下翻页,上翻页,查看相应的文本来进行替换
|
||
|
||
#### 同时编辑多个文件 ####
|
||
|
||
我们在命令提示符输入 vim file1 file2 file3 如下:
|
||
|
||
# vim file1 file2 file3
|
||
|
||
vim 会首先打开 file1,要跳到 file2 需用 :n 命令。当需要打开前一个文件时,:N 就可以了。
|
||
|
||
为了从 file1 跳到 file3
|
||
|
||
a) :buffers 命令会显示当前正在编辑的文件列表
|
||
|
||
:buffers
|
||
|
||

|
||
|
||
编辑多个文件
|
||
|
||
b) :buffer 3 命令(后边没有 s)会打开 file 进行编辑。
|
||
|
||
在上边的图片中,标记符号 # 表示该文件当前已被打开在后台,而 %a 标记的文件是正在被编辑的。另外,文件号(如上边例子的 3)后边的空格表示该文件还没有被打开。
|
||
|
||
#### vi 的临时 buffers ####
|
||
|
||
为了复制连续的多行(比如,假设为 4 行)到一个名为 a 的临时 buffer(与文件无关),并且还要将这些行粘贴到在当前 vi 会话文件中的其它位置,我们需要:
|
||
|
||
1. 按下 Esc 键以确认 vi 处在命令模式
|
||
|
||
2. 将光标放在我们希望复制的第一行文本
|
||
|
||
3. 输入 a4yy 复制当前行和接下来的 3 行,进入一个名为 a 的 buffer。我们一继续编辑我们的文件————我们不需要立即插入刚刚复制的行。
|
||
|
||
4. 当到了需要使用刚刚复制行的位置,在 p(小写)或 P(大写)命令来讲复制行插入到名为 a 的 buffer:
|
||
|
||
- 输入 ap,复制行将插入到光标位置所在行的下一行。
|
||
- 输入 aP,复制行将插入到光标位置所在行的上一行。
|
||
|
||
如果愿意,我们可以重复上述步骤,将 buffer a 中的内容插入到我们文件的多个位置。一个临时 buffer,像本次会话中的一样,会在当前窗口关闭时释放掉。
|
||
|
||
### 总结 ###
|
||
|
||
像我们看到的一样,vi/vim 在命令接口下是一个强大而灵活的文本编辑器。通过以下链接,随时分享你自己的技巧和评论。
|
||
|
||
#### 参考链接 ####
|
||
|
||
- [About the LFCS][1]
|
||
- [Why get a Linux Foundation Certification?][2]
|
||
- [Register for the LFCS exam][3]
|
||
|
||
--------------------------------------------------------------------------------
|
||
|
||
via: http://www.tecmint.com/vi-editor-usage/
|
||
|
||
作者:[Gabriel Cánepa][a]
|
||
译者:[GHLandy](https://github.com/GHLandy)
|
||
校对:[东风唯笑](https://github.com/dongfengweixiao)
|
||
|
||
本文由 [LCTT](https://github.com/LCTT/TranslateProject) 原创翻译,[Linux中国](https://linux.cn/) 荣誉推出
|
||
|
||
[a]:http://www.tecmint.com/author/gacanepa/
|
||
[1]:https://training.linuxfoundation.org/certification/LFCS
|
||
[2]:https://training.linuxfoundation.org/certification/why-certify-with-us
|
||
[3]:https://identity.linuxfoundation.org/user?destination=pid/1
|