17 KiB
How to Configure and Integrate iRedMail Services to Samba4 AD DC – Part 11
In this tutorial will learn how to modify iRedMail main daemons which provide mail services, respectively, Postfix used for mail transfer and Dovecot which delivers mail to accounts mailboxes, in order to integrate them both in Samba4 Active Directory Domain Controller.
By integrating iRedMail to a Samba4 AD DC you will benefit from the following features: user authentication, management, and status via Samba AD DC, create mail lists with the help of AD groups and Global LDAP Address Book in Roundcube.
Requirements
Step 1: Prepare iRedMail System for Sama4 AD Integration
1. On the first step, you need to assign a static IP address for your machine in case you’re using a dynamic IP address provided by a DHCP server.
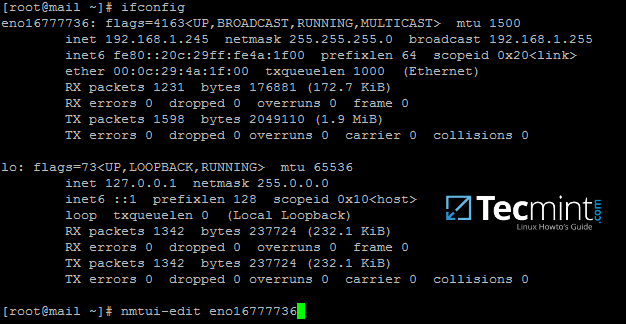
Run ifconfig command to list your machine network interfaces names and edit the proper network interface with your custom IP settings by issuing nmtui-edit command against the correct NIC.
Run nmtui-edit command with root privileges.
# ifconfig
# nmtui-edit eno16777736
Find Network Interface Name
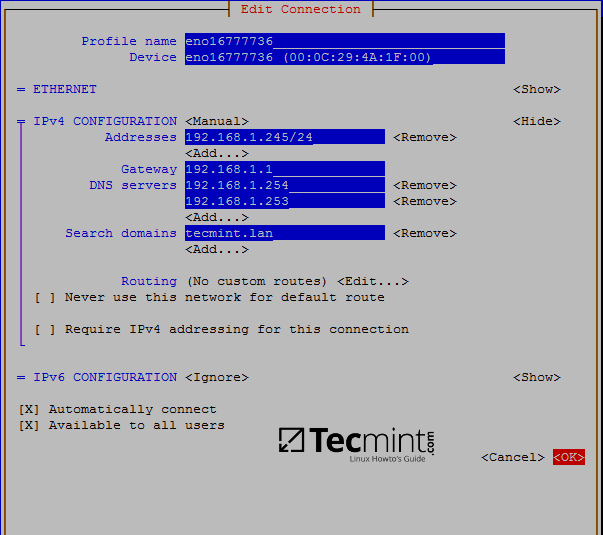
2. Once the network interface is opened for editing, add the proper static IP settings, make sure you add the DNS servers IP addresses of your Samba4 AD DC and the name of your domain in order to query the realm from your machine. Use the below screenshot as a guide.
Configure Network Settings
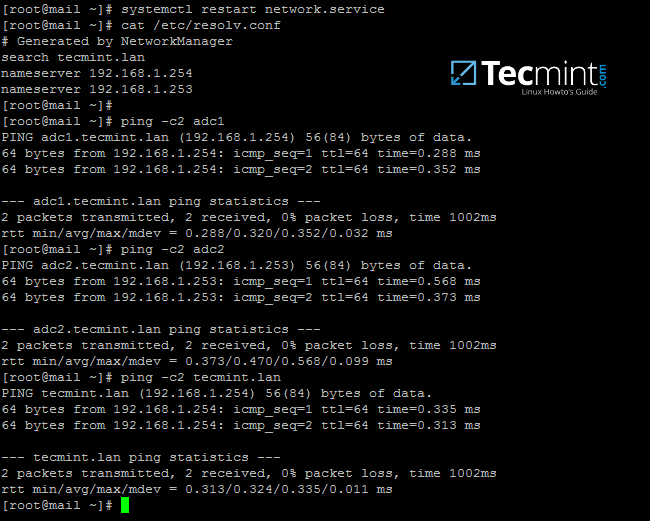
3. After you finish configuring the network interface, restart the network daemon to apply changes and issue a series of ping commands against the domain name and samba4 domain controllers FQDNs.
# systemctl restart network.service
# cat /etc/resolv.conf     # verify DNS resolver configuration if the correct DNS servers IPs are queried for domain resolution
# ping -c2 tecmint.lan     # Ping domain name
# ping -c2 adc1            # Ping first AD DC
# ping -c2 adc2            # Ping second AD DC
Verify Network DNS Configuration
4. Next, sync time with samba domain controller by installing the ntpdate package and query Samba4 machine NTP server by issuing the below commands:
# yum install ntpdate
# ntpdate -qu tecmint.lan      # querry domain NTP servers
# ntpdate tecmint.lan          # Sync time with the domain
Sync Time with Samba NTP Server
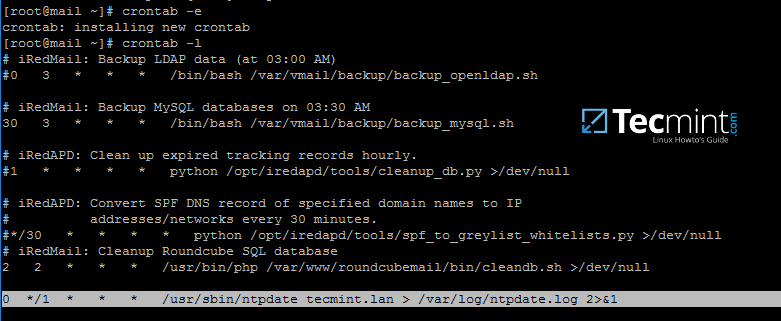
5. You might want the local time to be automatically synchronized with samba AD time server. In order to achieve this setting, add a scheduled job to run every hour by issuing crontab -e command and append the following line:
0 */1 * * * /usr/sbin/ntpdate tecmint.lan > /var/log/ntpdate.lan 2>&1
Auto Sync Time with Samba NTP
Step 2: Prepare Samba4 AD DC for iRedMail Integration
6. Now, move to a Windows machine with RSAT tools installed to manage Samba4 Active Directory as described in this tutorial here.
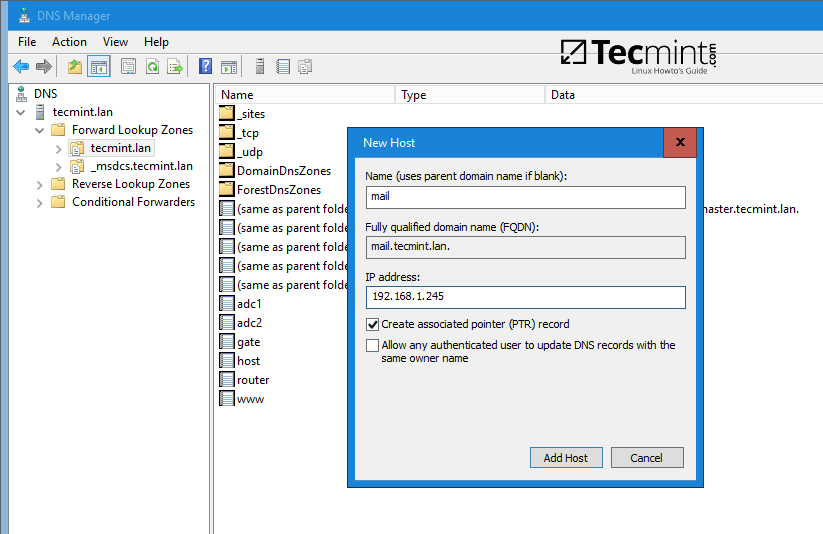
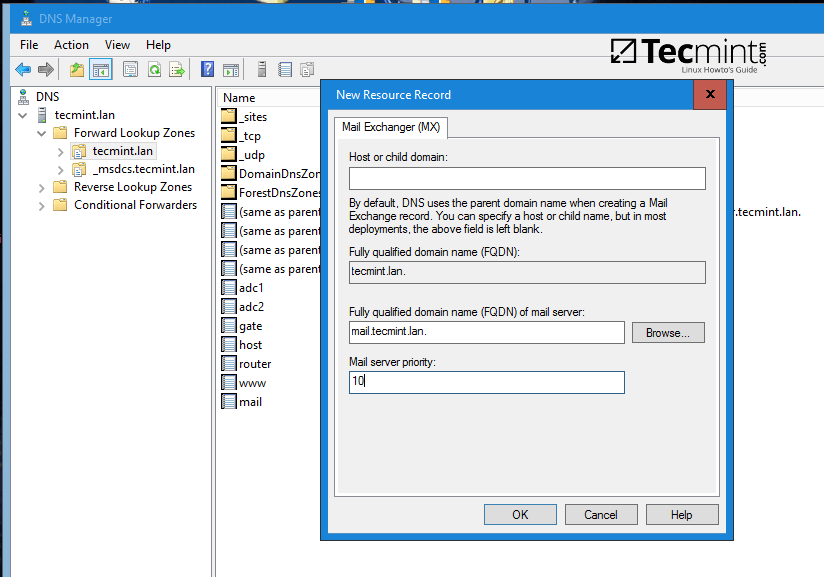
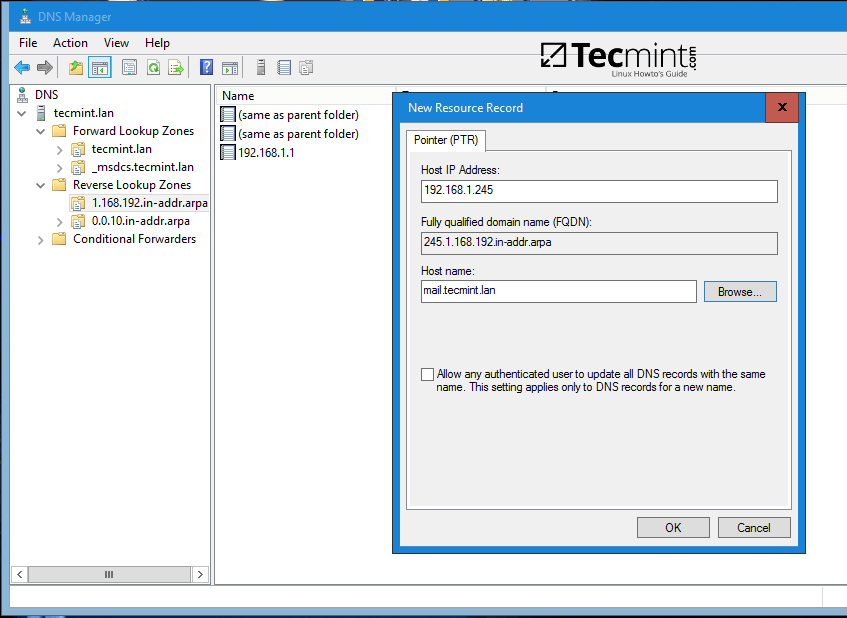
Open DNS Manager, go to your domain Forward Lookup Zones and add a new A record, an MX record and a PTR record to point to your iRedMail system IP address. Use the below screenshots as a guide.
Add A record (replace the name and the IP Address of iRedMail machine accordingly).
Create DNS A Record for iRedMail
Add MX record (leave child domain blank and add a 10 priority for this mail server).
Create DNS MX Record for iRedMail
Add PTR record by expanding to Reverse Lookup Zones (replace IP address of iRedMail server accordingly). In case you haven’t configured a reverse zone for your domain controller so far, read the following tutorial:
Create DNS PTR Record for iRedMail
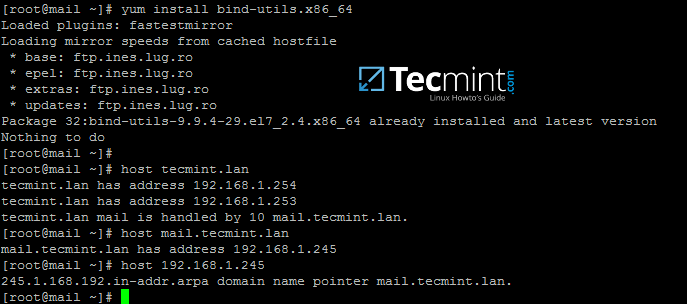
7. After you’ve added the basic DNS records which make a mail server to function properly, move to the iRedMail machine, install bind-utils package and query the newly added mail records as suggested on the below excerpt.
Samba4 AD DC DNS server should respond with the DNS records added in the previous step.
# yum install bind-utils
# host tecmint.lan
# host mail.tecmint.lan
# host 192.168.1.245
Install Bind and Query Mail Records
From a Windows machine, open a Command Prompt window and issue nslookup command against the above mail server records.
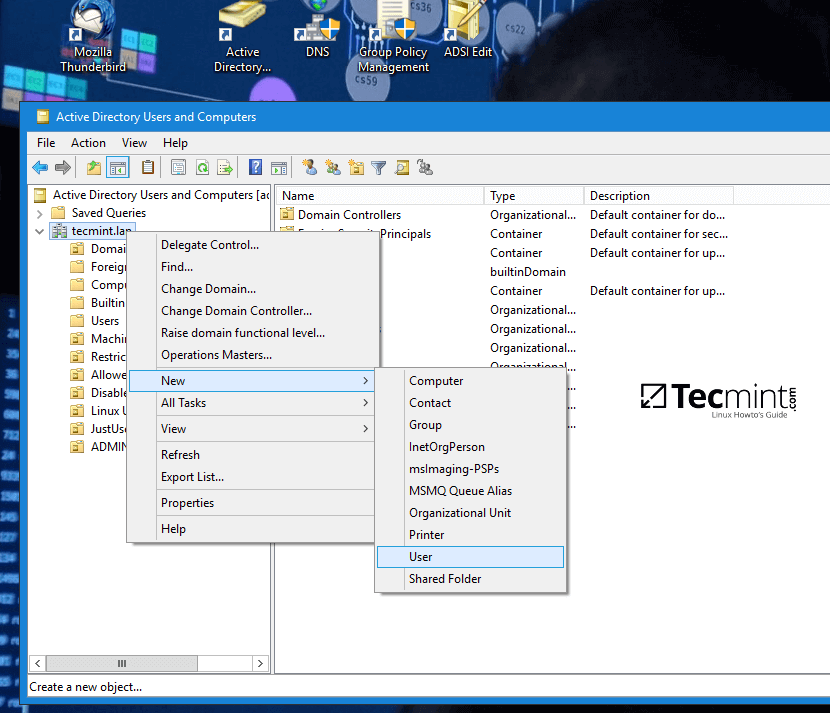
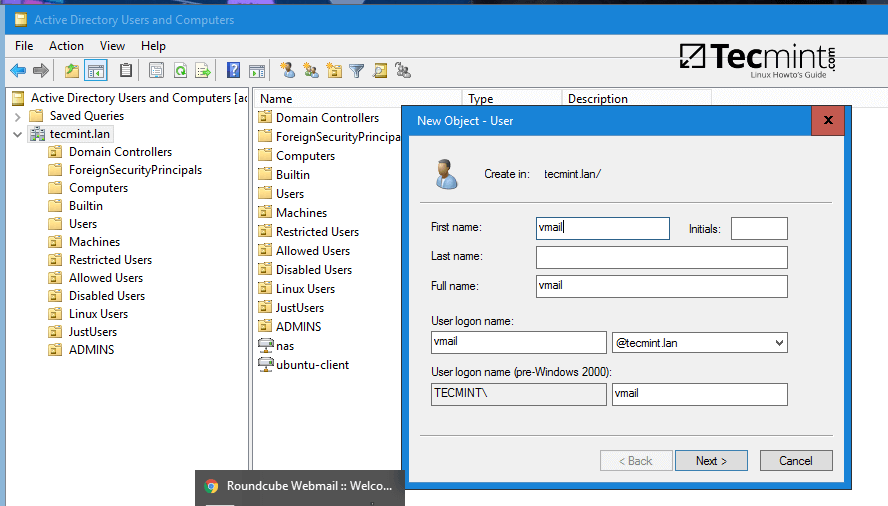
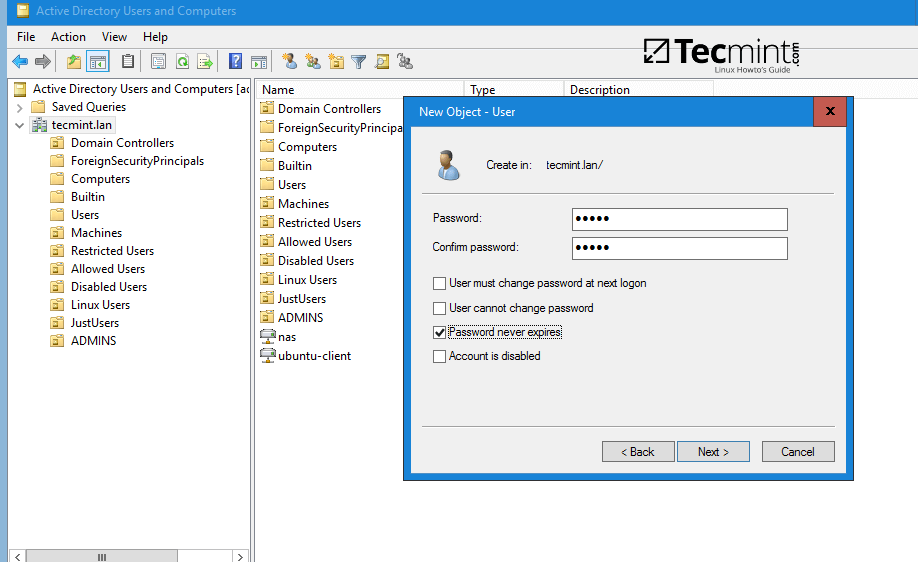
8. As a final pre-requirement, create a new user account with minimal privileges in Samba4 AD DC with the name vmail, choose a strong password for this user and make sure the password for this user never expires.
The vmail user account will be used by iRedMail services to query Samba4 AD DC LDAP database and pull the email accounts.
To create the vmail account, use ADUC graphical tool from a Windows machine joined to the realm with RSAT tools installed as illustrated on the below screenshots or use samba-tool command line directly from a domain controller as explained on the following topic.
In this guide, we’ll use the first method mentioned above.
Active Directory Users and Computers
Create New User for iRedMail
Set Strong Password for User
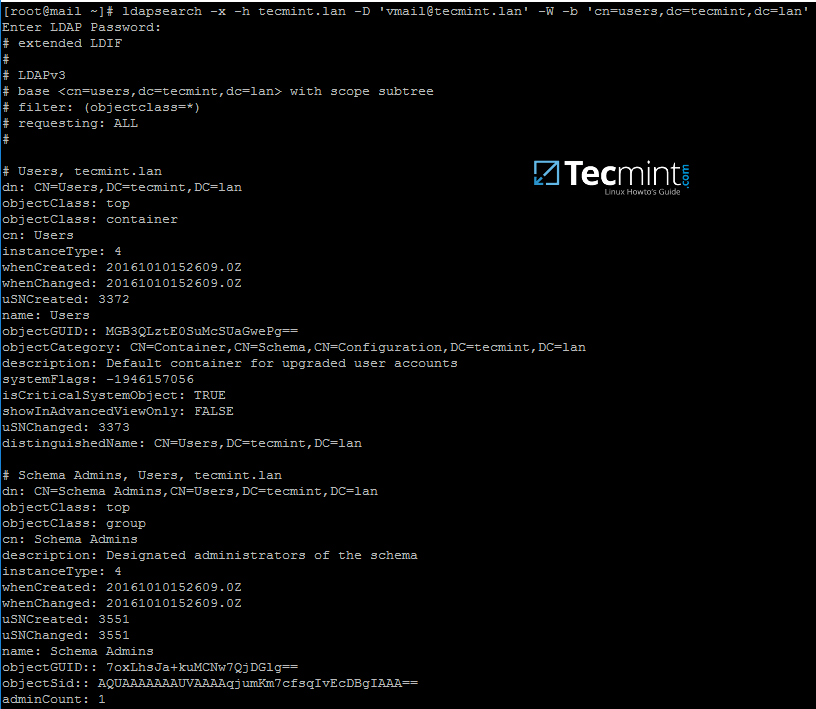
9. From iRedMail system, test the vmail user ability to query Samba4 AD DC LDAP database by issuing the below command. The returned result should be a total number of objects entries for your domain as illustrated on the below screenshots.
# ldapsearch -x -h tecmint.lan -D 'vmail@tecmint.lan' -W -b 'cn=users,dc=tecmint,dc=lan'
Note: Replace the domain name and the LDAP base dn in Samba4 AD (‘cn=users,dc=tecmint,dc=lan‘) accordingly.
Query Samba4 AD DC LDAP
Step 3: Integrate iRedMail Services to Samba4 AD DC
10. Now it’s time to tamper with iRedMail services (Postfix, Dovecot and Roundcube) in order to query Samba4 Domain Controller for mail accounts.
The first service to be modified will be the MTA agent, Postfix. Issue the following commands to disable a series of MTA settings, add your domain name to Postfix local domain and mailbox domains and use Dovecot agent to deliver received mails locally to user mailboxes.
# postconf -e virtual_alias_maps=' '
# postconf -e sender_bcc_maps=' '
# postconf -e recipient_bcc_maps= ' '
# postconf -e relay_domains=' '
# postconf -e relay_recipient_maps=' '
# postconf -e sender_dependent_relayhost_maps=' '
# postconf -e smtpd_sasl_local_domain='tecmint.lan'	#Replace with your own domain
# postconf -e virtual_mailbox_domains='tecmint.lan'	#Replace with your own domain
# postconf -e transport_maps='hash:/etc/postfix/transport'
# postconf -e smtpd_sender_login_maps='proxy:ldap:/etc/postfix/ad_sender_login_maps.cf'  # Check SMTP senders
# postconf -e virtual_mailbox_maps='proxy:ldap:/etc/postfix/ad_virtual_mailbox_maps.cf'  # Check local mail accounts
# postconf -e virtual_alias_maps='proxy:ldap:/etc/postfix/ad_virtual_group_maps.cf'  # Check local mail lists
# cp /etc/postfix/transport /etc/postfix/transport.backup	# Backup transport conf file
# echo "tecmint.lan dovecot" > /etc/postfix/transport		# Add your domain with dovecot transport
# cat /etc/postfix/transport					# Verify transport file
# postmap hash:/etc/postfix/transport
11. Next, create Postfix /etc/postfix/ad_sender_login_maps.cf configuration file with your favorite text editor and add the below configuration.
server_host     = tecmint.lan
server_port     = 389
version         = 3
bind            = yes
start_tls       = no
bind_dn         = vmail@tecmint.lan
bind_pw         = ad_vmail_account_password
search_base     = dc=tecmint,dc=lan
scope           = sub
query_filter    = (&(userPrincipalName=%s)(objectClass=person)(!(userAccountControl:1.2.840.113556.1.4.803:=2)))
result_attribute= userPrincipalName
debuglevel      = 0
12. Create /etc/postfix/ad_virtual_mailbox_maps.cf with the following configuration.
server_host     = tecmint.lan
server_port     = 389
version         = 3
bind            = yes
start_tls       = no
bind_dn         = vmail@tecmint.lan
bind_pw         = ad_vmail_account_password
search_base     = dc=tecmint,dc=lan
scope           = sub
query_filter    = (&(objectclass=person)(userPrincipalName=%s))
result_attribute= userPrincipalName
result_format   = %d/%u/Maildir/
debuglevel      = 0
13. Create /etc/postfix/ad_virtual_group_maps.cf with the below configuration.
server_host     = tecmint.lan
server_port     = 389
version         = 3
bind            = yes
start_tls       = no
bind_dn         = vmail@tecmint.lan
bind_pw         = ad_vmail_account_password
search_base     = dc=tecmint,dc=lan
scope           = sub
query_filter    = (&(objectClass=group)(mail=%s))
special_result_attribute = member
leaf_result_attribute = mail
result_attribute= userPrincipalName
debuglevel      = 0
On all three configuration files replace the values from server_host, bind_dn, bind_pw and search_base to reflect your own domain custom settings.
14. Next, open Postfix main configuration file and search and disable iRedAPD check_policy_service and smtpd_end_of_data_restrictions by adding a comment # in front of the following lines.
# nano /etc/postfix/main.cf
Comment the following lines:
#check_policy_service inet:127.0.0.1:7777
#smtpd_end_of_data_restrictions = check_policy_service inet:127.0.0.1:7777
15. Now, verify Postfix binding to Samba AD using an existing domain user and a domain group by issuing a series of queries as presented in the following examples.
The result should be similar as illustrated on the bellow screenshot.
# postmap -q tecmint_user@tecmint.lan ldap:/etc/postfix/ad_virtual_mailbox_maps.cf
# postmap -q tecmint_user@tecmint.lan ldap:/etc/postfix/ad_sender_login_maps.cf
# postmap -q linux_users@tecmint.lan ldap:/etc/postfix/ad_virtual_group_maps.cf
Verify Postfix Binding to Samba AD
Replace AD user and group accounts accordingly. Also, assure that the AD group you’re using has some AD users members assigned to it.
16. On the next step modify Dovecot configuration file in order to query Samba4 AD DC. Open file /etc/dovecot/dovecot-ldap.conf for editing and add the following lines.
hosts           = tecmint.lan:389
ldap_version    = 3
auth_bind       = yes
dn              = vmail@tecmint.lan
dnpass          = ad_vmail_password
base            = dc=tecmint,dc=lan
scope           = subtree
deref           = never
user_filter     = (&(userPrincipalName=%u)(objectClass=person)(!(userAccountControl:1.2.840.113556.1.4.803:=2)))
pass_filter     = (&(userPrincipalName=%u)(objectClass=person)(!(userAccountControl:1.2.840.113556.1.4.803:=2)))
pass_attrs      = userPassword=password
default_pass_scheme = CRYPT
user_attrs      = =home=/var/vmail/vmail1/%Ld/%Ln/Maildir/,=mail=maildir:/var/vmail/vmail1/%Ld/%Ln/Maildir/
The mailbox of a Samba4 AD account will be stored in /var/vmail/vmail1/your_domain.tld/your_domain_user/Maildir/ location on the Linux system.
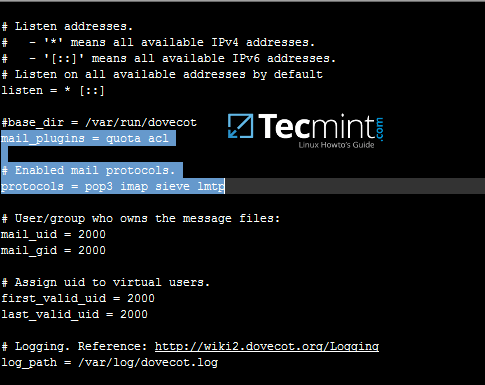
17. Make sure pop3 and imap protocols are enabled in dovecot main configuration file. Verify if quota and acl mail plugins are also enabled by opening file /etc/dovecot/dovecot.conf and check if these values are present.
Enable Pop3 and Imap in Dovecot
18. Optionally, if you want to set a global hard quota to not exceed the maximum of 500 MB of storage for each domain user, add the following line in /etc/dovecot/dovecot.conf file.
quota_rule = *:storage=500M
19. Finally, in order to apply all changes made so far, restart and verify the status of Postfix and Dovecot daemons by issuing the below commands with root privileges.
# systemctl restart postfix dovecot
# systemctl status postfix dovecot
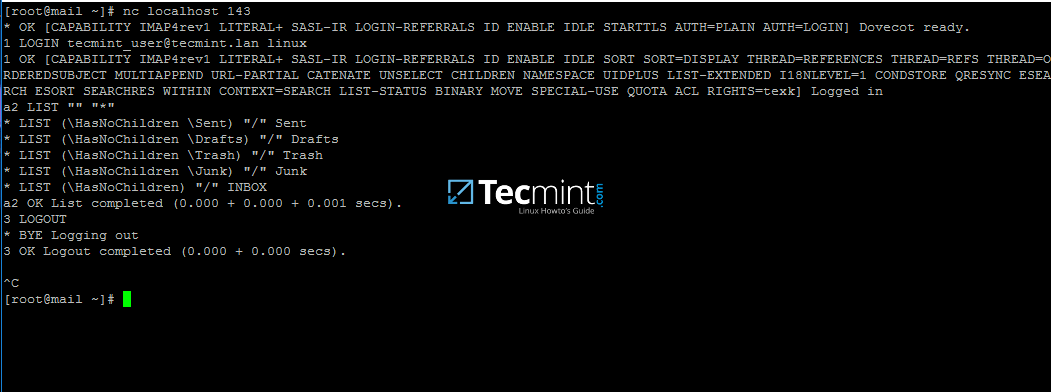
20. In order to test mail server configuration from the command line using IMAP protocol use telnet or netcat command as presented in the below example.
# nc localhost 143
a1 LOGIN ad_user@your_domain.tld ad_user_password
a2 LIST “” “*”
a3 LOGOUT
Test iRedMail Configuration
If you can perform an IMAP login from the command line with a Samba4 user account then iRedMail server seems ready to send and receive mail for Active Directory accounts.
On the next tutorial will discuss how to integrate Roundcube webmail with Samba4 AD DC and enable Global LDAP Address Book, customize Roudcube, access Roundcube web interface from a browser and disable some unneeded iRedMail services.
作者简介:
I'am a computer addicted guy, a fan of open source and linux based system software, have about 4 years experience with Linux distributions desktop, servers and bash scripting.
via: https://www.tecmint.com/integrate-iredmail-to-samba4-ad-dc-on-centos-7/
作者: Matei Cezar 译者:译者ID 校对:校对者ID
