mirror of
https://github.com/LCTT/TranslateProject.git
synced 2025-01-19 22:51:41 +08:00
79 lines
5.2 KiB
Markdown
79 lines
5.2 KiB
Markdown
(translating by runningwater)
|
|
How to manage a WiFi connection from the command line
|
|
================================================================================
|
|
Whenever you install a new Linux distribution on a computer, it is in general recommended that you connect to the internet via a wired connection. There are two main reasons for this: one, your wireless adapter may not have the right driver loaded; second, if you are installing from the command line, managing WiFi is scary. I always tried to avoid dealing with WiFi over the command line. But in the Linux world, there is no place for fear. If you do not know how to do something, that is the only reason you need to go ahead and learn it. So I forced myself to learn how to manage a WiFi connection from the command line on Linux.
|
|
|
|
There are of course multiple ways to connect to a WiFi from the command line. But for the sake of this post, and as an advice, I will try to use the most basic way: the one that uses programs and utilities included in the "default packages" of any distribution. Or at least I will try. An obvious reason for this choice is that the process can potentially be reproduced on any Linux computer. The downside is its relative complexity.
|
|
|
|
First, I will assume that you have the correct drivers loaded for your wireless LAN card. There is no way to start anything without that. And if you don't, you should take a look at the Wiki and documentation for your distribution.
|
|
|
|
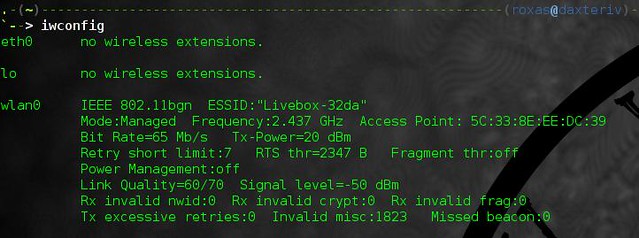
Then you can check which interface supports wireless connections with the command
|
|
|
|
$ iwconfig
|
|
|
|

|
|
|
|
In general, the wireless interface is called wlan0. There are of course exceptions, but for the rest of this tutorial, I will call it that way.
|
|
|
|
Just in case, you should make sure that the interface is up with:
|
|
|
|
$ sudo ip link set wlan0 up
|
|
|
|
Once you know that your interface is operational, you should scan for nearby wireless networks with:
|
|
|
|
$ sudo iw dev wlan0 scan | less
|
|
|
|

|
|
|
|
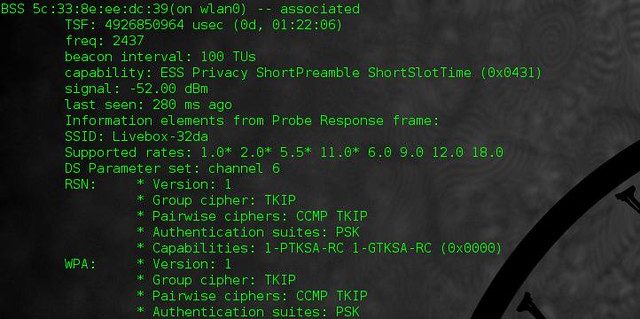
From the output, you can extract the name of the network (its SSID), its signal power, and which type of security it uses (e.g., WEP, WPA/WPA2). From there, the road splits into two: the nice and easy, and the slightly more complicated case.
|
|
|
|
If the network you want to connect to is not encrypted, you can connect straight to it with:
|
|
|
|
$ sudo iw dev wlan0 connect [network SSID]
|
|
|
|
If the network uses WEP encryption, it is also quite easy:
|
|
|
|
$ sudo iw dev wlan0 connect [network SSID] key 0:[WEP key]
|
|
|
|
But everything gets worse if the network uses WPA or WPA2 protocols. In this case, you have to use the utility called wpa_supplicant, which is not always included by default. You then have to modify the file at /etc/wpa_supplicant/wpa_supplicant.conf to add the lines:
|
|
|
|
network={
|
|
ssid="[network ssid]"
|
|
psk="[the passphrase]"
|
|
priority=1
|
|
}
|
|
|
|
I recommend that you append it at the end of the file, and make sure that the other configurations are commented out. Be careful that both the ssid and the passphrase are case sensitive. You can also technically put the name of the access point as the ssid, and wpa_supplicant will replace it with the proper ssid.
|
|
|
|
Once the configuration file is completed, launch this command in the background:
|
|
|
|
$ sudo wpa_supplicant -i wlan0 -c /etc/wpa_supplicant/wpa_supplicant.conf
|
|
|
|
Finally, whether you connected to an open or a secure network, you have to get an IP address. Simply use:
|
|
|
|
$ sudo dhcpcd wlan0
|
|
|
|
If everything goes well, you should get a brand new local IP via DHCP, and the process will fork in the background. If you want to be sure that you are connected, you can always check again with:
|
|
|
|
$ iwconfig
|
|
|
|

|
|
|
|
To conclude, I think that getting over the first step is completely worth it. You never know when your GUI will be down, or when you cannot access a wired connection, so getting ready now seems very important. Also, as mentioned before, there are a lot of ways (e.g., NetworkManager, [wicd][1], [netcfg][2], [wifi][3]) to manage a wireless connection. If I try to stick to the most basic way, I know that in some cases, the utilities that I used may not even be available to you, and that you would have to download them prior to that. On the other side of the balance, there are some more advanced programs, which are definitely not included in the "default packages," which will greatly simplify the whole process. But as a general advice, it is good to stick to the basics at first.
|
|
|
|
What other ways would you recommend to connect via WiFi from the command line? Please let us know in the comments.
|
|
|
|
--------------------------------------------------------------------------------
|
|
|
|
via: http://xmodulo.com/2014/08/manage-wifi-connection-command-line.html
|
|
|
|
作者:[Adrien Brochard][a]
|
|
译者:[runningwater](https://github.com/runningwater)
|
|
校对:[校对者ID](https://github.com/校对者ID)
|
|
|
|
本文由 [LCTT](https://github.com/LCTT/TranslateProject) 原创翻译,[Linux中国](http://linux.cn/) 荣誉推出
|
|
|
|
[a]:http://xmodulo.com/author/adrien
|
|
[1]:http://wicd.sourceforge.net/
|
|
[2]:https://www.archlinux.org/netcfg/
|
|
[3]:https://github.com/rockymeza/wifi |