48 KiB
translating by StdioA
Part 3 - Let’s Build A Web Server
“We learn most when we have to invent” —Piaget
In Part 2 you created a minimalistic WSGI server that could handle basic HTTP GET requests. And I asked you a question, “How can you make your server handle more than one request at a time?” In this article you will find the answer. So, buckle up and shift into high gear. You’re about to have a really fast ride. Have your Linux, Mac OS X (or any *nix system) and Python ready. All source code from the article is available on GitHub.
First let’s remember what a very basic Web server looks like and what the server needs to do to service client requests. The server you created in Part 1 and Part 2 is an iterative server that handles one client request at a time. It cannot accept a new connection until after it has finished processing a current client request. Some clients might be unhappy with it because they will have to wait in line, and for busy servers the line might be too long.
Here is the code of the iterative server webserver3a.py:
#####################################################################
# Iterative server - webserver3a.py                                 #
#                                                                   #
# Tested with Python 2.7.9 & Python 3.4 on Ubuntu 14.04 & Mac OS X  #
#####################################################################
import socket

SERVER_ADDRESS = (HOST, PORT) = '', 8888
REQUEST_QUEUE_SIZE = 5


def handle_request(client_connection):
    request = client_connection.recv(1024)
    print(request.decode())
    http_response = b"""\
HTTP/1.1 200 OK

Hello, World!
"""
    client_connection.sendall(http_response)


def serve_forever():
    listen_socket = socket.socket(socket.AF_INET, socket.SOCK_STREAM)
    listen_socket.setsockopt(socket.SOL_SOCKET, socket.SO_REUSEADDR, 1)
    listen_socket.bind(SERVER_ADDRESS)
    listen_socket.listen(REQUEST_QUEUE_SIZE)
    print('Serving HTTP on port {port} ...'.format(port=PORT))

    while True:
        client_connection, client_address = listen_socket.accept()
        handle_request(client_connection)
        client_connection.close()

if __name__ == '__main__':
    serve_forever()
To observe your server handling only one client request at a time, modify the server a little bit and add a 60 second delay after sending a response to a client. The change is only one line to tell the server process to sleep for 60 seconds.
And here is the code of the sleeping server webserver3b.py:
#########################################################################
# Iterative server - webserver3b.py                                     #
#                                                                       #
# Tested with Python 2.7.9 & Python 3.4 on Ubuntu 14.04 & Mac OS X      #
#                                                                       #
# - Server sleeps for 60 seconds after sending a response to a client   #
#########################################################################
import socket
import time

SERVER_ADDRESS = (HOST, PORT) = '', 8888
REQUEST_QUEUE_SIZE = 5


def handle_request(client_connection):
    request = client_connection.recv(1024)
    print(request.decode())
    http_response = b"""\
HTTP/1.1 200 OK

Hello, World!
"""
    client_connection.sendall(http_response)
    time.sleep(60)  # sleep and block the process for 60 seconds


def serve_forever():
    listen_socket = socket.socket(socket.AF_INET, socket.SOCK_STREAM)
    listen_socket.setsockopt(socket.SOL_SOCKET, socket.SO_REUSEADDR, 1)
    listen_socket.bind(SERVER_ADDRESS)
    listen_socket.listen(REQUEST_QUEUE_SIZE)
    print('Serving HTTP on port {port} ...'.format(port=PORT))

    while True:
        client_connection, client_address = listen_socket.accept()
        handle_request(client_connection)
        client_connection.close()

if __name__ == '__main__':
    serve_forever()
Start the server with:
$ python webserver3b.py
Now open up a new terminal window and run the curl command. You should instantly see the “Hello, World!” string printed on the screen:
$ curl http://localhost:8888/hello
Hello, World!
And without delay open up a second terminal window and run the same curl command:
$ curl http://localhost:8888/hello
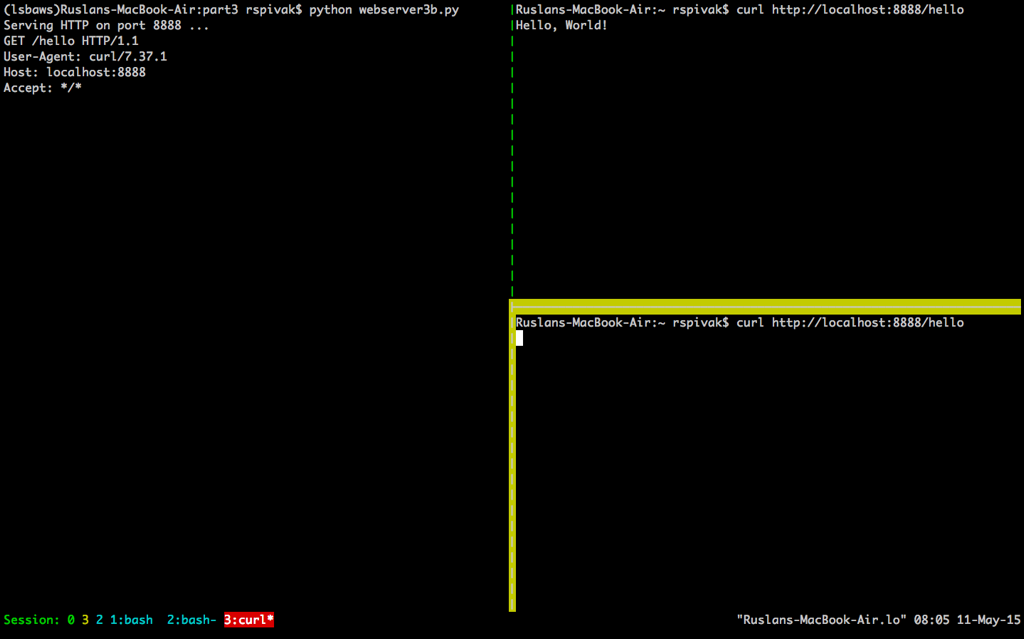
If you’ve done that within 60 seconds then the second curl should not produce any output right away and should just hang there. The server shouldn’t print a new request body on its standard output either. Here is how it looks like on my Mac (the window at the bottom right corner highlighted in yellow shows the second curl command hanging, waiting for the connection to be accepted by the server):
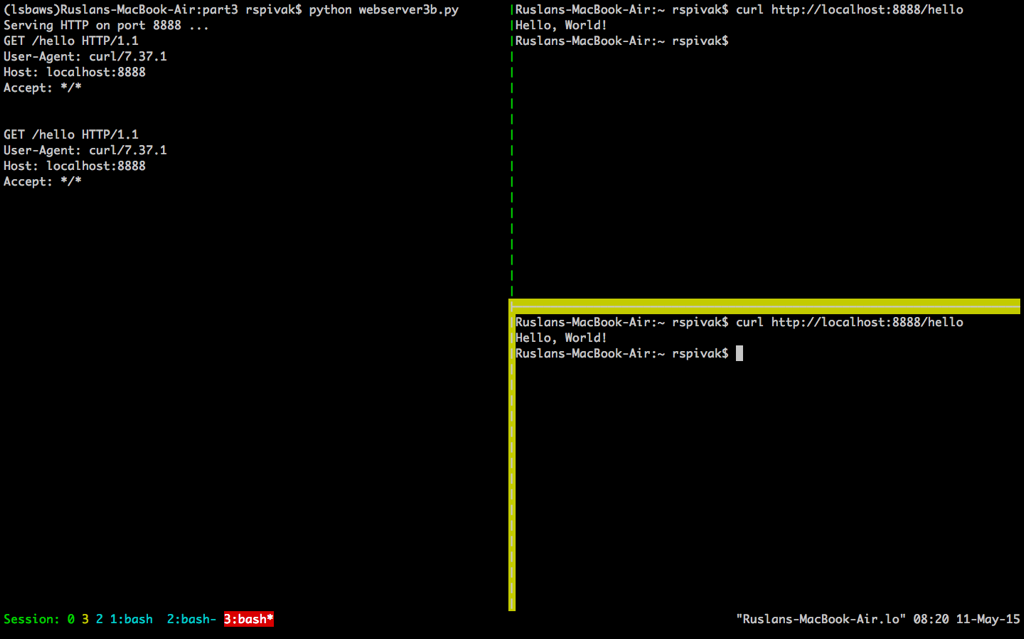
After you’ve waited long enough (more than 60 seconds) you should see the first curl terminate and the second curl print “Hello, World!” on the screen, then hang for 60 seconds, and then terminate:
The way it works is that the server finishes servicing the first curl client request and then it starts handling the second request only after it sleeps for 60 seconds. It all happens sequentially, or iteratively, one step, or in our case one client request, at a time.
Let’s talk about the communication between clients and servers for a bit. In order for two programs to communicate with each other over a network, they have to use sockets. And you saw sockets both in Part 1 and Part 2. But what is a socket?
A socket is an abstraction of a communication endpoint and it allows your program to communicate with another program using file descriptors. In this article I’ll be talking specifically about TCP/IP sockets on Linux/Mac OS X. An important notion to understand is the TCP socket pair.
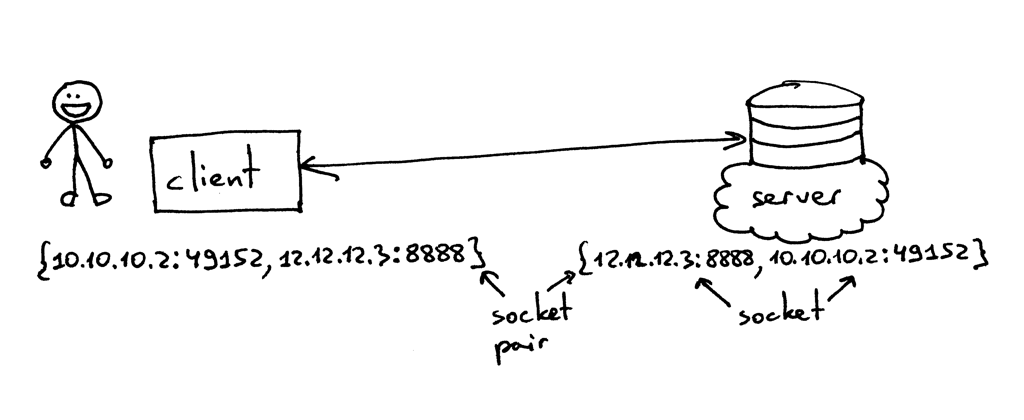
The socket pair for a TCP connection is a 4-tuple that identifies two endpoints of the TCP connection: the local IP address, local port, foreign IP address, and foreign port. A socket pair uniquely identifies every TCP connection on a network. The two values that identify each endpoint, an IP address and a port number, are often called a socket.1
So, the tuple {10.10.10.2:49152, 12.12.12.3:8888} is a socket pair that uniquely identifies two endpoints of the TCP connection on the client and the tuple {12.12.12.3:8888, 10.10.10.2:49152} is a socket pair that uniquely identifies the same two endpoints of the TCP connection on the server. The two values that identify the server endpoint of the TCP connection, the IP address 12.12.12.3 and the port 8888, are referred to as a socket in this case (the same applies to the client endpoint).
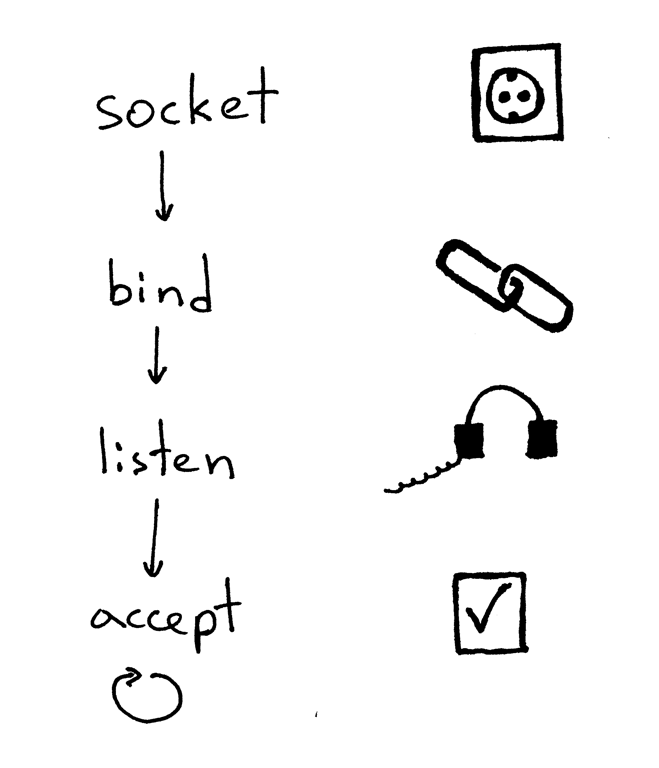
The standard sequence a server usually goes through to create a socket and start accepting client connections is the following:
- The server creates a TCP/IP socket. This is done with the following statement in Python:
listen_socket = socket.socket(socket.AF_INET, socket.SOCK_STREAM)
- The server might set some socket options (this is optional, but you can see that the server code above does just that to be able to re-use the same address over and over again if you decide to kill and re-start the server right away).
listen_socket.setsockopt(socket.SOL_SOCKET, socket.SO_REUSEADDR, 1)
- Then, the server binds the address. The bind function assigns a local protocol address to the socket. With TCP, calling bind lets you specify a port number, an IP address, both, or neither.1
listen_socket.bind(SERVER_ADDRESS)
- Then, the server makes the socket a listening socket
listen_socket.listen(REQUEST_QUEUE_SIZE)
The listen method is only called by servers. It tells the kernel that it should accept incoming connection requests for this socket.
After that’s done, the server starts accepting client connections one connection at a time in a loop. When there is a connection available the accept call returns the connected client socket. Then, the server reads the request data from the connected client socket, prints the data on its standard output and sends a message back to the client. Then, the server closes the client connection and it is ready again to accept a new client connection.
Here is what a client needs to do to communicate with the server over TCP/IP:
Here is the sample code for a client to connect to your server, send a request and print the response:
import socket

 # create a socket and connect to a server
 sock = socket.socket(socket.AF_INET, socket.SOCK_STREAM)
 sock.connect(('localhost', 8888))

 # send and receive some data
 sock.sendall(b'test')
 data = sock.recv(1024)
 print(data.decode())
After creating the socket, the client needs to connect to the server. This is done with the connect call:
sock.connect(('localhost', 8888))
The client only needs to provide the remote IP address or host name and the remote port number of a server to connect to.
You’ve probably noticed that the client doesn’t call bind and accept. The client doesn’t need to call bind because the client doesn’t care about the local IP address and the local port number. The TCP/IP stack within the kernel automatically assigns the local IP address and the local port when the client calls connect. The local port is called an ephemeral port, i.e. a short-lived port.
A port on a server that identifies a well-known service that a client connects to is called a well-known port (for example, 80 for HTTP and 22 for SSH). Fire up your Python shell and make a client connection to the server you run on localhost and see what ephemeral port the kernel assigns to the socket you’ve created (start the server webserver3a.py or webserver3b.py before trying the following example):
>>> import socket
>>> sock = socket.socket(socket.AF_INET, socket.SOCK_STREAM)
>>> sock.connect(('localhost', 8888))
>>> host, port = sock.getsockname()[:2]
>>> host, port
('127.0.0.1', 60589)
In the case above the kernel assigned the ephemeral port 60589 to the socket.
There are some other important concepts that I need to cover quickly before I get to answer the question from Part 2. You will see shortly why this is important. The two concepts are that of a process and a file descriptor.
What is a process? A process is just an instance of an executing program. When the server code is executed, for example, it’s loaded into memory and an instance of that executing program is called a process. The kernel records a bunch of information about the process - its process ID would be one example - to keep track of it. When you run your iterative server webserver3a.py or webserver3b.py you run just one process.
Start the server webserver3b.py in a terminal window:
$ python webserver3b.py
And in a different terminal window use the ps command to get the information about that process:
$ ps | grep webserver3b | grep -v grep
7182 ttys003    0:00.04 python webserver3b.py
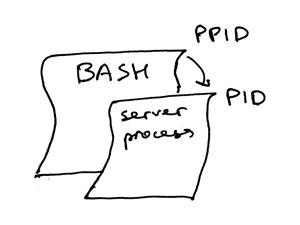
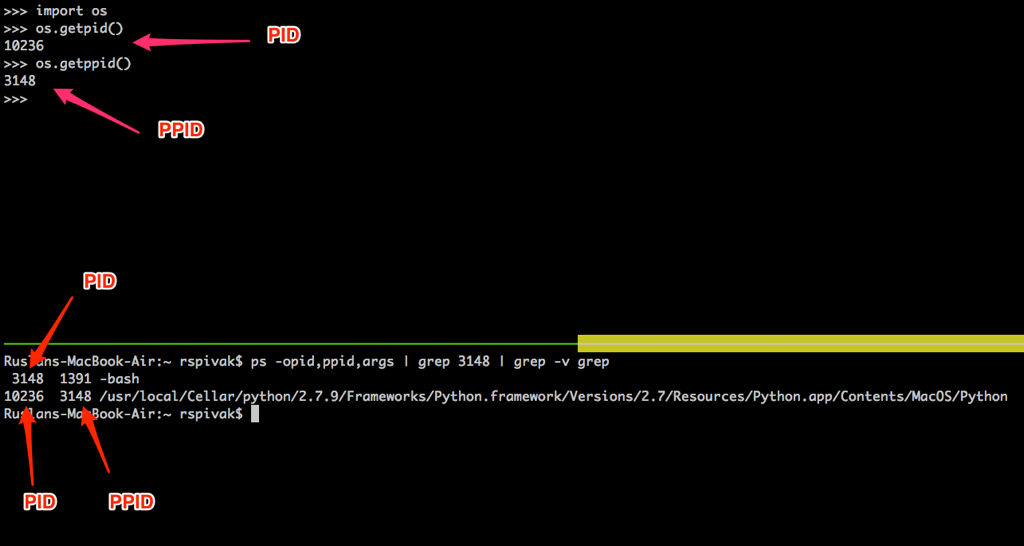
The ps command shows you that you have indeed run just one Python process webserver3b. When a process gets created the kernel assigns a process ID to it, PID. In UNIX, every user process also has a parent that, in turn, has its own process ID called parent process ID, or PPID for short. I assume that you run a BASH shell by default and when you start the server, a new process gets created with a PID and its parent PID is set to the PID of the BASH shell.
Try it out and see for yourself how it all works. Fire up your Python shell again, which will create a new process, and then get the PID of the Python shell process and the parent PID (the PID of your BASH shell) using os.getpid() and os.getppid() system calls. Then, in another terminal window run ps command and grep for the PPID (parent process ID, which in my case is 3148). In the screenshot below you can see an example of a parent-child relationship between my child Python shell process and the parent BASH shell process on my Mac OS X:
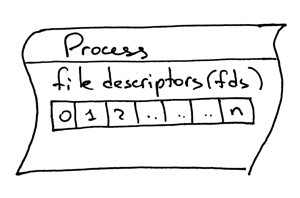
Another important concept to know is that of a file descriptor. So what is a file descriptor? A file descriptor is a non-negative integer that the kernel returns to a process when it opens an existing file, creates a new file or when it creates a new socket. You’ve probably heard that in UNIX everything is a file. The kernel refers to the open files of a process by a file descriptor. When you need to read or write a file you identify it with the file descriptor. Python gives you high-level objects to deal with files (and sockets) and you don’t have to use file descriptors directly to identify a file but, under the hood, that’s how files and sockets are identified in UNIX: by their integer file descriptors.
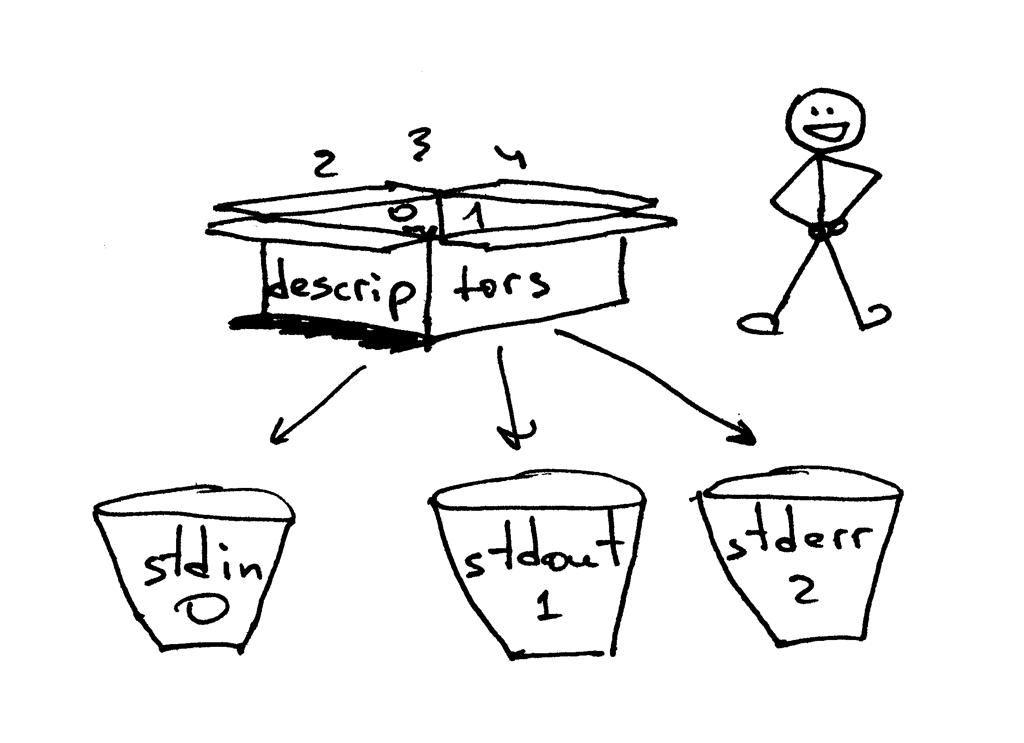
By default, UNIX shells assign file descriptor 0 to the standard input of a process, file descriptor 1 to the standard output of the process and file descriptor 2 to the standard error.
As I mentioned before, even though Python gives you a high-level file or file-like object to work with, you can always use the fileno() method on the object to get the file descriptor associated with the file. Back to your Python shell to see how you can do that:
>>> import sys
>>> sys.stdin
<open file '<stdin>', mode 'r' at 0x102beb0c0>
>>> sys.stdin.fileno()
0
>>> sys.stdout.fileno()
1
>>> sys.stderr.fileno()
2
And while working with files and sockets in Python, you’ll usually be using a high-level file/socket object, but there may be times where you need to use a file descriptor directly. Here is an example of how you can write a string to the standard output using a write system call that takes a file descriptor integer as a parameter:
>>> import sys
>>> import os
>>> res = os.write(sys.stdout.fileno(), 'hello\n')
hello
And here is an interesting part - which should not be surprising to you anymore because you already know that everything is a file in Unix - your socket also has a file descriptor associated with it. Again, when you create a socket in Python you get back an object and not a non-negative integer, but you can always get direct access to the integer file descriptor of the socket with the fileno() method that I mentioned earlier.
>>> import socket
>>> sock = socket.socket(socket.AF_INET, socket.SOCK_STREAM)
>>> sock.fileno()
3
One more thing I wanted to mention: have you noticed that in the second example of the iterative server webserver3b.py, when the server process was sleeping for 60 seconds you could still connect to the server with the second curl command? Sure, the curl didn’t output anything right away and it was just hanging out there but how come the server was not accept ing a connection at the time and the client was not rejected right away, but instead was able to connect to the server? The answer to that is the listen method of a socket object and its BACKLOG argument, which I called REQUEST_QUEUE_SIZE in the code. The BACKLOG argument determines the size of a queue within the kernel for incoming connection requests. When the server webserver3b.py was sleeping, the second curl command that you ran was able to connect to the server because the kernel had enough space available in the incoming connection request queue for the server socket.
While increasing the BACKLOG argument does not magically turn your server into a server that can handle multiple client requests at a time, it is important to have a fairly large backlog parameter for busy servers so that the accept call would not have to wait for a new connection to be established but could grab the new connection off the queue right away and start processing a client request without delay.
Whoo-hoo! You’ve covered a lot of ground. Let’s quickly recap what you’ve learned (or refreshed if it’s all basics to you) so far.
- Iterative server
- Server socket creation sequence (socket, bind, listen, accept)
- Client connection creation sequence (socket, connect)
- Socket pair
- Socket
- Ephemeral port and well-known port
- Process
- Process ID (PID), parent process ID (PPID), and the parent-child relationship.
- File descriptors
- The meaning of the BACKLOG argument of the listen socket method
Now I am ready to answer the question from Part 2: “How can you make your server handle more than one request at a time?” Or put another way, “How do you write a concurrent server?”
The simplest way to write a concurrent server under Unix is to use a fork() system call.
Here is the code of your new shiny concurrent server webserver3c.py that can handle multiple client requests at the same time (as in our iterative server example webserver3b.py, every child process sleeps for 60 secs):
###########################################################################
# Concurrent server - webserver3c.py                                      #
#                                                                         #
# Tested with Python 2.7.9 & Python 3.4 on Ubuntu 14.04 & Mac OS X        #
#                                                                         #
# - Child process sleeps for 60 seconds after handling a client's request #
# - Parent and child processes close duplicate descriptors                #
#                                                                         #
###########################################################################
import os
import socket
import time

SERVER_ADDRESS = (HOST, PORT) = '', 8888
REQUEST_QUEUE_SIZE = 5


def handle_request(client_connection):
    request = client_connection.recv(1024)
    print(
        'Child PID: {pid}. Parent PID {ppid}'.format(
            pid=os.getpid(),
            ppid=os.getppid(),
        )
    )
    print(request.decode())
    http_response = b"""\
HTTP/1.1 200 OK

Hello, World!
"""
    client_connection.sendall(http_response)
    time.sleep(60)


def serve_forever():
    listen_socket = socket.socket(socket.AF_INET, socket.SOCK_STREAM)
    listen_socket.setsockopt(socket.SOL_SOCKET, socket.SO_REUSEADDR, 1)
    listen_socket.bind(SERVER_ADDRESS)
    listen_socket.listen(REQUEST_QUEUE_SIZE)
    print('Serving HTTP on port {port} ...'.format(port=PORT))
    print('Parent PID (PPID): {pid}\n'.format(pid=os.getpid()))

    while True:
        client_connection, client_address = listen_socket.accept()
        pid = os.fork()
        if pid == 0:  # child
            listen_socket.close()  # close child copy
            handle_request(client_connection)
            client_connection.close()
            os._exit(0)  # child exits here
        else:  # parent
            client_connection.close()  # close parent copy and loop over

if __name__ == '__main__':
    serve_forever()
Before diving in and discussing how fork works, try it, and see for yourself that the server can indeed handle multiple client requests at the same time, unlike its iterative counterparts webserver3a.py and webserver3b.py. Start the server on the command line with:
$ python webserver3c.py
And try the same two curl commands you’ve tried before with the iterative server and see for yourself that, now, even though the server child process sleeps for 60 seconds after serving a client request, it doesn’t affect other clients because they are served by different and completely independent processes. You should see your curl commands output “Hello, World!” instantly and then hang for 60 secs. You can keep on running as many curl commands as you want (well, almost as many as you want :) and all of them will output the server’s response “Hello, World” immediately and without any noticeable delay. Try it.
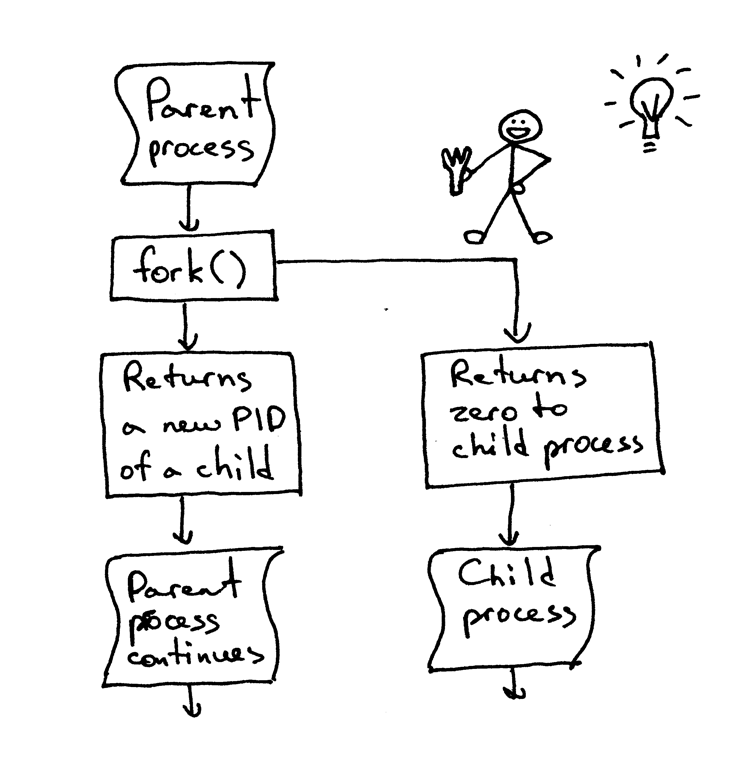
The most important point to understand about fork() is that you call fork once but it returns twice: once in the parent process and once in the child process. When you fork a new process the process ID returned to the child process is 0. When the fork returns in the parent process it returns the child’s PID.
I still remember how fascinated I was by fork when I first read about it and tried it. It looked like magic to me. Here I was reading a sequential code and then “boom!”: the code cloned itself and now there were two instances of the same code running concurrently. I thought it was nothing short of magic, seriously.
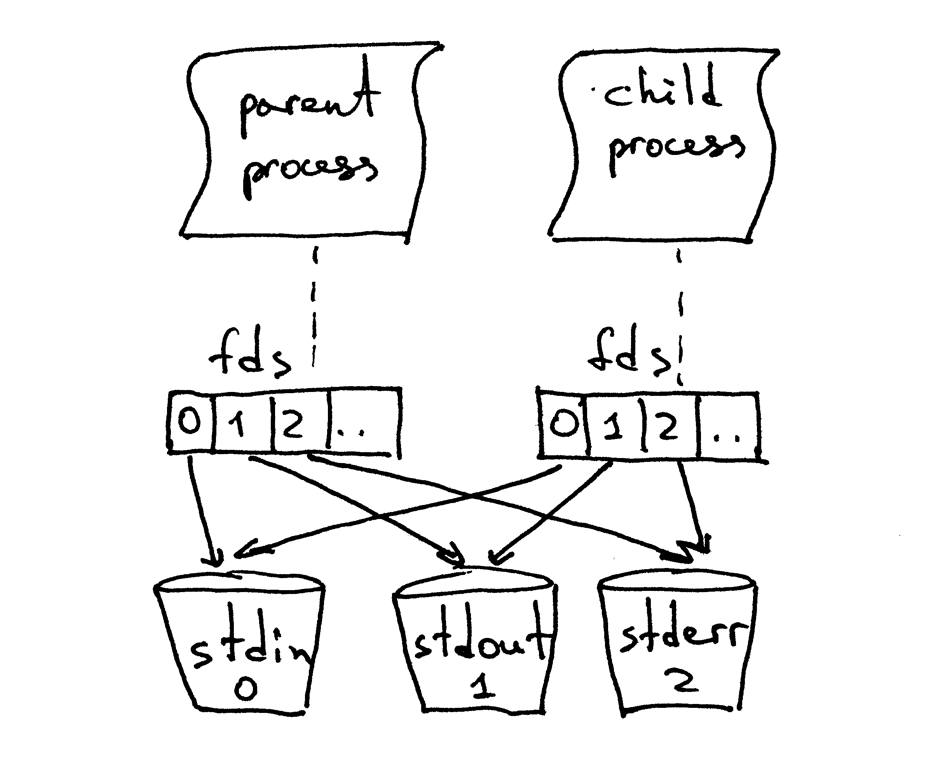
When a parent forks a new child, the child process gets a copy of the parent’s file descriptors:
You’ve probably noticed that the parent process in the code above closed the client connection:
else:  # parent
    client_connection.close()  # close parent copy and loop over
So how come a child process is still able to read the data from a client socket if its parent closed the very same socket? The answer is in the picture above. The kernel uses descriptor reference counts to decide whether to close a socket or not. It closes the socket only when its descriptor reference count becomes 0. When your server creates a child process, the child gets the copy of the parent’s file descriptors and the kernel increments the reference counts for those descriptors. In the case of one parent and one child, the descriptor reference count would be 2 for the client socket and when the parent process in the code above closes the client connection socket, it merely decrements its reference count which becomes 1, not small enough to cause the kernel to close the socket. The child process also closes the duplicate copy of the parent’s listen_socket because the child doesn’t care about accepting new client connections, it cares only about processing requests from the established client connection:
listen_socket.close() # close child copy
I’ll talk about what happens if you do not close duplicate descriptors later in the article.
As you can see from the source code of your concurrent server, the sole role of the server parent process now is to accept a new client connection, fork a new child process to handle that client request, and loop over to accept another client connection, and nothing more. The server parent process does not process client requests - its children do.
A little aside. What does it mean when we say that two events are concurrent?
When we say that two events are concurrent we usually mean that they happen at the same time. As a shorthand that definition is fine, but you should remember the strict definition:
Two events are concurrent if you cannot tell by looking at the program which will happen first.2
Again, it’s time to recap the main ideas and concepts you’ve covered so far.
- The simplest way to write a concurrent server in Unix is to - use the fork() system call
- When a process forks a new process it becomes a parent process to that newly forked child process.
- Parent and child share the same file descriptors after the call to fork.
- The kernel uses descriptor reference counts to decide whether to close the file/socket or not
- The role of a server parent process: all it does now is accept a new connection from a client, fork a child to handle the client request, and loop over to accept a new client connection.
Let’s see what is going to happen if you don’t close duplicate socket descriptors in the parent and child processes. Here is a modified version of the concurrent server where the server does not close duplicate descriptors, webserver3d.py:
###########################################################################
# Concurrent server - webserver3d.py                                      #
#                                                                         #
# Tested with Python 2.7.9 & Python 3.4 on Ubuntu 14.04 & Mac OS X        #
###########################################################################
import os
import socket

SERVER_ADDRESS = (HOST, PORT) = '', 8888
REQUEST_QUEUE_SIZE = 5


def handle_request(client_connection):
    request = client_connection.recv(1024)
    http_response = b"""\
HTTP/1.1 200 OK

Hello, World!
"""
    client_connection.sendall(http_response)


def serve_forever():
    listen_socket = socket.socket(socket.AF_INET, socket.SOCK_STREAM)
    listen_socket.setsockopt(socket.SOL_SOCKET, socket.SO_REUSEADDR, 1)
    listen_socket.bind(SERVER_ADDRESS)
    listen_socket.listen(REQUEST_QUEUE_SIZE)
    print('Serving HTTP on port {port} ...'.format(port=PORT))

    clients = []
    while True:
        client_connection, client_address = listen_socket.accept()
        # store the reference otherwise it's garbage collected
        # on the next loop run
        clients.append(client_connection)
        pid = os.fork()
        if pid == 0:  # child
            listen_socket.close()  # close child copy
            handle_request(client_connection)
            client_connection.close()
            os._exit(0)  # child exits here
        else:  # parent
            # client_connection.close()
            print(len(clients))

if __name__ == '__main__':
    serve_forever()
Start the server with:
$ python webserver3d.py
Use curl to connect to the server:
$ curl http://localhost:8888/hello
Hello, World!
Okay, the curl printed the response from the concurrent server but it did not terminate and kept hanging. What is happening here? The server no longer sleeps for 60 seconds: its child process actively handles a client request, closes the client connection and exits, but the client curl still does not terminate.
So why does the curl not terminate? The reason is the duplicate file descriptors. When the child process closed the client connection, the kernel decremented the reference count of that client socket and the count became 1. The server child process exited, but the client socket was not closed by the kernel because the reference count for that socket descriptor was not 0, and, as a result, the termination packet (called FIN in TCP/IP parlance) was not sent to the client and the client stayed on the line, so to speak. There is also another problem. If your long-running server doesn’t close duplicate file descriptors, it will eventually run out of available file descriptors:
Stop your server webserver3d.py with Control-C and check out the default resources available to your server process set up by your shell with the shell built-in command ulimit:
$ ulimit -a
core file size          (blocks, -c) 0
data seg size           (kbytes, -d) unlimited
scheduling priority             (-e) 0
file size               (blocks, -f) unlimited
pending signals                 (-i) 3842
max locked memory       (kbytes, -l) 64
max memory size         (kbytes, -m) unlimited
open files                      (-n) 1024
pipe size            (512 bytes, -p) 8
POSIX message queues     (bytes, -q) 819200
real-time priority              (-r) 0
stack size              (kbytes, -s) 8192
cpu time               (seconds, -t) unlimited
max user processes              (-u) 3842
virtual memory          (kbytes, -v) unlimited
file locks                      (-x) unlimited
As you can see above, the maximum number of open file descriptors (open files) available to the server process on my Ubuntu box is 1024.
Now let’s see how your server can run out of available file descriptors if it doesn’t close duplicate descriptors. In an existing or new terminal window, set the maximum number of open file descriptors for your server to be 256:
$ ulimit -n 256
Start the server webserver3d.py in the same terminal where you’ve just run the $ ulimit -n 256 command:
$ python webserver3d.py
and use the following client client3.py to test the server.
#####################################################################
# Test client - client3.py                                          #
#                                                                   #
# Tested with Python 2.7.9 & Python 3.4 on Ubuntu 14.04 & Mac OS X  #
#####################################################################
import argparse
import errno
import os
import socket


SERVER_ADDRESS = 'localhost', 8888
REQUEST = b"""\
GET /hello HTTP/1.1
Host: localhost:8888

"""


def main(max_clients, max_conns):
    socks = []
    for client_num in range(max_clients):
        pid = os.fork()
        if pid == 0:
            for connection_num in range(max_conns):
                sock = socket.socket(socket.AF_INET, socket.SOCK_STREAM)
                sock.connect(SERVER_ADDRESS)
                sock.sendall(REQUEST)
                socks.append(sock)
                print(connection_num)
                os._exit(0)


if __name__ == '__main__':
    parser = argparse.ArgumentParser(
        description='Test client for LSBAWS.',
        formatter_class=argparse.ArgumentDefaultsHelpFormatter,
    )
    parser.add_argument(
        '--max-conns',
        type=int,
        default=1024,
        help='Maximum number of connections per client.'
    )
    parser.add_argument(
        '--max-clients',
        type=int,
        default=1,
        help='Maximum number of clients.'
    )
    args = parser.parse_args()
    main(args.max_clients, args.max_conns)
In a new terminal window, start the client3.py and tell it to create 300 simultaneous connections to the server:
$ python client3.py --max-clients=300
Soon enough your server will explode. Here is a screenshot of the exception on my box:
The lesson is clear - your server should close duplicate descriptors. But even if you close duplicate descriptors, you are not out of the woods yet because there is another problem with your server, and that problem is zombies!
Yes, your server code actually creates zombies. Let’s see how. Start up your server again:
$ python webserver3d.py
Run the following curl command in another terminal window:
$ curl http://localhost:8888/hello
And now run the ps command to show running Python processes. This the example of ps output on my Ubuntu box:
$ ps auxw | grep -i python | grep -v grep
vagrant   9099  0.0  1.2  31804  6256 pts/0    S+   16:33   0:00 python webserver3d.py
vagrant   9102  0.0  0.0      0     0 pts/0    Z+   16:33   0:00 [python] <defunct>
Do you see the second line above where it says the status of the process with PID 9102 is Z+ and the name of the process is ? That’s our zombie there. The problem with zombies is that you can’t kill them.
Even if you try to kill zombies with $ kill -9 , they will survive. Try it and see for yourself.
What is a zombie anyway and why does our server create them? A zombie is a process that has terminated, but its parent has not waited for it and has not received its termination status yet. When a child process exits before its parent, the kernel turns the child process into a zombie and stores some information about the process for its parent process to retrieve later. The information stored is usually the process ID, the process termination status, and the resource usage by the process. Okay, so zombies serve a purpose, but if your server doesn’t take care of these zombies your system will get clogged up. Let’s see how that happens. First stop your running server and, in a new terminal window, use the ulimit command to set the max user processess to 400(make sure to set open files to a high number, let’s say 500 too):
$ ulimit -u 400
$ ulimit -n 500
Start the server webserver3d.py in the same terminal where you’ve just run the $ ulimit -u 400 command:
$ python webserver3d.py
In a new terminal window, start the client3.py and tell it to create 500 simultaneous connections to the server:
$ python client3.py --max-clients=500
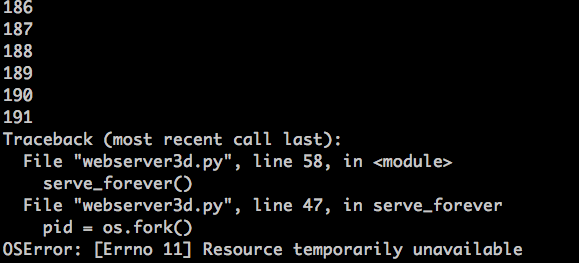
And, again, soon enough your server will blow up with an OSError: Resource temporarily unavailable exception when it tries to create a new child process, but it can’t because it has reached the limit for the maximum number of child processes it’s allowed to create. Here is a screenshot of the exception on my box:
As you can see, zombies create problems for your long-running server if it doesn’t take care of them. I will discuss shortly how the server should deal with that zombie problem.
Let’s recap the main points you’ve covered so far:
- If you don’t close duplicate descriptors, the clients won’t terminate because the client connections won’t get closed.
- If you don’t close duplicate descriptors, your long-running server will eventually run out of available file descriptors (max open files).
- When you fork a child process and it exits and the parent process doesn’t wait for it and doesn’t collect its termination status, it becomes a zombie.
- Zombies need to eat something and, in our case, it’s memory. Your server will eventually run out of available processes (max user processes) if it doesn’t take care of zombies.
- You can’t kill a zombie, you need to wait for it.
So what do you need to do to take care of zombies? You need to modify your server code to wait for zombies to get their termination status. You can do that by modifying your server to call a wait system call. Unfortunately, that’s far from ideal because if you call wait and there is no terminated child process the call to wait will block your server, effectively preventing your server from handling new client connection requests. Are there any other options? Yes, there are, and one of them is the combination of a signal handler with the wait system call.
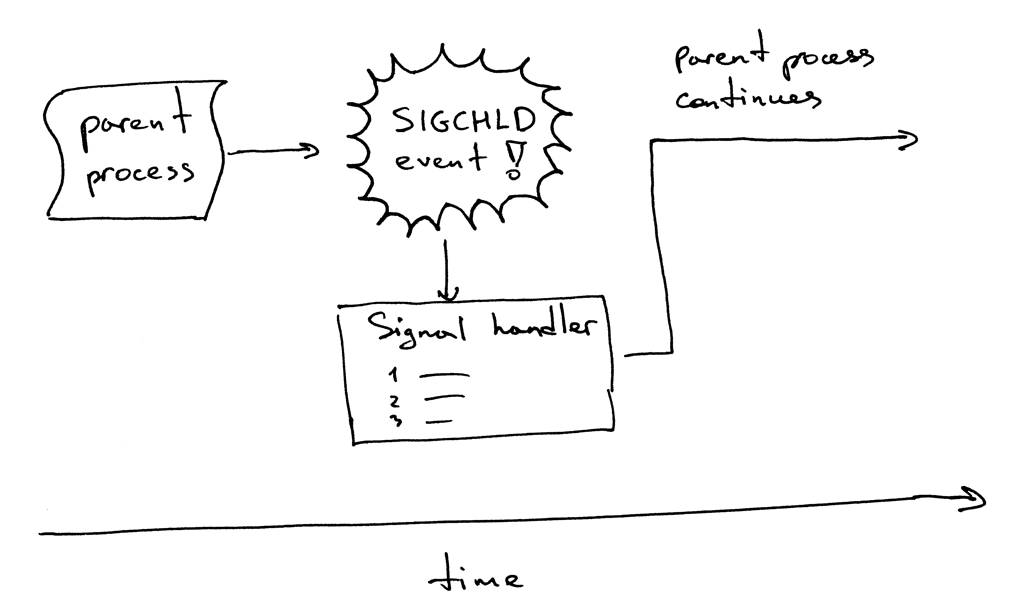
Here is how it works. When a child process exits, the kernel sends a SIGCHLD signal. The parent process can set up a signal handler to be asynchronously notified of that SIGCHLD event and then it can wait for the child to collect its termination status, thus preventing the zombie process from being left around.
By the way, an asynchronous event means that the parent process doesn’t know ahead of time that the event is going to happen.
Modify your server code to set up a SIGCHLD event handler and wait for a terminated child in the event handler. The code is available in webserver3e.py file:
###########################################################################
# Concurrent server - webserver3e.py                                      #
#                                                                         #
# Tested with Python 2.7.9 & Python 3.4 on Ubuntu 14.04 & Mac OS X        #
###########################################################################
import os
import signal
import socket
import time

SERVER_ADDRESS = (HOST, PORT) = '', 8888
REQUEST_QUEUE_SIZE = 5


def grim_reaper(signum, frame):
    pid, status = os.wait()
    print(
        'Child {pid} terminated with status {status}'
        '\n'.format(pid=pid, status=status)
    )


def handle_request(client_connection):
    request = client_connection.recv(1024)
    print(request.decode())
    http_response = b"""\
HTTP/1.1 200 OK

Hello, World!
"""
    client_connection.sendall(http_response)
    # sleep to allow the parent to loop over to 'accept' and block there
    time.sleep(3)


def serve_forever():
    listen_socket = socket.socket(socket.AF_INET, socket.SOCK_STREAM)
    listen_socket.setsockopt(socket.SOL_SOCKET, socket.SO_REUSEADDR, 1)
    listen_socket.bind(SERVER_ADDRESS)
    listen_socket.listen(REQUEST_QUEUE_SIZE)
    print('Serving HTTP on port {port} ...'.format(port=PORT))

    signal.signal(signal.SIGCHLD, grim_reaper)

    while True:
        client_connection, client_address = listen_socket.accept()
        pid = os.fork()
        if pid == 0:  # child
            listen_socket.close()  # close child copy
            handle_request(client_connection)
            client_connection.close()
            os._exit(0)
        else:  # parent
            client_connection.close()

if __name__ == '__main__':
    serve_forever()
Start the server:
$ python webserver3e.py
Use your old friend curl to send a request to the modified concurrent server:
$ curl http://localhost:8888/hello
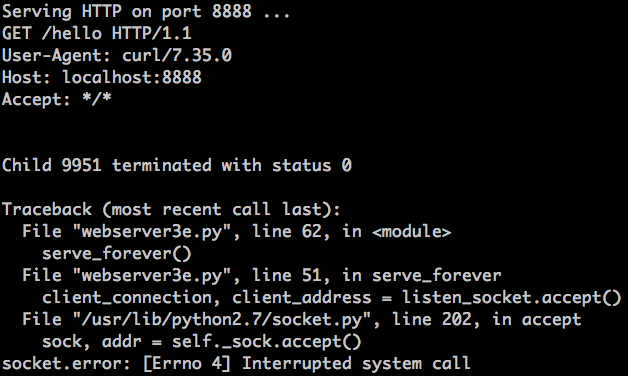
Look at the server:
What just happened? The call to accept failed with the error EINTR.
The parent process was blocked in accept call when the child process exited which caused SIGCHLD event, which in turn activated the signal handler and when the signal handler finished the accept system call got interrupted:
Don’t worry, it’s a pretty simple problem to solve, though. All you need to do is to re-start the accept system call. Here is the modified version of the server webserver3f.py that handles that problem:
###########################################################################
# Concurrent server - webserver3f.py                                      #
#                                                                         #
# Tested with Python 2.7.9 & Python 3.4 on Ubuntu 14.04 & Mac OS X        #
###########################################################################
import errno
import os
import signal
import socket

SERVER_ADDRESS = (HOST, PORT) = '', 8888
REQUEST_QUEUE_SIZE = 1024


def grim_reaper(signum, frame):
    pid, status = os.wait()


def handle_request(client_connection):
    request = client_connection.recv(1024)
    print(request.decode())
    http_response = b"""\
HTTP/1.1 200 OK

Hello, World!
"""
    client_connection.sendall(http_response)


def serve_forever():
    listen_socket = socket.socket(socket.AF_INET, socket.SOCK_STREAM)
    listen_socket.setsockopt(socket.SOL_SOCKET, socket.SO_REUSEADDR, 1)
    listen_socket.bind(SERVER_ADDRESS)
    listen_socket.listen(REQUEST_QUEUE_SIZE)
    print('Serving HTTP on port {port} ...'.format(port=PORT))

    signal.signal(signal.SIGCHLD, grim_reaper)

    while True:
        try:
            client_connection, client_address = listen_socket.accept()
        except IOError as e:
            code, msg = e.args
            # restart 'accept' if it was interrupted
            if code == errno.EINTR:
                continue
            else:
                raise

        pid = os.fork()
        if pid == 0:  # child
            listen_socket.close()  # close child copy
            handle_request(client_connection)
            client_connection.close()
            os._exit(0)
        else:  # parent
            client_connection.close()  # close parent copy and loop over


if __name__ == '__main__':
    serve_forever()
Start the updated server webserver3f.py:
$ python webserver3f.py
Use curl to send a request to the modified concurrent server:
$ curl http://localhost:8888/hello
See? No EINTR exceptions any more. Now, verify that there are no more zombies either and that your SIGCHLD event handler with wait call took care of terminated children. To do that, just run the ps command and see for yourself that there are no more Python processes with Z+ status (no more processes). Great! It feels safe without zombies running around.
- If you fork a child and don’t wait for it, it becomes a zombie.
- Use the SIGCHLD event handler to asynchronously wait for a terminated child to get its termination status
- When using an event handler you need to keep in mind that system calls might get interrupted and you need to be prepared for that scenario
Okay, so far so good. No problems, right? Well, almost. Try your webserver3f.py again, but instead of making one request with curl use client3.py to create 128 simultaneous connections:
$ python client3.py --max-clients 128
Now run the ps command again
$ ps auxw | grep -i python | grep -v grep
and see that, oh boy, zombies are back again!
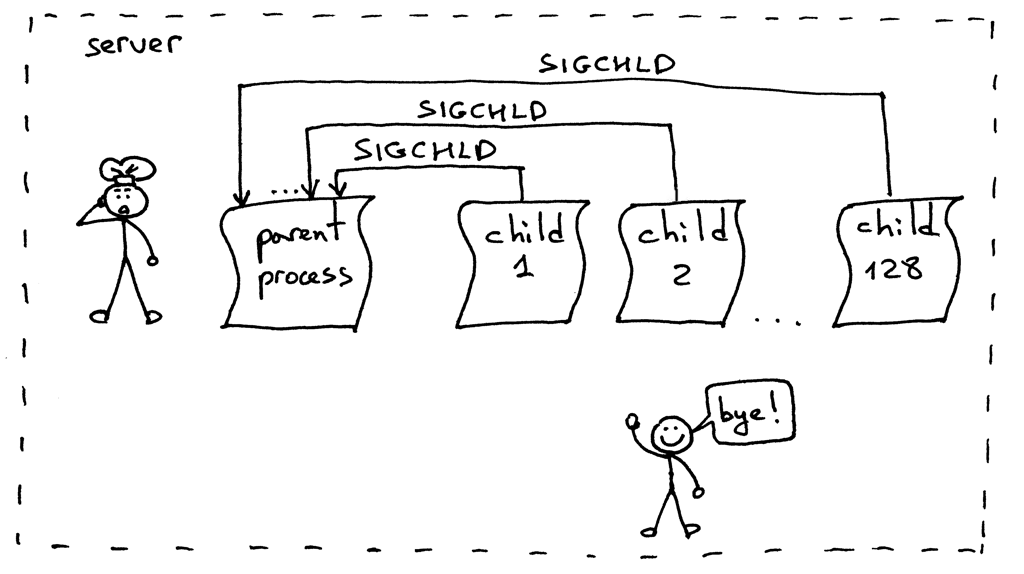
What went wrong this time? When you ran 128 simultaneous clients and established 128 connections, the child processes on the server handled the requests and exited almost at the same time causing a flood of SIGCHLD signals being sent to the parent process. The problem is that the signals are not queued and your server process missed several signals, which left several zombies running around unattended:
The solution to the problem is to set up a SIGCHLD event handler but instead of wait use a waitpid system call with a WNOHANG option in a loop to make sure that all terminated child processes are taken care of. Here is the modified server code, webserver3g.py:
###########################################################################
# Concurrent server - webserver3g.py                                      #
#                                                                         #
# Tested with Python 2.7.9 & Python 3.4 on Ubuntu 14.04 & Mac OS X        #
###########################################################################
import errno
import os
import signal
import socket

SERVER_ADDRESS = (HOST, PORT) = '', 8888
REQUEST_QUEUE_SIZE = 1024


def grim_reaper(signum, frame):
    while True:
        try:
            pid, status = os.waitpid(
                -1,          # Wait for any child process
                 os.WNOHANG  # Do not block and return EWOULDBLOCK error
            )
        except OSError:
            return

        if pid == 0:  # no more zombies
            return


def handle_request(client_connection):
    request = client_connection.recv(1024)
    print(request.decode())
    http_response = b"""\
HTTP/1.1 200 OK

Hello, World!
"""
    client_connection.sendall(http_response)


def serve_forever():
    listen_socket = socket.socket(socket.AF_INET, socket.SOCK_STREAM)
    listen_socket.setsockopt(socket.SOL_SOCKET, socket.SO_REUSEADDR, 1)
    listen_socket.bind(SERVER_ADDRESS)
    listen_socket.listen(REQUEST_QUEUE_SIZE)
    print('Serving HTTP on port {port} ...'.format(port=PORT))

    signal.signal(signal.SIGCHLD, grim_reaper)

    while True:
        try:
            client_connection, client_address = listen_socket.accept()
        except IOError as e:
            code, msg = e.args
            # restart 'accept' if it was interrupted
            if code == errno.EINTR:
                continue
            else:
                raise

        pid = os.fork()
        if pid == 0:  # child
            listen_socket.close()  # close child copy
            handle_request(client_connection)
            client_connection.close()
            os._exit(0)
        else:  # parent
            client_connection.close()  # close parent copy and loop over

if __name__ == '__main__':
    serve_forever()
Start the server:
$ python webserver3g.py
Use the test client client3.py:
$ python client3.py --max-clients 128
And now verify that there are no more zombies. Yay! Life is good without zombies :)
Congratulations! It’s been a pretty long journey but I hope you liked it. Now you have your own simple concurrent server and the code can serve as a foundation for your further work towards a production grade Web server.
I’ll leave it as an exercise for you to update the WSGI server from Part 2 and make it concurrent. You can find the modified version here. But look at my code only after you’ve implemented your own version. You have all the necessary information to do that. So go and just do it :)
What’s next? As Josh Billings said,
“Be like a postage stamp — stick to one thing until you get there.”
Start mastering the basics. Question what you already know. And always dig deeper.
“If you learn only methods, you’ll be tied to your methods. But if you learn principles, you can devise your own methods.” —Ralph Waldo Emerson
Below is a list of books that I’ve drawn on for most of the material in this article. They will help you broaden and deepen your knowledge about the topics I’ve covered. I highly recommend you to get those books somehow: borrow them from your friends, check them out from your local library, or just buy them on Amazon. They are the keepers:
- Unix Network Programming, Volume 1: The Sockets Networking API (3rd Edition)
- Advanced Programming in the UNIX Environment, 3rd Edition
- The Linux Programming Interface: A Linux and UNIX System Programming Handbook
- TCP/IP Illustrated, Volume 1: The Protocols (2nd Edition) (Addison-Wesley Professional Computing Series)
- The Little Book of SEMAPHORES (2nd Edition): The Ins and Outs of Concurrency Control and Common Mistakes. Also available for free on the author’s site here.
BTW, I’m writing a book “Let’s Build A Web Server: First Steps” that explains how to write a basic web server from scratch and goes into more detail on the topics I just covered. Subscribe to the mailing list to get the latest updates about the book and the release date.


