mirror of
https://github.com/LCTT/TranslateProject.git
synced 2025-02-28 01:01:09 +08:00
246 lines
9.6 KiB
Markdown
246 lines
9.6 KiB
Markdown
如何配置 VirtualBox 中的客户机与宿主机之间的网络连接
|
||
============================================================
|
||
|
||
当你在 [VirtualBox 虚拟机软件][2] 中安装了各种操作系统时,你可能需要实现宿主机与虚拟机之间的相互访问。
|
||
|
||
在这篇文章中,我们将会以最简单明了的方式来说明如何配置客户机与 Linux 宿主机的网络,以实现两者相互访问或者让客户机连接到外网。(LCTT 译注:客户机指 Oracle VirtualBox 虚拟机软件中安装的操作系统,如本文中用到的 CentOS 7 和 Ubuntu 16.10 。宿主机就是你自己的笔记本电脑或台式机,注意这篇文章中作者的宿主机上安装的操作系统是 Linux Mint 18 ,而不是我们平时使用的 Windows 系统。)
|
||
|
||
本文测试环境:
|
||
1、宿主机操作系统—— Linux Mint 18
|
||
2、客户机操作系统—— CentOS 7 和 Ubuntu 16.10
|
||
|
||
#### 要求
|
||
|
||
1、宿主机上安装的 [Oracle VirtualBox 虚拟机][1] 能正常使用。
|
||
2、你得事先在 Oracle virtualBox 虚拟机软件中安装好客户机操作系统,比如 Ubuntu、Fedora、CentOS、 Linux Mint 或者其它的 Linux 系统也行。
|
||
3、在你配置网络前,请先关闭客户机。
|
||
|
||
为了让宿主机和客户机能够互相联通,这两个机器的默认网卡 IP 必须设置在同一网段,你可以为客户机添加多达 4 块网卡。
|
||
|
||
默认网卡(网卡 1)通常用于使用 NAT 连接方式连接到宿主机进行上网。
|
||
|
||
重要提示:通常总是设置第一块网卡与宿主机通信,第二块网卡连接到外网。
|
||
|
||
### 为客户机和宿主机创建网卡
|
||
|
||
在下面的 VirtualBox 管理器界面,创建客户机和宿主机之间的通信网卡。
|
||
|
||
打开文件->首选项配置,或者使用组合键 `Ctrl + G` :
|
||
|
||
[
|
||

|
||
][3]
|
||
|
||
*Virtualbox 首选项界面*
|
||
|
||
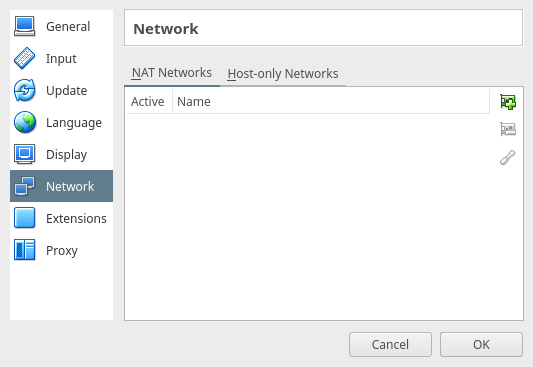
在下图中有两个选项,单击并选择仅主机( Host-only )网络。然后使用右侧的 `+` 按钮来添加一个新的仅主机网络。
|
||
|
||
[
|
||

|
||
][4]
|
||
|
||
*设置客户机网络*
|
||
|
||
这样就创建好了一个名为 vboxnet0 的新的仅主机模式网卡。
|
||
|
||
如果你愿意,你可以使用中间的 `-` 按钮来删除这个网卡,你可以单击编辑按钮来查看这个网卡的详细配置信息。
|
||
|
||
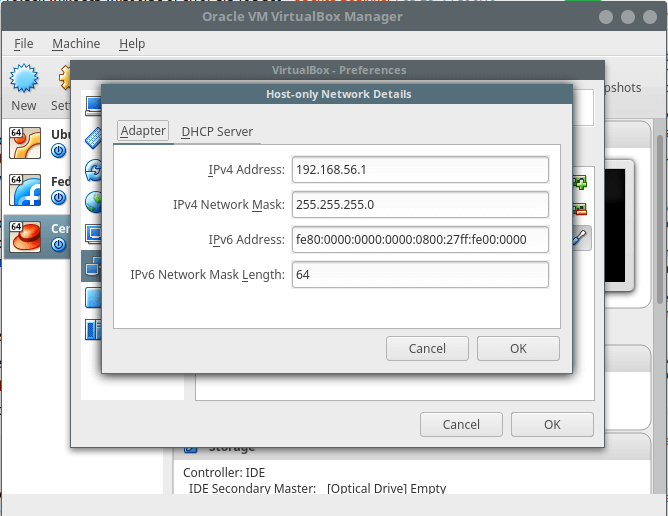
你也可以根据自己的实际环境修改配置信息,比如网络地址,子网掩码等等。
|
||
|
||
注意:下图中的 IPv4 地址就是你的宿主机的 IP 地址。
|
||
|
||
[
|
||

|
||
][6]
|
||
|
||
*宿主机网络信息*
|
||
|
||
下图中,如果你想让客户机使用动态 IP 地址,你可以通过配置 DHCP 服务来完成(在使用前请确保启用 DHCP )。但是我建议你为客户机配置一个静态 IP 地址。
|
||
|
||
在下面的设置所有网络界面单击 OK 按钮来保存修改的配置。
|
||
|
||
[
|
||

|
||
][7]
|
||
|
||
*为客户机设置静态 IP 地址*
|
||
|
||
#### 配置客户机网络设置
|
||
|
||
注意:你可以根据下面的步骤来为任何需要与宿主机通信的客户机添加网卡。
|
||
|
||
回到 VirtualBox 管理器界面,选择客户机,比如 Ubuntu 16.10 Server 或者 CentOS 7 ,然后单击设置菜单。
|
||
|
||
[
|
||

|
||
][8]
|
||
|
||
*配置客户机网络设置*
|
||
|
||
#### 配置客户机网卡以连接到宿主机
|
||
|
||
从下图的界面中选择网络选项。然后配置第一块网卡( 网卡 1 )的信息如下:
|
||
|
||
1、勾选选项:“启用网卡”来开启该网卡。
|
||
2、在连接方式选项:选择仅主机( Host-only )网络。
|
||
3、然后选择网卡名称:vboxnet0
|
||
|
||
如下图所示,单击 OK 来保存设置:
|
||
|
||
[
|
||

|
||
][9]
|
||
|
||
*启用客户机网络*
|
||
|
||
#### 配置客户机网卡连接外网
|
||
|
||
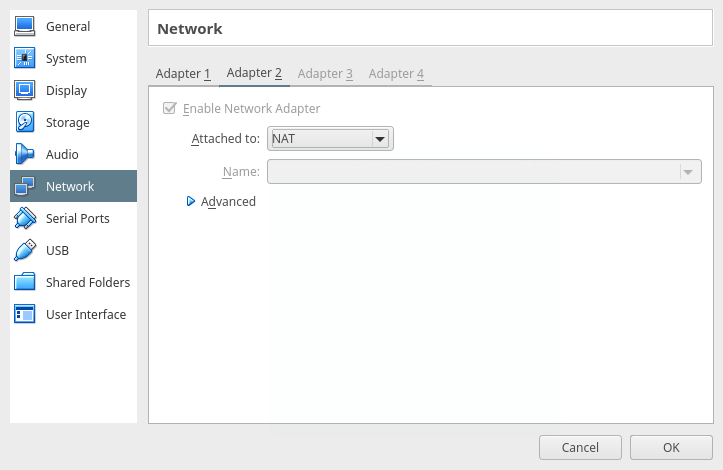
之后添加第二块网卡(网卡 2 )来让客户机连接到宿主机进行上网。使用下面的设置:
|
||
|
||
1、勾选选项:“启用网络连接”来激活这块网卡。
|
||
2、在连接方式选项:选择 NAT 方式。
|
||
|
||
[
|
||

|
||
][10]
|
||
|
||
为客户机启用网络连接
|
||
|
||
#### 为客户机设置静态 IP 地址
|
||
|
||
启动客户机,登录系统并[配置静态 IP 地址][11]。在客户机上执行下面的命令来查看所有网卡配置信息,然后分配一个 IP 地址:
|
||
|
||
```
|
||
$ ip add
|
||
```
|
||
[
|
||

|
||
][12]
|
||
|
||
*为客户机配置静态 IP 地址*
|
||
|
||
从上面的截图中可以看出客户机已启用了三块网卡:
|
||
|
||
1、`lo` ——回环网络接口
|
||
2、`enp0s3` (网卡 1)—— 前一步我们配置的连接方式为仅主机( Host-Only)模式并且已启用 DHCP 的网卡,之后我们又配置成了静态 IP 地址。
|
||
3、`enp0s8` (网卡 2)—— 用于连接到外网。该网卡默认情况下使用 DHCP 来动态获取 IP 地址。
|
||
|
||
##### 在 Debian/Ubuntu/Linux Mint 系统下的配置
|
||
|
||
重要提示: 这里我使用的是 Ubuntu 16.10 Server , IP 地址为 192.168.56.5 。
|
||
|
||
使用你喜欢的编辑器及管理员账号打开 `/etc/network/interfaces` 配置文件:
|
||
|
||
```
|
||
$ sudo vi /etc/network/interfaces
|
||
```
|
||
|
||
修改网卡 enp0s3 的配置信息如下(根据你的实际环境进行修改):
|
||
|
||
```
|
||
auto enp0s3
|
||
iface enp0s3 inet static
|
||
address 192.168.56.5
|
||
network 192.168.56.0
|
||
netmask 255.255.255.0
|
||
gateway 192.168.56.1
|
||
dns-nameservers 8.8.8.8 192.168.56.1
|
||
```
|
||
|
||
保存并退出。
|
||
|
||
然后使用下面的命令来重启网络服务:
|
||
|
||
```
|
||
$ sudo systemctl restart networking
|
||
```
|
||
|
||
或者,正常重启系统,然后检查网络配置是否为新的 IP 地址:
|
||
|
||
```
|
||
$ ip add
|
||
```
|
||
|
||
#####在 RHEL/CentOS/Fedora 系统下的配置
|
||
|
||
重要提示: 这里我使用的是 CentOS 7 系统, IP 地址为: 192.168.56.10 。
|
||
|
||
使用管理员帐号及你喜欢的编辑器打开 enp0s3 (仅主机网络)的网卡配置文件 `/etc/sysconfig/network-scripts/ifcfg-enp0s3` :
|
||
|
||
```
|
||
$ sudo vi /etc/sysconfig/network-scripts/ifcfg-enp0s3
|
||
```
|
||
|
||
创建或修改配置文件信息如下(根据你实际的环境进行修改):
|
||
|
||
```
|
||
BOOTPROTO=static
|
||
ONBOOT=yes
|
||
IPADDR=192.168.56.10
|
||
NETWORK=192.168.56.0
|
||
NETMASK=255.255.255.0
|
||
GATEWAY=192.168.56.1
|
||
DNS=8.8.8.8 192.168.56.1
|
||
NM_CONTROLLED=no #use this file not network manager to manage interface
|
||
```
|
||
|
||
保存并退出。然后使用下面的命令重启网络服务(也可以重启系统):
|
||
|
||
```
|
||
$ sudo systemctl restart network.service
|
||
```
|
||
|
||
检查修改的配置地信息是否生效:
|
||
|
||
```
|
||
$ ip add
|
||
```
|
||
|
||
#### 在宿主机上使用 SSH 工具来管理客户机
|
||
|
||
在宿主机上使用 SSH 工具来管理你的客户机。在下面的实例中,我将使用 SSH 工具连接到 CentOS 7 服务器(192.168.56.10):
|
||
|
||
```
|
||
$ ssh tecmint@192.168.56.10
|
||
$ who
|
||
```
|
||
[
|
||

|
||
][13]
|
||
|
||
*使用 SSH 工具连接客户机*
|
||
|
||
就写到这里吧!在这篇文章中,我们用简单易懂的方法讲述了如何在宿主机与客户机之间设置网络连接方式。请在下面的评论区跟大家分享下你的想法。
|
||
|
||
--------------------------------------------------------------------------------
|
||
|
||
作者简介:
|
||
|
||
Aaron Kili 是一名 Linux 和 F.O.S.S 爱好者,即将从事 Linux 系统管理员和网页开发工作,他日前是 TecMint 技术网站的原创作者,非常喜欢使用电脑工作,坚信分享知识是一种美德。
|
||
|
||
--------------------------------------------------------------------------------
|
||
|
||
via: http://www.tecmint.com/network-between-guest-vm-and-host-virtualbox/
|
||
|
||
作者:[Aaron Kili][a]
|
||
译者:[rusking](https://github.com/rusking)
|
||
校对:[Bestony](https://github.com/Bestony)
|
||
|
||
本文由 [LCTT](https://github.com/LCTT/TranslateProject) 原创编译,[Linux中国](https://linux.cn/) 荣誉推出
|
||
|
||
[a]:http://www.tecmint.com/author/aaronkili/
|
||
|
||
[1]:http://www.tecmint.com/install-virtualbox-on-redhat-centos-fedora/
|
||
[2]:http://www.tecmint.com/install-virtualbox-on-redhat-centos-fedora/
|
||
[3]:http://www.tecmint.com/wp-content/uploads/2017/02/Virtualbox-Preferences-Window.png
|
||
[4]:http://www.tecmint.com/wp-content/uploads/2017/02/Set-Guest-Network.png
|
||
[5]:http://www.tecmint.com/wp-content/uploads/2017/02/Virtualbox-Preferences-Window-1.png
|
||
[6]:http://www.tecmint.com/wp-content/uploads/2017/02/Host-Network-Details.png
|
||
[7]:http://www.tecmint.com/wp-content/uploads/2017/02/Set-Guest-Static-IP-Address.png
|
||
[8]:http://www.tecmint.com/wp-content/uploads/2017/02/Configure-VM-Settings.png
|
||
[9]:http://www.tecmint.com/wp-content/uploads/2017/02/Enable-Network-Adapter-for-Guest-VM.png
|
||
[10]:http://www.tecmint.com/wp-content/uploads/2017/02/Enable-Network-Adapter-for-VM.png
|
||
[11]:http://www.tecmint.com/set-add-static-ip-address-in-linux/
|
||
[12]:http://www.tecmint.com/wp-content/uploads/2017/02/Configure-Static-IP-Address-for-VM.png
|
||
[13]:http://www.tecmint.com/wp-content/uploads/2017/02/Connect-Guest-VM-using-SSH.png
|