13 KiB
Cloudgizer: An introduction to a new open source web development tool
Cloudgizer is a free open source tool for building web applications. It combines the ease of scripting languages with the performance of C, helping manage the development effort and run-time resources for cloud applications.
Cloudgizer works on Red Hat/CentOS Linux with the Apache web server and MariaDB database. It is licensed under Apache License version 2.
Hello World
In this example, we output an HTTP header and Hello World, followed by a horizontal line:
#include "cld.h"

void home()
{
   /*<
   output-http-header

   Hello World!
   <hr/>
   >*/
}
Cloudgizer code is written as a C comment with /*< and >*/ at the beginning and ending, respectively.
Writing output to the web client is as simple as directly writing HTML code in your source. There are no API calls or special markups for that—simplicity is good because HTML (or JavaScript, CSS, etc.) will probably comprise a good chunk of your code.
How it works
Cloudgizer source files (with a .v extension) are translated into C code by the cld command-line tool. C code is then compiled and linked with the web server and your application is ready to be used. For instance, generated code for the source file named home.v would be __home.c, if you'd like to examine it.
Much of your code will be written as "markups," small snippets of intuitive and descriptive code that let you easily do things like the following:
- database queries
- web programming
- encoding and encryption
- executing programs
- safe string manipulation
- file operations
- sending emails
and other common tasks. For less common tasks, there is an API that covers broader functionality. And ultimately, you can write any C code and use any libraries you wish to complete your task.
The main() function is generated by Cloudgizer and is a part of the framework, which provides Apache and database integration and other services. One such service is tracing and debugging (including memory garbage collection, underwrite/overwrite detection, run-time HTML linting, etc.). A program crash produces a full stack, including the source code lines, and the crash report is emailed to you the moment it happens.
A Cloudgizer application is linked with the Apache server as an Apache module in a pre-fork configuration. This means the Apache web server will pre-fork a number of processes and direct incoming requests to them. The Apache module mechanism provides high-performance request handling for applications.
All Cloudgizer applications run under the same Linux user, with each application separated under its own application directory. This user is also the Apache user; i.e., the user running the web server.
Each application has its own database with the name matching that of the application. Cloudgizer establishes and maintains database connections across requests, increasing performance.
Development process
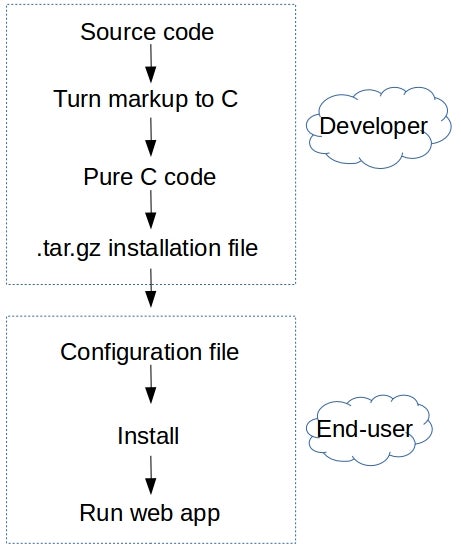
The process of compiling your source code and building an installation file is automated. By using the cldpackapp script, you’ll transform your code into pure C code and create an installation file (a .tar.gz file). The end user will install this file with the help of a configuration file called appinfo, producing a working web application. This process is straightforward:
The deployment process is designed to be automated if needed, with configurable parameters.
Getting started
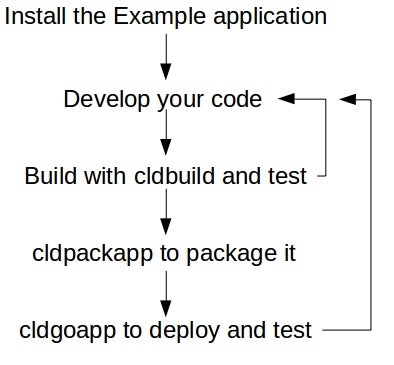
The development starts with installing the Example application. This sets up the development environment; you start with a Hello World and build up your application from there.
The Example application also serves as a smoke test because it has a number of code snippets that test various Cloudgizer features. It also gives you a good amount of example code (hence the name).
There are two files to be aware of as you start:
cld_handle_request.vis where incoming requests (such asGET,POST, or a command-line execution) are processed.sourcelistlists all your source code so that Cloudgizer can make your application.
In addition to cld_handle_request.v, oops.v implements an error handler, and file_too_large.v implements a response to an upload that's too large. These are already implemented in the Example application, and you can keep them as they are or tweak them.
Use cldbuild to recompile source-file (.v) changes, and cldpackapp to create an installer file for testing or release delivery via cldgoapp:
Deployment via cldgoapp lets you install an application from scratch or update from one version to another.
Example
Here's a stock-ticker application that updates and reports on ticker prices. It is included in the Example application.
The code
The request handler checks the URL query parameter page, and if it's stock, it calls function stock():
#include "cld.h"

void cld_handle_request()
{
  /*<
  input-param page

  if-string page="stock"
      c stock ();
  else
      report-error "Unrecognized page %s", page
  end-if
  >*/
}
The implementation of function stock() would be in file stock.v. The code adds a stock ticker if the URL query parameter action is add or shows all stock tickers if it is show.
#include "cld.h"

void stock()
{
   /*<

   output-http-header

   <html>
       <body>
       input-param action

       if-string action="add"
           input-param stock_name
           input-param stock_price

           run-query#add_data = "insert into stock \
               (stock_name, stock_price) values \
               (<?stock_name?>, <?stock_price?>) \
               on duplicate key update \
               stock_price=<?stock_price?>"

               query-result#add_data, error as \
                   define err

               if atoi(err) != 0
                   report-error "Cannot update \
                       stock price, error [%s]",err
               end-if
           end-query

           <div>
               Stock price updated!
           </div>
       else-if-string action="show"
           <table>
               <tr>
                   <td>Stock name</td>
                   <td>Stock price</td>
               </tr>
           run-query#show_data = "select stock_name, \
               stock_price from stock"

               <tr>
                   <td>
                   query-result#show_data, stock_name
                   </td>
                   <td>
                   query-result#show_data, stock_price
                   </td>
               </tr>
           end-query
           </table>
       else
           <div>Unrecognized request!</div>
       end-if
       </body>
   </html>
   >*/
}
The database table
The SQL table used would be:
create table stock (stock_name varchar(100) primary key, stock_price bigint);
Making and packaging
To include stock.v in your Cloudgizer application, simply add it to the sourcelist file:
SOURCE_FILES=stock.v ....
...
stock.o : stock.v $(CLDINCLUDE)/cld.h $(HEADER_FILES)
...
To recompile changes to your code, use:
cldbuild
To package your application for deployment, use:
cldpackapp
When packaging an application, all additional objects you create (other than source code files), should be included in the create.sh file. This file sets up anything that the Cloudgizer application installer doesn't do; in this case, create the above SQL table. For example, the following code in your create.sh might suffice:
echo -e "drop table if exists stock;\ncreate table stock (stock_name varchar(100) primary key, stock_price bigint);" | mysql -u root -p$CLD_DB_ROOT_PWD -D $CLD_APP_NAME
In create.sh, you can use any variables from the appinfo file (an installation configuration file). Those variables always include CLD_DB_ROOT_PWD (the root password database, which is always automatically cleared after installation for security), CLD_APP_NAME (the application and database name), CLD_SERVER (the URL of the installation server), CLD_EMAIL (the administration and notification email address), and others. You also have CLD_APP_HOME_DIR (the application's home directory) and CLD_APP_INSTALL_DIR (the location where the installation .tar.gz file had been unzipped so you can copy files from it). You can include any other variables in the appinfo file that you find useful.
Using the application
If your application name is 'myapp' running on myserver.com, then the URL to update a stock ticker would be this:
https://myserver.com/go.myapp?page=stock&action=add&stock_name=RHT&stock_price=500
and the URL to show all stock tickers would be this:
https://myserver.com/go.myapp?page=stock&action=show
(The URL path for all Cloudgizer applications always starts with go.; in this case, go.myapp.)
Download and more examples
For more examples or download and installation details, visit Zigguro.org/cloudgizer. You'll also find the above example included in the installation (see the Example application source code).
For a much larger real-world example, check out the source code for Rentomy, a free open source cloud application for rental property managers, written entirely in Cloudgizer and consisting of over 32,000 lines of code.
Why use Cloudgizer?
Here's why Rentomy is written in Cloudgizer:
Originally, the goal was to use one of the popular scripting languages or process virtual machines like Java, and to host Rentomy as a Software-as-a-Service (Saas) free of charge.
Since there are nearly 50 million rental units in the US alone, a free service like this needs superior software performance.
So squeezing more power from CPUs and using less RAM became very important. And with Moore's Law slowing down, the bloat of popular web languages is costing more computing resources—we're talking about process-virtual machines, interpreters, p-code generators, etc.
Debugging can be a pain because more layers of abstraction exist between you and what's really going on. Not every library can be easily used, so some functional and interoperability limitations remain.
On the other hand, in terms of big performance and a small footprint, there is no match for C. Most libraries are written in C for the same reason, so virtually any library you need is available, and debugging is straightforward.
However, C has issues with memory and overall safety (overwrites, underwrites, garbage collection, etc.), usability (it is low-level), application packaging, etc. And equally important, much of the development cost lies in the ease of writing and debugging the code and in its accessibility to novices.
From this perspective, Cloudgizer was born. Greater performance and a smaller footprint mean cheaper computing power. Easy, stable coding brings Zen to the development process, as does the ability to manage it better.
In hindsight, using Cloudgizer to build Rentomy was like using a popular scripting language without the issues.
via: https://opensource.com/article/18/8/cloudgizer-intro
作者:Sergio Mijares 选题:lujun9972 译者:译者ID 校对:校对者ID


