sources/tech/20200728 How to create a documentation site with Docsify and GitHub Pages.md
12 KiB
How to create a documentation site with Docsify and GitHub Pages
Use Docsify to create documentation web pages to publish on GitHub
Pages.

Documentation is an essential part of making any open source project useful to users. But it's not always developers' top priority, as they may be more focused on making their application better than on helping people use it. This is why making it easier to publish documentation is so valuable to developers. In this tutorial, I'll show you one option for doing so: combining the Docsify documentation generator with GitHub Pages.
If you prefer to learn by video, you can access the YouTube version of this how-to:
By default, GitHub Pages prompts users to use Jekyll, a static site generator that supports HTML, CSS, and other web technologies. Jekyll generates a static website from documentation files encoded in Markdown format, which GitHub automatically recognizes due to their .md or .markdown extension. While this setup is nice, I wanted to try something else.
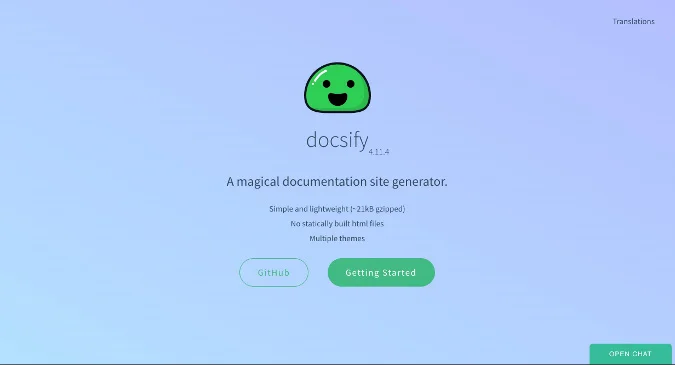
Fortunately, GitHub Pages' HTML file support means you can use other site-generation tools, including Docsify, to create a website on the platform. Docsify is an MIT-Licensed open source project with features that make it easy to create an attractive advanced documentation site on GitHub Pages.
(Bryant Son, CC BY-SA 4.0)
Get started with Docsify
There are two ways to install Docsify:
- Docsify's command-line interface (CLI) through NPM
- Manually by writing your own
index.html
Docsify recommends the NPM approach, but I will use the second option. If you want to use NPM, follow the instructions in the quick-start guide.
Download the sample content from GitHub
I've published this example's source code on the project's GitHub page. You can download the files individually or clone the repo with:
`git clone https://github.com/bryantson/OpensourceDotComDemos`
Then cd into the DocsifyDemo directory.
I will walk you through the cloned code from my sample repo below, so you can understand how to modify Docsify. If you prefer, you can start from scratch by creating a new index.html file, like in the example in Docsify's docs:
<!-- index.html -->

<!DOCTYPE html>
<[html][12]>
<[head][13]>
  <[meta][14] http-equiv="X-UA-Compatible" content="IE=edge,chrome=1">
  <[meta][14] name="viewport" content="width=device-width,initial-scale=1">
  <[meta][14] charset="UTF-8">
  <[link][15] rel="stylesheet" href="//cdn.jsdelivr.net/npm/docsify/themes/vue.css">
</[head][13]>
<[body][16]>
  <[div][17] id="app"></[div][17]>
  <[script][18]>
    window.$docsify = {
      //...
    }
  </[script][18]>
  <[script][18] src="//cdn.jsdelivr.net/npm/docsify/lib/docsify.min.js"></[script][18]>
</[body][16]>
</[html][12]>
Explore how Docsify works
If you cloned my GitHub repo and changed into the DocsifyDemo directory, you should see a file structure like this:
(Bryant Son, CC BY-SA 4.0)
| File/Folder Name | What It Is |
|---|---|
| index.html | The main Docsify initiation file (and the most important file) |
| _sidebar.md | Renders the navigation |
| README.md | The default Markdown file at the root of your documentation |
| images | Contains a sample .jpg image from the README.md |
| Other directories and files | Contain navigatable Markdown files |
Index.html is the only thing required for Docsify to work. Open the file, so you can explore the contents:
<!-- index.html -->
<!DOCTYPE html>
<[html][12]>
<[head][13]>
<[meta][14] http-equiv="X-UA-Compatible" content="IE=edge,chrome=1">
<[meta][14] name="viewport" content="width=device-width,initial-scale=1">
<[meta][14] charset="UTF-8">
<[link][15] rel="stylesheet" href="//cdn.jsdelivr.net/npm/docsify/themes/vue.css">
<[title][20]>Docsify Demo</[title][20]>
</[head][13]>
<[body][16]>
<[div][17] id="app"></[div][17]>
<[script][18]>
window.$docsify = {
el: "#app",
repo: '<https://github.com/bryantson/OpensourceDotComDemos/tree/master/DocsifyDemo>',
loadSidebar: true,
}
</[script][18]>
<[script][18] src="//cdn.jsdelivr.net/npm/docsify/lib/docsify.min.js"></[script][18]>
</[body][16]>
</[html][12]>
This is essentially just a plain HTML file, but take a look at these two lines:
<[link][15] rel="stylesheet" href="//cdn.jsdelivr.net/npm/docsify/themes/vue.css">
... SOME OTHER STUFFS ...
<[script][18] src="//cdn.jsdelivr.net/npm/docsify/lib/docsify.min.js"></[script][18]>
These lines use content delivery network (CDN) URLs to serve the CSS and JavaScript scripts to transform the site into a Docsify site. As long as you include these lines, you can turn your regular GitHub page into a Docsify page.
The first line after the body tag specifies what to render:
`<div id="app"></div>`
Docsify is using the single page application (SPA) approach to render a requested page instead of refreshing an entirely new page.
Last, look at the lines inside the script block:
<[script][18]>
window.$docsify = {
el: "#app",
repo: '<https://github.com/bryantson/OpensourceDotComDemos/tree/master/DocsifyDemo>',
loadSidebar: true,
}
</[script][18]>
In this block:
-
The
elproperty basically says, "Hey, this is theidI am looking for, so locate theidand render it there." -
Changing the
repovalue identifies which page users will be redirected to when they click the GitHub icon in the top-right corner.
(Bryant Son, CC BY-SA 4.0)
- Setting
loadSideBartotruewill make Docsify look for the_sidebar.mdfile that contains your navigation links.
You can find all the options in the Configuration section of Docsify's docs.
Next, look at the _sidebar.md file. Because you set the loadSidebar property value to true in index.html, Docsify will look for the _sidebar.md file and generate the navigation file from its contents. The _sidebar.md contents in the sample repo are:
<!-- docs/_sidebar.md -->

* [HOME](./)

* [Tutorials](./tutorials/index)
  * [Tomcat](./tutorials/tomcat/index)
  * [Cloud](./tutorials/cloud/index)
  * [Java](./tutorials/java/index)

* [About](./about/index)

* [Contact](./contact/index)
This uses Markdown's link format to create the navigation. Note that the Tomcat, Cloud, and Java links are indented; this causes them to be rendered as sublinks under the parent link.
Files like README.md and images pertain to the repository's structure, but all the other Markdown files are related to your Docsify webpage.
Modify the files you downloaded however you want, based on your needs. In the next step, you will add these files to your GitHub repo, enable GitHub Pages, and finish the project.
Enable GitHub Pages
Create a sample GitHub repo, then use the following GitHub commands to check, commit, and push your code:
$ git clone LOCATION_TO_YOUR_GITHUB_REPO
$ cd LOCATION_TO_YOUR_GITHUB_REPO
$ git add .
$ git commit -m "My first Docsify!"
$ git push
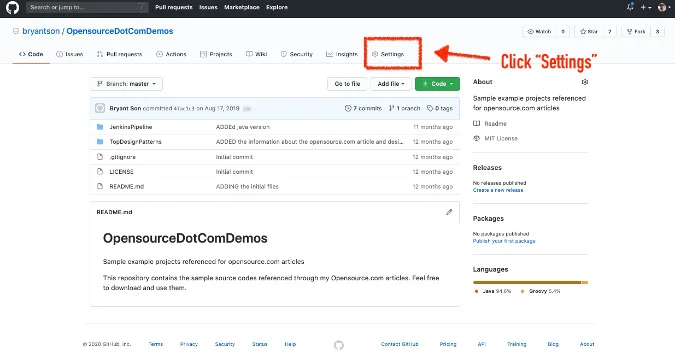
Set up your GitHub Pages page. From inside your new GitHub repo, click Settings:
(Bryant Son, CC BY-SA 4.0)
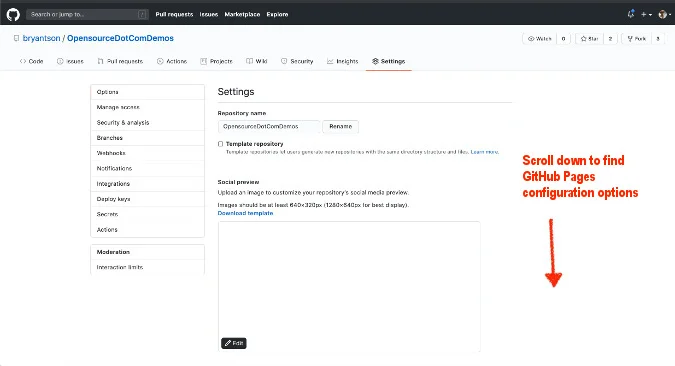
Scroll down until you see GitHub Pages:
(Bryant Son, CC BY-SA 4.0)
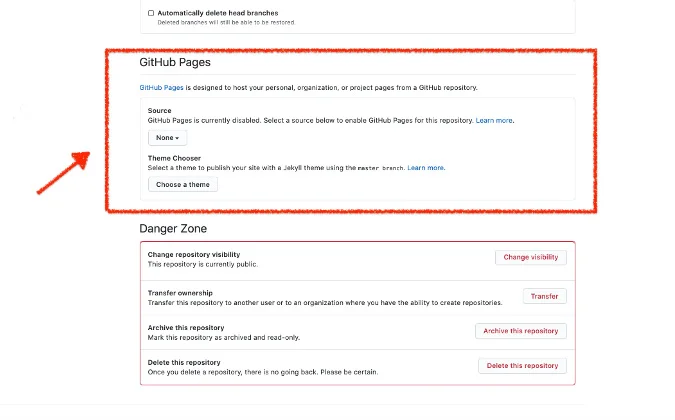
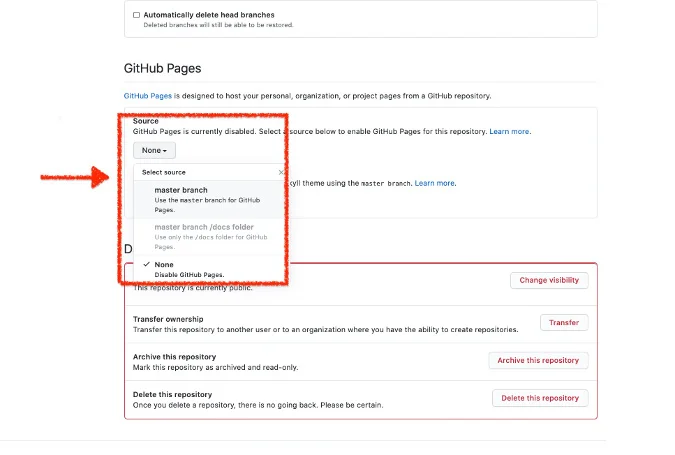
Look for the Source section:
(Bryant Son, CC BY-SA 4.0)
Click the drop-down menu under Source. Usually, you will set this to the master branch, but you can use another branch, if you'd like:
(Bryant Son, CC BY-SA 4.0)
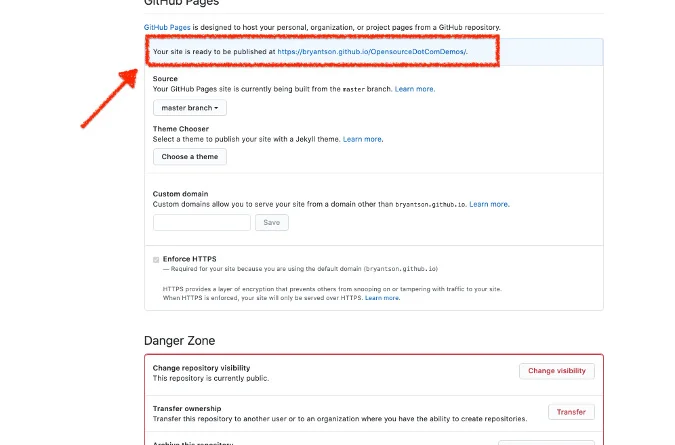
That's it! You should now have a link to your GitHub Pages page. Clicking the link will take you there, and it should render with Docsify:
(Bryant Son, CC BY-SA 4.0)
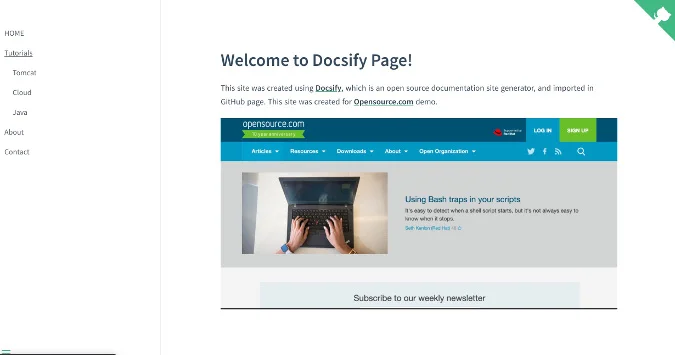
And it should look something like this:
(Bryant Son, CC BY-SA 4.0)
Conclusion
By editing a single HTML file and some Markdown text, you can create an awesome-looking documentation site with Docsify. What do you think? Please leave a comment and also share any other open source tools that can be used with GitHub Pages.
See how Jekyll, an open source generator of static HTML files, makes running a blog as easy as...
via: https://opensource.com/article/20/7/docsify-github-pages
作者:Bryant Son 选题:lujun9972 译者:译者ID 校对:校对者ID
