10 KiB
Supercharge Grammar Checking in LibreOffice With LanguageTool
The popular open source productivity suite LibreOffice comes with built-in grammar and spell checker.
However, there are better tools for this purpose. One of them is LanguageTool.
In this tutorial, I'll show how you can integrate LanguageTool in LibreOffice for better, accurate writing.
What is LanguageTool?
LanguageTool is a multilingual spelling, style, and grammar checker that helps correct or paraphrase texts. It offers several mediums to use, like a native Java app for Linux, a web-based editor, browser extensions for both Firefox and Chrome etc.
LanguageTool is an open source alternative to popular tools like Grammarly.
It offers a free basic plan with essential features and a premium plan with advanced features. For normal casual use cases, the free version is more than enough. The premium version is not that expensive as well and if you like it and afford it, you can opt for the premium version.
Check LibreOffice version
There are two methods of using LanguageTool depending on which LibreOffice version you are using.
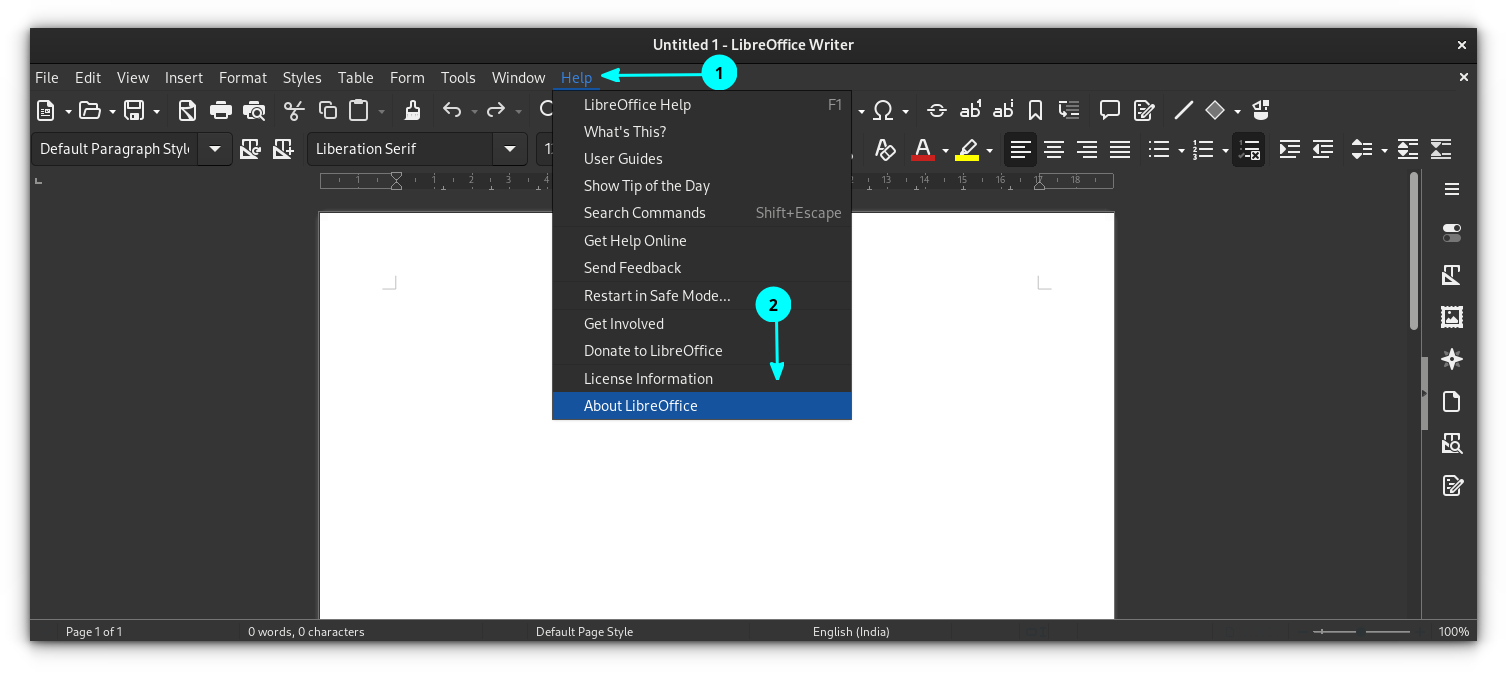
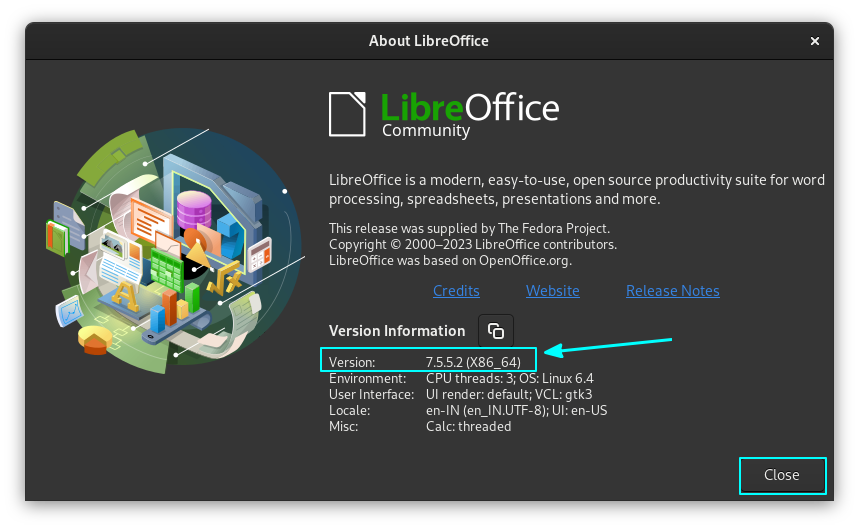
In order to know your LibreOffice version, click on Help in main menu and go to About page.
You can get the version details from here.
Using LanguageTool in the newer LibreOffice Writer
✋
You can use this method if you have LibreOffice version 7.4 or higher.
Step 1: Enable LanguageTool Server
🚧
Since this is a connection between LanguageTool’s server and LibreOffice on your computer, you need a stable internet connection to make this work.
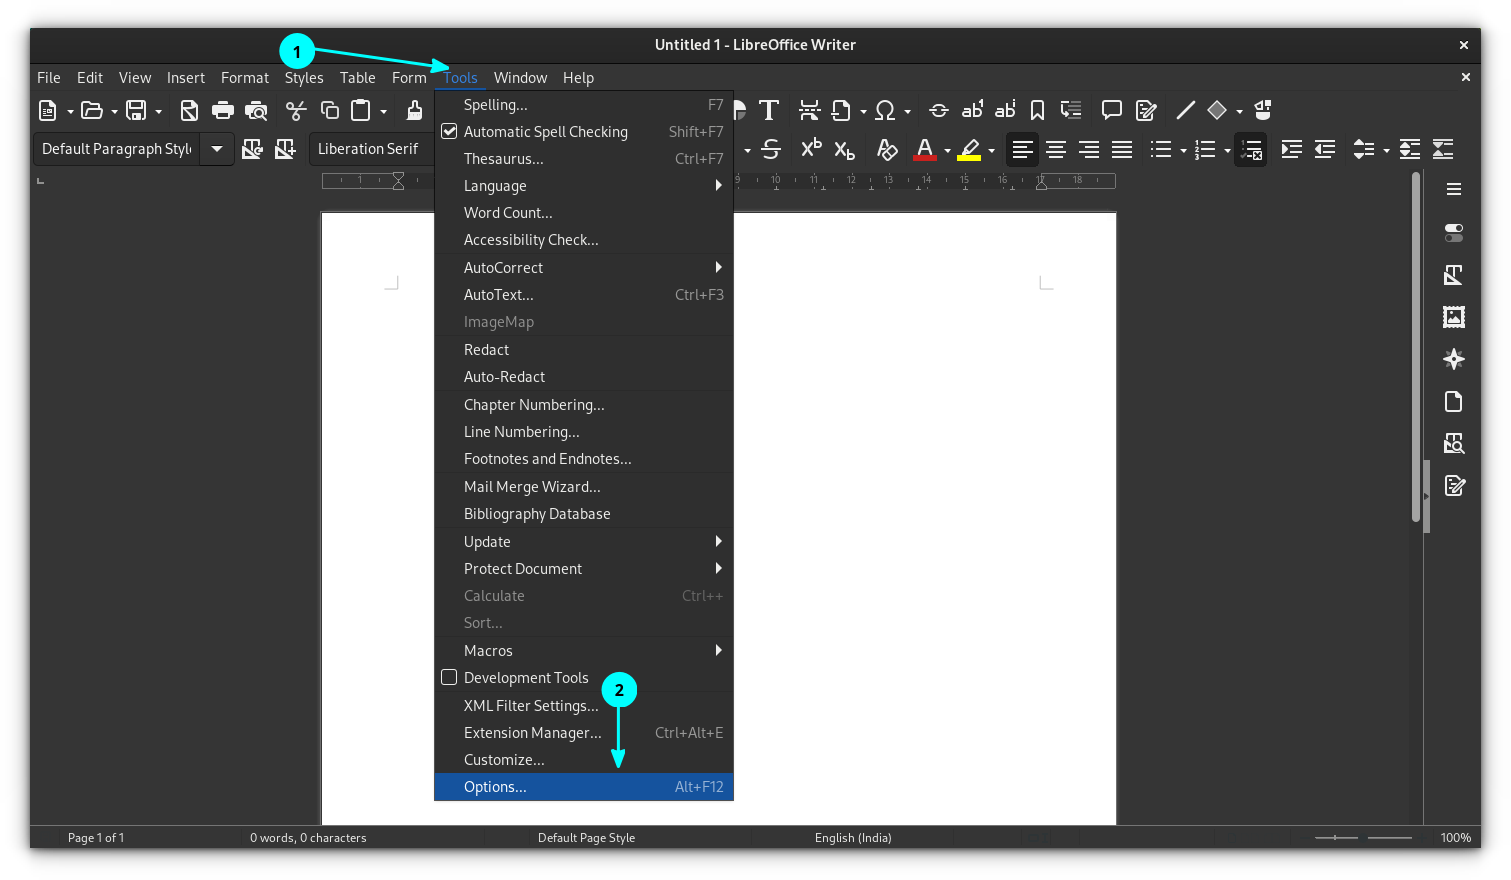
Go to Tools > Options.
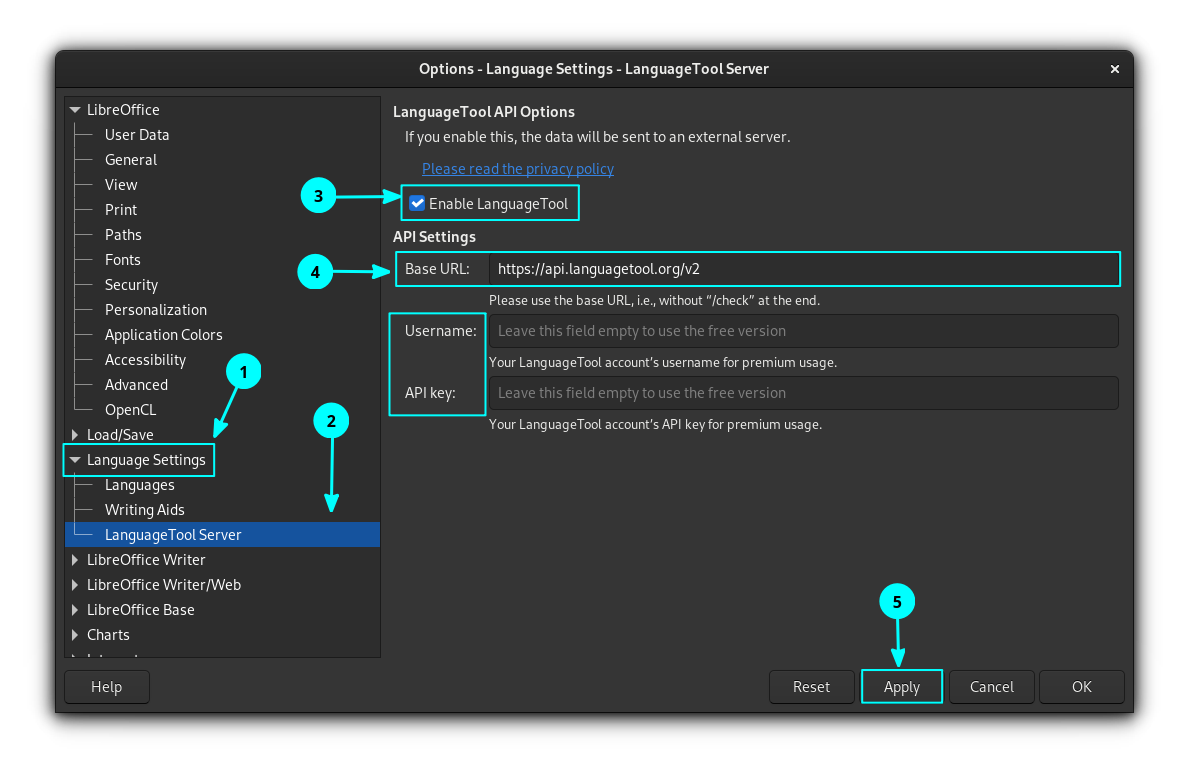
In the options window, select Language Settings > LanguageTool Server and then Click on Enable LanguageTool button, as shown below.
Here, you have three possibilities.
Use the Free version of LanguageTool
There is not much to do here. Because, upon clicking the “Enable” checkbox, probably the base URL field will be filled automatically with the required URL. If not, enter the below URL on the base URL field and leave the other two fields empty.
https://api.languagetool.org/v2
Use the Premium version of LanguageTool
If you have subscribed to a premium version of LanguageTool, first enter the base URL field with:
https://api.languagetoolplus.com/v2
On the “Username” field, enter your registered Email address and in the “API Key” field, enter your API key.
💡
You can generate your API Key yourself, by clicking on “Access token” in the settings of the LanguageTool Editor.
Set up a local server
If you want to set up a local server, then copy and paste the below URL to the “Base URL” field:
http://localhost:8081/v2
Step 2: Enable LanguageTool
Now that you have set up the LanguageTool server in LibreOffice, you need to enable the tool.
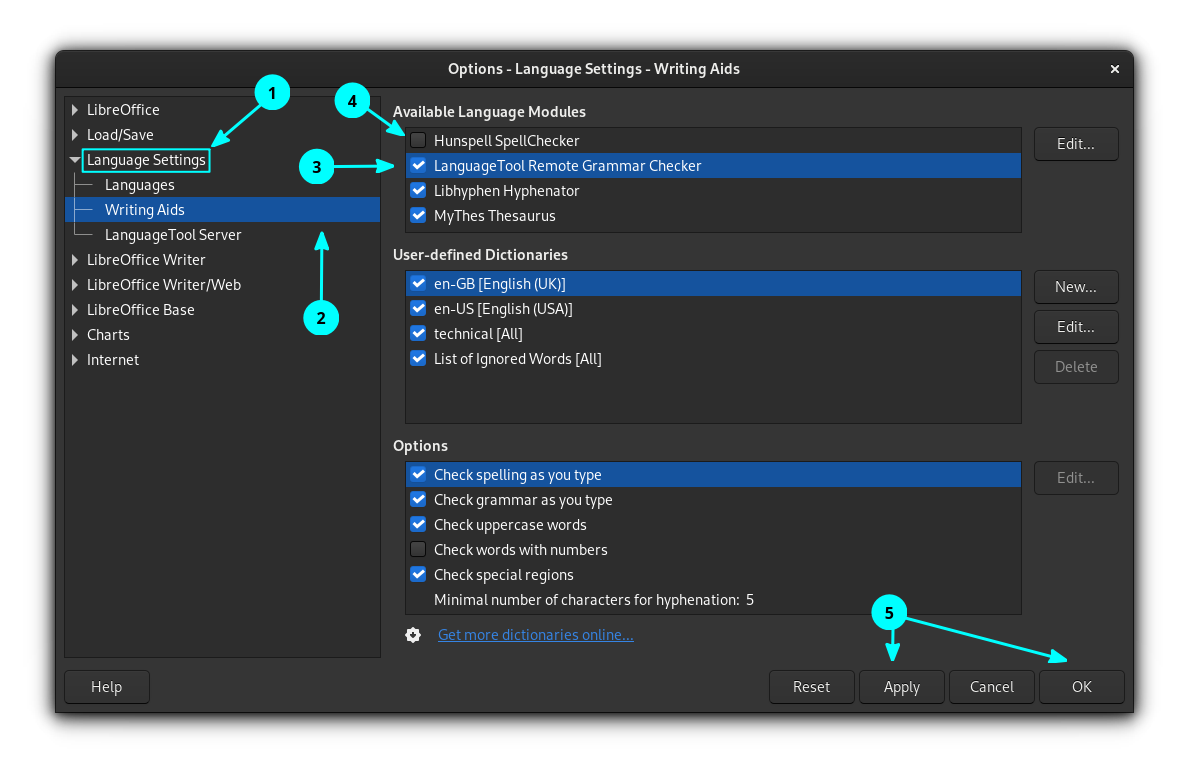
For that, go to Tools > Options. Inside the Options window, go to Language Settings > Writing Aids.
Enable LanguageTool Remote Grammar Checker , by clicking on the checkbox. Click OK to apply the settings.
🚧
If you have any other spell check tool enabled, disable all of them.
Step 3: Spell Check
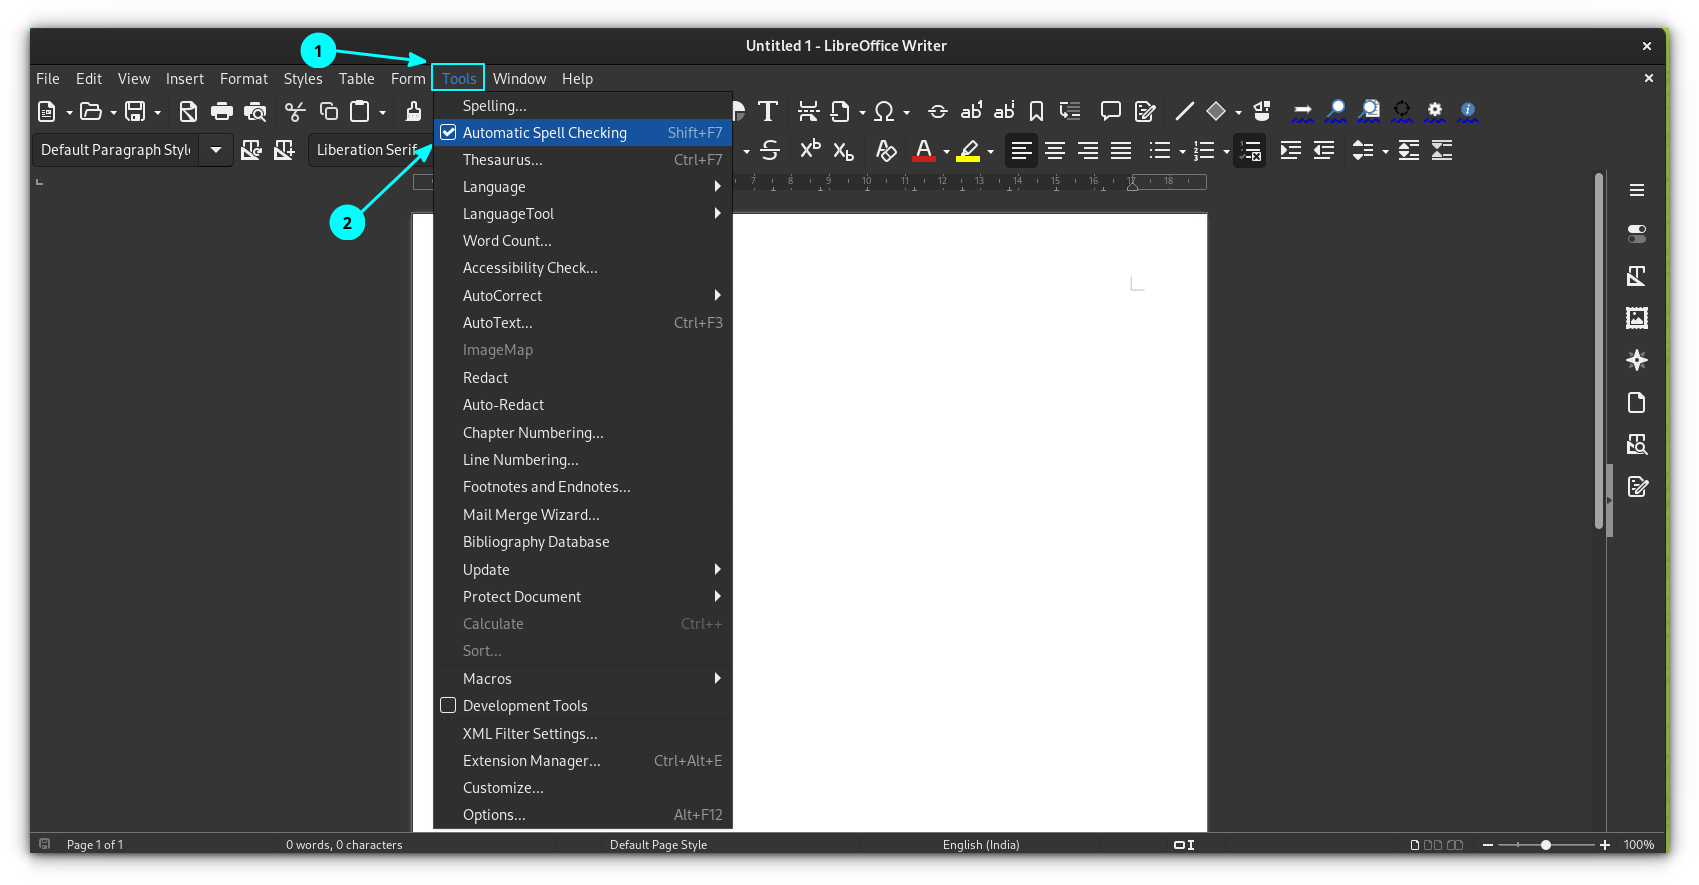
Verify if automatic spell check is enabled. For this, click on Tools and enable Automatic Spell Checking.
From here, once you start typing, it will detect grammar mistakes, spelling errors, etc.
Using LanguageTool in older LibreOffice Writer
✋
For LibreOffice below version 7.4, you can use a LanguageTool extension to access the proofreading service.
Compared to the API method, there are several advantages of using the extension.
- The extension runs on the local machine. No remote server is needed.
- The extension supports all rules working on the level of full text (e.g., opening and closing quotes are recognized even if they are more than one paragraph away from each other).
- Automatically adds all lists of correctly spelled words (according to LanguageTool) to the dictionaries used by LibreOffice.
- The extension supports grammar checking of Impress and Calc documents (Only manual checking by the LT check dialog. An automated check is not supported by LibreOffice.)
Step 1: Install the required packages
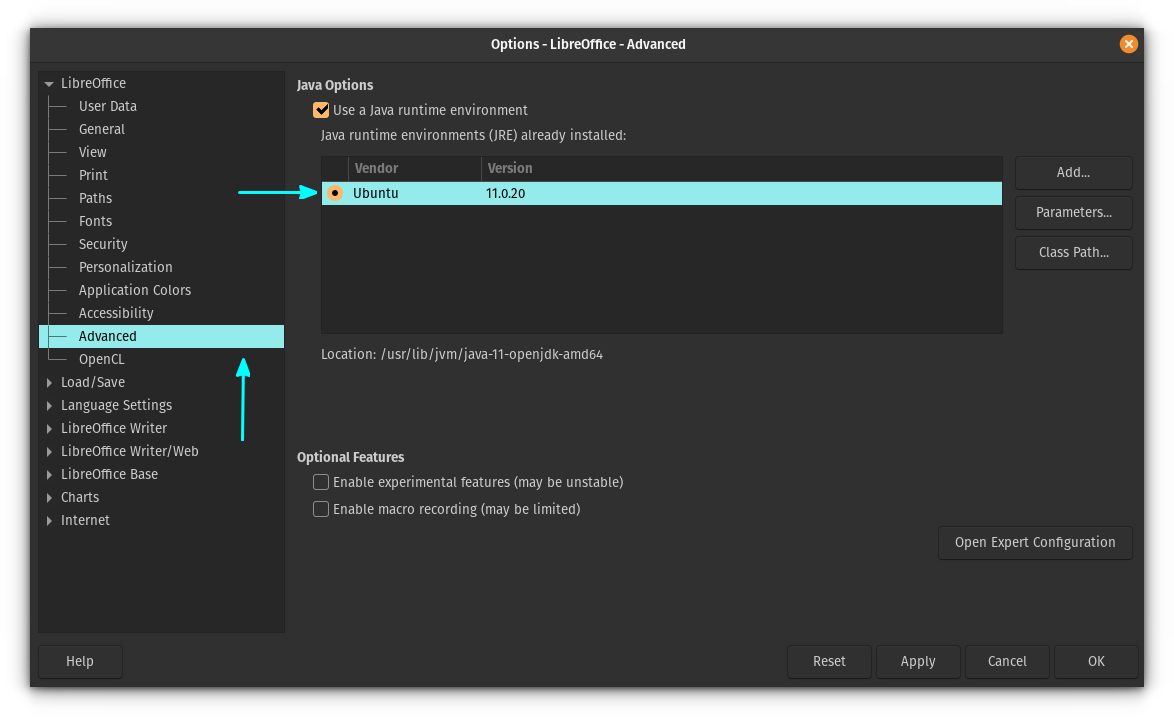
Since LanguageTool depends on Java, you need to have Java Runtime environment installed on your system and accessible by LibreOffice.
You can check this in LibreOffice by going to Tools > Options > Advanced.
If you do not have this, open a terminal and run:
sudo apt install default-jre libreoffice-java-common
This will install the necessary packages. Once installed, restart LibreOffice, if any instance is running, and then again check if everything is OK.
Step 2: Download the extension
LibreOffice's extensions are .oxt files. There is a dedicated platform for all the available LibreOffice extensions. There is one extension called LanguageTool, which you need here. You can download the latest version from the button below. It is a 200+ MiB sized file.
Download Latest Stable LanguageTool Extension for LibreOffice
Step 3: Install the extension
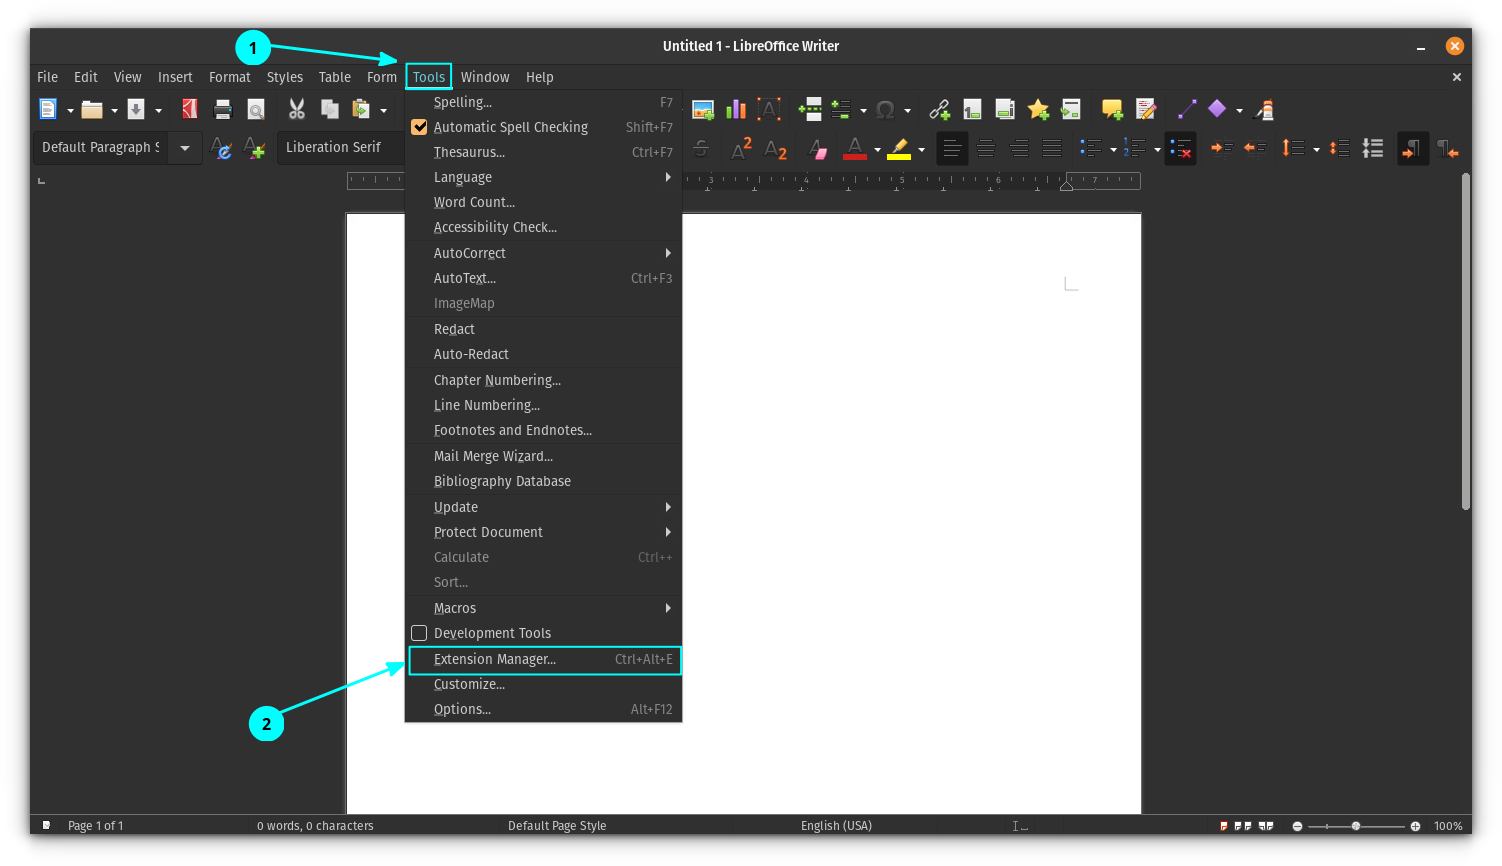
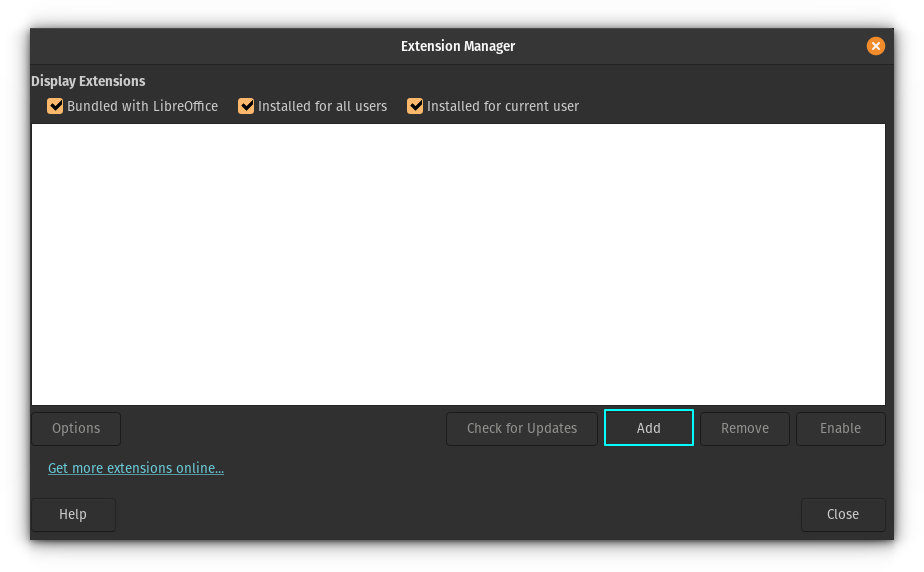
Open LibreOffice Writer. Select Tools > Extension Manager from the main menu.
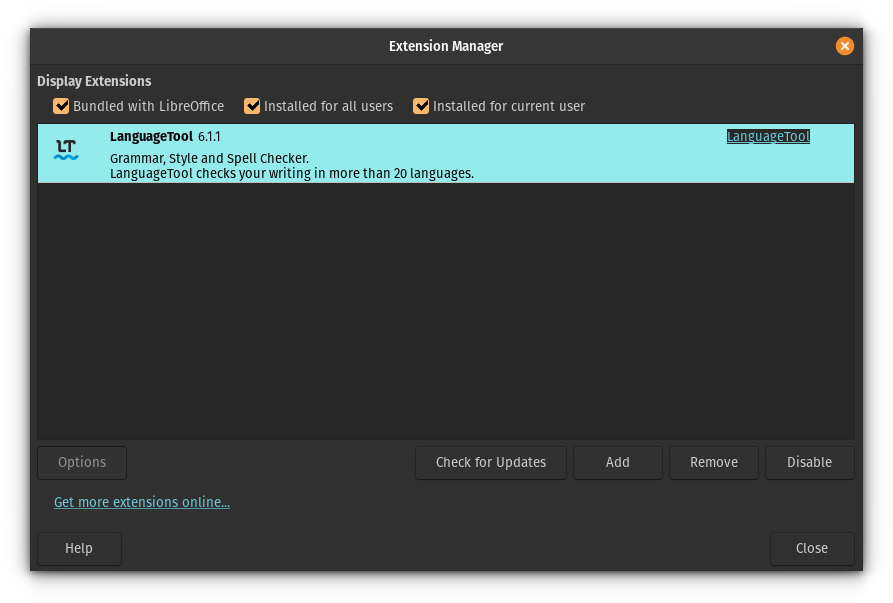
You can also press the shortcut key CTRL+ALT+E to go to the extension manager. Inside the extension manager, click on Add button.
Browse and open the downloaded extension file to install it. You can see the installation progress and once completed, it will be listed on the extension manager.
You should restart LibreOffice to finish the installation.
Step 4: Enable LanguageTool Extension and turn off other spell check tools
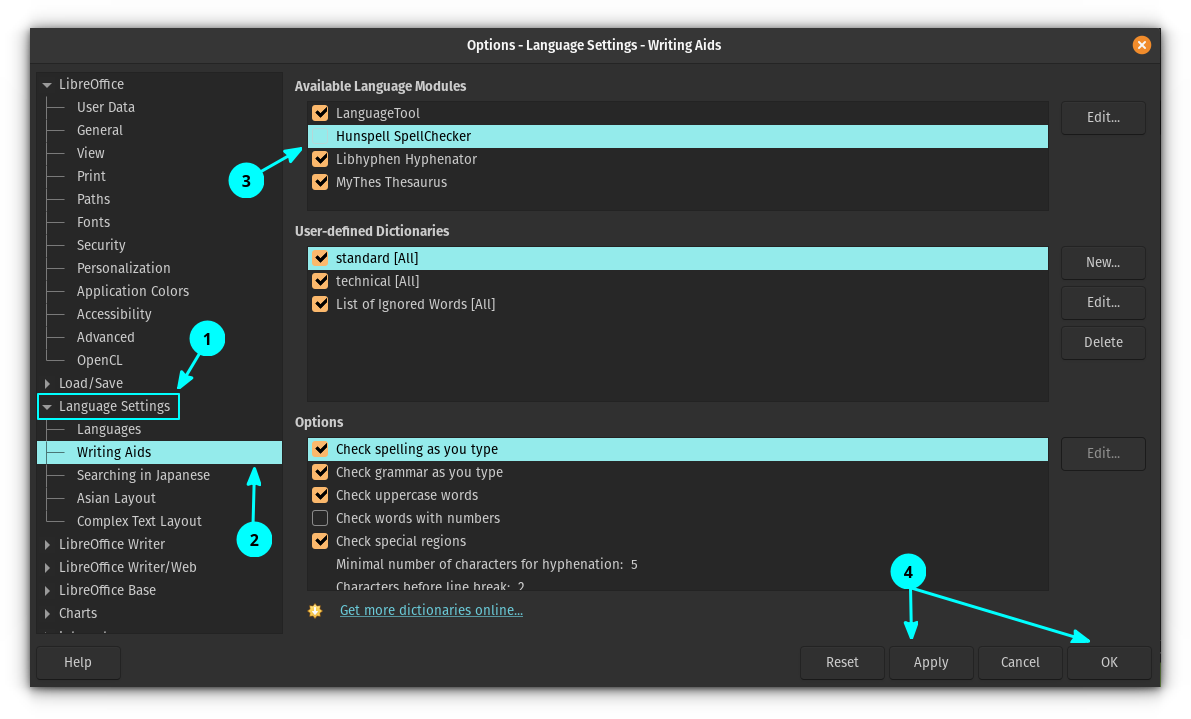
Enable LanguageTool in Writing Aids. Also, if you have any other spell-check tools or the default one enabled, disable them. You can do all this by going to Tools > Options > Language Settings > Writing Aids.
Apply the changes and restart LibreOffice.
Step 4: Dock or undock the toolbar
After you restart the LibreOffice, you can see a tiny floating toolbar. This is the LanguageTool toolbar, and you can dock this toolbar to your LibreOffice section. To do that, click on the top-right dropdown button and select Dock Toolbar.
You can see that the toolbar has now docked to the main toolbar section of LibreOffice. If you want to keep it as undocked later, right-click on it and select “Undock Toolbar”.
Step 5: Check your documents
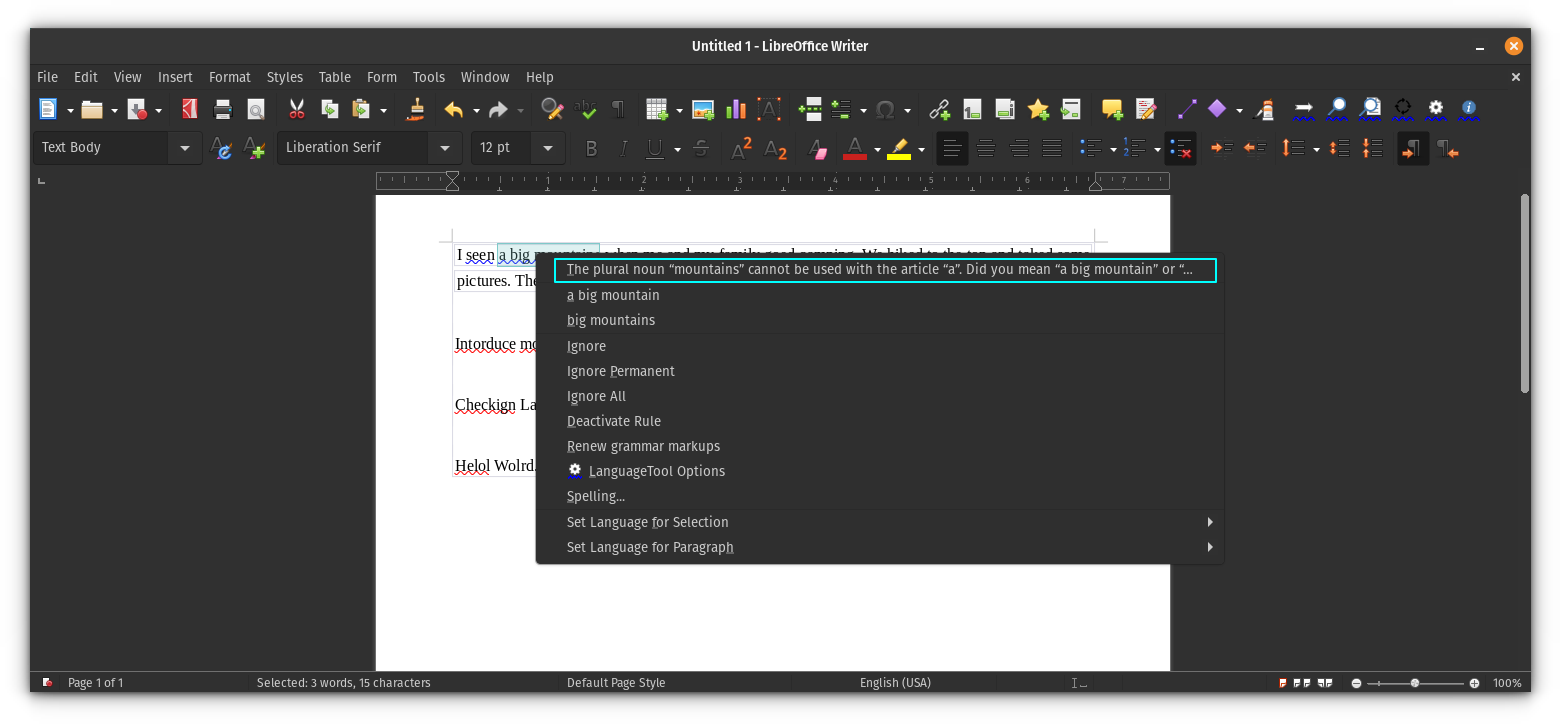
Now, if you start typing, you can see that LanguageTool starts suggesting.
Step 6: Tweak the extension
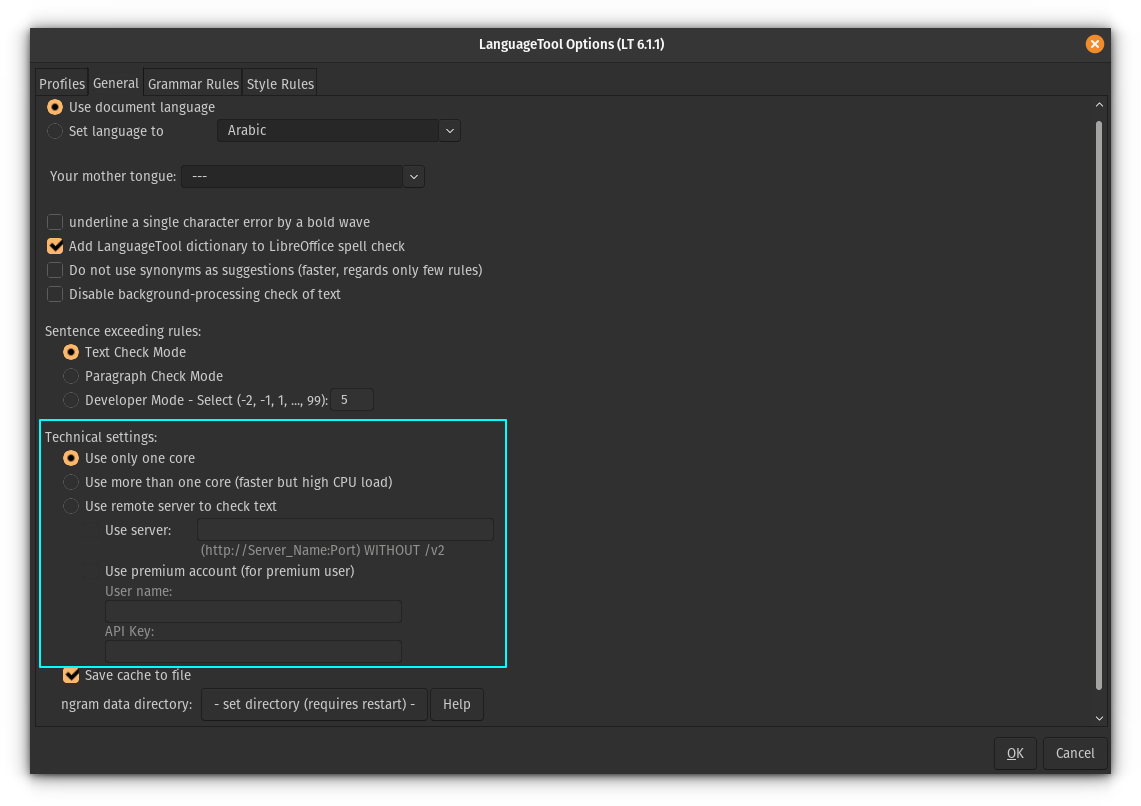
The extension provides several options to make it more productive. To access the extension settings, click on the settings button on the docked toolbar.
You will get a settings dialog box, where you can manage the working of the extension. It also provides a way to add a premium account, if you have any, using the API add section.
In the end...
I know that LibreOffice has built-in grammar checker. However, as a fan of LanguageTool, I would prefer using the same tool even in LibreOffice. It adds a lot more grammar checking features and uses my custom dictionary. Basically, I get a streamlined experience.
I hope you it enhances your LibreOffice Writer experience as well. Stay tuned for more LibreOffice tips.
via: https://itsfoss.com/libreoffice-languagetool/
