12 KiB
Top 10 Kdenlive Features for Faster Video Editing [Beginner’s Guide]
In this article, I will show you how easy to learn Kdenlive features and create awesome videos.
Kdenlive is a free and open-source video editor for Linux, Windows and macOS. It’s a KDE application and is considered one of the best feature-rich video editors. Although other excellent contenders exist in the free video editor space, such as Blender and Da Vinci Resolve, Kdenlive is the “OG” of all. I think it has all the features you get for free instead of buying costly licenses from commercial video editors.
Basic video editing in Kdenlive is easy if you know how to do it. Each of these Kdenlive features probably takes less than a minute to learn.
In this article, I will show you some basic video editing operations in Kdenlive in the easiest way.
Top 10 Kdenlive Features
1. Create Title
Titles are labels or simple texts which show on top of videos. They are similar to subtitles to explain the context of a frame or scene. It’s straightforward to create a custom title.
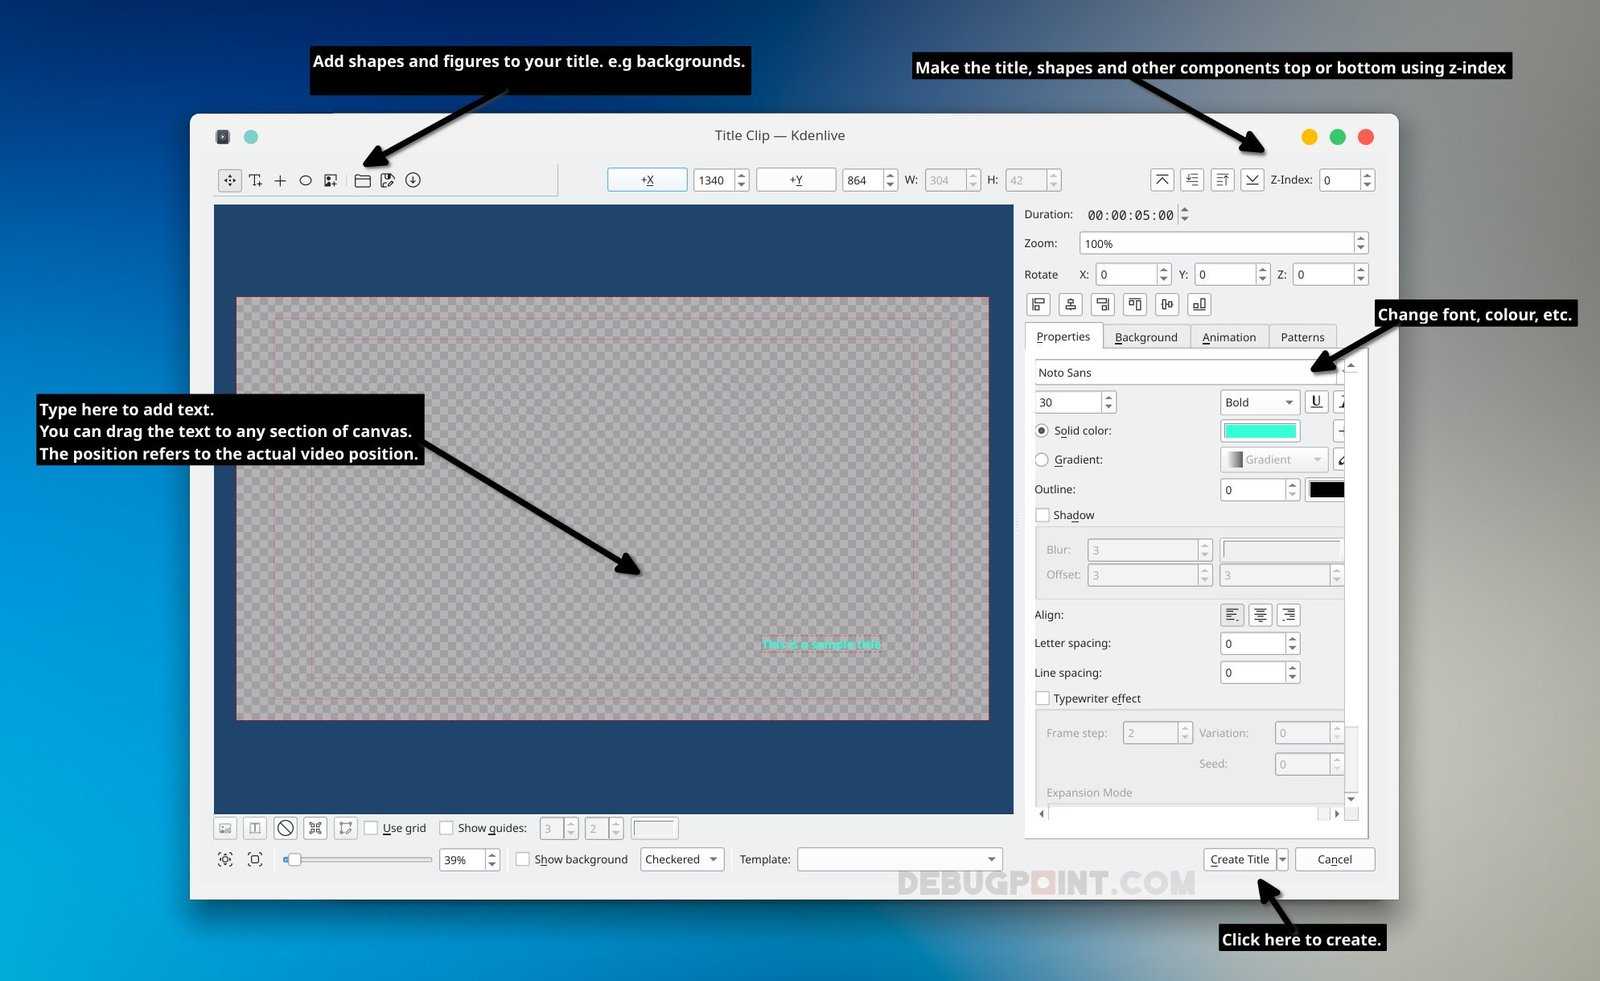
From the menu, select Project > Add Title Clip. In the title clip window, you should see a canvas. It’s the size of your video. Now, you can write anything for your title. Moreover, you can change font, colour, size and other text attributes from the right pane. You can add a background via the custom shapes at the top if you wish to add a background.
Once done, you can click the Create Title button, which should be added to your video. Now you can drag the title to the timeline for further manipulation.
If you want to change something on the Title again, you can Right-Click on the title and select Edit Clip.
2. Animation in titles
Suppose you want to do some basic animations of titles, such as zoom-in, zoom-out, and vertical/horizontal scrolling. In that case, it’s super easy via the Animation tab in the edit title dialogue.
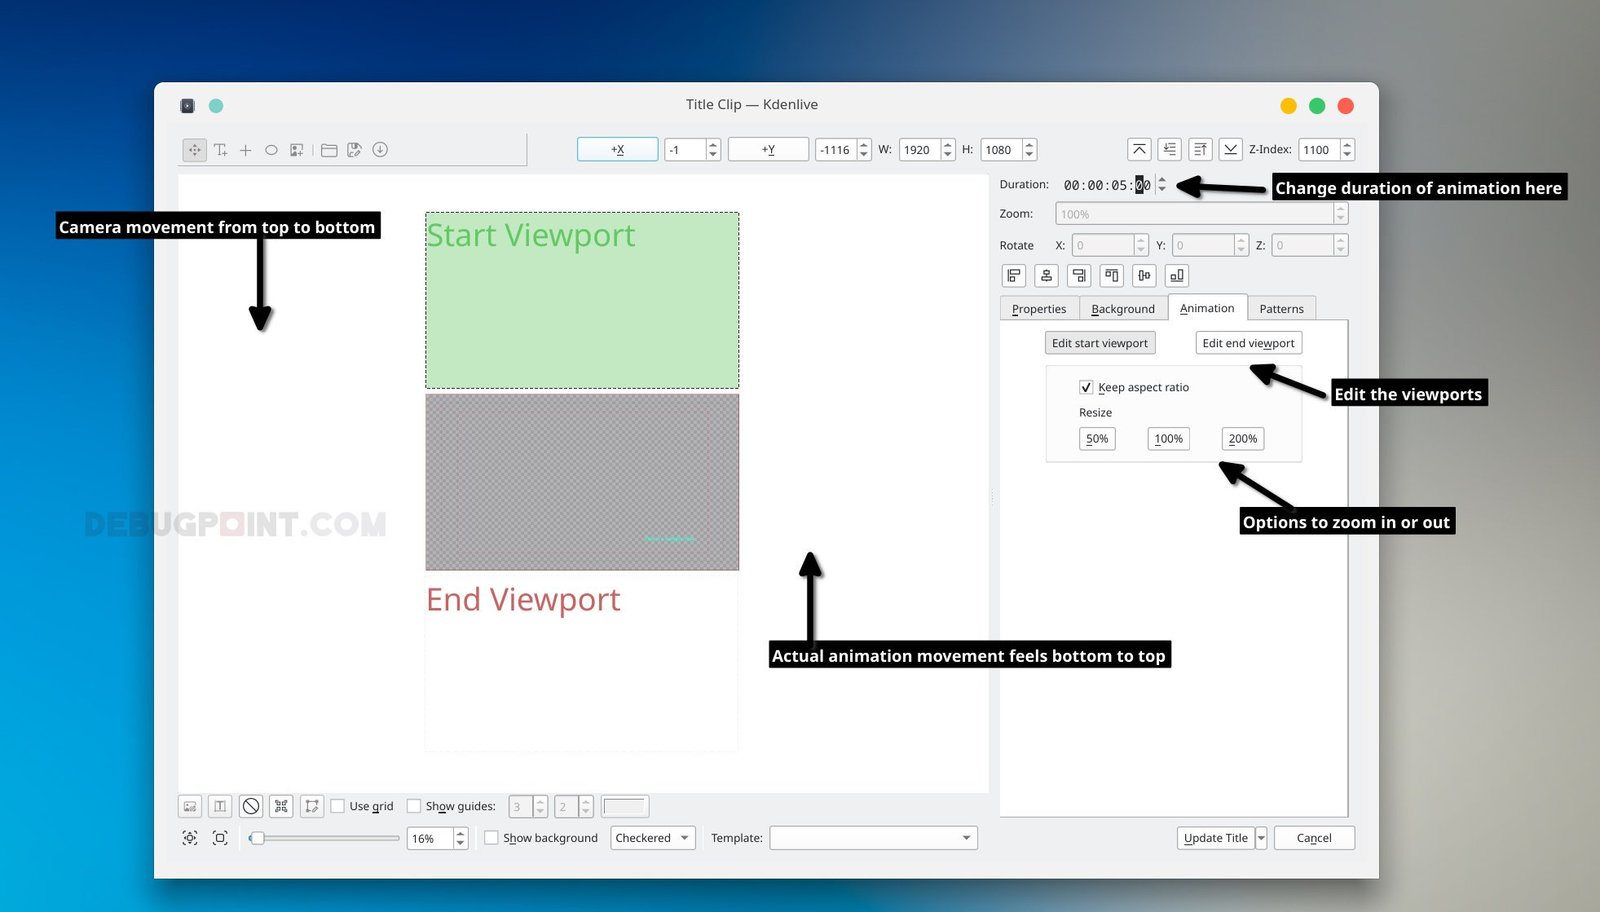
The Animation tab has two main buttons – Edit Start viewport and Edit End viewport. You can use these two buttons to animate your title.
For example, click the Edit Start Viewport if you want to scroll a text from bottom to top. It will give you GREEN Canvas. Using the mouse, drag the canvas to the top of the screen.
Similarly, click on the Edit End Viewport and drag the RED canvas to the bottom, as shown below.
Now, press Update TItle to change it. The animation happens as if the camera is moving from Start (top) to the End viewport (Bottom) – effectively making your title go from bottom to top.
Now you can also play around with several options, such as the duration of the animation. In addition, if you want to zoom in or out, you can change the aspect ratio as well similarly. Moreover, you can also rotate the titles via the X, Y and Z axis as well.
Finally, you can use all the above features to get the desired animations.
3. One-click transition (fade in and fade out)
In Kdenlive, you can easily apply the fade-in and fade-out transition in any clip with just one click. Select any clip (video, audio or title) and mouseover. On the left top section, you should see a green circle. Drag that green circle to the right on how long you want the transition.
Similarly, on the right-top, you should see a red circle. And you can repeat the steps easily.
See the below image.
Additionally, you can further change the time or ‘fade to black’ effect in your transitions with settings on the right side.
See how easy it is to add a transition?
4. Cut video, audio & anything
The most used operation in any video editing is cutting the clips. Kdenlive makes it so easy for you. It is required for better storytelling and composition.
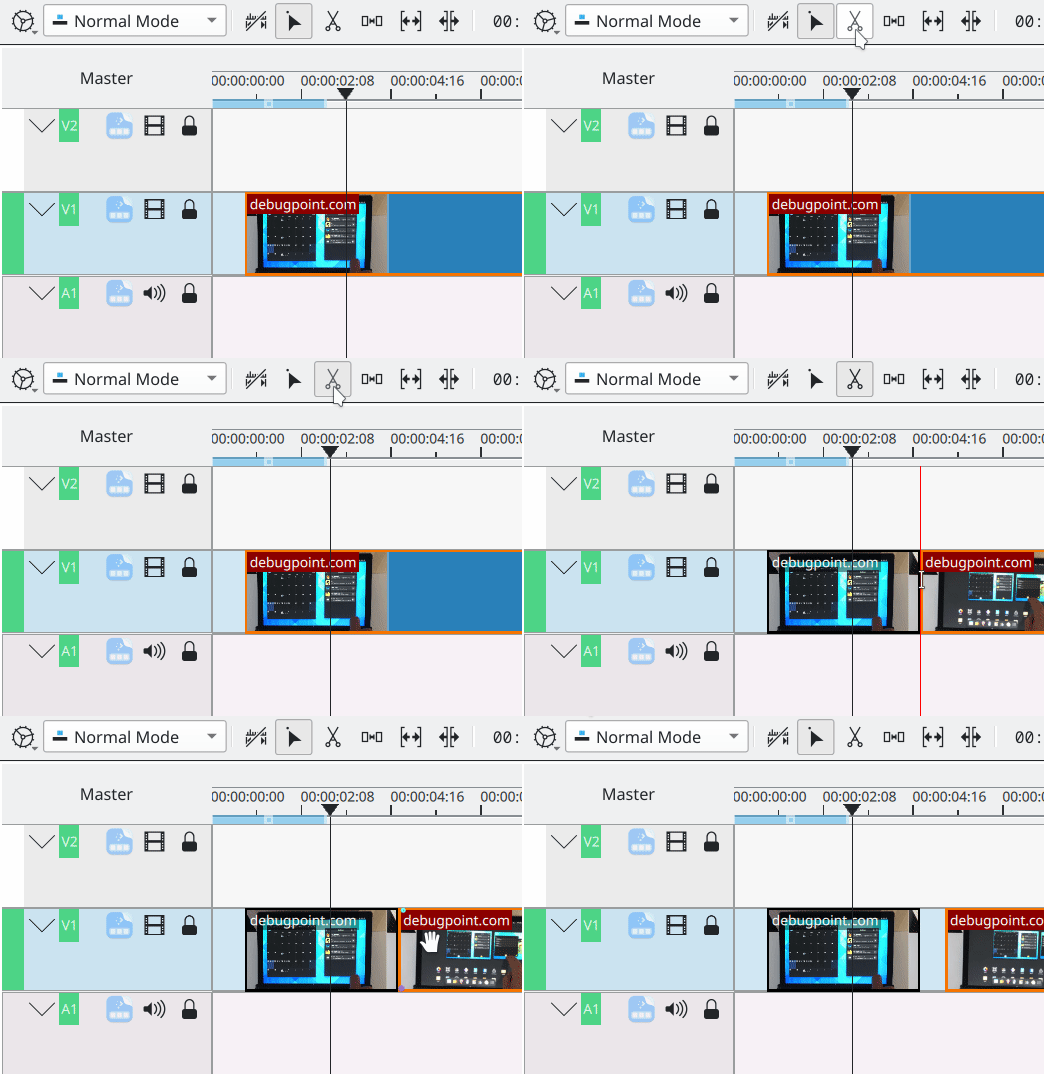
To cut a clip, simple use the Razor tool or press X after selecting the clip. Then click on the timestamp where you want it to happen. And that’s it. You can now use the pointer tool to move around the clipped part or delete them.
See it in action below.
5. Moving a section of blocks
When working on a complex edit, such as movies or short films, you create hundreds of small clips across tracks in the timeline. Moving them as a single or a group might feel tedious at first. But Kdenlive makes it easy.
You can quickly move a single clip, or a set of clips together left or right via the spacer tool or by pressing M from the keyboard. Click on the spacer tool and drag your mouse for easy movement. Keep the mouse pointer in the proper place to move them around.
In addition, you can also press Left Shift from the keyboard and select a select of clips to move.
6. Reusing a title
Reusing stuff saves time and money for everyone. Especially when you spend some hours creating that stunning title animation, and next time, you can import it to your next project and use it.
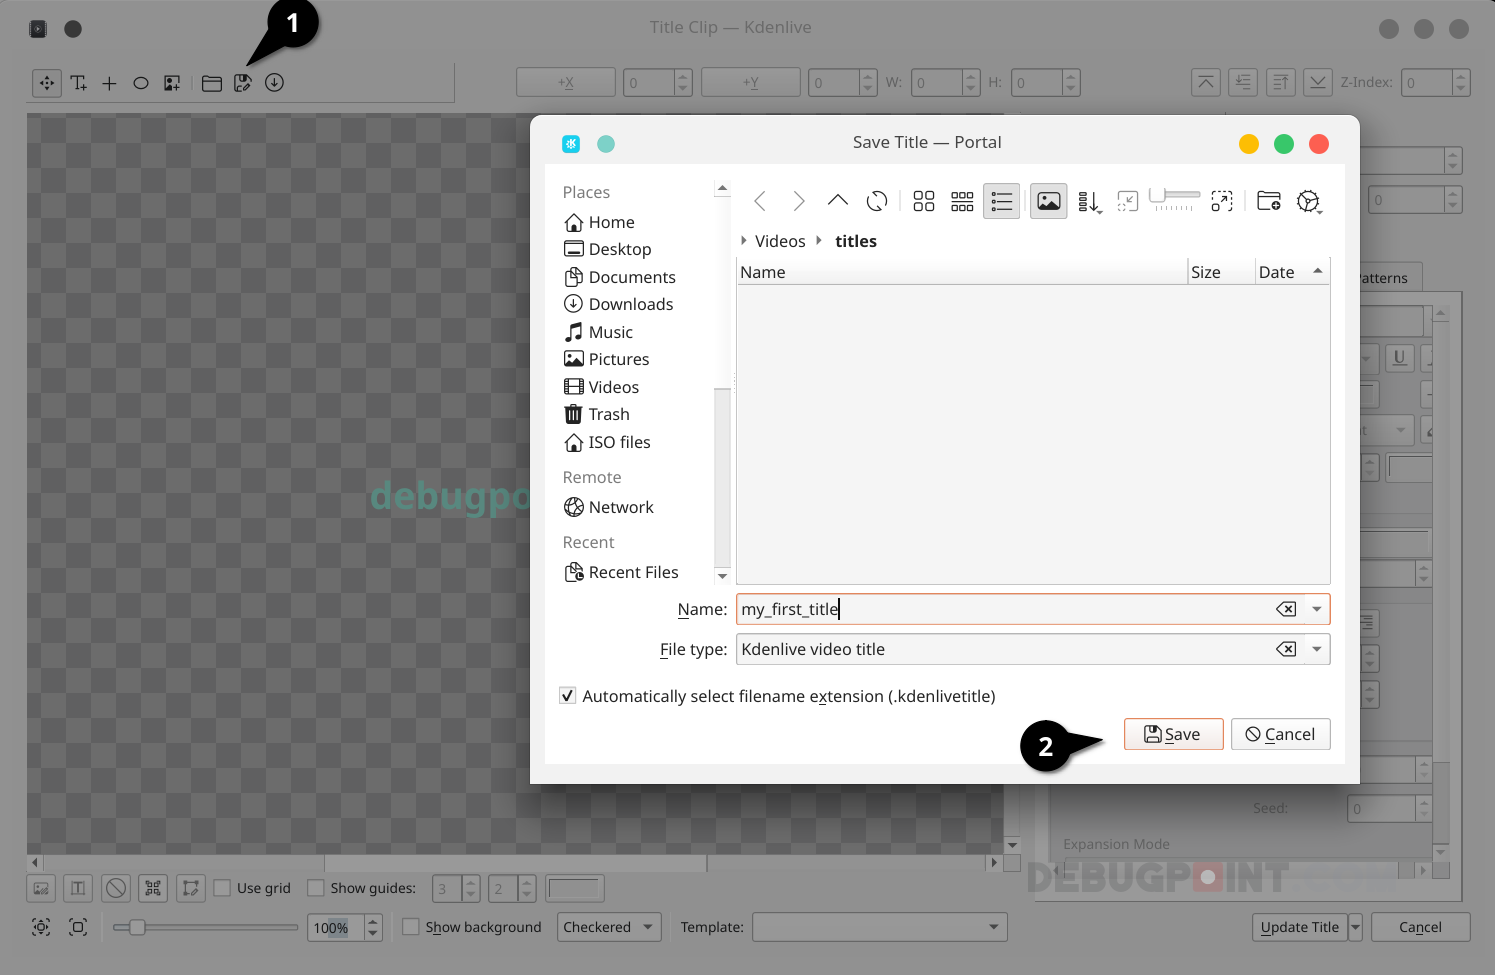
So to save a title animation, open the Edit Title Clip window and click on the Save As button in the toolbar. Then give a name and save it. The file saves in your home Videos > Titles folder.
Next time, you can open Project Bin > Add Template Title and select the one you saved.
It’s super easy. Also, you may want to download a massive list of pre-made titles from the Kde Store!
7. Changing colour profiles
Colour grading is an important aspect of movie making or video editing. It often comes during the post-production phase. Kdenlive brings a vast list of colour effects you can combine and use for your target story.
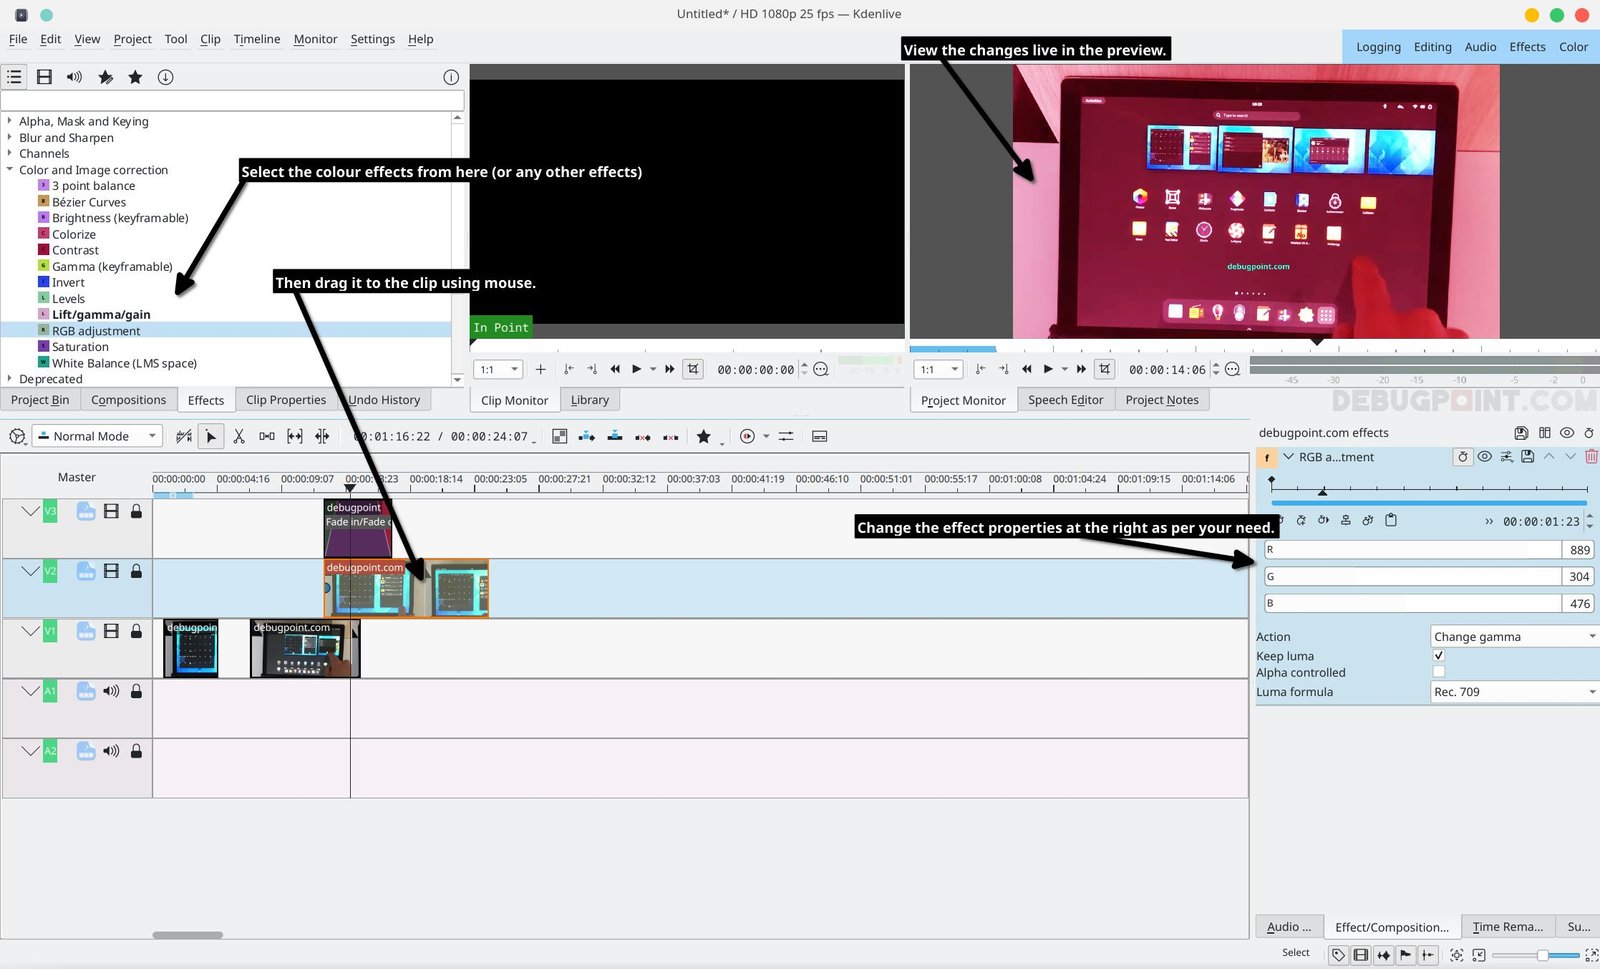
To apply the colour effects, go to the Effects tab in the project Bin. Then drag any Colour and Image Correction effect to the target clip. And now, you can apply or tweak various settings for that effect using the right panel.
All the changes are live in the canvas for easy preview.
8. Audio volume controls
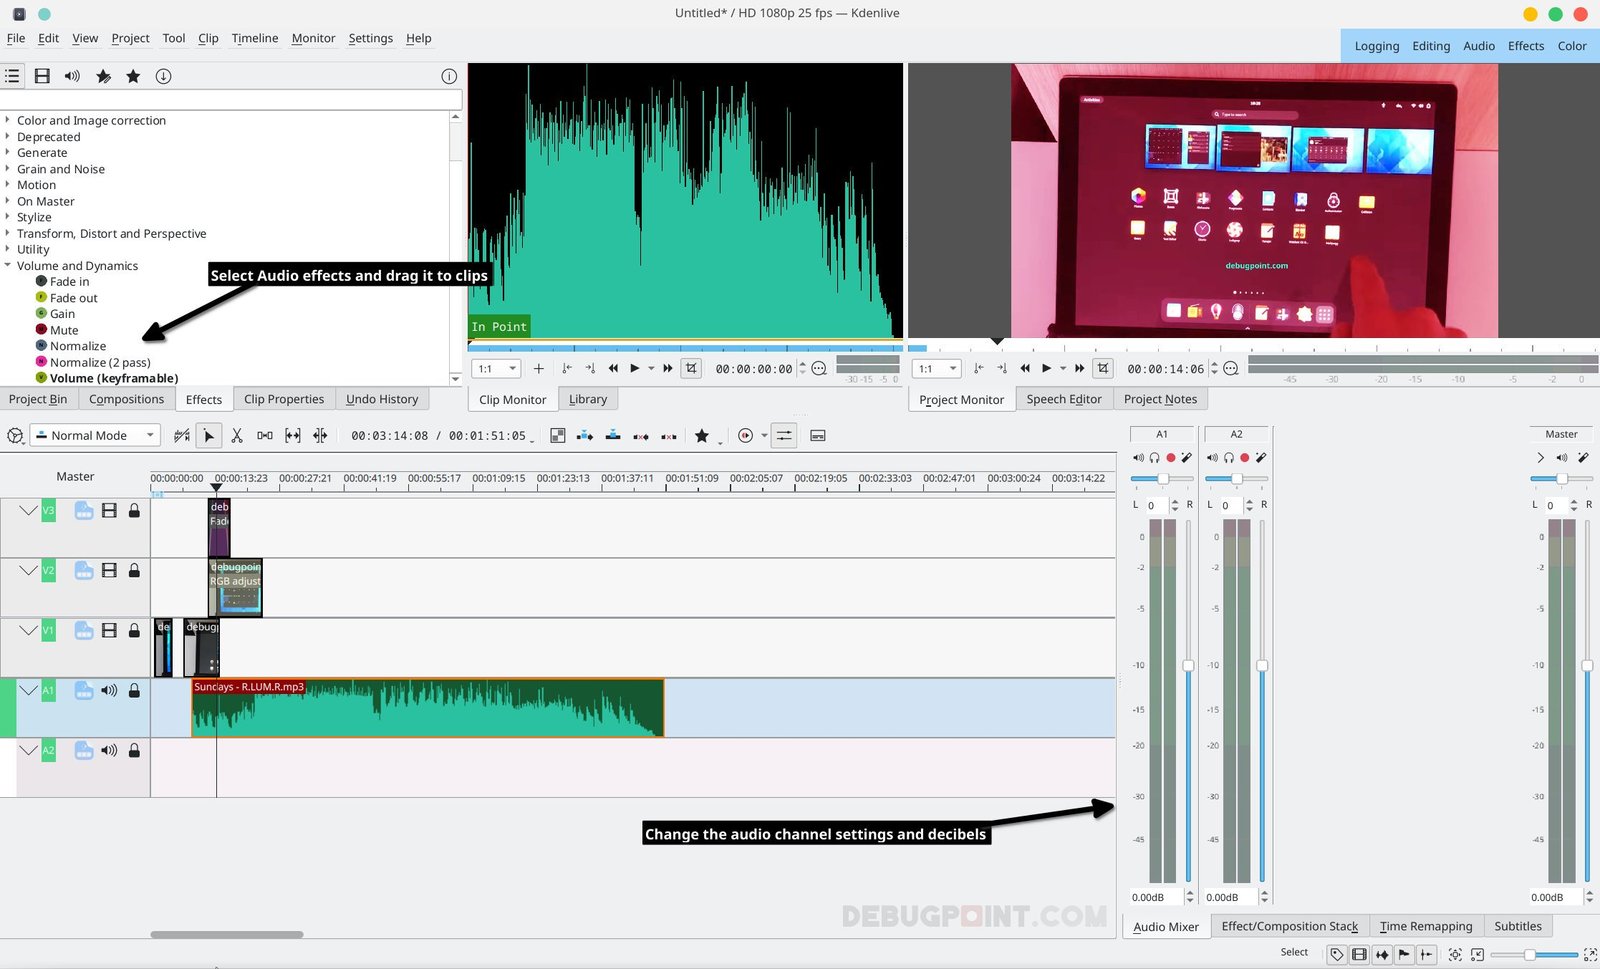
Similar to video or colour profiles, audio is also an essential item to consider in storytelling. The actual camera footage may have noises or volume problems. In Kdenlive, you can easily change the volume decibels. Select the audio track; on the right side, you should see the left and right channels. Also, the master control allows you to change the audio channels’ decibels.
You can also add various effects to the Audio from the effects tab.
9. Pan and Zoom
The Pan and Zoom effect is easy to apply if you know how to use it in Kdenlive. Here’s how you can apply a zoom animation to a video section.
-
Drag the Transform,
Distort and Perspective > Transformeffect to the clip. -
Move the pointer to a position where you want the zoom to effect (say up to 200%).
-
Click on
add Keyframe. On this, the keyframe changes its size to 200%. -
Now, if you play from the beginning, you should see the video zooming in to 200%.
-
Similarly, if you want to Pan, move the pointer to the specific position. Then click add a keyframe.
-
On the preview canvas, there is a red circle in the centre. Drag the circle to the position where you want to pan into. And that’s it.
If you play it now, you can see the video pans into your keyframe timestamp.
Now there are various options such as X, Y and Z axis change of the clip, keyframe interpolation and compositing, which you can play around with.
Here’s a quick video demonstrating the above two pan and zoom methods – the easiest way.
10. Freeze frame
If you want a still frame from a video, you can also do that using Kdenlive. To do that, go to the video timestamp you want to freeze. Right-click on the preview and select Extract Frame to Project. It creates a jpg file of the frame of the video and adds it to the project bin.
Once done, you can cut the clip using the Razor tool, drag the image down and append the rest of the clips. So, effectively you now have a freeze frame of a single moment in your video.
Bonus Tip: Create vertical videos for Instagram Reels and others
The entire world’s concentration time narrowed down to 30 seconds of vertical videos. And that’s why Instagram, Tiktok and other social feeds or reels are becoming popular.
Using Kdenlive, you can easily create these vertical videos.
Create a new project, and select the Settings tab in the project settings window. Various project profiles are available for your project or target resolutions inside the settings. Select Custom > Vertical HD 60fps. You can also change the pre-sets and create a new profile. And then, you can create titles and animations like any other videos.
Wrapping Up
If you went through all the Kdenlive features above, then I guess you are ready to create incredible videos for YouTube or streaming platforms. They are super easy to use and help you to save time for faster video creation.
Remember that the above list of features is just scratching the surface since it’s for beginners only. There are hundreds of features of Kdenlive if you want to learn.
Once you know the basics, you can learn & experience more to create stunning videos and movies.
That’s why I said Kdenlive is an underrated tool and “OG” of all video editors. Finally, I hope this article helps you learn KDenlive quickly.
Also, do you want similar articles or deep-dive in each feature for other open-source apps? Let me know the names in the comment box below.
via: https://www.debugpoint.com/kdenlive-features/

