mirror of
https://github.com/LCTT/TranslateProject.git
synced 2025-01-10 22:21:11 +08:00
111 lines
5.2 KiB
Markdown
111 lines
5.2 KiB
Markdown
用Grub启动ISO镜像
|
||
================================================================================
|
||
如果你想要使用多个Linux发行版,你没有那么多的选择。你要么安装到你的物理机或虚拟机中,要么以live模式从ISO文件启动。第二个选择,对硬盘空间需求较小,只是有点麻烦,因为你需要将ISO文件写入到U盘或CD/DVD中来启动。不过,这里还有另外一个可选的折中方案:把ISO镜像放在硬盘中,然后以live模式来启动。该方案比完全安装更省空间,而且功能也完备,这对于缓慢的虚拟机而言是个不错的替代方案。下面我将介绍怎样使用流行的Grub启动加载器来实现该方案。
|
||
|
||
很明显,你将需要使用到Grub,这是几乎所有现代Linux发行版都使用的。你也需要你所想用的Linux版本的ISO文件,将它下载到本地磁盘。最后,你需要知道启动分区在哪里,并怎样在Grub中描述。对于此,请使用以下命令:
|
||
|
||
# fdisk -l
|
||
|
||
带有‘*’的就是启动分区。对于我,就是/dev/sda1,用Grub语言描述就是(hd0,1)。
|
||
|
||

|
||
|
||
作为参考,sda2就是(hd0,2),sdb1就是(hd1,1),以此类推。(你明白了吧。)
|
||
|
||
### 我们需要编辑什么? ###
|
||
|
||
首先,打开/etc/default/grub并检查以下行:
|
||
|
||
#GRUB_HIDDEN_TIMEOUT=0
|
||
|
||
需要在此行前添加‘#’进行注释。
|
||
|
||
保存,然后打开/etc/grub.d/40_custom。
|
||
|
||
在该文件中,你将添加启动到ISO的参数。结构如下:
|
||
|
||
menuentry "[Entry's title in the grub screen]" {
|
||
set isofile="[path to ISO file]"
|
||
loopback loop [boot partition in Grub language]$isofile
|
||
[some specific] arguments
|
||
}
|
||
|
||
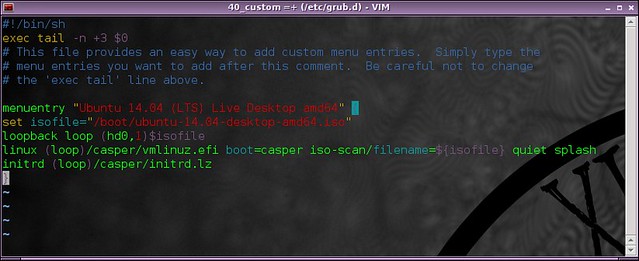
例如,如果你想要从ISO文件启动Ubuntu,那么你就是想要添加如下行到40_custom文件:
|
||
|
||
menuentry "Ubuntu 14.04 (LTS) Live Desktop amd64" {
|
||
set isofile="/boot/ubuntu-14.04-desktop-amd64.iso"
|
||
loopback loop (hd0,1)$isofile
|
||
linux (loop)/casper/vmlinuz.efi boot=casper iso-scan/filename=${isofile} quiet splash
|
||
initrd (loop)/casper/initrd.lz
|
||
}
|
||
|
||

|
||
|
||
如果你想要启动Gparted:
|
||
|
||
menuentry "GParted Live amd64" {
|
||
set isofile="/boot/gparted-live-0.18.0-2-amd64.iso"
|
||
loopback loop (hd0,1)$isofile
|
||
loopback loop $isofile
|
||
linux (loop)/live/vmlinuz boot=live config union=aufs noswap noprompt ip=frommedia toram=filesystem.squashfs findiso=${isofile}
|
||
initrd (loop)/live/initrd.img
|
||
}
|
||
|
||
或者甚至是Fedora:
|
||
|
||
menuentry "Fedora 20 Live Desktop x86_64" {
|
||
set isofile="/boot/Fedora-Live-Desktop-x86_64-20-1.iso"
|
||
loopback loop (hd0,1)$isofile
|
||
loopback loop $isofile
|
||
linux (loop)/isolinux/vmlinuz0 root=live:CDLABEL=Fedora-Live-Desktop-x86_64-20-1 rootfstype=auto ro rd.live.image quiet rhgb rd.luks=0 rd.md=0 rd.dm=0 iso-scan/filename=${isofile}
|
||
initrd (loop)/isolinux/initrd0.img
|
||
}
|
||
|
||
注意,参数可根据发行版进行修改。幸运的是,有许多地方你可以查阅到。我喜欢这个发行版,但是还有很多其它的发行版你可以启动。同时,请注意你放置ISO文件的地方。如果你的家目录被加密或者无法被访问到,你可能更喜欢将这些文件放到像例子中的启动分区。但是,请首先确保启动分区有足够的空间。
|
||
|
||
最后,不要忘了保存40_custom文件并使用以下命令来更新grub:
|
||
|
||
# sudo update-grub
|
||
|
||
以便在下次启动时看到修改。
|
||
|
||

|
||
|
||
### 接下来做什么? ###
|
||
|
||
想要更多东西?好吧,那就修改下参数来玩玩。你可以启动一个ISO文件,并让它持续做一些事情。例如,如果你是个彻头彻尾的妄想症患者,想要有个可以快速清除硬盘的选项,那么可以使用[DBAN][1]来进行一些设置。现在,真的要当心啊,因为此设置会清除你的硬盘,而且在启动时也没有恢复选项:
|
||
|
||
menuentry "Darik's Boot and Nuke" {
|
||
set isofile="/boot/dban.iso"
|
||
loopback loop (hd0,1)$isofile
|
||
linux (loop)/dban.bzi nuke="dwipe" silent
|
||
}
|
||
|
||
另外一个选择
|
||
|
||
menuentry "Darik's Boot and Nuke" {
|
||
set isofile="/boot/dban.iso"
|
||
loopback loop (hd0,1)$isofile
|
||
linux (loop)/dban.bzi
|
||
}
|
||
|
||
可以显示DBAN选项,让你选择清除驱动器。**当心,因为它仍然十分危险**。
|
||
|
||
小结一下,对于ISO文件和Grub有很多事情可做:从快速live会话到一键毁灭,都可以满足你。之后,你也可以试试启动一些针对隐私方面的发行版,如[Tails][2]。
|
||
|
||
你认为从Grub启动一个ISO这个主意怎样?这是不是你想要做的呢?为什么呢?请在下面留言。
|
||
|
||
--------------------------------------------------------------------------------
|
||
|
||
via: http://xmodulo.com/boot-iso-image-from-grub.html
|
||
|
||
作者:[Adrien Brochard][a]
|
||
译者:[GOLinux](https://github.com/GOLinux)
|
||
校对:[wxy](https://github.com/wxy)
|
||
|
||
本文由 [LCTT](https://github.com/LCTT/TranslateProject) 原创翻译,[Linux中国](http://linux.cn/) 荣誉推出
|
||
|
||
[a]:http://xmodulo.com/author/adrien
|
||
[1]:http://www.dban.org/
|
||
[2]:https://tails.boum.org/
|