想玩路由器吗?使用 Quagga 将你的 CentOS 变成 OSPF 路由器
================================================================================
[Quagga][1]是一个开源路由软件套件,可以将Linux变成支持如RIP、OSPF、BGP和IS-IS等主要路由协议的路由器。它具有对IPv4和IPv6的完整支持,并支持路由/前缀过滤。Quagga可以是你生命中的救星,以防你的生产路由器一旦宕机,而你没有备用的设备而只能等待更换。通过适当的配置,Quagga甚至可以作为生产路由器。
本教程中,我们将连接假设之间具有专线连接的两个分支机构网络(例如,192.168.1.0/24和172.17.1.0/24)。
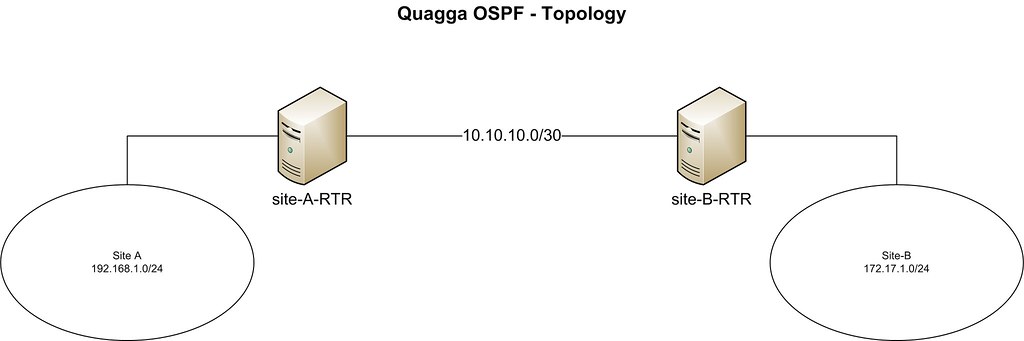
我们的CentOS位于所述专用链路的两端。两台主机名分别设置为“site-A-RTR”和“site-B-RTR'。下面是IP地址的详细信息。
- **Site-A**: 192.168.1.0/24
- **Site-B**: 172.16.1.0/24
- **两个 Linux 路由器之间的对等网络**: 10.10.10.0/30
Quagga包括了几个协同工作的守护进程。在本教程中,我们将重点建立以下守护进程。
1. **Zebra**: 核心守护进程,负责内核接口和静态路由。
1. **Ospfd**: IPv4 OSPF 守护进程。
### 在CentOS上安装Quagga ###
我们使用yum安装Quagga。
# yum install quagga
在CentOS7,SELinux默认会阻止quagga将配置文件写到/usr/sbin/zebra。这个SELinux策略会干扰我们接下来要介绍的安装过程,所以我们要禁用此策略。对于这一点,无论是[关闭SELinux][2](这里不推荐),还是如下启用“zebra_write_config”都可以。如果你使用的是CentOS 6的请跳过此步骤。
# setsebool -P zebra_write_config 1
如果没有做这个修改,在我们尝试在Quagga命令行中保存配置的时候看到如下错误。
Can't open configuration file /etc/quagga/zebra.conf.OS1Uu5.
安装完Quagga后,我们要配置必要的对等IP地址,并更新OSPF设置。Quagga自带了一个命令行称为vtysh。vtysh里面用到的Quagga命令与主要的路由器厂商如思科和Juniper是相似的。
### 步骤 1: 配置 Zebra ###
我们首先创建Zebra配置文件,并启用Zebra守护进程。
# cp /usr/share/doc/quagga-XXXXX/zebra.conf.sample /etc/quagga/zebra.conf
# service zebra start
# chkconfig zebra on
启动vtysh命令行:
# vtysh
首先,我们为Zebra配置日志文件。输入下面的命令进入vtysh的全局配置模式:
site-A-RTR# configure terminal
指定日志文件位置,接着退出模式:
site-A-RTR(config)# log file /var/log/quagga/quagga.log
site-A-RTR(config)# exit
永久保存配置:
site-A-RTR# write
接下来,我们要确定可用的接口并按需配置它们的IP地址。
site-A-RTR# show interface
----------
Interface eth0 is up, line protocol detection is disabled
. . . . .
Interface eth1 is up, line protocol detection is disabled
. . . . .
配置eth0参数:
site-A-RTR# configure terminal
site-A-RTR(config)# interface eth0
site-A-RTR(config-if)# ip address 10.10.10.1/30
site-A-RTR(config-if)# description to-site-B
site-A-RTR(config-if)# no shutdown
继续配置eth1参数:
site-A-RTR(config)# interface eth1
site-A-RTR(config-if)# ip address 192.168.1.1/24
site-A-RTR(config-if)# description to-site-A-LAN
site-A-RTR(config-if)# no shutdown
现在验证配置:
site-A-RTR(config-if)# do show interface
----------
Interface eth0 is up, line protocol detection is disabled
. . . . .
inet 10.10.10.1/30 broadcast 10.10.10.3
. . . . .
Interface eth1 is up, line protocol detection is disabled
. . . . .
inet 192.168.1.1/24 broadcast 192.168.1.255
. . . . .
----------
site-A-RTR(config-if)# do show interface description
----------
Interface Status Protocol Description
eth0 up unknown to-site-B
eth1 up unknown to-site-A-LAN
永久保存配置:
site-A-RTR(config-if)# do write
在site-B上重复上面配置IP地址的步骤。
如果一切顺利,你应该可以在site-A的服务器上ping通site-B上的对等IP地址10.10.10.2了。
注意:一旦Zebra的守护进程启动了,在vtysh命令行中的任何改变都会立即生效。因此没有必要在更改配置后重启Zebra守护进程。
### 步骤 2: 配置OSPF ###
我们首先创建OSPF配置文件,并启动OSPF守护进程:
# cp /usr/share/doc/quagga-XXXXX/ospfd.conf.sample /etc/quagga/ospfd.conf
# service ospfd start
# chkconfig ospfd on
现在启动vtysh命令行来继续OSPF配置:
# vtysh
输入路由配置模式:
site-A-RTR# configure terminal
site-A-RTR(config)# router ospf
可选配置路由id:
site-A-RTR(config-router)# router-id 10.10.10.1
添加在OSPF中的网络:
site-A-RTR(config-router)# network 10.10.10.0/30 area 0
site-A-RTR(config-router)# network 192.168.1.0/24 area 0
永久保存配置:
site-A-RTR(config-router)# do write
在site-B上重复和上面相似的OSPF配置:
site-B-RTR(config-router)# network 10.10.10.0/30 area 0
site-B-RTR(config-router)# network 172.16.1.0/24 area 0
site-B-RTR(config-router)# do write
OSPF的邻居现在应该启动了。只要ospfd在运行,通过vtysh的任何OSPF相关配置的改变都会立即生效而不必重启ospfd。
下一节,我们会验证我们的Quagga设置。
### 验证 ###
#### 1. 通过ping测试 ####
首先你应该可以从site-A ping同site-B的LAN子网。确保你的防火墙没有阻止ping的流量。
[root@site-A-RTR ~]# ping 172.16.1.1 -c 2
#### 2. 检查路由表 ####
必要的路由应该同时出现在内核与Quagga理由表中。
[root@site-A-RTR ~]# ip route
----------
10.10.10.0/30 dev eth0 proto kernel scope link src 10.10.10.1
172.16.1.0/30 via 10.10.10.2 dev eth0 proto zebra metric 20
192.168.1.0/24 dev eth1 proto kernel scope link src 192.168.1.1
----------
[root@site-A-RTR ~]# vtysh
site-A-RTR# show ip route
----------
Codes: K - kernel route, C - connected, S - static, R - RIP, O - OSPF,
I - ISIS, B - BGP, > - selected route, * - FIB route
O 10.10.10.0/30 [110/10] is directly connected, eth0, 00:14:29
C>* 10.10.10.0/30 is directly connected, eth0
C>* 127.0.0.0/8 is directly connected, lo
O>* 172.16.1.0/30 [110/20] via 10.10.10.2, eth0, 00:14:14
C>* 192.168.1.0/24 is directly connected, eth1
#### 3. 验证OSPF邻居和路由 ####
在vtysh命令行中,你可以检查必要的邻居是否在线与是否已经学习了合适的路由。
[root@site-A-RTR ~]# vtysh
site-A-RTR# show ip ospf neighbor
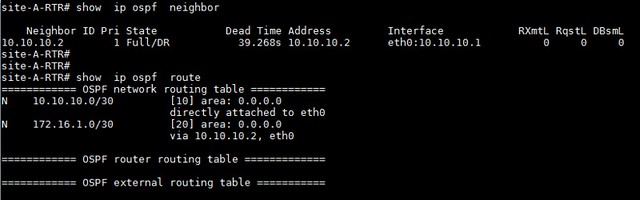
本教程中,我们将重点放在使用Quagga配置基本的OSPF。在一般情况下,Quagga能让我们能够轻松在一台普通的Linux机器上配置动态路由协议,如OSPF、RIP或BGP。启用了Quagga的机器可以与你网络中的其他路由器进行通信和交换路由信息。由于它支持主要的开放标准的路由协议,它或许是许多情况下的首选。更重要的是,Quagga的命令行界面与主要路由器厂商如思科和Juniper几乎是相同的,这使得部署和维护Quagga机器变得非常容易。
希望这些对你们有帮助。
--------------------------------------------------------------------------------
via: http://xmodulo.com/turn-centos-box-into-ospf-router-quagga.html
作者:[Sarmed Rahman][a]
译者:[geekpi](https://github.com/geekpi)
校对:[wxy](https://github.com/wxy)
本文由 [LCTT](https://github.com/LCTT/TranslateProject) 原创翻译,[Linux中国](http://linux.cn/) 荣誉推出
[a]:http://xmodulo.com/author/sarmed
[1]:http://www.nongnu.org/quagga/
[2]:http://xmodulo.com/how-to-disable-selinux.html