大数据初步:在树莓派上通过 Apache Spark on YARN 搭建 Hadoop 集群
===
有些时候我们想从 DQYDJ 网站的数据中分析点有用的东西出来,在过去,我们要[用 R 语言提取固定宽度的数据](https://dqydj.com/how-to-import-fixed-width-data-into-a-spreadsheet-via-r-playing-with-ipums-cps-data/),然后通过数学建模来分析[美国的最低收入补贴](http://dqydj.com/negative-income-tax-cost-calculator-united-states/),当然也包括其他优秀的方法。
今天我将向你展示对大数据的一点探索,不过有点变化,使用的是全世界最流行的微型电脑————[树莓派](https://www.raspberrypi.org/),如果手头没有,那就看下一篇吧(可能是已经处理好的数据),对于其他用户,请继续阅读吧,今天我们要建立一个树莓派 Hadoop集群!
### I. 为什么要建立一个树莓派的 Hadoop 集群?

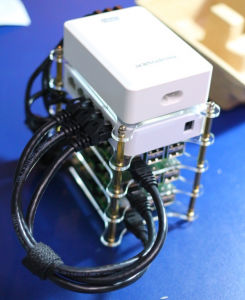
*由三个树莓派节点组成的 Hadoop 集群*
我们对 DQYDJ 的数据做了[大量的处理工作](https://dqydj.com/finance-calculators-investment-calculators-and-visualizations/),但这些还不能称得上是大数据。
和许许多多有争议的话题一样,数据的大小之别被解释成这样一个笑话:
> 如果能被内存所存储,那么它就不是大数据。 ————佚名
似乎这儿有两种解决问题的方法:
1. 我们可以找到一个足够大的数据集合,任何家用电脑的物理或虚拟内存都存不下。
2. 我们可以买一些不用特别定制,我们现有数据就能淹没它的电脑:
—— 上手树莓派 2B
这个由设计师和工程师制作出来的精致小玩意儿拥有 1GB 的内存, MicroSD 卡充当它的硬盘,此外,每一台的价格都低于 50 美元,这意味着你可以花不到 250 美元的价格搭建一个 Hadoop 集群。
或许天下没有比这更便宜的入场券来带你进入大数据的大门。
### II. 制作一个树莓派集群
我最喜欢制作的原材料。
这里我将给出我原来为了制作树莓派集群购买原材料的链接,如果以后要在亚马逊购买的话你可先这些链接收藏起来,也是对本站的一点支持。(谢谢)
- [树莓派 2B 3 块](http://amzn.to/2bEFTVh)
- [4 层亚克力支架](http://amzn.to/2bTo1br)
- [6 口 USB 转接器](http://amzn.to/2bEGO8g),我选了白色 RAVPower 50W 10A 6 口 USB 转接器
- [MicroSD 卡](http://amzn.to/2cguV9I),这个五件套 32GB 卡非常棒
- [短的 MicroUSB 数据线](http://amzn.to/2bX2mwm),用于给树莓派供电
- [短网线](http://amzn.to/2bDACQJ)
- 双面胶,我有一些 3M 的,很好用
#### 开始制作
1. 首先,装好三个树莓派,每一个用螺丝钉固定在亚克力面板上。(看下图)
2. 接下来,安装以太网交换机,用双面胶贴在其中一个在亚克力面板上。
3. 用双面胶贴将 USB 转接器贴在一个在亚克力面板使之成为最顶层。
4. 接着就是一层一层都拼好——这里我选择将树莓派放在交换机和USB转接器的底下(可以看看完整安装好的两张截图)
想办法把线路放在需要的地方——如果你和我一样购买力 USB 线和网线,我可以将它们卷起来放在亚克力板子的每一层
现在不要急着上电,需要将系统烧录到 SD 卡上才能继续。
#### 烧录 Raspbian
按照[这个教程](https://www.raspberrypi.org/downloads/raspbian/)将 Raspbian 烧录到三张 SD 卡上,我使用的是 Win7 下的 [Win32DiskImager][2]。
将其中一张烧录好的 SD 卡插在你想作为主节点的树莓派上,连接 USB 线并启动它。
#### 启动主节点
这里有[一篇非常棒的“Because We Can Geek”的教程](http://www.becausewecangeek.com/building-a-raspberry-pi-hadoop-cluster-part-1/),讲如何安装 Hadoop 2.7.1,此处就不再熬述。
在启动过程中有一些要注意的地方,我将带着你一起设置直到最后一步,记住我现在使用的 IP 段为 192.168.1.50 – 192.168.1.52,主节点是 .50,从节点是 .51 和 .52,你的网络可能会有所不同,如果你想设置静态 IP 的话可以在评论区看看或讨论。
一旦你完成了这些步骤,接下来要做的就是启用交换文件,Spark on YARN 将分割出一块非常接近内存大小的交换文件,当你内存快用完时便会使用这个交换分区。
(如果你以前没有做过有关交换分区的操作的话,可以看看[这篇教程](https://www.digitalocean.com/community/tutorials/how-to-add-swap-on-ubuntu-14-04),让 `swappiness` 保持较低水准,因为 MicroSD 卡的性能扛不住)
现在我准备介绍有关我的和“Because We Can Geek”关于启动设置一些微妙的区别。
对于初学者,确保你给你的树莓派起了一个正式的名字——在 `/etc/hostname` 设置,我的主节点设置为 ‘RaspberryPiHadoopMaster’ ,从节点设置为 ‘RaspberryPiHadoopSlave#’
主节点的 `/etc/hosts` 配置如下:
```
#/etc/hosts
127.0.0.1 localhost
::1 localhost ip6-localhost ip6-loopback
ff02::1 ip6-allnodes
ff02::2 ip6-allrouters
192.168.1.50 RaspberryPiHadoopMaster
192.168.1.51 RaspberryPiHadoopSlave1
192.168.1.52 RaspberryPiHadoopSlave2
```
如果你想让 Hadoop、YARN 和 Spark 运行正常的话,你也需要修改这些配置文件(不妨现在就编辑)。
这是 `hdfs-site.xml`:
```
fs.default.name
hdfs://RaspberryPiHadoopMaster:54310
hadoop.tmp.dir
/hdfs/tmp
```
这是 `yarn-site.xml` (注意内存方面的改变):
```
yarn.nodemanager.aux-services
mapreduce_shuffle
yarn.nodemanager.resource.cpu-vcores
4
yarn.nodemanager.resource.memory-mb
1024
yarn.scheduler.minimum-allocation-mb
128
yarn.scheduler.maximum-allocation-mb
1024
yarn.scheduler.minimum-allocation-vcores
1
yarn.scheduler.maximum-allocation-vcores
4
yarn.nodemanager.vmem-check-enabled
false
Whether virtual memory limits will be enforced for containers
yarn.nodemanager.vmem-pmem-ratio
4
Ratio between virtual memory to physical memory when setting memory limits for containers
yarn.resourcemanager.resource-tracker.address
RaspberryPiHadoopMaster:8025
yarn.resourcemanager.scheduler.address
RaspberryPiHadoopMaster:8030
yarn.resourcemanager.address
RaspberryPiHadoopMaster:8040
```
`slaves`:
```
RaspberryPiHadoopMaster
RaspberryPiHadoopSlave1
RaspberryPiHadoopSlave2
```
`core-site.xml`:
```
fs.default.name
hdfs://RaspberryPiHadoopMaster:54310
hadoop.tmp.dir
/hdfs/tmp
```
#### 设置两个从节点:
接下来[按照 “Because We Can Geek”上的教程](http://www.becausewecangeek.com/building-a-raspberry-pi-hadoop-cluster-part-2/),你需要对上面的文件作出小小的改动。 在 `yarn-site.xml` 中主节点没有改变,所以从节点中不必含有这个 `slaves` 文件。
### III. 在我们的树莓派集群中测试 YARN
如果所有设备都正常工作,在主节点上你应该执行如下命令:
```
start-dfs.sh
start-yarn.sh
```
当设备启动后,以 Hadoop 用户执行,如果你遵循教程,用户应该是 `hduser`。
接下来执行 `hdfs dfsadmin -report` 查看三个节点是否都正确启动,确认你看到一行粗体文字 ‘Live datanodes (3)’:
```
Configured Capacity: 93855559680 (87.41 GB)
Raspberry Pi Hadoop Cluster picture Straight On
Present Capacity: 65321992192 (60.84 GB)
DFS Remaining: 62206627840 (57.93 GB)
DFS Used: 3115364352 (2.90 GB)
DFS Used%: 4.77%
Under replicated blocks: 0
Blocks with corrupt replicas: 0
Missing blocks: 0
Missing blocks (with replication factor 1): 0
————————————————-
Live datanodes (3):
Name: 192.168.1.51:50010 (RaspberryPiHadoopSlave1)
Hostname: RaspberryPiHadoopSlave1
Decommission Status : Normal
```
你现在可以做一些简单的诸如 ‘Hello, World!’ 的测试,或者直接进行下一步。
### IV. 安装 SPARK ON YARN
YARN 的意思是另一种非常好用的资源调度器(Yet Another Resource Negotiator),已经作为一个易用的资源管理器集成在 Hadoop 基础安装包中。
[Apache Spark](https://spark.apache.org/) 是 Hadoop 生态圈中的另一款软件包,它是一个毁誉参半的执行引擎和[捆绑的 MapReduce](https://hadoop.apache.org/docs/r1.2.1/mapred_tutorial.html)。在一般情况下,相对于基于磁盘存储的 MapReduce,Spark 更适合基于内存的存储,某些运行任务能够得到 10-100 倍提升——安装完成集群后你可以试试 Spark 和 MapReduce 有什么不同。
我个人对 Spark 还是留下非常深刻的印象,因为它提供了两种数据工程师和科学家都比较擅长的语言—— Python 和 R。
安装 Apache Spark 非常简单,在你家目录下,`wget "为 Hadoop 2.7 构建的 Apache Spark”`([来自这个页面](https://spark.apache.org/downloads.html)),然后运行 `tar -xzf “tgz 文件”`,最后把解压出来的文件移动至 `/opt`,并清除刚才下载的文件,以上这些就是安装步骤。
我又创建了只有两行的文件 `spark-env.sh`,其中包含 Spark 的配置文件目录。
```
SPARK_MASTER_IP=192.168.1.50
SPARK_WORKER_MEMORY=512m
```
(在 YARN 跑起来之前我不确定这些是否有必要。)
### V. 你好,世界! 为 Apache Spark 寻找有趣的数据集!
在 Hadoop 世界里面的 ‘Hello, World!’ 就是做单词计数。
我决定让我们的作品做一些内省式……为什么不统计本站最常用的单词呢?也许统计一些关于本站的大数据会更有用。
如果你有一个正在运行的 WordPress 博客,可以通过简单的两步来导出和净化。
1. 我使用 [Export to Text](https://wordpress.org/support/plugin/export-to-text) 插件导出文章的内容到纯文本文件中
2. 我使用一些[压缩库](https://pypi.python.org/pypi/bleach)编写了一个 Python 脚本来剔除 HTML
```
import bleach
# Change this next line to your 'import' filename, whatever you would like to strip
# HTML tags from.
ascii_string = open('dqydj_with_tags.txt', 'r').read()
new_string = bleach.clean(ascii_string, tags=[], attributes={}, styles=[], strip=True)
new_string = new_string.encode('utf-8').strip()
# Change this next line to your 'export' filename
f = open('dqydj_stripped.txt', 'w')
f.write(new_string)
f.close()
```
现在我们有了一个更小的、适合复制到树莓派所搭建的 HDFS 集群上的文件。
如果你不能树莓派主节点上完成上面的操作,找个办法将它传输上去(scp、 rsync 等等),然后用下列命令行复制到 HDFS 上。
```
hdfs dfs -copyFromLocal dqydj_stripped.txt /dqydj_stripped.txt
```
现在准备进行最后一步 - 向 Apache Spark 写入一些代码。
### VI. 点亮 Apache Spark
Cloudera 有个极棒的程序可以作为我们的超级单词计数程序的基础,[你可以在这里找到](https://www.cloudera.com/documentation/enterprise/5-6-x/topics/spark_develop_run.html)。我们接下来为我们的内省式单词计数程序修改它。
在主节点上[安装‘stop-words’](https://pypi.python.org/pypi/stop-words)这个 python 第三方包,虽然有趣(我在 DQYDJ 上使用了 23,295 次 the 这个单词),你可能不想看到这些语法单词占据着单词计数的前列,另外,在下列代码用你自己的数据集替换所有有关指向 dqydj 文件的地方。
```
import sys
from stop_words import get_stop_words
from pyspark import SparkContext, SparkConf
if __name__ == "__main__":
# create Spark context with Spark configuration
conf = SparkConf().setAppName("Spark Count")
sc = SparkContext(conf=conf)
# get threshold
try:
threshold = int(sys.argv[2])
except:
threshold = 5
# read in text file and split each document into words
tokenized = sc.textFile(sys.argv[1]).flatMap(lambda line: line.split(" "))
# count the occurrence of each word
wordCounts = tokenized.map(lambda word: (word.lower().strip(), 1)).reduceByKey(lambda v1,v2:v1 +v2)
# filter out words with fewer than threshold occurrences
filtered = wordCounts.filter(lambda pair:pair[1] >= threshold)
print "*" * 80
print "Printing top words used"
print "-" * 80
filtered_sorted = sorted(filtered.collect(), key=lambda x: x[1], reverse = True)
for (word, count) in filtered_sorted: print "%s : %d" % (word.encode('utf-8').strip(), count)
# Remove stop words
print "\n\n"
print "*" * 80
print "Printing top non-stop words used"
print "-" * 80
# Change this to your language code (see the stop-words documentation)
stop_words = set(get_stop_words('en'))
no_stop_words = filter(lambda x: x[0] not in stop_words, filtered_sorted)
for (word, count) in no_stop_words: print "%s : %d" % (word.encode('utf-8').strip(), count)
```
保存好 wordCount.py,确保上面的路径都是正确无误的。
现在,准备念出咒语,让运行在 YARN 上的 Spark 跑起来,你可以看到我在 DQYDJ 使用最多的单词是哪一个。
```
/opt/spark-2.0.0-bin-hadoop2.7/bin/spark-submit –master yarn –executor-memory 512m –name wordcount –executor-cores 8 wordCount.py /dqydj_stripped.txt
```
### VII. 我在 DQYDJ 使用最多的单词
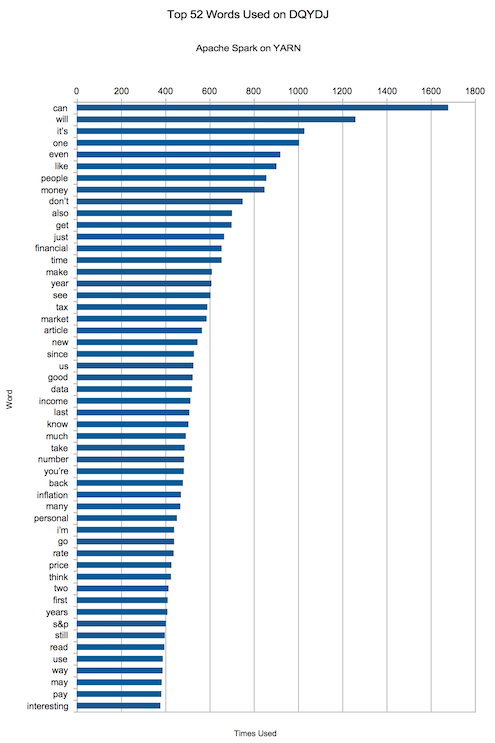
可能入列的单词有哪一些呢?“can, will, it’s, one, even, like, people, money, don’t, also“.
嘿,不错,“money”悄悄挤进了前十。在一个致力于金融、投资和经济的网站上谈论这似乎是件好事,对吧?
下面是的前 50 个最常用的词汇,请用它们刻画出有关我的文章的水平的结论。

我希望你能喜欢这篇关于 Hadoop、YARN 和 Apache Spark 的教程,现在你可以在 Spark 运行和编写其他的应用了。
你的下一步是任务是开始[阅读 pyspark 文档](https://spark.apache.org/docs/2.0.0/api/python/index.html)(以及用于其他语言的该库),去学习一些可用的功能。根据你的兴趣和你实际存储的数据,你将会深入学习到更多——有流数据、SQL,甚至机器学习的软件包!
你怎么看?你要建立一个树莓派 Hadoop 集群吗?想要在其中挖掘一些什么吗?你在上面看到最令你惊奇的单词是什么?为什么 'S&P' 也能上榜?
--------------------------------------------------------------------------------
via: https://dqydj.com/raspberry-pi-hadoop-cluster-apache-spark-yarn/
作者:[PK][a]
译者:[popy32](https://github.com/sfantree)
校对:[wxy](https://github.com/wxy)
本文由 [LCTT](https://github.com/LCTT/TranslateProject) 组织编译,[Linux中国](https://linux.cn/) 荣誉推出
[a]: https://dqydj.com/about/#contact_us
[1]: https://www.raspberrypi.org/downloads/raspbian/
[2]: https://sourceforge.net/projects/win32diskimager/
[3]: http://www.becausewecangeek.com/building-a-raspberry-pi-hadoop-cluster-part-1/
[4]: https://www.digitalocean.com/community/tutorials/how-to-add-swap-on-ubuntu-14-04
[5]: http://www.becausewecangeek.com/building-a-raspberry-pi-hadoop-cluster-part-2/
[6]: https://spark.apache.org/
[7]: https://hadoop.apache.org/docs/r1.2.1/mapred_tutorial.html
[8]: https://spark.apache.org/downloads.html
[9]: https://wordpress.org/support/plugin/export-to-text
[10]: https://pypi.python.org/pypi/bleach