[#]: collector: (lujun9972)
[#]: translator: (lujun9972)
[#]: reviewer: (wxy)
[#]: publisher: (wxy)
[#]: url: (https://linux.cn/article-10564-1.html)
[#]: subject: (How to use Magit to manage Git projects)
[#]: via: (https://opensource.com/article/19/1/how-use-magit)
[#]: author: (Sachin Patil https://opensource.com/users/psachin)
如何在 Emacs 中使用 Magit 管理 Git 项目
======
> Emacs 的 Magit 扩展插件使得使用 Git 进行版本控制变得简单起来。

[Git][1] 是一个很棒的用于项目管理的 [版本控制][2] 工具,就是新人学习起来太难。Git 的命令行工具很难用,你不仅需要熟悉它的标志和选项,还需要知道什么环境下使用它们。这使人望而生畏,因此不少人只会非常有限的几个用法。
好在,现今大多数的集成开发环境 (IDE) 都包含了 Git 扩展,大大地简化了使用使用的难度。Emacs 中就有这么一款 Git 扩展名叫 [Magit][3]。
Magit 项目成立有差不多 10 年了,它将自己定义为 “一件 Emacs 内的 Git 瓷器”。也就是说,它是一个操作界面,每个操作都能一键完成。本文会带你领略一下 Magit 的操作界面并告诉你如何使用它来管理 Git 项目。
若你还没有做,请在开始本教程之前先 [安装 Emacs][4],再 [安装 Magit][5]。
### Magit 的界面
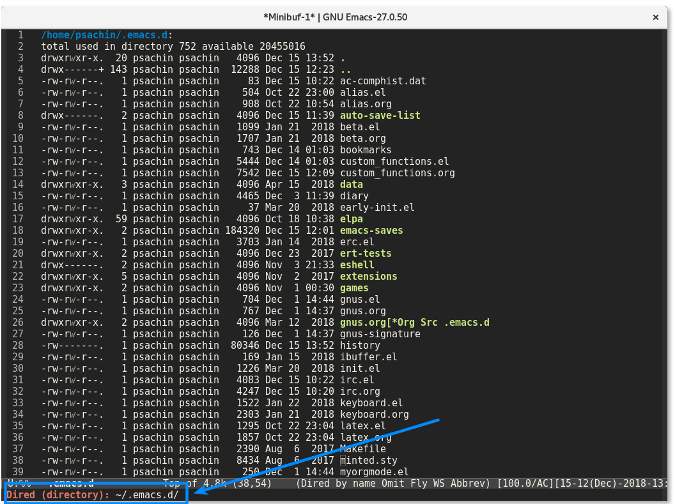
首先用 Emacs 的 [Dired 模式][6] 访问一个项目的目录。比如我所有的 Emacs 配置存储在 `~/.emacs.d/` 目录中,就是用 Git 来进行管理的。
若你在命令行下工作,则你需要输入 `git status` 来查看项目的当前状态。Magit 也有类似的功能:`magit-status`。你可以通过 `M-x magit-status` (快捷方式是 `Alt+x magit-status` )来调用该功能。结果看起来像下面这样:
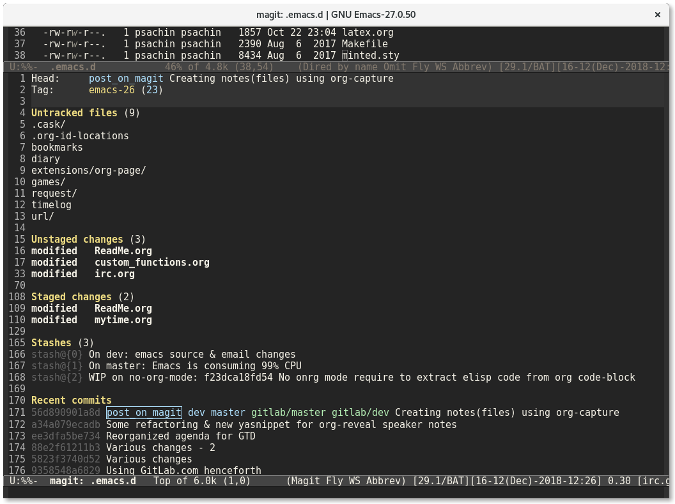
Magit 显示的信息比 `git status` 命令的要多得多。它分别列出了未追踪文件列表、未暂存文件列表以及已暂存文件列表。它还列出了储藏列表以及最近几次的提交 —— 所有这些信息都在一个窗口中展示。
如果你想查看修改了哪些内容,按下 `Tab` 键。比如,我移动光标到未暂存的文件 `custom_functions.org` 上,然后按下 `Tab` 键,Magit 会显示修改了哪些内容:
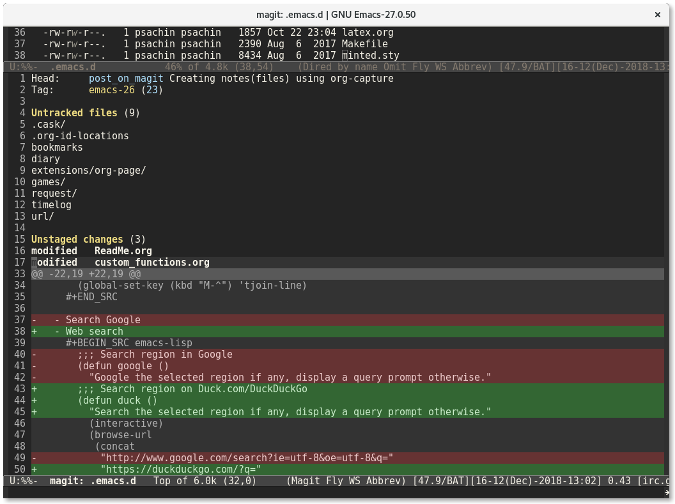
这跟运行命令 `git diff custom_functions.org` 类似。储藏文件更简单。只需要移动光标到文件上然后按下 `s` 键。该文件就会迅速移动到已储藏文件列表中:
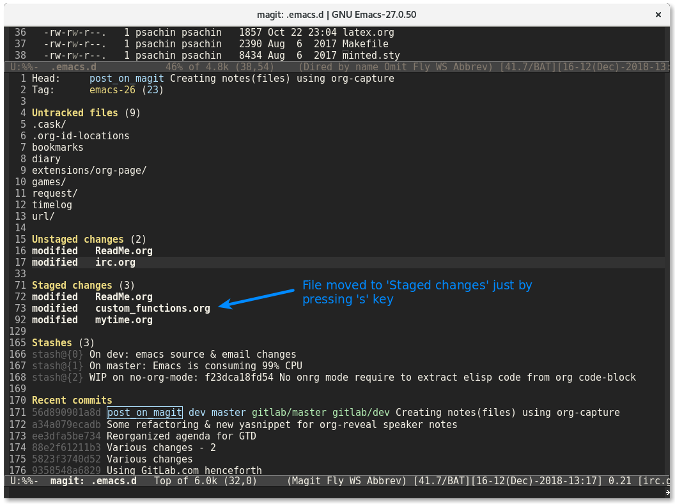
要反储藏某个文件,使用 `u` 键。按下 `s` 和 `u` 键要比在命令行输入 `git add -u ` 和 `git reset HEAD ` 快的多也更有趣的多。
### 提交更改
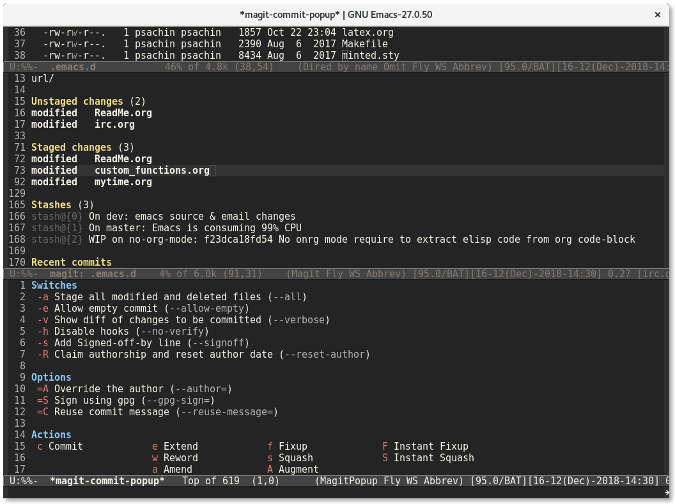
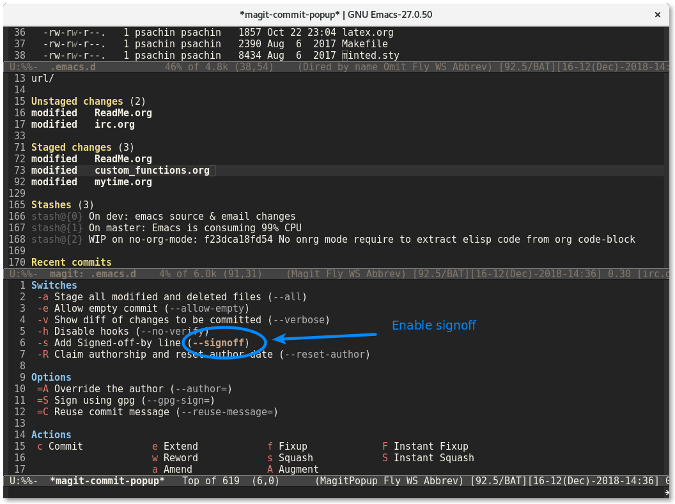
在同一个 Magit 窗口中,按下 `c` 键会显示一个提交窗口,其中提供了许多标志,比如 `--all` 用来暂存所有文件或者 `--signoff` 来往提交信息中添加签名行。
将光标移动到想要启用签名标志的行,然后按下回车。`--signoff` 文本会变成高亮,这说明该标志已经被启用。
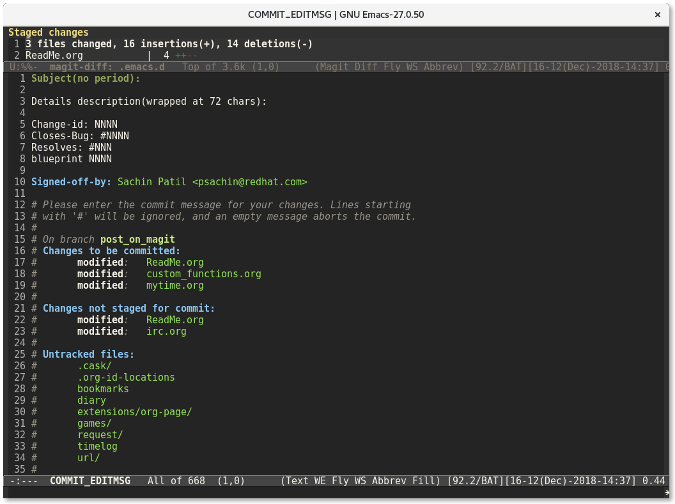
再次按下 `c` 键会显示一个窗口供你输入提交信息。
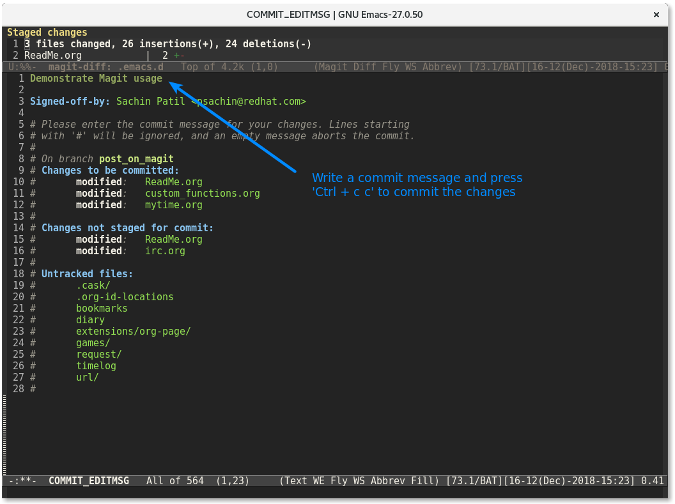
最后,使用 `C-c C-c `(按键 `Ctrl+cc` 的缩写形式) 来提交更改。
### 推送更改
更改提交后,提交行将会显示在 `Recent commits` 区域中显示。
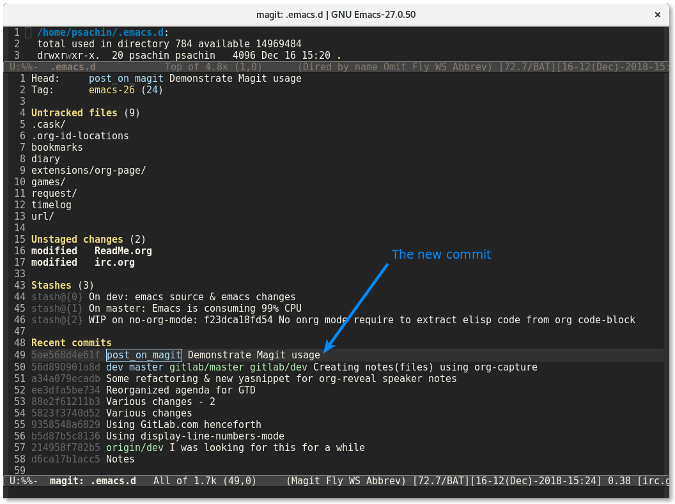
将光标放到该提交处然后按下 `p` 来推送该变更。
若你想感受一下使用 Magit 的感觉,我已经在 YouTube 上传了一段 [演示][7]。本文只涉及到 Magit 的一点皮毛。它有许多超酷的功能可以帮你使用 Git 分支、变基等功能。你可以在 Magit 的主页上找到 [文档、支持,以及更多][8] 的链接。
--------------------------------------------------------------------------------
via: https://opensource.com/article/19/1/how-use-magit
作者:[Sachin Patil][a]
选题:[lujun9972][b]
译者:[lujun9972](https://github.com/lujun9972)
校对:[wxy](https://github.com/wxy)
本文由 [LCTT](https://github.com/LCTT/TranslateProject) 原创编译,[Linux中国](https://linux.cn/) 荣誉推出
[a]: https://opensource.com/users/psachin
[b]: https://github.com/lujun9972
[1]: https://git-scm.com
[2]: https://git-scm.com/book/en/v2/Getting-Started-About-Version-Control
[3]: https://magit.vc
[4]: https://www.gnu.org/software/emacs/download.html
[5]: https://magit.vc/manual/magit/Installing-from-Melpa.html#Installing-from-Melpa
[6]: https://www.gnu.org/software/emacs/manual/html_node/emacs/Dired-Enter.html#Dired-Enter
[7]: https://youtu.be/Vvw75Pqp7Mc
[8]: https://magit.vc/