[#]: collector: (lujun9972)
[#]: translator: (geekpi)
[#]: reviewer: (wxy)
[#]: publisher: (wxy)
[#]: url: (https://linux.cn/article-11286-1.html)
[#]: subject: (How to Install Ansible (Automation Tool) on Debian 10 (Buster))
[#]: via: (https://www.linuxtechi.com/install-ansible-automation-tool-debian10/)
[#]: author: (Pradeep Kumar https://www.linuxtechi.com/author/pradeep/)
如何在 Debian 10 上安装 Ansible
======
在如今的 IT 领域,自动化一个是热门话题,每个组织都开始采用自动化工具,像 Puppet、Ansible、Chef、CFEngine、Foreman 和 Katello。在这些工具中,Ansible 是几乎所有 IT 组织中管理 UNIX 和 Linux 系统的首选。在本文中,我们将演示如何在 Debian 10 Sever 上安装和使用 Ansible。
![Ansible-Install-Debian10][2]
我的实验室环境:
* Debian 10 – Ansible 服务器/ 控制节点 – 192.168.1.14
* CentOS 7 – Ansible 主机 (Web 服务器)– 192.168.1.15
* CentOS 7 – Ansible 主机(DB 服务器)– 192.169.1.17
我们还将演示如何使用 Ansible 服务器管理 Linux 服务器
### 在 Debian 10 Server 上安装 Ansible
我假设你的 Debian 10 中有一个拥有 root 或 sudo 权限的用户。在我这里,我有一个名为 `pkumar` 的本地用户,它拥有 sudo 权限。
Ansible 2.7 包存在于 Debian 10 的默认仓库中,在命令行中运行以下命令安装 Ansible,
```
root@linuxtechi:~$ sudo apt update
root@linuxtechi:~$ sudo apt install ansible -y
```
运行以下命令验证 Ansible 版本,
```
root@linuxtechi:~$ sudo ansible --version
```

要安装最新版本的 Ansible 2.8,首先我们必须设置 Ansible 仓库。
一个接一个地执行以下命令,
```
root@linuxtechi:~$ echo "deb http://ppa.launchpad.net/ansible/ansible/ubuntu bionic main" | sudo tee -a /etc/apt/sources.list
root@linuxtechi:~$ sudo apt-key adv --keyserver keyserver.ubuntu.com --recv-keys 93C4A3FD7BB9C367
root@linuxtechi:~$ sudo apt update
root@linuxtechi:~$ sudo apt install ansible -y
root@linuxtechi:~$ sudo ansible --version
```

### 使用 Ansible 管理 Linux 服务器
请参考以下步骤,使用 Ansible 控制器节点管理 Linux 类的服务器,
#### 步骤 1:在 Ansible 服务器及其主机之间交换 SSH 密钥
在 Ansible 服务器生成 ssh 密钥并在 Ansible 主机之间共享密钥。
```
root@linuxtechi:~$ sudo -i
root@linuxtechi:~# ssh-keygen
root@linuxtechi:~# ssh-copy-id root@linuxtechi
root@linuxtechi:~# ssh-copy-id root@linuxtechi
```
#### 步骤 2:创建 Ansible 主机清单
安装 Ansible 后会自动创建 `/etc/ansible/hosts`,在此文件中我们可以编辑 Ansible 主机或其客户端。我们还可以在家目录中创建自己的 Ansible 主机清单,
运行以下命令在我们的家目录中创建 Ansible 主机清单。
```
root@linuxtechi:~$ vi $HOME/hosts
[Web]
192.168.1.15
[DB]
192.168.1.17
```
保存并退出文件。
注意:在上面的主机文件中,我们也可以使用主机名或 FQDN,但为此我们必须确保 Ansible 主机可以通过主机名或者 FQDN 访问。
#### 步骤 3:测试和使用默认的 Ansible 模块
Ansible 附带了许多可在 `ansible` 命令中使用的默认模块,示例如下所示。
语法:
```
# ansible -i <host_file> -m <module> <host>
```
这里:
* `-i ~/hosts`:包含 Ansible 主机列表
* `-m`:在之后指定 Ansible 模块,如 ping 和 shell
* `<host>`:我们要运行 Ansible 模块的 Ansible 主机
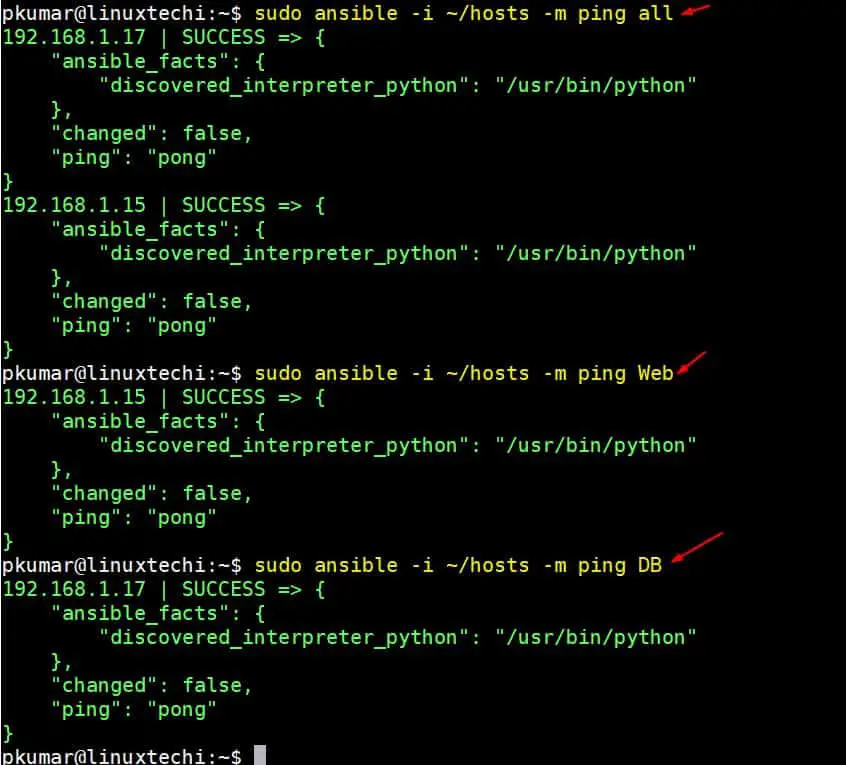
使用 Ansible ping 模块验证 ping 连接,
```
root@linuxtechi:~$ sudo ansible -i ~/hosts -m ping all
root@linuxtechi:~$ sudo ansible -i ~/hosts -m ping Web
root@linuxtechi:~$ sudo ansible -i ~/hosts -m ping DB
```
命令输出如下所示:
使用 shell 模块在 Ansible 主机上运行 shell 命令
语法:
```
ansible -i <hosts_file> -m shell -a <shell_commands> <host>
```
例子:
```
root@linuxtechi:~$ sudo ansible -i ~/hosts -m shell -a "uptime" all
192.168.1.17 | CHANGED | rc=0 >>
01:48:34 up 1:07, 3 users, load average: 0.00, 0.01, 0.05
192.168.1.15 | CHANGED | rc=0 >>
01:48:39 up 1:07, 3 users, load average: 0.00, 0.01, 0.04
root@linuxtechi:~$
root@linuxtechi:~$ sudo ansible -i ~/hosts -m shell -a "uptime ; df -Th / ; uname -r" Web
192.168.1.15 | CHANGED | rc=0 >>
01:52:03 up 1:11, 3 users, load average: 0.12, 0.07, 0.06
Filesystem Type Size Used Avail Use% Mounted on
/dev/mapper/centos-root xfs 13G 1017M 12G 8% /
3.10.0-327.el7.x86_64
root@linuxtechi:~$
```
上面的命令输出表明我们已成功设置 Ansible 控制器节点。
让我们创建一个安装 nginx 的示例剧本,下面的剧本将在所有服务器上安装 nginx,这些服务器是 Web 主机组的一部分,但在这里,我的主机组下只有一台 centos 7 机器。
```
root@linuxtechi:~$ vi nginx.yaml
---
- hosts: Web
tasks:
- name: Install latest version of nginx on CentOS 7 Server
yum: name=nginx state=latest
- name: start nginx
service:
name: nginx
state: started
```
现在使用以下命令执行剧本。
```
root@linuxtechi:~$ sudo ansible-playbook -i ~/hosts nginx.yaml
```
上面命令的输出类似下面这样,
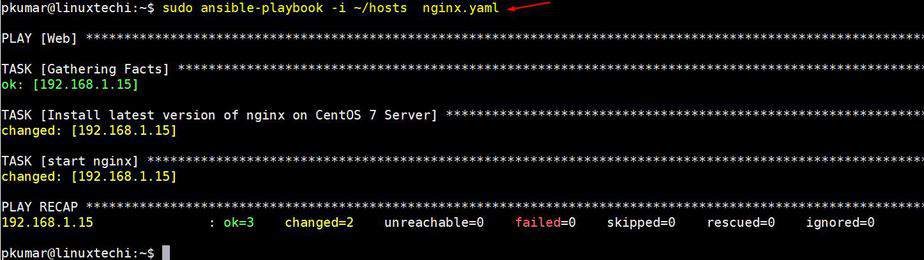
这表明 Ansible 剧本成功执行了。
本文就是这些了,请分享你的反馈和评论。
--------------------------------------------------------------------------------
via: https://www.linuxtechi.com/install-ansible-automation-tool-debian10/
作者:[Pradeep Kumar][a]
选题:[lujun9972][b]
译者:[geekpi](https://github.com/geekpi)
校对:[wxy](https://github.com/wxy)
本文由 [LCTT](https://github.com/LCTT/TranslateProject) 原创编译,[Linux中国](https://linux.cn/) 荣誉推出
[a]: https://www.linuxtechi.com/author/pradeep/
[b]: https://github.com/lujun9972
[1]: data:image/gif;base64,R0lGODlhAQABAIAAAAAAAP///yH5BAEAAAAALAAAAAABAAEAAAIBRAA7
[2]: https://www.linuxtechi.com/wp-content/uploads/2019/08/Ansible-Install-Debian10.jpg