Samba 系列(十四):在命令行中将 CentOS 7 与 Samba4 AD 集成
============================================================
本指南将向你介绍如何使用 Authconfig 在命令行中将无图形界面的 CentOS 7 服务器集成到 [Samba4 AD 域控制器][3]中。
这类设置提供了由 Samba 持有的单一集中式帐户数据库,允许 AD 用户通过网络基础设施对 CentOS 服务器进行身份验证。
#### 要求
1. [在 Ubuntu 上使用 Samba4 创建 AD 基础架构][1]
2. [CentOS 7.3 安装指南][2]
### 步骤 1:为 Samba4 AD DC 配置 CentOS
1、 在开始将 CentOS 7 服务器加入 Samba4 DC 之前,你需要确保网络接口被正确配置为通过 DNS 服务查询域。
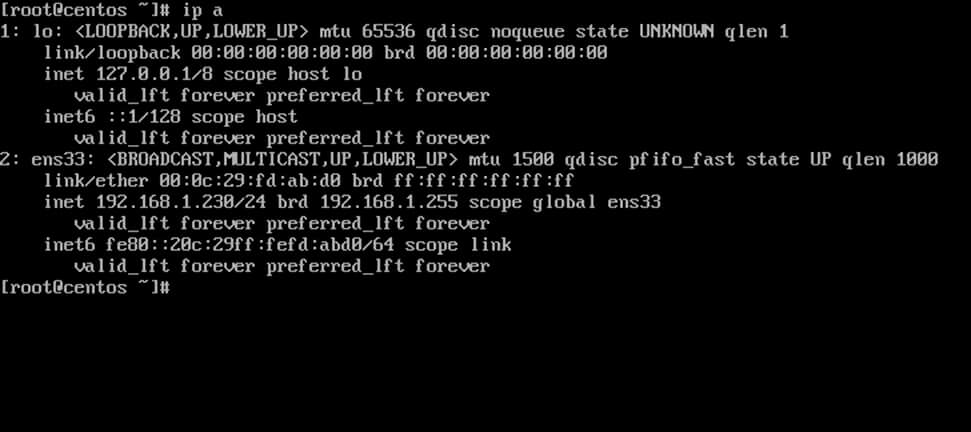
运行 `ip address` 命令列出你机器网络接口,选择要编辑的特定网卡,通过针对接口名称运行 `nmtui-edit` 命令(如本例中的 ens33),如下所示。
```
# ip address
# nmtui-edit ens33
```
[][5]
*列出网络接口*
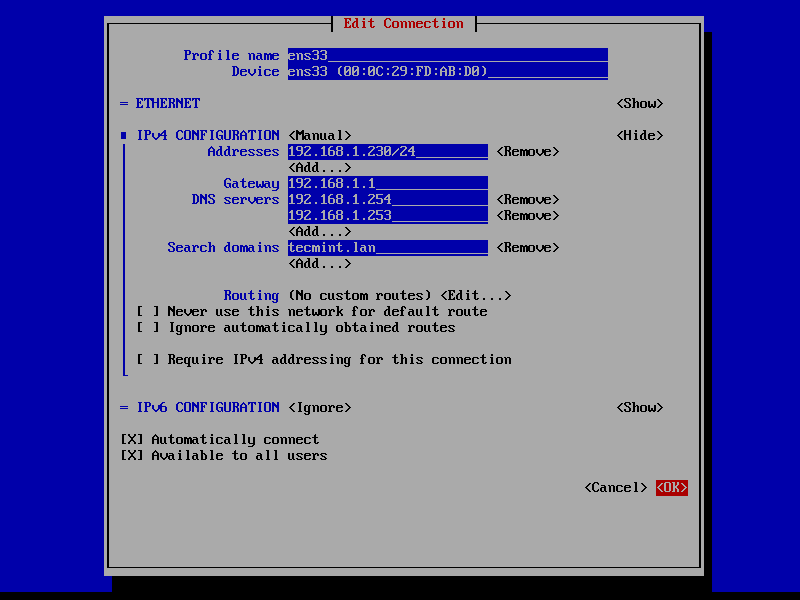
2、 打开网络接口进行编辑后,添加最适合 LAN 的静态 IPv4 配置,并确保为 DNS 服务器设置 Samba AD 域控制器 IP 地址。
另外,在搜索域中追加你的域的名称,并使用 [TAB] 键跳到确定按钮来应用更改。
当你仅对域 dns 记录使用短名称时, 已提交的搜索域保证域对应项会自动追加到 dns 解析 (FQDN) 中。
[][6]
*配置网络接口*
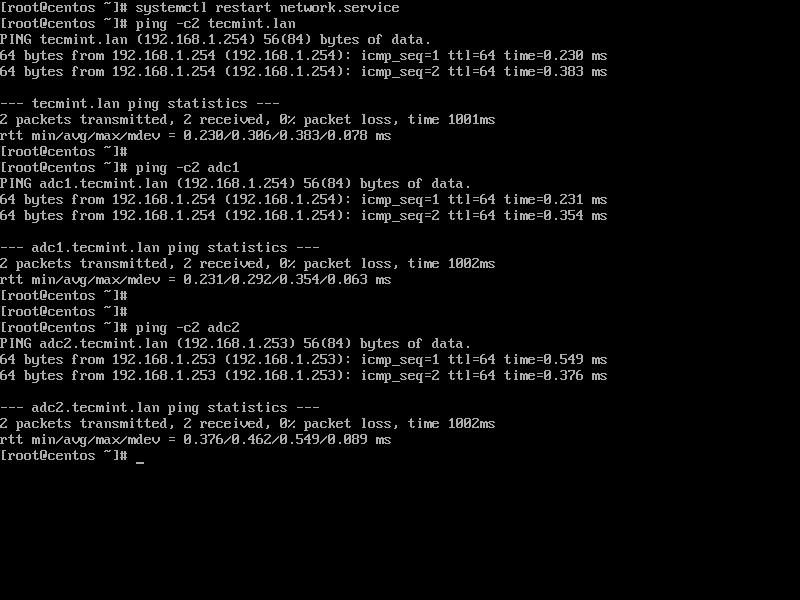
3、最后,重启网络守护进程以应用更改,并通过对域名和域控制器 ping 来测试 DNS 解析是否正确配置,如下所示。
```
# systemctl restart network.service
# ping -c2 tecmint.lan
# ping -c2 adc1
# ping -c2 adc2
```
[][7]
*验证域上的 DNS 解析*
4、 另外,使用下面的命令配置你的计算机主机名并重启机器应用更改。
```
# hostnamectl set-hostname your_hostname
# init 6
```
使用以下命令验证主机名是否正确配置。
```
# cat /etc/hostname
# hostname
```
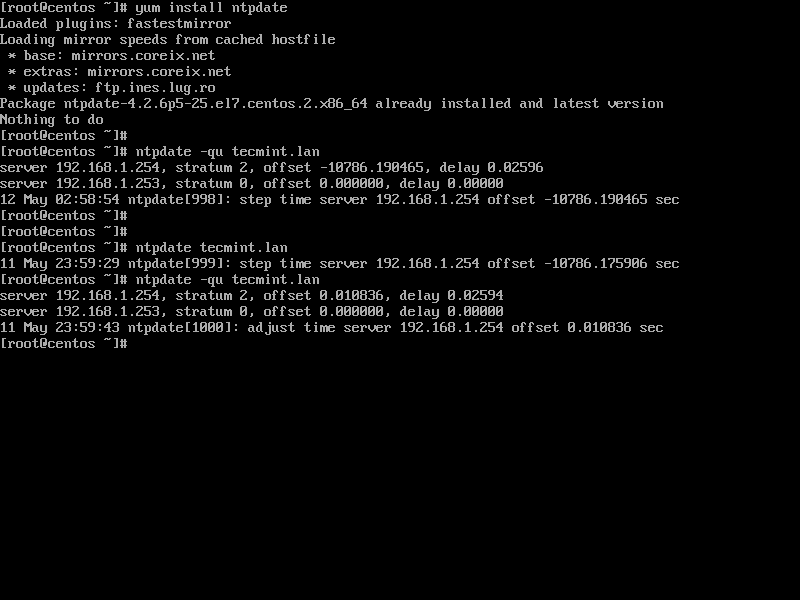
5、 最后,使用 root 权限运行以下命令,与 Samba4 AD DC 同步本地时间。
```
# yum install ntpdate
# ntpdate domain.tld
```
[][8]
*与 Samba4 AD DC 同步时间*
### 步骤 2:将 CentOS 7 服务器加入到 Samba4 AD DC
6、 要将 CentOS 7 服务器加入到 Samba4 AD 中,请先用具有 root 权限的帐户在计算机上安装以下软件包。
```
# yum install authconfig samba-winbind samba-client samba-winbind-clients
```
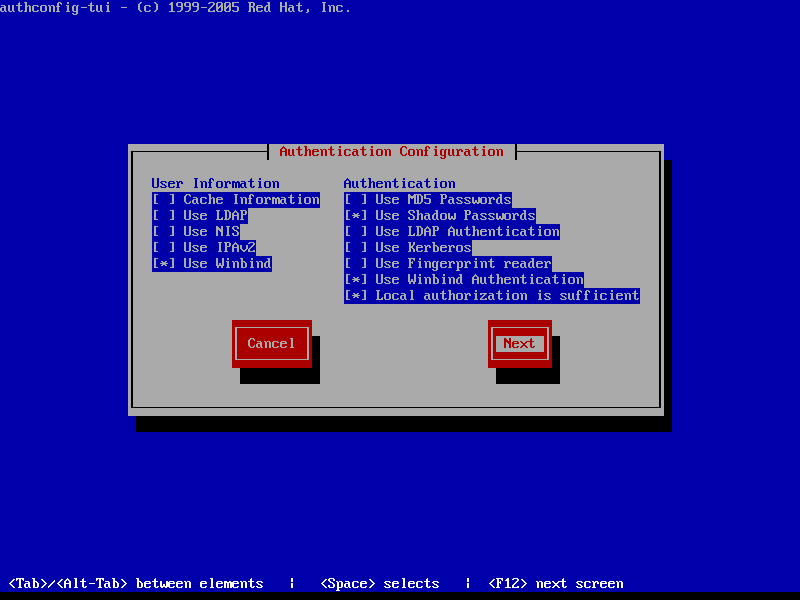
7、 为了将 CentOS 7 服务器与域控制器集成,可以使用 root 权限运行 `authconfig-tui`,并使用下面的配置。
```
# authconfig-tui
```
首屏选择:
* 在 User Information 中:
* Use Winbind
* 在 Authentication 中使用[空格键]选择:
* Use Shadow Password
* Use Winbind Authentication
* Local authorization is sufficient
[][9]
*验证配置*
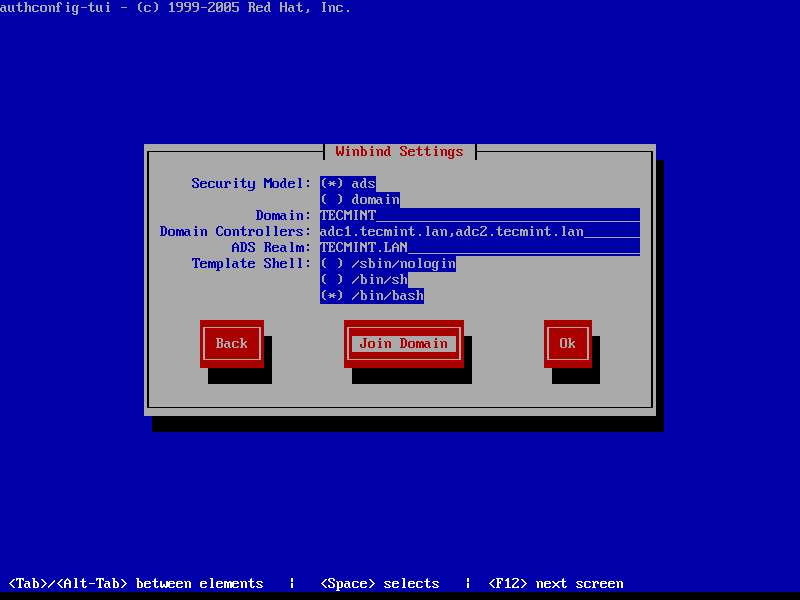
8、 点击 Next 进入 Winbind 设置界面并配置如下:
* Security Model: ads
* Domain = YOUR_DOMAIN (use upper case)
* Domain Controllers = domain machines FQDN (comma separated if more than one)
* ADS Realm = YOUR_DOMAIN.TLD
* Template Shell = /bin/bash
[][10]
*Winbind 设置*
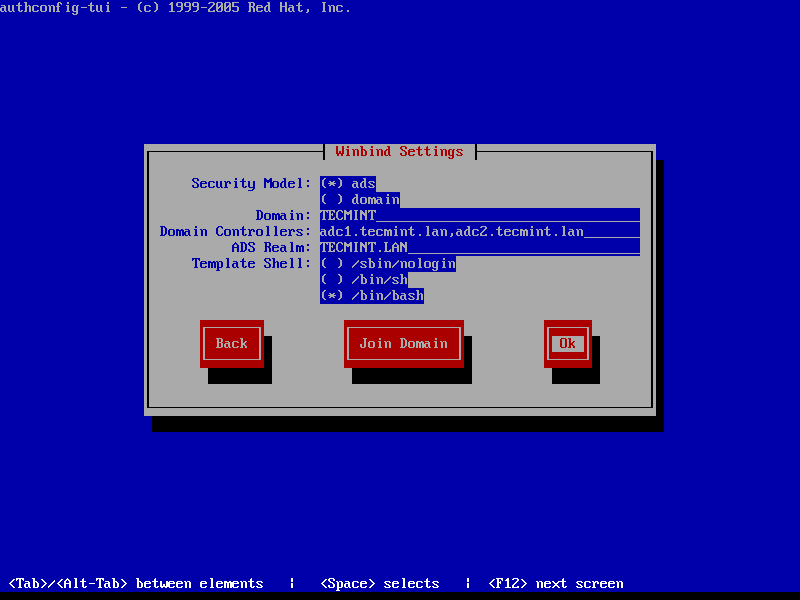
9、 要加入域,使用 [tab] 键跳到 “Join Domain” 按钮,然后按[回车]键加入域。
在下一个页面,添加具有提升权限的 Samba4 AD 帐户的凭据,以将计算机帐户加入 AD,然后单击 “OK” 应用设置并关闭提示。
请注意,当你输入用户密码时,凭据将不会显示在屏幕中。在下面再次点击 OK,完成 CentOS 7 的域集成。
[][11]
*加入域到 Samba4 AD DC*
[][12]
*确认 Winbind 设置*
要强制将机器添加到特定的 Samba AD OU 中,请使用 hostname 命令获取计算机的完整名称,并使用机器名称在该 OU 中创建一个新的计算机对象。
将新对象添加到 Samba4 AD 中的最佳方法是已经集成到[安装了 RSAT 工具][13]的域的 Windows 机器上使用 ADUC 工具。
重要:加入域的另一种方法是使用 `authconfig` 命令行,它可以对集成过程进行广泛的控制。
但是,这种方法很容易因为其众多参数造成错误,如下所示。该命令必须输入一条长命令行。
```
# authconfig --enablewinbind --enablewinbindauth --smbsecurity ads --smbworkgroup=YOUR_DOMAIN --smbrealm YOUR_DOMAIN.TLD --smbservers=adc1.yourdomain.tld --krb5realm=YOUR_DOMAIN.TLD --enablewinbindoffline --enablewinbindkrb5 --winbindtemplateshell=/bin/bash--winbindjoin=domain_admin_user --update --enablelocauthorize --savebackup=/backups
```
10、 机器加入域后,通过使用以下命令验证 winbind 服务是否正常运行。
```
# systemctl status winbind.service
```
11、 接着检查是否在 Samba4 AD 中成功创建了 CentOS 机器对象。从安装了 RSAT 工具的 Windows 机器使用 AD 用户和计算机工具,并进入到你的域计算机容器。一个名为 CentOS 7 Server 的新 AD 计算机帐户对象应该在右边的列表中。
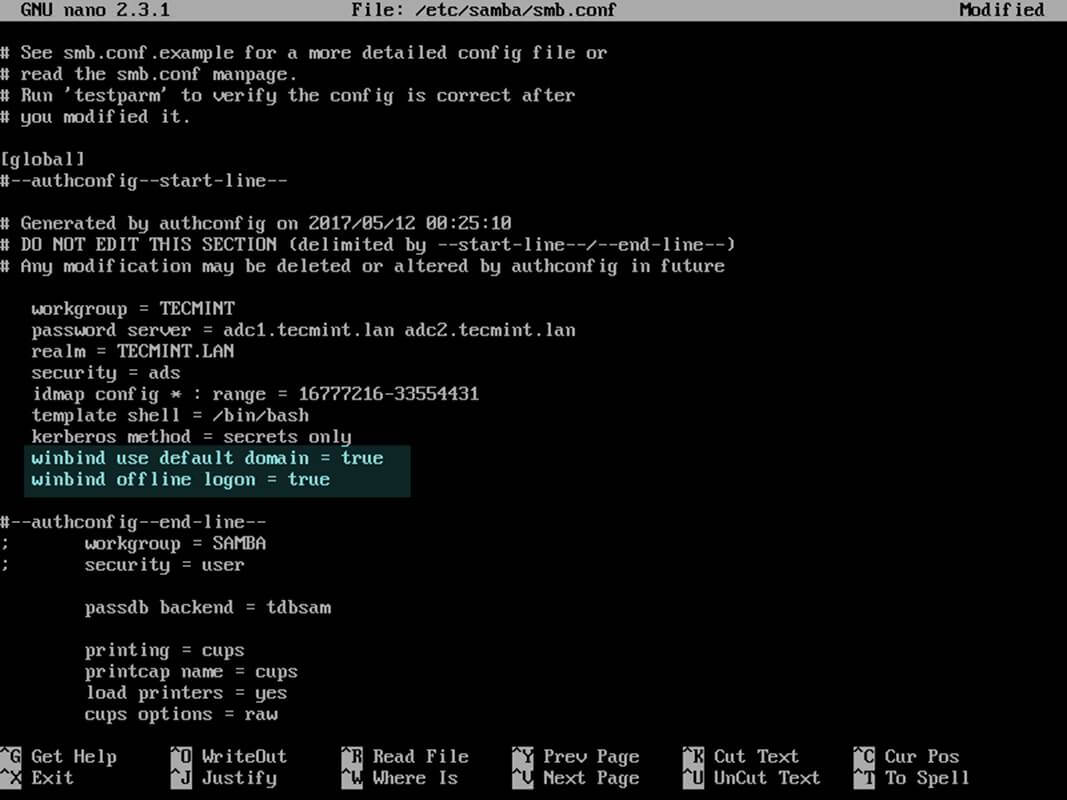
12、 最后,使用文本编辑器打开 samba 主配置文件(`/etc/samba/smb.conf`)来调整配置,并在 `[global]` 配置块的末尾附加以下行,如下所示:
```
winbind use default domain = true
winbind offline logon = true
```
[][14]
*配置 Samba*
13、 为了在 AD 帐户首次登录时在机器上创建本地家目录,请运行以下命令:
```
# authconfig --enablemkhomedir --update
```
14、 最后,重启 Samba 守护进程使更改生效,并使用一个 AD 账户登陆验证域加入。AD 帐户的家目录应该会自动创建。
```
# systemctl restart winbind
# su - domain_account
```
[][15]
*验证域加入*
15、 通过以下命令之一列出域用户或域组。
```
# wbinfo -u
# wbinfo -g
```
[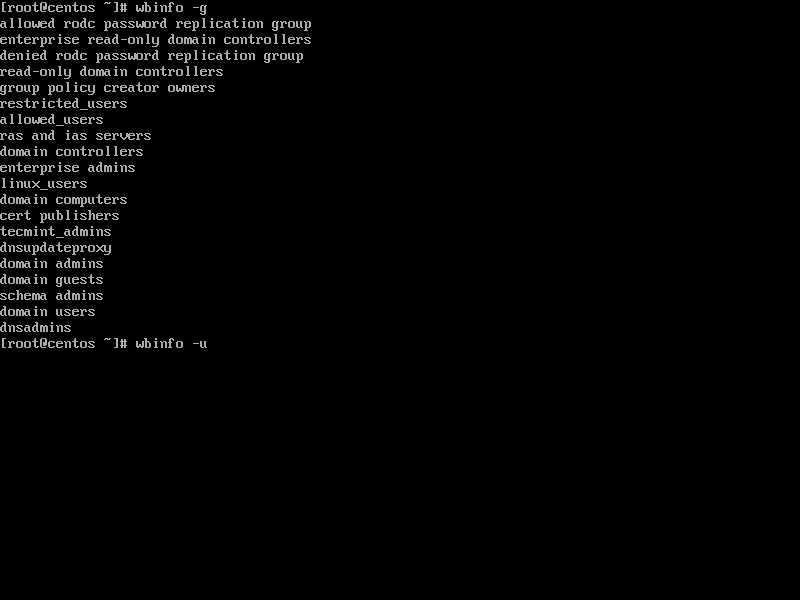][16]
*列出域用户和组*
16、 要获取有关域用户的信息,请运行以下命令。
```
# wbinfo -i domain_user
```
[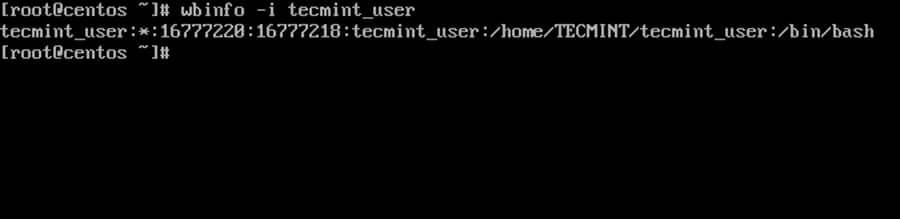][17]
*列出域用户信息*
17、 要显示域摘要信息,请使用以下命令。
```
# net ads info
```
[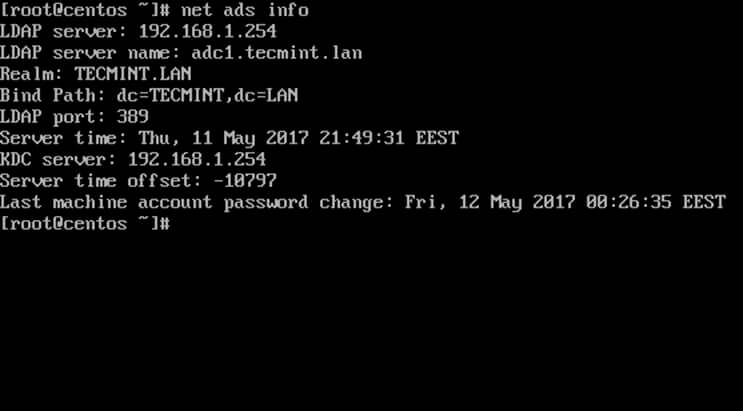][18]
*列出域摘要*
### 步骤 3:使用 Samba4 AD DC 帐号登录CentOS
18、 要在 CentOS 中与域用户进行身份验证,请使用以下命令语法之一。
```
# su - ‘domain\domain_user’
# su - domain\\domain_user
```
或者在 samba 配置文件中设置了 `winbind use default domain = true` 参数的情况下,使用下面的语法。
```
# su - domain_user
# su - domain_user@domain.tld
```
19、 要为域用户或组添加 root 权限,请使用 `visudocommand` 编辑 `sudoers` 文件,并添加以下截图所示的行。
```
YOUR_DOMAIN\\domain_username ALL=(ALL:ALL) ALL #For domain users
%YOUR_DOMAIN\\your_domain\ group ALL=(ALL:ALL) ALL #For domain groups
```
或者在 samba 配置文件中设置了 `winbind use default domain = true` 参数的情况下,使用下面的语法。
```
domain_username ALL=(ALL:ALL) ALL #For domain users
%your_domain\ group ALL=(ALL:ALL) ALL #For domain groups
```
[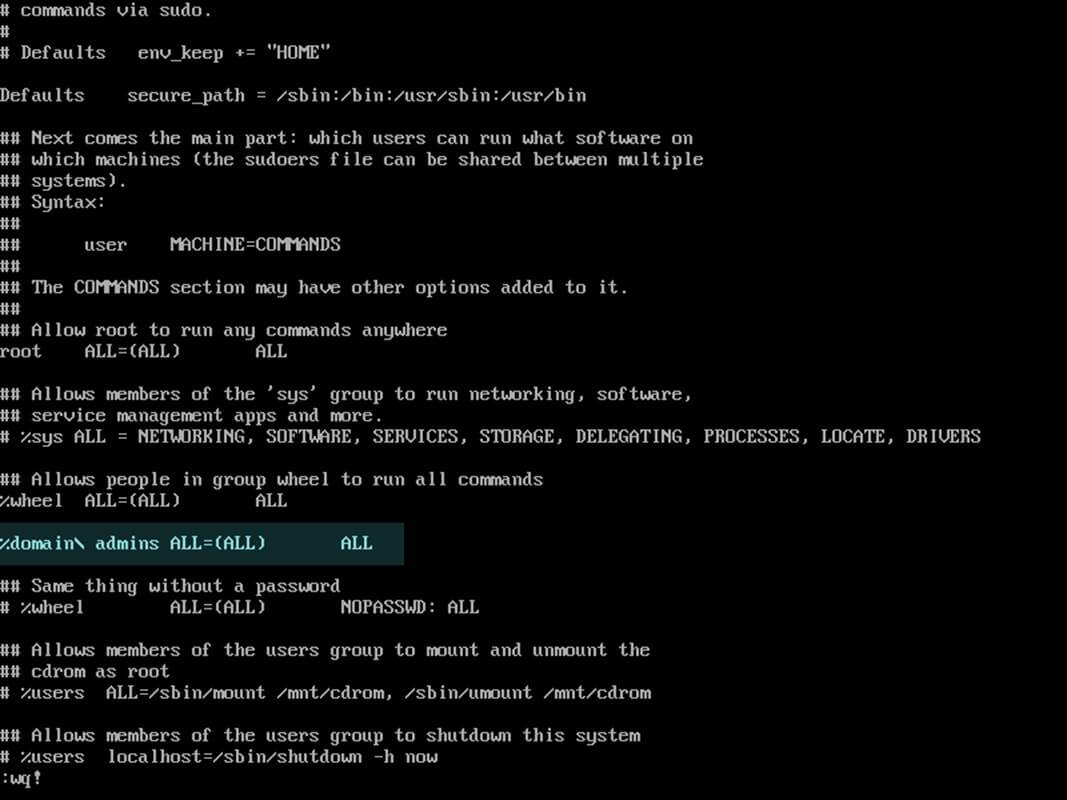][19]
*授予域用户 root 权限*
20、 针对 Samba4 AD DC 的以下一系列命令也可用于故障排除:
```
# wbinfo -p #Ping domain
# wbinfo -n domain_account #Get the SID of a domain account
# wbinfo -t #Check trust relationship
```
21、 要离开该域, 请使用具有提升权限的域帐户对你的域名运行以下命令。从 AD 中删除计算机帐户后, 重启计算机以在集成进程之前还原更改。
```
# net ads leave -w DOMAIN -U domain_admin
# init 6
```
就是这样了!尽管此过程主要集中在将 CentOS 7 服务器加入到 Samba4 AD DC 中,但这里描述的相同步骤也适用于将 CentOS 服务器集成到 Microsoft Windows Server 2012 AD 中。
--------------------------------------------------------------------------------
作者简介:
Matei Cezar - 我是一个电脑上瘾的家伙,开源和基于 linux 的系统软件的粉丝,在 Linux 发行版桌面、服务器和 bash 脚本方面拥有大约 4 年的经验。
------------------
via: https://www.tecmint.com/integrate-centos-7-to-samba4-active-directory/
作者:[Matei Cezar][a]
译者:[geekpi](https://github.com/geekpi)
校对:[wxy](https://github.com/wxy)
本文由 [LCTT](https://github.com/LCTT/TranslateProject) 原创编译,[Linux中国](https://linux.cn/) 荣誉推出
[a]:https://www.tecmint.com/author/cezarmatei/
[1]:https://linux.cn/article-8065-1.html
[2]:https://linux.cn/article-8048-1.html
[3]:https://linux.cn/article-8065-1.html
[4]:https://www.tecmint.com/ip-command-examples/
[5]:https://www.tecmint.com/wp-content/uploads/2017/07/List-Network-Interfaces.jpg
[6]:https://www.tecmint.com/wp-content/uploads/2017/07/Configure-Network-Interface.png
[7]:https://www.tecmint.com/wp-content/uploads/2017/07/Verify-DNS-Resolution-on-Domain.png
[8]:https://www.tecmint.com/wp-content/uploads/2017/07/Sync-Time-with-Samba4-AD-DC.png
[9]:https://www.tecmint.com/wp-content/uploads/2017/07/Authentication-Configuration.png
[10]:https://www.tecmint.com/wp-content/uploads/2017/07/Winbind-Settings.png
[11]:https://www.tecmint.com/wp-content/uploads/2017/07/Join-Domain-to-Samba4-AD-DC.png
[12]:https://www.tecmint.com/wp-content/uploads/2017/07/Confirm-Winbind-Settings.png
[13]:https://linux.cn/article-8097-1.html
[14]:https://www.tecmint.com/wp-content/uploads/2017/07/Configure-Samba.jpg
[15]:https://www.tecmint.com/wp-content/uploads/2017/07/Verify-Domain-Joining.jpg
[16]:https://www.tecmint.com/wp-content/uploads/2017/07/List-Domain-Users-and-Groups.png
[17]:https://www.tecmint.com/wp-content/uploads/2017/07/List-Domain-User-Info.jpg
[18]:https://www.tecmint.com/wp-content/uploads/2017/07/List-Domain-Summary.jpg
[19]:https://www.tecmint.com/wp-content/uploads/2017/07/Grant-Root-Privileges-on-Domain-Users.jpg
[20]:https://www.tecmint.com/author/cezarmatei/
[21]:https://www.tecmint.com/10-useful-free-linux-ebooks-for-newbies-and-administrators/
[22]:https://www.tecmint.com/free-linux-shell-scripting-books/