如何在 Ubuntu16.04 中用 Apache 部署 Jenkins 自动化服务器 ============================================================ Jenkins 是从 Hudson 项目衍生出来的自动化服务器。Jenkins 是一个基于服务器的应用程序,运行在 Java servlet 容器中,它支持包括 Git、SVN 以及 Mercurial 在内的多种 SCM(Source Control Management,源码控制工具)。Jenkins 提供了上百种插件帮助你的项目实现自动化。Jenkins 由 Kohsuke Kawaguchi 开发,在 2011 年使用 MIT 协议发布了第一个发行版,它是个自由软件。 在这篇指南中,我会向你介绍如何在 Ubuntu 16.04 中安装最新版本的 Jenkins。我们会用自己的域名运行 Jenkins,在 apache web 服务器中安装和配置 Jenkins,而且支持反向代理。 ### 前提 * Ubuntu 16.04 服务器 - 64 位 * Root 权限 ### 第一步 - 安装 Java OpenJDK 7 Jenkins 基于 Java,因此我们需要在服务器上安装 Java OpenJDK 7。在这里,我们会从一个 PPA 仓库安装 Java 7,首先我们需要添加这个仓库。 默认情况下,Ubuntu 16.04 没有安装用于管理 PPA 仓库的 python-software-properties 软件包,因此我们首先需要安装这个软件。使用 apt 命令安装 python-software-properties。 ``` apt-get install python-software-properties ``` 下一步,添加 Java PPA 仓库到服务器中。 ``` add-apt-repository ppa:openjdk-r/ppa ``` 用 apt 命令更新 Ubuntu 仓库并安装 Java OpenJDK。 ``` apt-get update apt-get install openjdk-7-jdk ``` 输入下面的命令验证安装: ``` java -version ``` 你会看到安装到服务器上的 Java 版本。 [ 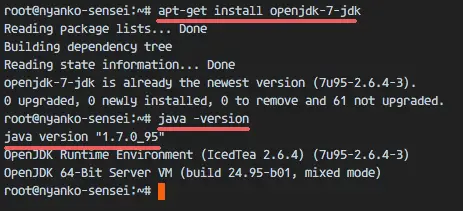 ][9] ### 第二步 - 安装 Jenkins Jenkins 给软件安装包提供了一个 Ubuntu 仓库,我们会从这个仓库中安装 Jenkins。 用下面的命令添加 Jenkins 密钥和仓库到系统中。 ``` wget -q -O - https://pkg.jenkins.io/debian-stable/jenkins.io.key | sudo apt-key add - echo 'deb https://pkg.jenkins.io/debian-stable binary/' | tee -a /etc/apt/sources.list ``` 更新仓库并安装 Jenkins。 ``` apt-get update apt-get install jenkins ``` 安装完成后,用下面的命令启动 Jenkins。 ``` systemctl start jenkins ``` 通过检查 Jenkins 默认使用的端口(端口 8080)验证 Jenkins 正在运行。我会像下面这样用 `netstat` 命令检测: ``` netstat -plntu ``` Jenkins 已经安装好了并运行在 8080 端口。 [ 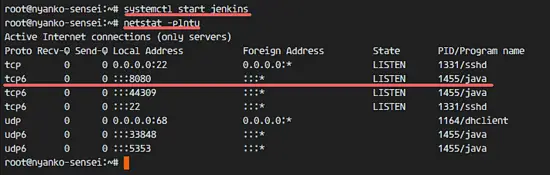 ][10] ### 第三步 - 为 Jenkins 安装和配置 Apache 作为反向代理 在这篇指南中,我们会在一个 Apache web 服务器中运行 Jenkins,我们会为 Jenkins 配置 apache 作为反向代理。首先我会安装 apache 并启用一些需要的模块,然后我会为 Jenkins 用域名 my.jenkins.id 创建虚拟主机文件。请在这里使用你自己的域名并在所有配置文件中出现的地方替换。 从 Ubuntu 仓库安装 apache2 web 服务器。 ``` apt-get install apache2 ``` 安装完成后,启用 proxy 和 proxy_http 模块以便将 apache 配置为 Jenkins 的前端服务器/反向代理。 ``` a2enmod proxy a2enmod proxy_http ``` 下一步,在 `sites-available` 目录创建新的虚拟主机文件。 ``` cd /etc/apache2/sites-available/ vim jenkins.conf ``` 粘贴下面的虚拟主机配置。 ``` <Virtualhost *:80> ServerName my.jenkins.id ProxyRequests Off ProxyPreserveHost On AllowEncodedSlashes NoDecode <Proxy http://localhost:8080/*> Order deny,allow Allow from all </Proxy> ProxyPass / http://localhost:8080/ nocanon ProxyPassReverse / http://localhost:8080/ ProxyPassReverse / http://my.jenkins.id/ </Virtualhost> ``` 保存文件。然后用 `a2ensite` 命令激活 Jenkins 虚拟主机。 ``` a2ensite jenkins ``` 重启 Apache 和 Jenkins。 ``` systemctl restart apache2 systemctl restart jenkins ``` 检查 Jenkins 和 Apache 正在使用 80 和 8080 端口。 ``` netstat -plntu ``` [ 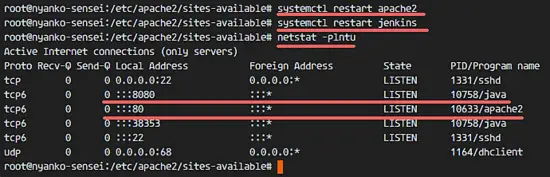 ][11] ### 第四步 - 配置 Jenkins Jenkins 用域名 'my.jenkins.id' 运行。打开你的 web 浏览器然后输入 URL。你会看到要求你输入初始管理员密码的页面。Jenkins 已经生成了一个密码,因此我们只需要显示并把结果复制到密码框。 用 `cat` 命令显示 Jenkins 初始管理员密码。 ``` cat /var/lib/jenkins/secrets/initialAdminPassword a1789d1561bf413c938122c599cf65c9 ``` [  ][12] 将结果粘贴到密码框然后点击 Continue。 [ 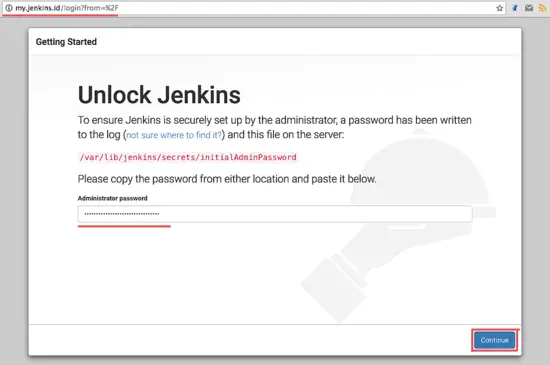 ][13] 现在为了后面能比较好的使用,我们需要在 Jenkins 中安装一些插件。选择 Install Suggested Plugin,点击它。 [ 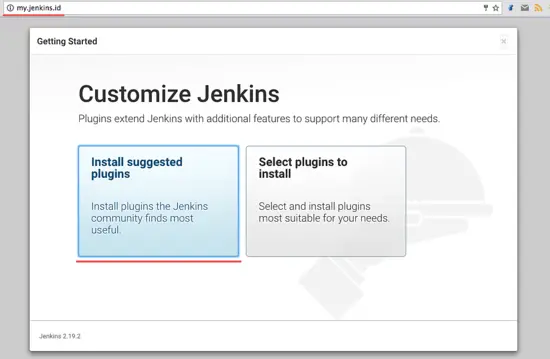 ][14] Jenkins 插件安装过程: [ 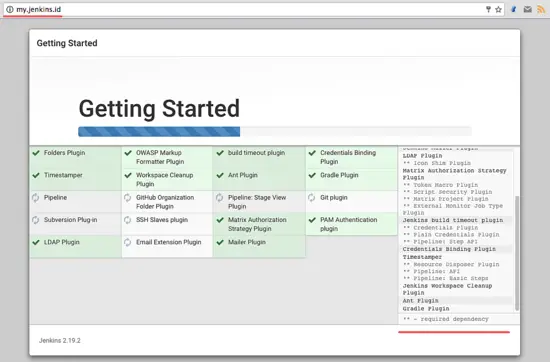 ][15] 安装完插件后,我们需要创建一个新的管理员密码。输入你的管理员用户名、密码、电子邮件等,然后点击 ‘**Save and Finish**’。 [ 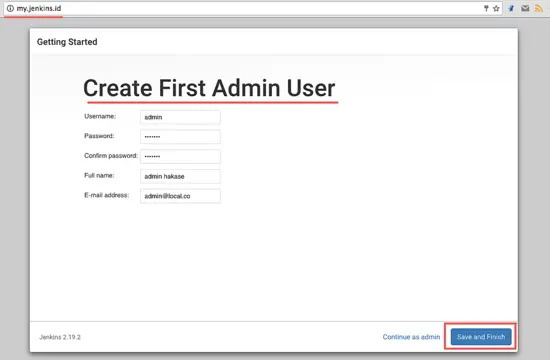 ][16] 点击 start 开始使用 Jenkins。你会被重定向到 Jenkins 管理员面板。 [ 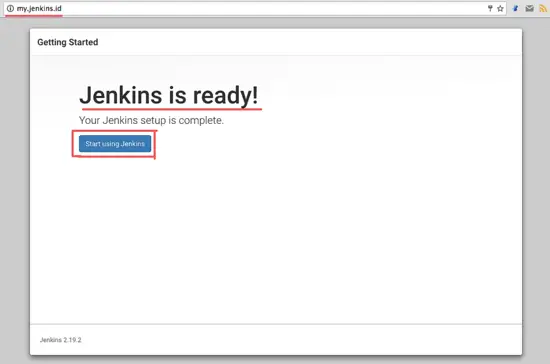 ][17] 成功完成 Jenkins 安装和配置。 [  ][18] ### 第五步 - Jenkins 安全 在 Jenkins 管理员面板,我们需要为 Jenkins 配置标准的安全,点击 ‘**Manage Jenkins**’ 和 ‘**Configure Global Security**’。 [  ][19] Jenkins 在 ‘**Access Control**’ 部分提供了多种认证方法。为了能够控制所有的用户权限,我选择了 ‘**Matrix-based Security**’。在复选框 ‘**User/Group**’ 中启用 admin 用户。通过**勾选所有选项**给 admin 所有权限,给 anonymous 只读权限。现在点击 ‘**Save**’。 [  ][20] 你会被重定向到面板,如果出现了登录选项,只需输入你的管理员账户和密码。 ### 第六步 - 测试一个简单的自动化任务 在这一部分,我想为 Jenkins 服务测试一个简单的任务。为了测试 Jenkins 我会创建一个简单的任务,并用 top 命令查看服务器的负载。 在 Jenkins 管理员面板上,点击 ‘**Create New Job**’。 [  ][21] 输入任务的名称,在这里我输入 ‘Checking System’,选择 Freestyle Project 然后点击 OK。 [ 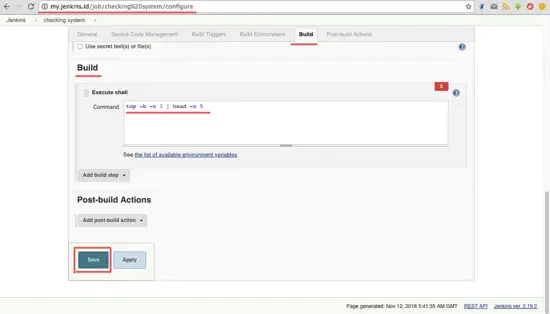 ][22] 进入 Build 标签页。在 Add build step,选择选项 Execute shell。 在输入框输入下面的命令。 ``` top -b -n 1 | head -n 5 ``` 点击 Save。 [ 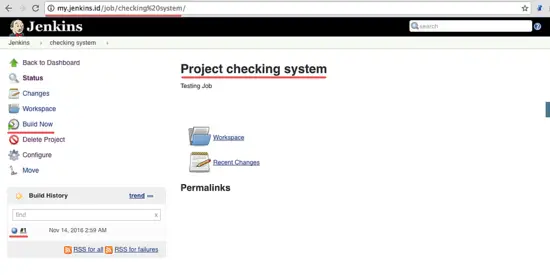 ][23] 现在你是在任务 ‘Project checking system’ 的任务页。点击 Build Now 执行任务 ‘checking system’。 任务执行完成后,你会看到 Build History,点击第一个任务查看结果。 下面是 Jenkins 任务执行的结果。 [ 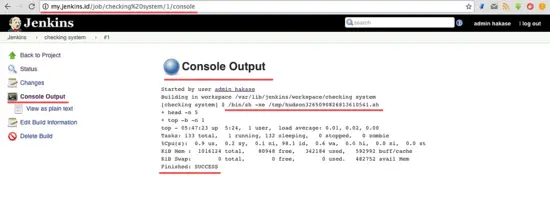 ][24] 到这里就介绍完了在 Ubuntu 16.04 中用 Apache web 服务器安装 Jenkins 的内容。 -------------------------------------------------------------------------------- via: https://www.howtoforge.com/tutorial/how-to-install-jenkins-with-apache-on-ubuntu-16-04/ 作者:[Muhammad Arul][a] 译者:[ictlyh](https://github.com/ictlyh) 校对:[wxy](https://github.com/wxy) 本文由 [LCTT](https://github.com/LCTT/TranslateProject) 组织编译,[Linux中国](https://linux.cn/) 荣誉推出 [a]:https://twitter.com/howtoforgecom [1]:https://www.howtoforge.com/tutorial/how-to-install-jenkins-with-apache-on-ubuntu-16-04/#prerequisite [2]:https://www.howtoforge.com/tutorial/how-to-install-jenkins-with-apache-on-ubuntu-16-04/#step-install-java-openjdk- [3]:https://www.howtoforge.com/tutorial/how-to-install-jenkins-with-apache-on-ubuntu-16-04/#step-install-jenkins [4]:https://www.howtoforge.com/tutorial/how-to-install-jenkins-with-apache-on-ubuntu-16-04/#step-install-and-configure-apache-as-reverse-proxy-for-jenkins [5]:https://www.howtoforge.com/tutorial/how-to-install-jenkins-with-apache-on-ubuntu-16-04/#step-configure-jenkins [6]:https://www.howtoforge.com/tutorial/how-to-install-jenkins-with-apache-on-ubuntu-16-04/#step-jenkins-security [7]:https://www.howtoforge.com/tutorial/how-to-install-jenkins-with-apache-on-ubuntu-16-04/#step-testing-a-simple-automation-job [8]:https://www.howtoforge.com/tutorial/how-to-install-jenkins-with-apache-on-ubuntu-16-04/#reference [9]:https://www.howtoforge.com/images/how-to-install-jenkins-with-apache-on-ubuntu-16-04/big/1.png [10]:https://www.howtoforge.com/images/how-to-install-jenkins-with-apache-on-ubuntu-16-04/big/2.png [11]:https://www.howtoforge.com/images/how-to-install-jenkins-with-apache-on-ubuntu-16-04/big/3.png [12]:https://www.howtoforge.com/images/how-to-install-jenkins-with-apache-on-ubuntu-16-04/big/4.png [13]:https://www.howtoforge.com/images/how-to-install-jenkins-with-apache-on-ubuntu-16-04/big/5.png [14]:https://www.howtoforge.com/images/how-to-install-jenkins-with-apache-on-ubuntu-16-04/big/6.png [15]:https://www.howtoforge.com/images/how-to-install-jenkins-with-apache-on-ubuntu-16-04/big/7.png [16]:https://www.howtoforge.com/images/how-to-install-jenkins-with-apache-on-ubuntu-16-04/big/8.png [17]:https://www.howtoforge.com/images/how-to-install-jenkins-with-apache-on-ubuntu-16-04/big/9.png [18]:https://www.howtoforge.com/images/how-to-install-jenkins-with-apache-on-ubuntu-16-04/big/10.png [19]:https://www.howtoforge.com/images/how-to-install-jenkins-with-apache-on-ubuntu-16-04/big/11.png [20]:https://www.howtoforge.com/images/how-to-install-jenkins-with-apache-on-ubuntu-16-04/big/12.png [21]:https://www.howtoforge.com/images/how-to-install-jenkins-with-apache-on-ubuntu-16-04/big/13.png [22]:https://www.howtoforge.com/images/how-to-install-jenkins-with-apache-on-ubuntu-16-04/big/14.png [23]:https://www.howtoforge.com/images/how-to-install-jenkins-with-apache-on-ubuntu-16-04/big/15.png [24]:https://www.howtoforge.com/images/how-to-install-jenkins-with-apache-on-ubuntu-16-04/big/16.png