如何在RHEL/CentOS/Fedora中使用LVM创建和设置LUN- 第二部分
================================================================================
LUN是逻辑单元号,它与iSCSI存储服务器共享。物理iSCSI target服务器共享它的驱动器来初始化TCP/IP网络。驱动器的集合称作LUN来幸存一个大型存储也就是SAN(Storage Area Network)。在真实环境中LUN在LVM中定义,因此它可以按需扩展。

Create LUNS using LVM in Target Server
### 为什么使用LUN? ###
LUN用于存储,SAN存储大多数有LUN的集群来组成池,LUN由几块物理驱动器组成。我们可以使用LUN作为系统物理驱动器来安装操作系统,LUN在集群、虚拟服务器、SAN中使用。在虚拟服务器中使用LUN的目的是作为系统存储。LUN的性能和可靠性根据在创建目标存储服务器时所使用的驱动器决定。
### 需求 ###
要了解创建iSCSI target服务器点击下面的链接。
- [使用iSCSI target创建爱你集中话安全存储][1]
#### 主服务器设置 ####
系统信息和网络设置部分与已经写的iSCSI Target服务相同 - 我们在相同的服务器上定义LUN。
- 操作系统 – CentOS release 6.5 (最终版)
- iSCSI Target IP – 192.168.0.200
- 使用的端口 : TCP 860, 3260
- 配置文件 : /etc/tgt/targets.conf
## 在iSCSI Target Server使用LVM创建LUN ##
首先,用**fdisk -l**命令找出驱动器的列表,这会列出系统中所有分区的列表。
# fdisk -l
上面的命令只会给出基本系统的驱动器信息。为了个到存储设备的信息,使用下面的命令来的到存储设备的列表。
# fdisk -l /dev/vda && fdisk -l /dev/sda

列出存储设备
**注意**:这里**vda**是虚拟机硬盘,因为我使用的是虚拟机来用于演示,**/dev/sda** 是额外加入的存储。
### 第一步: 创建用于LUN的LVM ###
我们使用**/dev/sda**驱动器来创建LVM。
# fdisk -l /dev/sda

列出LVM驱动器
现在让我们如下使用fdisk命令列出驱动器分区。
# fdisk -cu /dev/sda
- The option ‘**-c**‘ 关闭DOS兼容模式。
- The option ‘**-u**‘ 用于列出分区表,给出扇区而不是柱面的大小。
使用**n**创建新的分区。
Command (m for help): n
使用**p**创建主分区。
Command action
e extended
p primary partition (1-4)
给我们创建的分区一个分区号。
Partition number (1-4): 1
到这里,我们就要设置LVM驱动器了。因此,我们需要使用默认的设置来使用整个驱动器。
First sector (2048-37748735, default 2048):
Using default value 2048
Last sector, +sectors or +size{K,M,G} (2048-37748735, default 37748735):
Using default value 37748735
选择分区的类型,这里我们要设置LVM,因此使用**8e**。使用**l**列出所有的类型。
Command (m for help): t
选择想要改变类型的分区。
Selected partition 1
Hex code (type L to list codes): 8e
Changed system type of partition 1 to 8e (Linux LVM)
在改变完类型之后,通过打印(**p**)选项来列出分区表。
Command (m for help): p
Disk /dev/sda: 19.3 GB, 19327352832 bytes
255 heads, 63 sectors/track, 2349 cylinders, total 37748736 sectors
Units = sectors of 1 * 512 = 512 bytes
Sector size (logical/physical): 512 bytes / 512 bytes
I/O size (minimum/optimal): 512 bytes / 512 bytes
Disk identifier: 0x9fae99c8
Device Boot Start End Blocks Id System
/dev/sda1 2048 37748735 18873344 8e Linux LVM
使用**w**写入设置并退出fdisk工具,重启系统使设置生效。
作为参考,我下面附上了截图来给你在创建LVM驱动器时一个明确的指导。

创建LVM分区
系统重启后,使用fdisk命令列出分区表。
# fdisk -l /dev/sda

验证LVM分区
### 第二步: 为LUN创建逻辑卷 ###
现在我们使用‘pvcreate’命令创建物理卷。
# pvcreate /dev/sda1
用iSCSI的名字创建卷组来区分组。
# vgcreate vg_iscsi /dev/sda1
这里我定义了4个逻辑卷,因此在我的iSCSI target上就会有4个LUN。
# lvcreate -L 4G -n lv_iscsi vg_iscsi
# lvcreate -L 4G -n lv_iscsi-1 vg_iscsi
# lvcreate -L 4G -n lv_iscsi-2 vg_iscsi
# lvcreate -L 4G -n lv_iscsi-3 vg_iscsi
列出物理卷、卷组和逻辑卷确定。
# pvs && vgs && lvs
# lvs
为了更好地理解上面的命令,我在下面包含了截图作为参考。

创建LVM逻辑卷

验证LVM逻辑卷
### 第三步: 在Target Server中定义LUN ###
我们已经创建了逻辑卷并准备使用LUN,现在我们在target配置中定义LUN,如果这样那么它只能用在客户机中(启动器)。
用你选择的编辑器打开位于‘/etc/tgt/targets.conf’的target配置文件。
# vim /etc/tgt/targets.conf
追加下面的target配置文件中的定义。保存并关闭文件。
<target iqn.2014-07.com.tecmint:tgt1>
backing-store /dev/vg_iscsi/lv_iscsi
</target>
<target iqn.2014-07.com.tecmint:tgt1>
backing-store /dev/vg_iscsi/lv_iscsi-1
</target>
<target iqn.2014-07.com.tecmint:tgt1>
backing-store /dev/vg_iscsi/lv_iscsi-2
</target>
<target iqn.2014-07.com.tecmint:tgt1>
backing-store /dev/vg_iscsi/lv_iscsi-3
</target
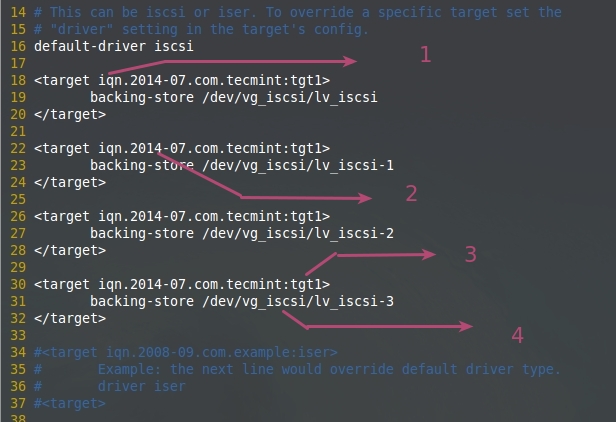
在target中配置LUN
- iSCSI 限定名 (iqn.2014-07.com.tecmint:tgt1).
- 随你怎么使用
- 确定使用目标, 这台服务器中的第一个目标
- 4. LVM共享特定的LUN。
接下来使用下面命令重载**tgd**服务配置。
# /etc/init.d/tgtd reload

重载配置
接下来使用下面的命令验证可用的LUN。
# tgtadm --mode target --op show

列出可用LUN

LUN信息
The above command will give long list of available LUNs with following information.
上面的命令会列出可用LUN的下面这些信息
- iSCSI 限定名
- iSCSI 准备使用
- 默认LUN 0被控制器保留
- LUN 1是我们定义的target服务器
- 这里我为每个LUN都定义了4GB
- 在线: 是的,这就是可以使用的LUN
现在我们已经使用LVM为target服务器定义了LUN,这可扩展并且支持很多特性,如快照。我们将会在第三部分了解如何用target服务器授权,并且本地挂载远程存储。
--------------------------------------------------------------------------------
via: http://www.tecmint.com/create-luns-using-lvm-in-iscsi-target/
作者:[Babin Lonston][a]
译者:[geekpi](https://github.com/geekpi)
校对:[校对者ID](https://github.com/校对者ID)
本文由 [LCTT](https://github.com/LCTT/TranslateProject) 原创翻译,[Linux中国](http://linux.cn/) 荣誉推出
[a]:http://www.tecmint.com/author/babinlonston/
[1]:http://www.tecmint.com/create-centralized-secure-storage-using-iscsi-targetin-linux/