使用 chroot 监狱限制 SSH 用户访问指定目录
============================================================
将 [SSH 用户会话限制][1]访问到特定的目录内,特别是在 web 服务器上,这样做有多个原因,但最显而易见的是为了系统安全。为了锁定 SSH 用户在某个目录,我们可以使用 **chroot** 机制。
在诸如 Linux 之类的类 Unix 系统中更改 root(**chroot**)是将特定用户操作与其他 Linux 系统分离的一种手段;使用称为 **chrooted 监狱** 的新根目录更改当前运行的用户进程及其子进程的明显根目录。
在本教程中,我们将向你展示如何限制 SSH 用户访问 Linux 中指定的目录。注意,我们将以 root 用户身份运行所有命令,如果你以普通用户身份登录服务器,请使用 [sudo 命令][2]。
### 步骤 1:创建 SSH chroot 监狱
1、 使用 mkdir 命令开始创建 chroot 监狱:
```
# mkdir -p /home/test
```
2、 接下来,根据 `sshd_config` 手册找到所需的文件,`ChrootDirectory` 选项指定在身份验证后要 chroot 到的目录的路径名。该目录必须包含支持用户会话所必需的文件和目录。
对于交互式会话,这需要至少一个 shell,通常为 `sh` 和基本的 `/dev` 节点,例如 `null`、`zero`、`stdin`、`stdout`、`stderr` 和 `tty` 设备:
```
# ls -l /dev/{null,zero,stdin,stdout,stderr,random,tty}
```
[

][3]
*列出所需文件*
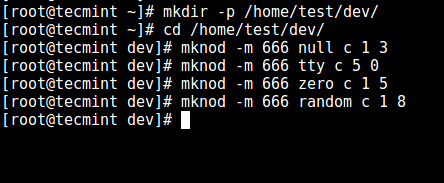
3、 现在,使用 `mknod` 命令创建 `/dev` 下的文件。在下面的命令中,`-m` 标志用来指定文件权限位,`c` 意思是字符文件,两个数字分别是文件指向的主要号和次要号。
```
# mkdir -p /home/test/dev/
# cd /home/test/dev/
# mknod -m 666 null c 1 3
# mknod -m 666 tty c 5 0
# mknod -m 666 zero c 1 5
# mknod -m 666 random c 1 8
```
[
][4]
*创建 /dev 和所需文件*
4、 在此之后,在 chroot 监狱中设置合适的权限。注意 chroot 监狱和它的子目录以及子文件必须被 `root` 用户所有,并且对普通用户或用户组不可写:
```
# chown root:root /home/test
# chmod 0755 /home/test
# ls -ld /home/test
```
[

][5]
*设置目录权限*
### 步骤 2:为 SSH chroot 监狱设置交互式 shell
5、 首先,创建 `bin` 目录并复制 `/bin/bash` 到 `bin` 中:
```
# mkdir -p /home/test/bin
# cp -v /bin/bash /home/test/bin/
```
[

][6]
*复制文件到 bin 目录中*
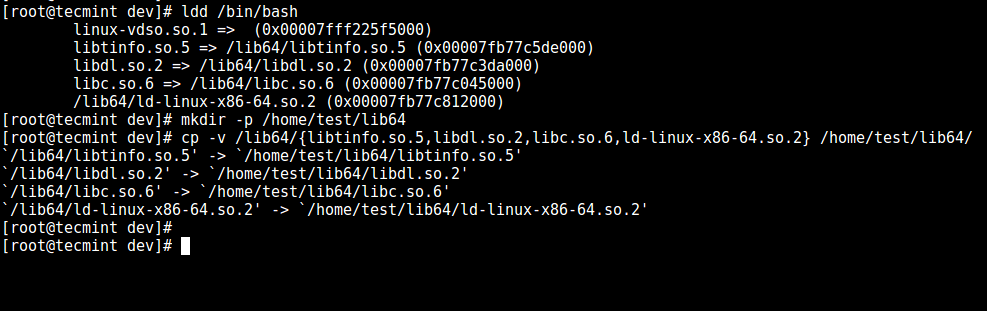
6、 现在,识别 bash 所需的共享库,如下所示复制它们到 `lib64` 中:
```
# ldd /bin/bash
# mkdir -p /home/test/lib64
# cp -v /lib64/{libtinfo.so.5,libdl.so.2,libc.so.6,ld-linux-x86-64.so.2} /home/test/lib64/
```
[
][7]
*复制共享库文件*
### 步骤 3:创建并配置 SSH 用户
7、 现在,使用 [useradd 命令][8]创建 SSH 用户,并设置安全密码:
```
# useradd tecmint
# passwd tecmint
```
8、 创建 chroot 监狱通用配置目录 `/home/test/etc` 并复制已更新的账号文件(`/etc/passwd` 和 `/etc/group`)到这个目录中:
```
# mkdir /home/test/etc
# cp -vf /etc/{passwd,group} /home/test/etc/
```
[

][9]
*复制密码文件*
注意:每次向系统添加更多 SSH 用户时,都需要将更新的帐户文件复制到 `/home/test/etc` 目录中。
### 步骤 4:配置 SSH 来使用 chroot 监狱
9、 现在打开 `sshd_config` 文件。
```
# vi /etc/ssh/sshd_config
```
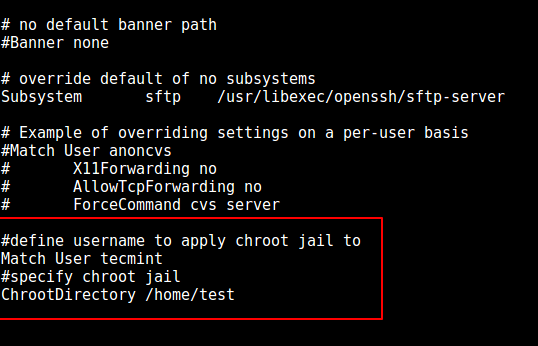
在此文件中添加或修改下面这些行。
```
# 定义要使用 chroot 监狱的用户
Match User tecmint
# 指定 chroot 监狱
ChrootDirectory /home/test
```
[
][10]
*配置 SSH chroot 监狱*
保存文件并退出,重启 sshd 服务:
```
# systemctl restart sshd
或者
# service sshd restart
```
### 步骤 5:测试 SSH 的 chroot 监狱
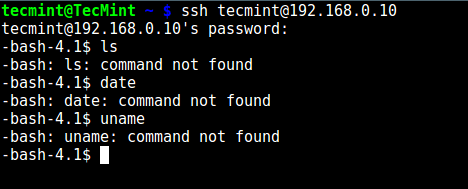
10、 这次,测试 chroot 监狱的设置是否如希望的那样成功了:
```
# ssh tecmint@192.168.0.10
-bash-4.1$ ls
-bash-4.1$ date
-bash-4.1$ uname
```
[
][11]
*测试 SSH 用户 chroot 监狱*
从上面的截图上来看,我们可以看到 SSH 用户被锁定在了 chroot 监狱中,并且不能使用任何外部命令如(`ls`、`date`、`uname` 等等)。
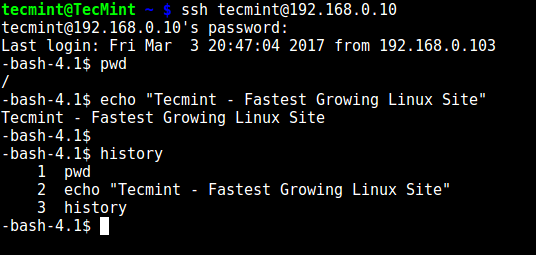
用户只可以执行 `bash` 以及它内置的命令(比如:`pwd`、`history`、`echo` 等等):
```
# ssh tecmint@192.168.0.10
-bash-4.1$ pwd
-bash-4.1$ echo "Tecmint - Fastest Growing Linux Site"
-bash-4.1$ history
```
[
][12]
*SSH 内置命令*
### 步骤6: 创建用户的主目录并添加 Linux 命令
11、 从前面的步骤中,我们可以看到用户被锁定在了 root 目录,我们可以为 SSH 用户创建一个主目录(以及为所有将来的用户这么做):
```
# mkdir -p /home/test/home/tecmint
# chown -R tecmint:tecmint /home/test/home/tecmint
# chmod -R 0700 /home/test/home/tecmint
```
[

][13]
*创建 SSH 用户主目录*
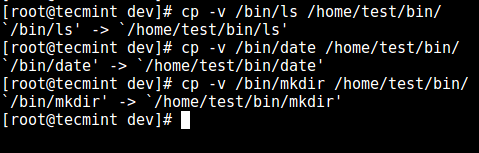
12、 接下来,在 `bin` 目录中安装几个用户命令,如 `ls`、`date`、`mkdir`:
```
# cp -v /bin/ls /home/test/bin/
# cp -v /bin/date /home/test/bin/
# cp -v /bin/mkdir /home/test/bin/
```
[
][14]
*向 SSH 用户添加命令*
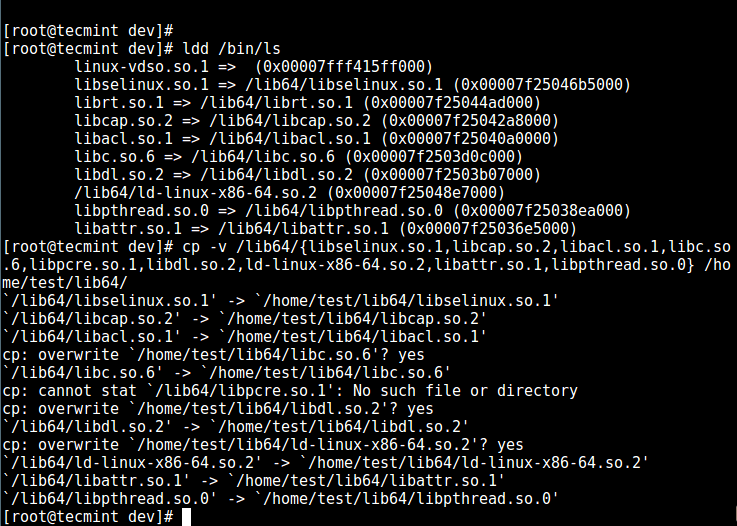
13、 接下来,检查上面命令的共享库并将它们移到 chroot 监狱的库目录中:
```
# ldd /bin/ls
# cp -v /lib64/{libselinux.so.1,libcap.so.2,libacl.so.1,libc.so.6,libpcre.so.1,libdl.so.2,ld-linux-x86-64.so.2,libattr.so.1,libpthread.so.0} /home/test/lib64/
```
[
][15]
*复制共享库*
### 步骤 7:测试 sftp 的 用 chroot 监狱
14、 最后用 sftp 做一个测试;测试你先前安装的命令是否可用。
在 `/etc/ssh/sshd_config` 中添加下面的行:
```
# 启用 sftp 的 chrooted 监狱
ForceCommand internal-sftp
```
保存并退出文件。接下来重启 sshd 服务:
```
# systemctl restart sshd
或者
# service sshd restart
```
15、 现在使用 ssh 测试,你会得到下面的错误:
```
# ssh tecmint@192.168.0.10
```
[

][16]
*测试 SSH Chroot 监狱*
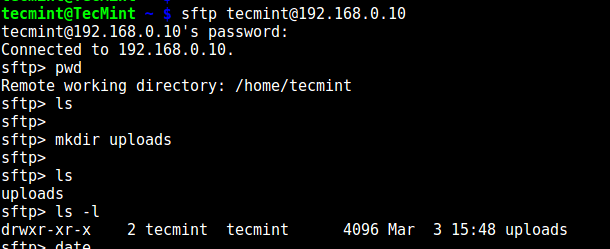
试下使用 sftp:
```
# sftp tecmint@192.168.0.10
```
[
][17]
*测试 sFTP SSH 用户*
**建议阅读:** [使用 chroot 监狱将 sftp 用户限制在主目录中][18]。
就是这样了!在文本中,我们向你展示了如何在 Linux 中限制 ssh 用户到指定的目录中( chroot 监狱)。请在评论栏中给我们提供你的想法。
--------------------------------------------------------------------------------
作者简介:
Aaron Kili 是一个 Linux 及 F.O.S.S 热衷者,即将成为 Linux 系统管理员、web 开发者,目前是 TecMint 的内容创作者,他喜欢用电脑工作,并坚信分享知识。
--------------------------------------------------------------------------------
via: http://www.tecmint.com/restrict-ssh-user-to-directory-using-chrooted-jail/
作者:[Aaron Kili][a]
译者:[geekpi](https://github.com/geekpi)
校对:[jasminepeng](https://github.com/jasminepeng)
本文由 [LCTT](https://github.com/LCTT/TranslateProject) 原创编译,[Linux中国](https://linux.cn/) 荣誉推出
[a]:http://www.tecmint.com/author/aaronkili/
[1]:http://www.tecmint.com/restrict-sftp-user-home-directories-using-chroot/
[2]:http://www.tecmint.com/sudoers-configurations-for-setting-sudo-in-linux/
[3]:http://www.tecmint.com/wp-content/uploads/2017/03/Listing-Required-Files.png
[4]:http://www.tecmint.com/wp-content/uploads/2017/03/Create-Required-Files.png
[5]:http://www.tecmint.com/wp-content/uploads/2017/03/Set-Permission-on-Directory.png
[6]:http://www.tecmint.com/wp-content/uploads/2017/03/Copy-Bin-Files.png
[7]:http://www.tecmint.com/wp-content/uploads/2017/03/Copy-Shared-Library-Files.png
[8]:http://www.tecmint.com/add-users-in-linux/
[9]:http://www.tecmint.com/wp-content/uploads/2017/03/Copy-Password-Files.png
[10]:http://www.tecmint.com/wp-content/uploads/2017/03/Configure-SSH-Chroot-Jail.png
[11]:http://www.tecmint.com/wp-content/uploads/2017/03/Testing-SSH-User-Chroot-Jail.png
[12]:http://www.tecmint.com/wp-content/uploads/2017/03/SSH-Builtin-Commands.png
[13]:http://www.tecmint.com/wp-content/uploads/2017/03/Create-SSH-User-Home-Directory.png
[14]:http://www.tecmint.com/wp-content/uploads/2017/03/Add-Commands-to-SSH-User.png
[15]:http://www.tecmint.com/wp-content/uploads/2017/03/Copy-Shared-Libraries.png
[16]:http://www.tecmint.com/wp-content/uploads/2017/03/Test-SSH-Chroot-Jail.png
[17]:http://www.tecmint.com/wp-content/uploads/2017/03/Testing-sFTP-SSH-User.png
[18]:http://www.tecmint.com/restrict-sftp-user-home-directories-using-chroot/
[19]:http://www.tecmint.com/author/aaronkili/
[20]:http://www.tecmint.com/10-useful-free-linux-ebooks-for-newbies-and-administrators/
[21]:http://www.tecmint.com/free-linux-shell-scripting-books/