mirror of
https://github.com/LCTT/TranslateProject.git
synced 2024-12-26 21:30:55 +08:00
199 lines
6.5 KiB
Markdown
199 lines
6.5 KiB
Markdown
|
|
中心化存储(iSCSI)- “初始器客户端” 在RHEL/CentOS/Fedora上的设置 - 第三部分
|
|||
|
|
================================================================================
|
|||
|
|
**iSCSI** 初始化器是一种用于与iSCSI target服务器认证并访问服务器上共享的的LUN的客户端。我们可以在本地挂载的硬盘上部署任何操作系统,只需要安装一个包来与target服务器验证。
|
|||
|
|
|
|||
|
|

|
|||
|
|
|
|||
|
|
初始器客户端设置
|
|||
|
|
|
|||
|
|
#### 功能 ####
|
|||
|
|
|
|||
|
|
- 可以处理本地挂载磁盘上的任意文件系统
|
|||
|
|
- 在使用fdisk命令后不需要重启系统
|
|||
|
|
|
|||
|
|
#### 要求 ####
|
|||
|
|
|
|||
|
|
- [使用iSCSI Target创建集中化安全存储- 第一部分][1]
|
|||
|
|
- [在Target服务器中使用LVM创建LUN - 第二部分][2]
|
|||
|
|
|
|||
|
|
#### 我的客户端设置 ####
|
|||
|
|
|
|||
|
|
- 操作系统 – CentOS release 6.5 (最终版)
|
|||
|
|
- iSCSI Target IP – 192.168.0.50
|
|||
|
|
- 使用的端口 : TCP 3260
|
|||
|
|
|
|||
|
|
**Warning**: Never stop the service while LUNs Mounted in Client machines (Initiator).
|
|||
|
|
**Warning**:永远不要在使用LUN的时候在客户端中(初始化器)停止服务。
|
|||
|
|
|
|||
|
|
### 客户端设置 ###
|
|||
|
|
|
|||
|
|
**1.** 在客户端,我们需要安装包‘**iSCSI-initiator-utils**‘,用下面的命令搜索包。
|
|||
|
|
|
|||
|
|
# yum search iscsi
|
|||
|
|
|
|||
|
|
**示例输出**
|
|||
|
|
|
|||
|
|
============================= N/S Matched: iscsi ================================
|
|||
|
|
iscsi-initiator-utils.x86_64 : iSCSI daemon and utility programs
|
|||
|
|
iscsi-initiator-utils-devel.x86_64 : Development files for iscsi-initiator-utils
|
|||
|
|
|
|||
|
|
**2.** 一旦定位了包,就用下面的yum命令安装初始化包。
|
|||
|
|
|
|||
|
|
# yum install iscsi-initiator-utils.x86_64
|
|||
|
|
|
|||
|
|
**3.** 安装完毕后,我们需要发现**Target 服务器**上的共享。客户端的命令有点难记,因此我们使用man来的到需要运行的命令列表
|
|||
|
|
|
|||
|
|
# man iscsiadm
|
|||
|
|
|
|||
|
|

|
|||
|
|
|
|||
|
|
man iscsiadm
|
|||
|
|
|
|||
|
|
**4.** 按下**SHIFT+G** 进入man页的底部并且稍微向上滚动来的到登录的示例命令。下面的发现命令中,需要用我们的**服务器IP地址**来替换。
|
|||
|
|
|
|||
|
|
# iscsiadm --mode discoverydb --type sendtargets --portal 192.168.0.200 --discover
|
|||
|
|
|
|||
|
|
**5.** 这里我们从下面的命令中得到了iSCSIi限定名(iqn)。
|
|||
|
|
|
|||
|
|
192.168.0.200:3260,1 iqn.2014-07.com.tecmint:tgt1
|
|||
|
|
|
|||
|
|

|
|||
|
|
|
|||
|
|
发现服务器
|
|||
|
|
|
|||
|
|
**6.** 要登录就用下面的命令来连接一台LUN到我们本地系统中,这会与服务器验证并允许我们登录LUN。
|
|||
|
|
|
|||
|
|
# iscsiadm --mode node --targetname iqn.2014-07.com.tecmint:tgt1 --portal 192.168.0.200:3260 --login
|
|||
|
|
|
|||
|
|

|
|||
|
|
|
|||
|
|
登录到服务器
|
|||
|
|
|
|||
|
|
**注意**:登出使用登录命令并在命令的最后使用logout来替换。
|
|||
|
|
|
|||
|
|
# iscsiadm --mode node --targetname iqn.2014-07.com.tecmint:tgt1 --portal 192.168.0.200:3260 --logout
|
|||
|
|
|
|||
|
|

|
|||
|
|
|
|||
|
|
等出服务器
|
|||
|
|
|
|||
|
|
**7.** 登录服务器后,使用下面的命令列出节点的记录。
|
|||
|
|
|
|||
|
|
# iscsiadm --mode node
|
|||
|
|
|
|||
|
|

|
|||
|
|
|
|||
|
|
列出节点
|
|||
|
|
|
|||
|
|
**8.** 显示特定节点的所有数据
|
|||
|
|
|
|||
|
|
# iscsiadm --mode node --targetname iqn.2014-07.com.tecmint:tgt1 --portal 192.168.0.200:3260
|
|||
|
|
|
|||
|
|
**示例输出**
|
|||
|
|
|
|||
|
|
# BEGIN RECORD 6.2.0-873.10.el6
|
|||
|
|
node.name = iqn.2014-07.com.tecmint:tgt1
|
|||
|
|
node.tpgt = 1
|
|||
|
|
node.startup = automatic
|
|||
|
|
node.leading_login = No
|
|||
|
|
iface.hwaddress = <empty>
|
|||
|
|
iface.ipaddress = <empty>
|
|||
|
|
iface.iscsi_ifacename = default
|
|||
|
|
iface.net_ifacename = <empty>
|
|||
|
|
iface.transport_name = tcp
|
|||
|
|
iface.initiatorname = <empty>
|
|||
|
|
iface.bootproto = <empty>
|
|||
|
|
iface.subnet_mask = <empty>
|
|||
|
|
iface.gateway = <empty>
|
|||
|
|
iface.ipv6_autocfg = <empty>
|
|||
|
|
iface.linklocal_autocfg = <empty>
|
|||
|
|
....
|
|||
|
|
|
|||
|
|
**9.** 接着列出使用的磁盘,fdisk会列出所有的认证过的磁盘。
|
|||
|
|
|
|||
|
|
# fdisk -l /dev/sda
|
|||
|
|
|
|||
|
|

|
|||
|
|
|
|||
|
|
列出磁盘
|
|||
|
|
|
|||
|
|
**10.** 运行fdisk命令来创建一个新的分区
|
|||
|
|
|
|||
|
|
# fdisk -cu /dev/sda
|
|||
|
|
|
|||
|
|

|
|||
|
|
|
|||
|
|
创建新分区
|
|||
|
|
|
|||
|
|
**注意**:在使用fdisk创建新分区之后,我们无需重启,就像使用我们本地的文件系统一样就行。因为这个将远程共享存储挂载到本地了。
|
|||
|
|
|
|||
|
|
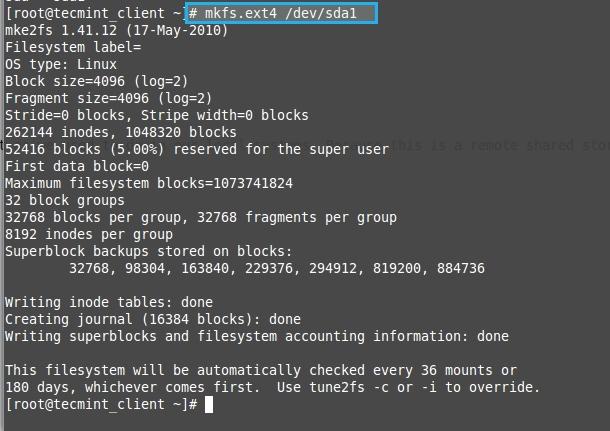
**11.** 格式化新创建的分区
|
|||
|
|
|
|||
|
|
# mkfs.ext4 /dev/sda1
|
|||
|
|
|
|||
|
|

|
|||
|
|
|
|||
|
|
格式化新分区
|
|||
|
|
|
|||
|
|
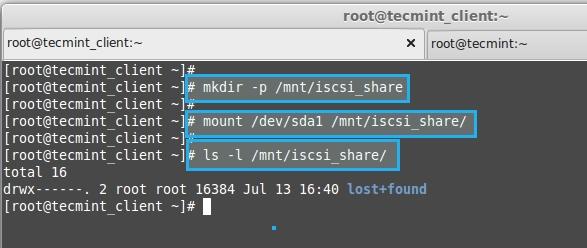
**12.** 创建一个目录来挂载新创建的分区
|
|||
|
|
|
|||
|
|
# mkdir /mnt/iscsi_share
|
|||
|
|
# mount /dev/sda1 /mnt/iscsi_share/
|
|||
|
|
# ls -l /mnt/iscsi_share/
|
|||
|
|
|
|||
|
|

|
|||
|
|
|
|||
|
|
挂载新分区
|
|||
|
|
|
|||
|
|
**13.** 列出挂载点
|
|||
|
|
|
|||
|
|
# df -Th
|
|||
|
|
|
|||
|
|
- **-T** – Prints files system types.
|
|||
|
|
- **-h** – Prints in human readable format eg : Megabyte or Gigabyte.
|
|||
|
|
|
|||
|
|

|
|||
|
|
|
|||
|
|
列出新分区
|
|||
|
|
|
|||
|
|
**14.** 如果需要永久挂在使用fdtab文件
|
|||
|
|
|
|||
|
|
# vim /etc/fstab
|
|||
|
|
|
|||
|
|
**15.**在fstab后追加下面行
|
|||
|
|
|
|||
|
|
/dev/sda1 /mnt/iscsi_share/ ext4 defaults,_netdev 0 0
|
|||
|
|
|
|||
|
|
**注意:** 在fdtab中使用_netdev,说明这是一个网络设备。
|
|||
|
|
|
|||
|
|

|
|||
|
|
|
|||
|
|
自动挂载分区
|
|||
|
|
|
|||
|
|
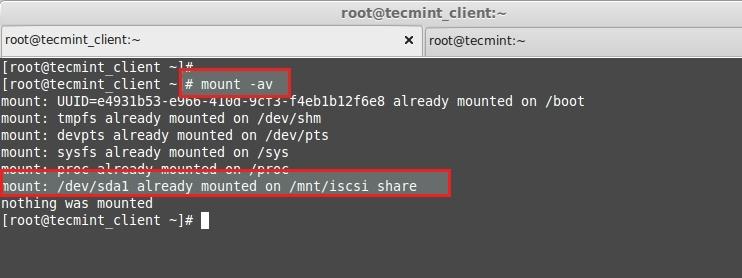
**16.** 最后检查我们fstab文件是否有错误。
|
|||
|
|
|
|||
|
|
# mount -av
|
|||
|
|
|
|||
|
|
- **-a** – 所有挂载点
|
|||
|
|
- **-v** – 繁琐模式
|
|||
|
|
|
|||
|
|

|
|||
|
|
|
|||
|
|
验证fstab文件
|
|||
|
|
|
|||
|
|
我们已经成功完成了我们的客户端配置。现在让我们像本地磁盘一样使用它吧。
|
|||
|
|
|
|||
|
|
--------------------------------------------------------------------------------
|
|||
|
|
|
|||
|
|
via: http://www.tecmint.com/iscsi-initiator-client-setup/
|
|||
|
|
|
|||
|
|
作者:[Babin Lonston][a]
|
|||
|
|
译者:[geekpi](https://github.com/geekpi)
|
|||
|
|
校对:[校对者ID](https://github.com/校对者ID)
|
|||
|
|
|
|||
|
|
本文由 [LCTT](https://github.com/LCTT/TranslateProject) 原创翻译,[Linux中国](http://linux.cn/) 荣誉推出
|
|||
|
|
|
|||
|
|
[a]:http://www.tecmint.com/author/babinlonston/
|
|||
|
|
[1]:http://www.tecmint.com/create-centralized-secure-storage-using-iscsi-targetin-linux/
|
|||
|
|
[2]:http://www.tecmint.com/create-luns-using-lvm-in-iscsi-target/
|