2014-10-03 19:05:16 +08:00
如何在 Linux 系统中创建一个云端的加密文件系统
2014-09-10 11:13:07 +08:00
================================================================================
2014-10-03 19:05:16 +08:00
[Amazon S3][1] 和 [Google Cloud Storage][2] 之类的商业云存储服务以能承受的价格提供了高可用性、可扩展、无限容量的对象存储服务。为了加速这些云产品的广泛采用,这些提供商为他们的产品基于明确的 API 和 SDK 培养了一个良好的开发者生态系统。而基于云的文件系统便是这些活跃的开发者社区中的典型产品,已经有了好几个开源的实现。
2014-09-10 11:13:07 +08:00
2014-10-03 19:05:16 +08:00
[S3QL][3] 便是最流行的开源云端文件系统之一。它是一个基于 FUSE 的文件系统,提供了好几个商业或开源的云存储后端,比如 Amazon S3、Google Cloud Storage、Rackspace CloudFiles, ,
2014-09-10 11:13:07 +08:00
2014-10-03 19:05:16 +08:00
需要明确的是, , , ( )
2014-09-10 11:13:07 +08:00
2014-10-03 19:05:16 +08:00
在这篇教程中,我将会描述“如何基于 Amazon S3 用 S3QL 配置一个加密文件系统”。作为一个使用范例,我还会说明如何在挂载的 S3QL 文件系统上运行 rsync 备份工具。
2014-09-10 11:13:07 +08:00
2014-10-03 19:05:16 +08:00
### 准备工作 ###
2014-09-10 11:13:07 +08:00
2014-10-03 19:05:16 +08:00
本教程首先需要你创建一个 [Amazon AWS 帐号][4](注册是免费的,但是需要一张有效的信用卡)。
2014-09-10 11:13:07 +08:00
2014-10-03 19:05:16 +08:00
然后 [创建一个 AWS access key][4]( ) ,
2014-09-10 11:13:07 +08:00
2014-10-03 19:05:16 +08:00
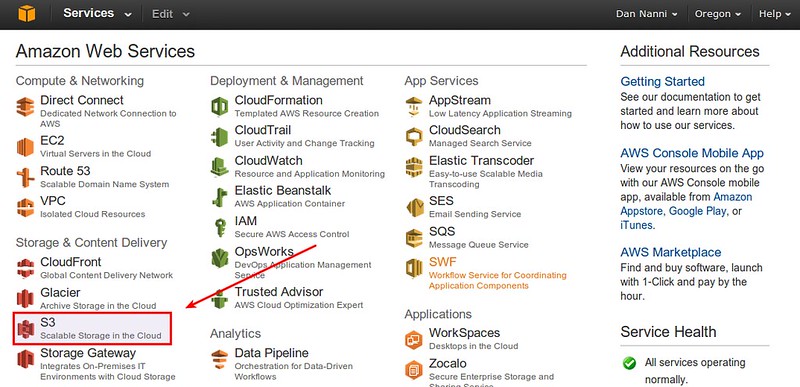
之后通过 AWS 管理面板访问 AWS S3,
2014-09-10 11:13:07 +08:00

2014-10-03 19:05:16 +08:00
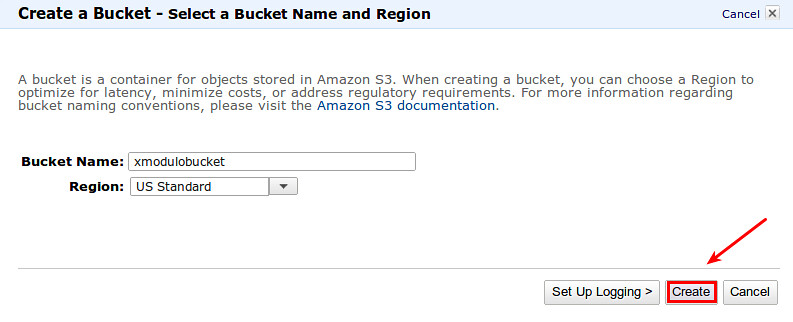
为最佳性能考虑,请选择一个地理上距离你最近的区域。
2014-09-10 11:13:07 +08:00

2014-10-03 19:05:16 +08:00
### 在 Linux 上安装 S3QL ###
2014-09-10 11:13:07 +08:00
2014-10-03 19:05:16 +08:00
在大多数 Linux 发行版中都有预先编译好的 S3QL 软件包。
2014-09-10 11:13:07 +08:00
2014-10-03 19:05:16 +08:00
#### 对于 Debian、Ubuntu 或 Linux Mint:
2014-09-10 11:13:07 +08:00
2014-10-03 19:05:16 +08:00
$ sudo apt-get install s3ql
2014-09-10 11:13:07 +08:00
2014-10-03 19:05:16 +08:00
#### 对于 Fedora:
2014-09-10 11:13:07 +08:00
2014-10-06 22:10:56 +08:00
$ sudo yum install s3ql
2014-09-10 11:13:07 +08:00
2014-10-03 19:05:16 +08:00
对于 Arch Linux,
2014-09-10 11:13:07 +08:00
2014-10-06 21:50:46 +08:00
### 首次配置 S3QL ###
2014-09-10 11:13:07 +08:00
2014-10-06 21:50:46 +08:00
在 ~/.s3ql 目录中创建 autoinfo2 文件,它是 S3QL 的一个默认的配置文件。这个文件里的信息包括必须的 AWS access key,
2014-09-10 11:13:07 +08:00
$ mkdir ~/.s3ql
2014-10-06 22:10:56 +08:00
$ vi ~/.s3ql/authinfo2
2014-09-10 11:13:07 +08:00
----------
[s3]
storage-url: s3://[bucket-name]
backend-login: [your-access-key-id]
backend-password: [your-secret-access-key]
fs-passphrase: [your-encryption-passphrase]
2014-10-06 21:50:46 +08:00
指定的 AWS S3 bucket 需要预先通过 AWS 管理面板来创建。
2014-09-10 11:13:07 +08:00
2014-10-06 21:50:46 +08:00
为了安全起见,让 authinfo2 文件仅对你可访问。
2014-09-10 11:13:07 +08:00
2014-10-06 22:10:56 +08:00
$ chmod 600 ~/.s3ql/authinfo2
2014-09-10 11:13:07 +08:00
2014-10-06 21:50:46 +08:00
### 创建 S3QL 文件系统 ###
2014-09-10 11:13:07 +08:00
2014-10-06 21:50:46 +08:00
现在你已经准备好可以在 AWS S3 上创建一个 S3QL 文件系统了。
2014-09-10 11:13:07 +08:00
2014-10-06 21:50:46 +08:00
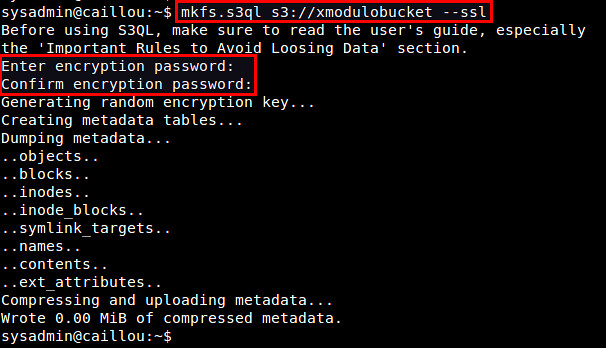
使用 mkfs.s3ql 工具来创建一个新的 S3QL 文件系统。这个命令中的 bucket 名应该与 authinfo2 文件中所指定的相符。使用“--ssl”参数将强制使用 SSL 连接到后端存储服务器。默认情况下,
2014-09-10 11:13:07 +08:00
2014-10-06 22:10:56 +08:00
$ mkfs.s3ql s3://[bucket-name] --ssl
2014-09-10 11:13:07 +08:00
2014-10-06 21:50:46 +08:00
你会被要求输入一个加密口令。请输入你在 ~/.s3ql/autoinfo2 中通过“fs-passphrase”指定的那个口令。
2014-09-10 11:13:07 +08:00
2014-10-06 21:50:46 +08:00
如果一个新文件系统被成功创建,你将会看到这样的输出:
2014-09-10 11:13:07 +08:00

2014-10-06 21:50:46 +08:00
### 挂载 S3QL 文件系统 ###
2014-09-10 11:13:07 +08:00
2014-10-06 21:50:46 +08:00
当你创建了一个 S3QL 文件系统之后,下一步便是要挂载它。
2014-09-10 11:13:07 +08:00
2014-10-06 21:50:46 +08:00
首先创建一个本地的挂载点,然后使用 mount.s3ql 命令来挂载 S3QL 文件系统。
2014-09-10 11:13:07 +08:00
$ mkdir ~/mnt_s3ql
2014-10-06 22:10:56 +08:00
$ mount.s3ql s3://[bucket-name] ~/mnt_s3ql
2014-09-10 11:13:07 +08:00
2014-10-06 21:50:46 +08:00
挂载一个 S3QL 文件系统不需要特权用户,只要确定你对该挂载点有写权限即可。
2014-09-10 11:13:07 +08:00
2014-10-06 21:50:46 +08:00
视情况,你可以使用“--compress”参数来指定一个压缩算法( ) ,
2014-09-10 11:13:07 +08:00
2014-10-06 22:10:56 +08:00
$ mount.s3ql --compress bzip2 s3://[bucket-name] ~/mnt_s3ql
2014-09-10 11:13:07 +08:00
2014-10-06 21:50:46 +08:00
因为性能原因,
2014-09-10 11:13:07 +08:00
2014-10-06 21:50:46 +08:00
如果想要除你以外的用户访问一个已挂载的 S3QL 文件系统,请使用“--allow-other”选项。
2014-09-10 11:13:07 +08:00
2014-10-06 21:50:46 +08:00
如果你想通过 NFS 导出已挂载的 S3QL 文件系统到其他机器,请使用“--nfs”选项。
2014-09-10 11:13:07 +08:00
2014-10-06 21:50:46 +08:00
运行 mount.s3ql 之后,检查 S3QL 文件系统是否被成功挂载了:
2014-09-10 11:13:07 +08:00
$ df ~/mnt_s3ql
2014-10-06 22:10:56 +08:00
$ mount | grep s3ql
2014-09-10 11:13:07 +08:00

### Unmount an S3QL File System ###
To unmount an S3QL file system (with potentially uncommitted data) safely, use umount.s3ql command. It will wait until all data (including the one in local file system cache) has been successfully transferred and written to backend servers. Depending on the amount of write-pending data, this process can take some time.
2014-10-06 22:10:56 +08:00
$ umount.s3ql ~/mnt_s3ql
2014-09-10 11:13:07 +08:00
View S3QL File System Statistics and Repair an S3QL File System
To view S3QL file system statistics, you can use s3qlstat command, which shows information such as total data/metadata size, de-duplication and compression ratio.
2014-10-06 22:10:56 +08:00
$ s3qlstat ~/mnt_s3ql
2014-09-10 11:13:07 +08:00

You can check and repair an S3QL file system with fsck.s3ql command. Similar to fsck command, the file system being checked needs to be unmounted first.
2014-10-06 22:10:56 +08:00
$ fsck.s3ql s3://[bucket-name]
2014-09-10 11:13:07 +08:00
### S3QL Use Case: Rsync Backup ###
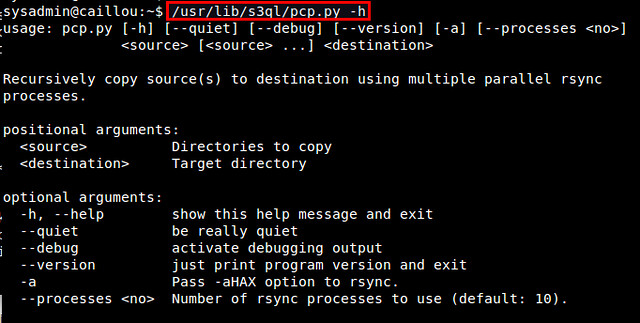
Let me conclude this tutorial with one popular use case of S3QL: local file system backup. For this, I recommend using rsync incremental backup tool especially because S3QL comes with a rsync wrapper script (/usr/lib/s3ql/pcp.py). This script allows you to recursively copy a source tree to a S3QL destination using multiple rsync processes.
2014-10-06 22:10:56 +08:00
$ /usr/lib/s3ql/pcp.py -h
2014-09-10 11:13:07 +08:00

The following command will back up everything in ~/Documents to an S3QL file system via four concurrent rsync connections.
2014-10-06 22:10:56 +08:00
$ /usr/lib/s3ql/pcp.py -a --quiet --processes=4 ~/Documents ~/mnt_s3ql
2014-09-10 11:13:07 +08:00
The files will first be copied to the local file cache, and then gradually flushed to the backend servers over time in the background.
For more information about S3QL such as automatic mounting, snapshotting, immuntable trees, I strongly recommend checking out the [official user's guide][7]. Let me know what you think of S3QL. Share your experience with any other tools.
--------------------------------------------------------------------------------
via: http://xmodulo.com/2014/09/create-cloud-based-encrypted-file-system-linux.html
作者:[Dan Nanni][a]
2014-10-03 19:05:16 +08:00
译者:[felixonmars](https://github.com/felixonmars)
2014-09-10 11:13:07 +08:00
校对:[校对者ID](https://github.com/校对者ID)
本文由 [LCTT ](https://github.com/LCTT/TranslateProject ) 原创翻译,[Linux中国](http://linux.cn/) 荣誉推出
[a]:http://xmodulo.com/author/nanni
[1]:http://aws.amazon.com/s3
[2]:http://code.google.com/apis/storage/
[3]:https://bitbucket.org/nikratio/s3ql/
[4]:http://aws.amazon.com/
[5]:http://ask.xmodulo.com/create-amazon-aws-access-key.html
[6]:https://aur.archlinux.org/packages/s3ql/
2014-09-30 11:51:24 +08:00
[7]:http://www.rath.org/s3ql-docs/