mirror of
https://github.com/LCTT/TranslateProject.git
synced 2025-01-16 22:42:21 +08:00
180 lines
8.1 KiB
Markdown
180 lines
8.1 KiB
Markdown
|
|
How To Recover Windows 7 And Delete Ubuntu In 3 Easy Steps
|
|||
|
|
================================================================================
|
|||
|
|
### Introduction ###
|
|||
|
|
|
|||
|
|
This is a strange article for me to write as I am normally in a position where I would advocate installing Ubuntu and getting rid of Windows.
|
|||
|
|
|
|||
|
|
What makes writing this article today doubly strange is that I am choosing to write it on the day that Windows 7 mainstream support comes to an end.
|
|||
|
|
|
|||
|
|
So why am I writing this now?
|
|||
|
|
|
|||
|
|
I have been asked on so many occasions now how to remove Ubuntu from a dual booting Windows 7 or a dual booting Windows 8 system and it just makes sense to write the article.
|
|||
|
|
|
|||
|
|
I spent the Christmas period looking through the comments that people have left on articles and it is time to write the posts that are missing and update some of those that have become old and need attention.
|
|||
|
|
|
|||
|
|
I am going to spend the rest of January doing just that. This is the first step. If you have Windows 7 dual booting with Ubuntu and you want Windows 7 back without restoring to factory settings follow this guide. (Note there is a separate guide required for Windows 8)
|
|||
|
|
|
|||
|
|
### The Steps Required To Remove Ubuntu ###
|
|||
|
|
|
|||
|
|
1. Remove Grub By Fixing The Windows Boot Record
|
|||
|
|
1. Delete The Ubuntu Partitions
|
|||
|
|
1. Expand The Windows Partition
|
|||
|
|
|
|||
|
|
### Back Up Your System ###
|
|||
|
|
|
|||
|
|
Before you begin I recommend taking a backup of your system.
|
|||
|
|
|
|||
|
|
I also recommend not leaving this to chance nor Microsoft's own tools.
|
|||
|
|
|
|||
|
|
[Click here for a guide showing how to backup your drive using Macrium Reflect.][1]
|
|||
|
|
|
|||
|
|
If you have any data you wish to save within Ubuntu log into it now and back up the data to external hard drives, USB drives or DVDs.
|
|||
|
|
|
|||
|
|
### Step 1 - Remove The Grub Boot Menu ###
|
|||
|
|
|
|||
|
|
|
|||
|
|
|
|||
|
|
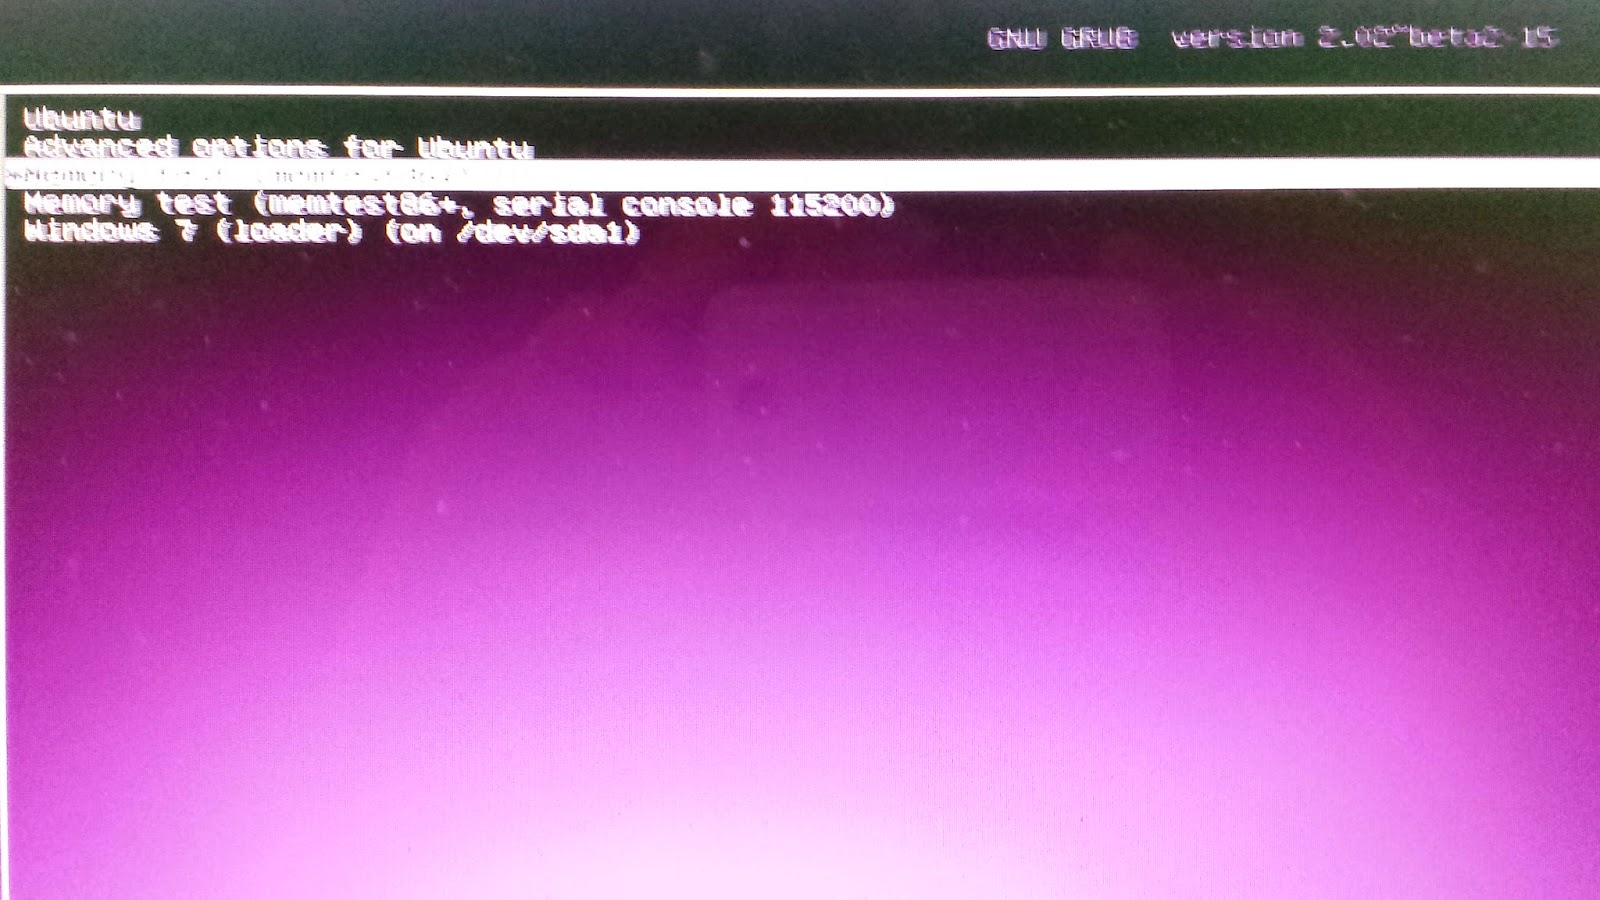
When you boot your system you will see a menu similar to the one in the image.
|
|||
|
|
|
|||
|
|
To remove this menu and boot straight into Windows you have to fix the master boot record.
|
|||
|
|
|
|||
|
|
To do this I am going to show you how to create a system recovery disk, how to boot to the recovery disk and how to fix the master boot record.
|
|||
|
|
|
|||
|
|

|
|||
|
|
|
|||
|
|
Press the "Start" button and search for "backup and restore". Click the icon that appears.
|
|||
|
|
|
|||
|
|
A window should open as shown in the image above.
|
|||
|
|
|
|||
|
|
Click on "Create a system repair disc".
|
|||
|
|
|
|||
|
|
You will need a [blank DVD][2].
|
|||
|
|
|
|||
|
|

|
|||
|
|
|
|||
|
|
Insert the blank DVD in the drive and select your DVD drive from the dropdown list.
|
|||
|
|
|
|||
|
|
Click "Create Disc".
|
|||
|
|
|
|||
|
|
Restart your computer leaving the disk in and when the message appears to boot from CD press "Enter" on the keyboard.
|
|||
|
|
|
|||
|
|
|
|||
|
|
|
|||
|
|
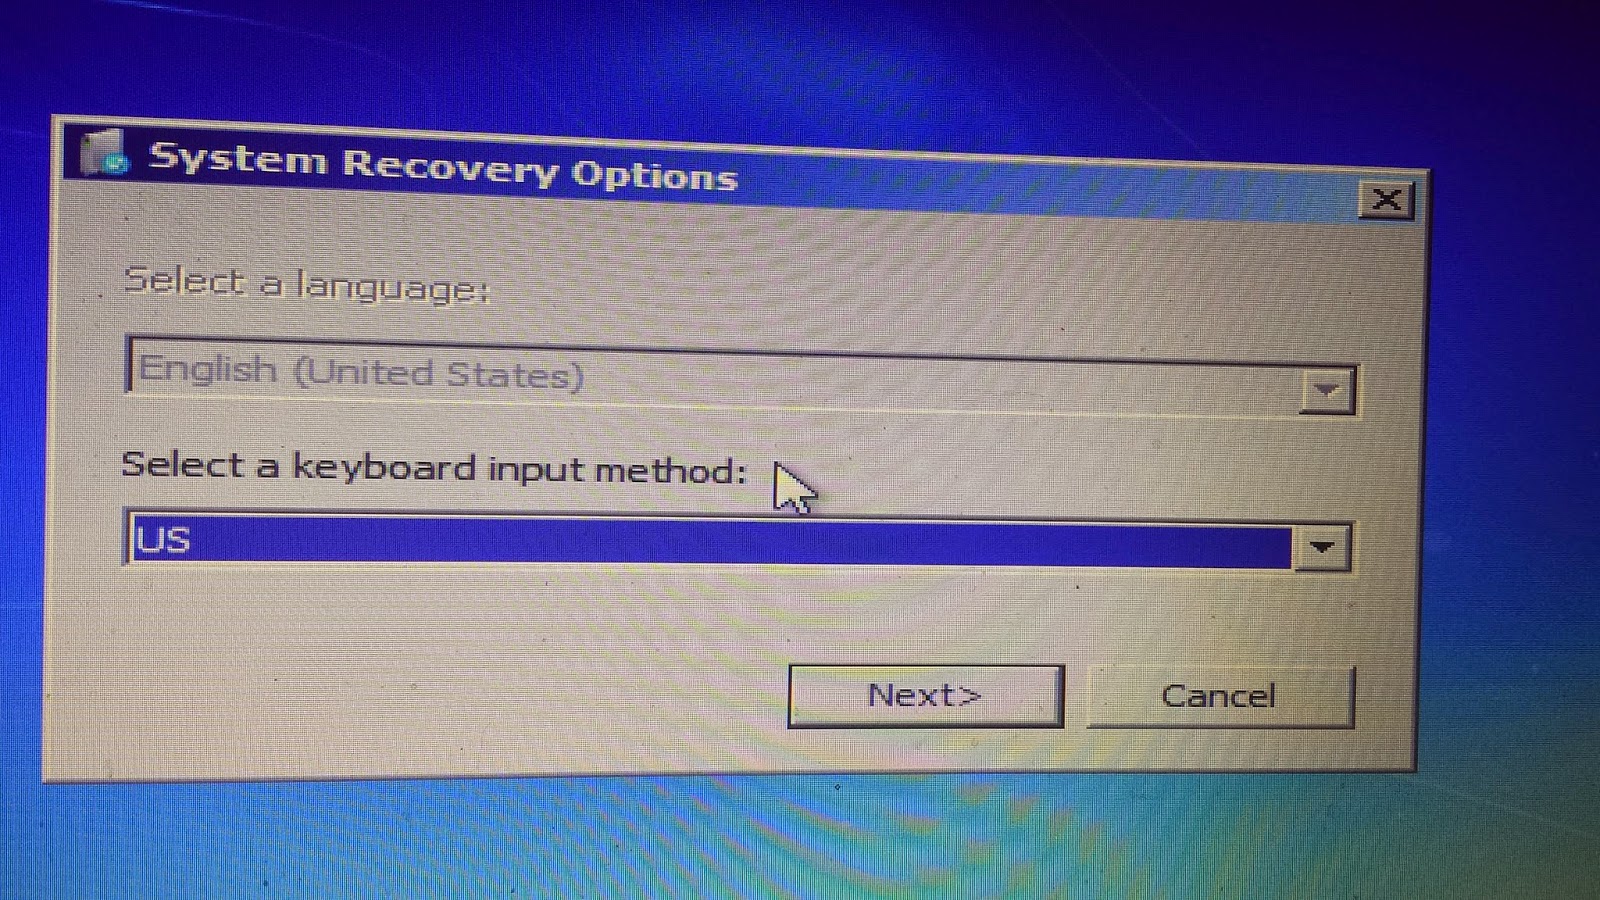
A set of "Systems Recovery Options" screens will appear.
|
|||
|
|
|
|||
|
|
You will be asked to choose your keyboard layout.
|
|||
|
|
|
|||
|
|
Choose the appropriate options from the lists provided and click "Next".
|
|||
|
|
|
|||
|
|
|
|||
|
|
|
|||
|
|
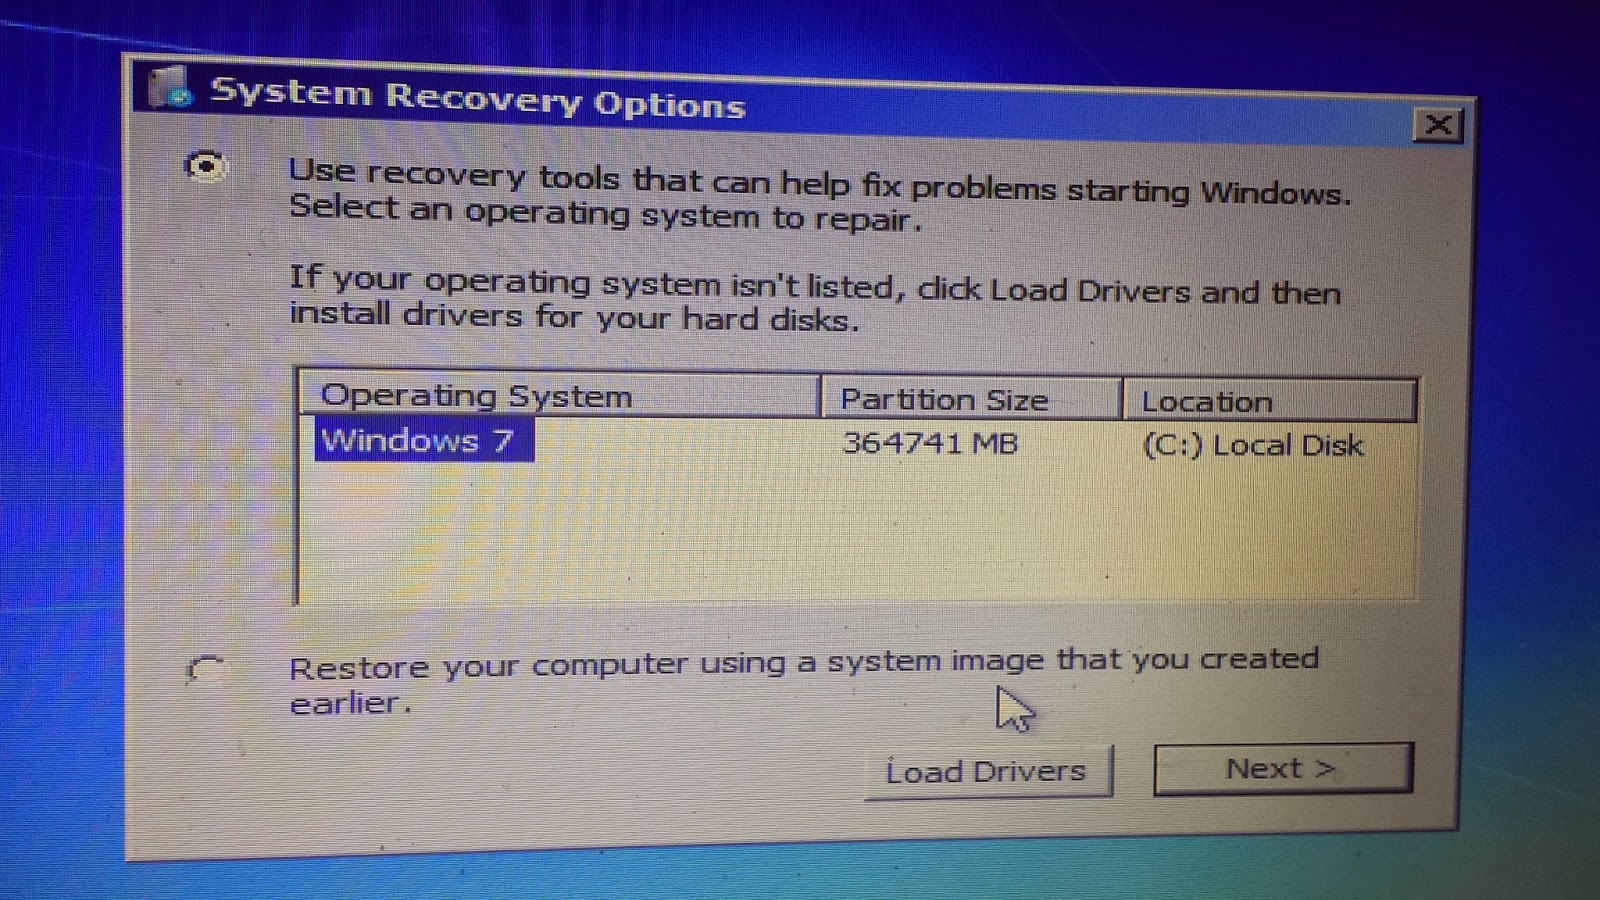
The next screen lets you choose an operating system to attempt to fix.
|
|||
|
|
|
|||
|
|
Alternatively you can restore your computer using a system image saved earlier.
|
|||
|
|
|
|||
|
|
Leave the top option checked and click "Next".
|
|||
|
|
|
|||
|
|
|
|||
|
|
|
|||
|
|
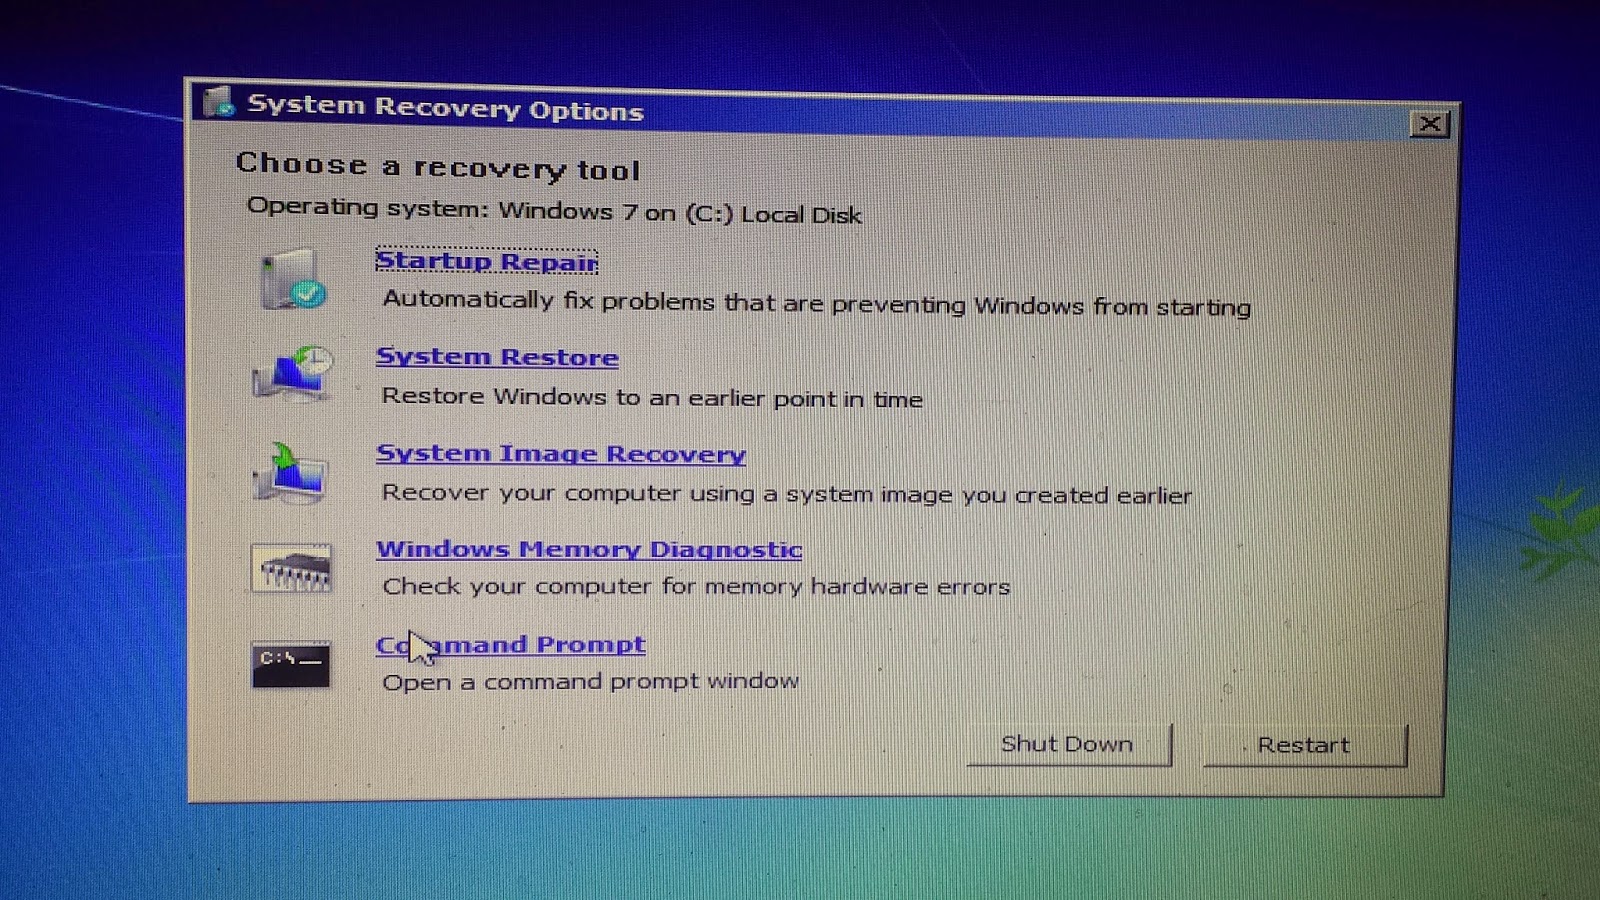
You will now see a screen with options to repair your disk and restore your system etc.
|
|||
|
|
|
|||
|
|
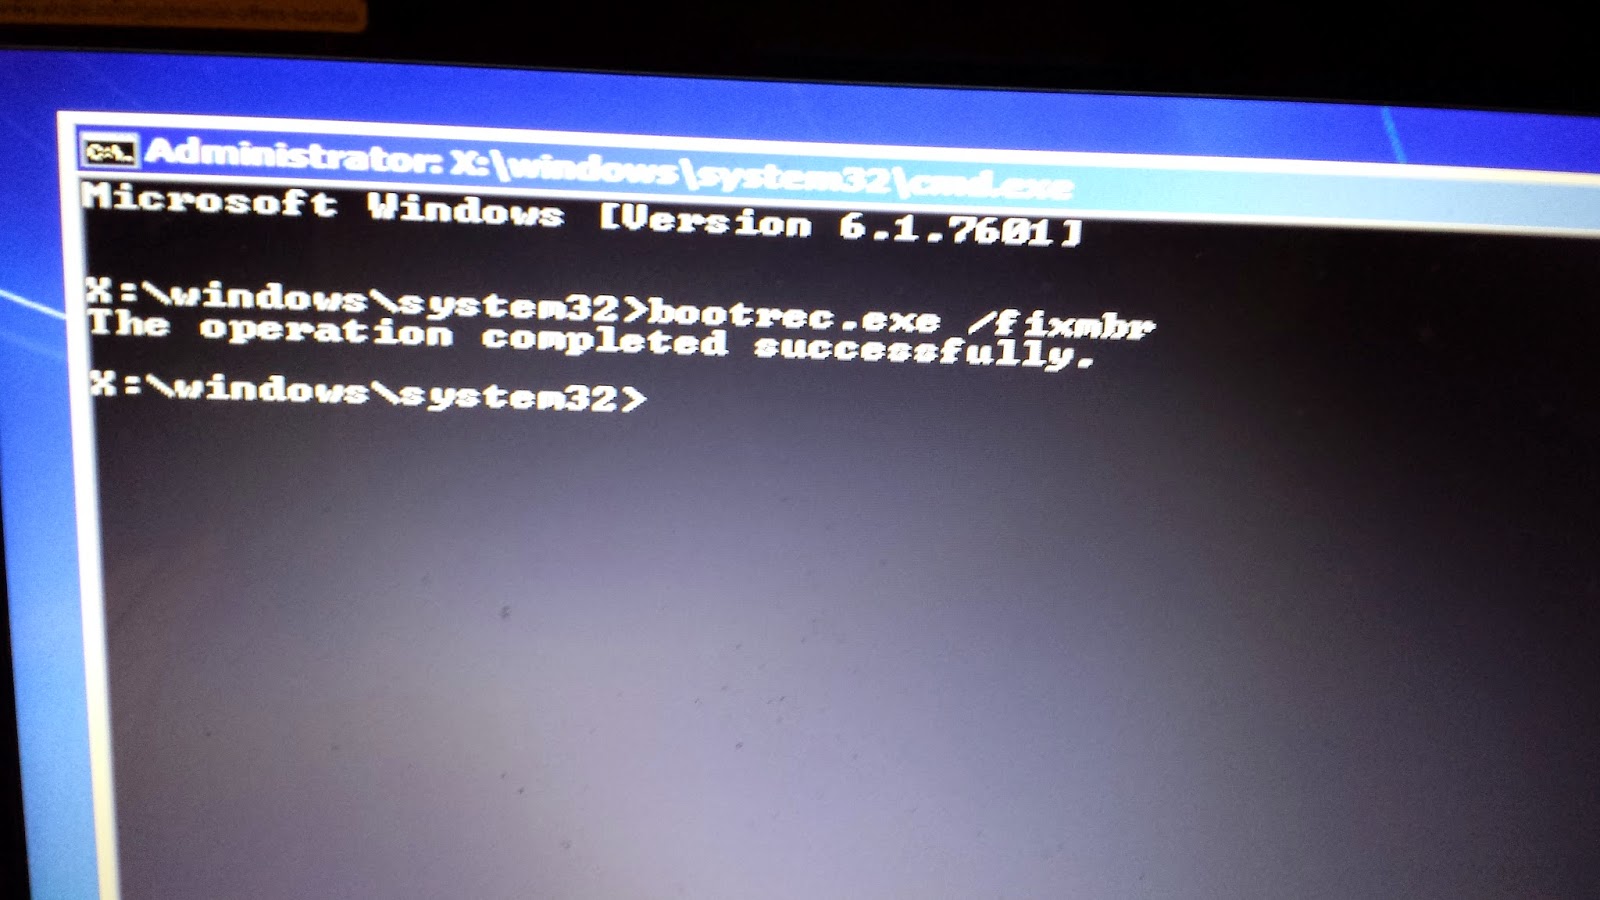
All you need to do is fix the master boot record and this can be done from the command prompt.
|
|||
|
|
|
|||
|
|
Click "Command Prompt".
|
|||
|
|
|
|||
|
|
|
|||
|
|
|
|||
|
|
Now simply type the following command into the command prompt:
|
|||
|
|
|
|||
|
|
bootrec.exe /fixmbr
|
|||
|
|
|
|||
|
|
A message will appear stating that the operation has completed successfully.
|
|||
|
|
|
|||
|
|
You can now close the command prompt window.
|
|||
|
|
|
|||
|
|
Click the "Restart" button and remove the DVD.
|
|||
|
|
|
|||
|
|
Your computer should boot straight into Windows 7.
|
|||
|
|
|
|||
|
|
### Step 2 - Delete The Ubuntu Partitions ###
|
|||
|
|
|
|||
|
|

|
|||
|
|
|
|||
|
|
To delete Ubuntu you need to use the "Disk Management" tool from within Windows.
|
|||
|
|
|
|||
|
|
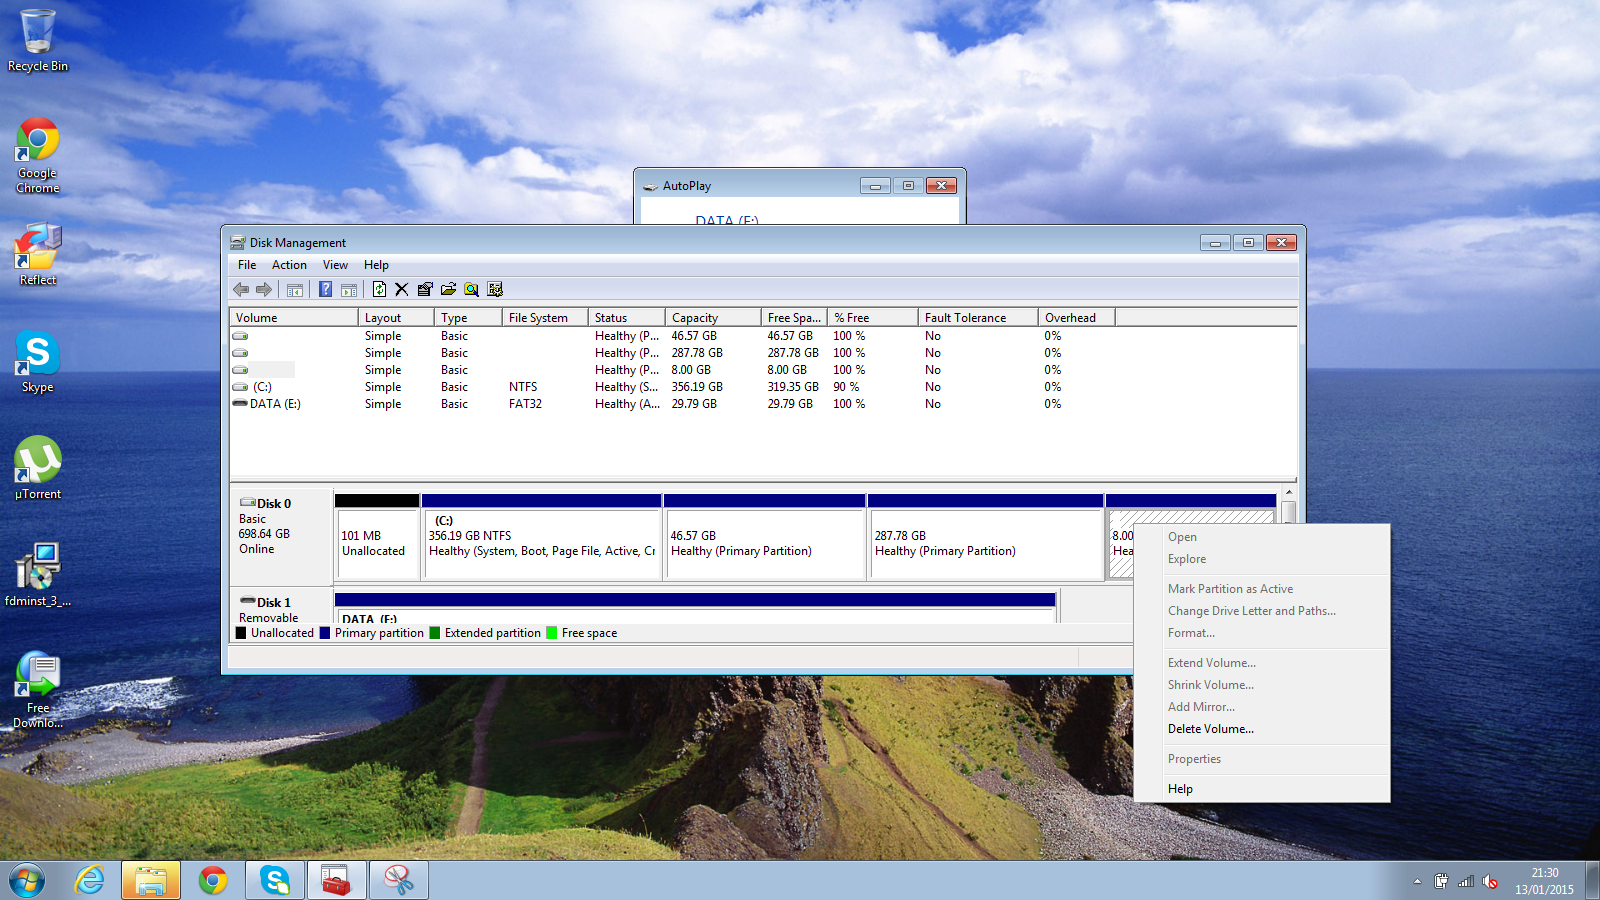
Press "Start" and type "Create and format hard disk partitions" into the search box. A window will appear similar to the image above.
|
|||
|
|
|
|||
|
|
Now my screen above isn't going to be quite the same as yours but it won't be much different. If you look at disk 0 there is 101 MB of unallocated space and then 4 partitions.
|
|||
|
|
|
|||
|
|
The 101 MB of space is a mistake I made when installing Windows 7 in the first place. The C: drive is Windows 7, the next partition (46.57 GB) is Ubuntu's root partition. The 287 GB partition is the /HOME partition and the 8 GB partition is the SWAP space.
|
|||
|
|
|
|||
|
|
The only one we really need for Windows is the C: drive so the rest can be deleted.
|
|||
|
|
|
|||
|
|
**Note: Be careful. You may have recovery partitions on the disk. Do not delete the recovery partitions. They should be labelled and will have file systems set to NTFS or FAT32**
|
|||
|
|
|
|||
|
|
|
|||
|
|
|
|||
|
|
Right click on one of the partitions you wish to delete (i.e. the root, home and swap partitions) and from the menu click "Delete Volume".
|
|||
|
|
|
|||
|
|
**(Do not delete any partitions that have a file system of NTFS or FAT32)**
|
|||
|
|
|
|||
|
|
Repeat this process for the other two partitions.
|
|||
|
|
|
|||
|
|

|
|||
|
|
|
|||
|
|
After the partitions have been deleted you will have a large area of free space. Right click the free space and choose delete.
|
|||
|
|
|
|||
|
|

|
|||
|
|
|
|||
|
|
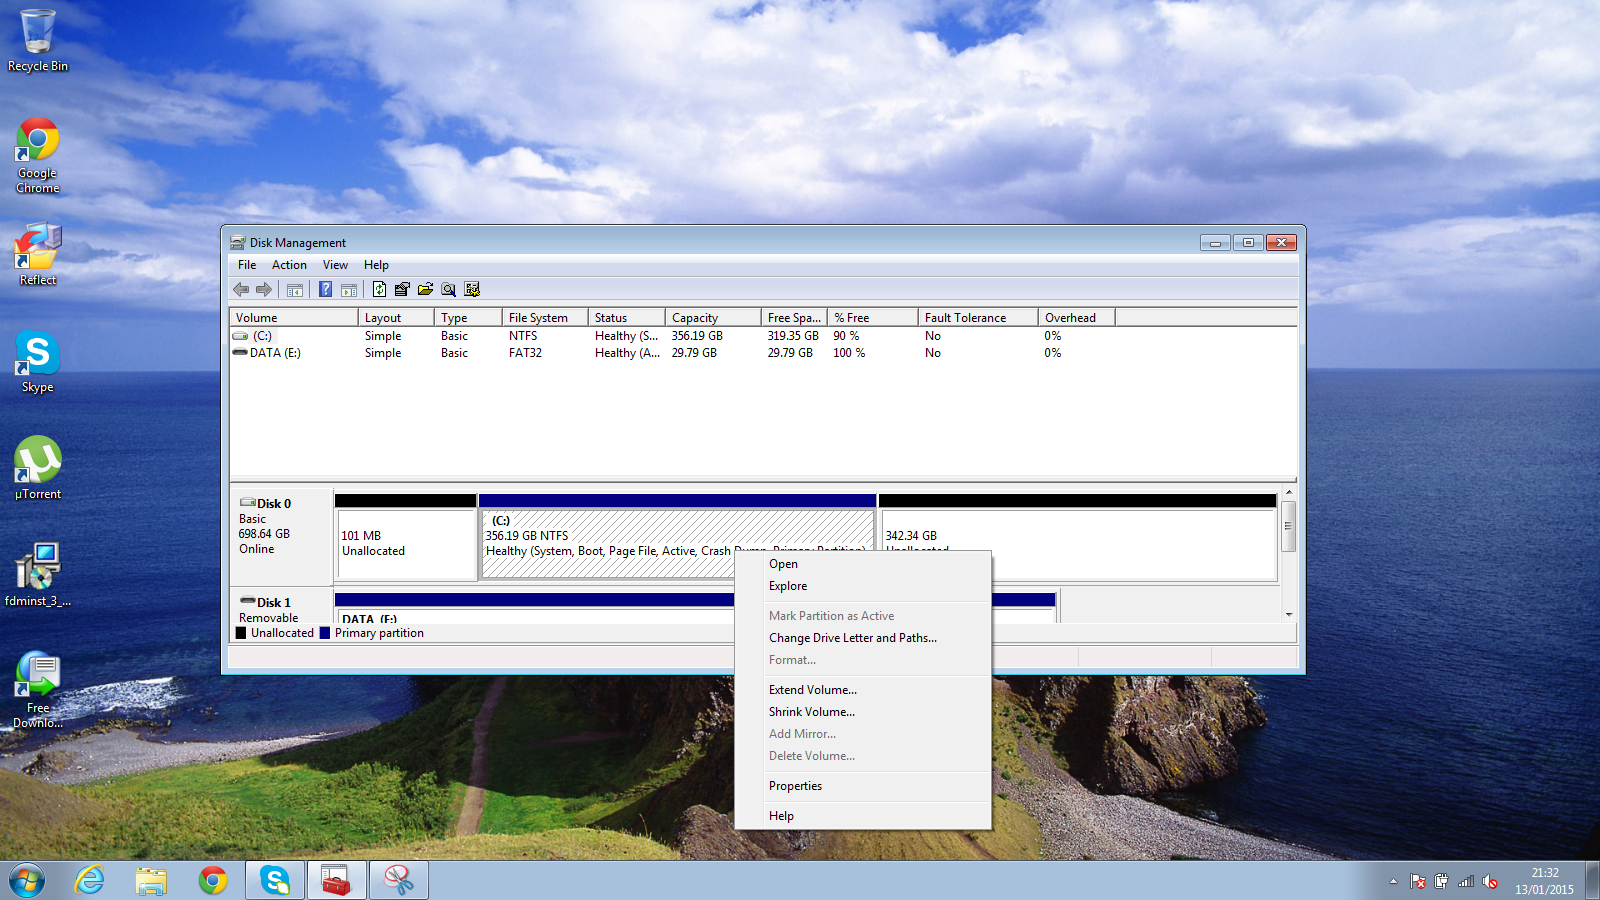
Your disk will now contain your C drive and a large amount of unallocated space.
|
|||
|
|
|
|||
|
|
### Step 3 - Expand The Windows Partition ###
|
|||
|
|
|
|||
|
|
|
|||
|
|
|
|||
|
|
The final step is to expand Windows so that it is one large partition again.
|
|||
|
|
|
|||
|
|
To do this right click on the Windows partition (C: drive) and choose "Extend Volume".
|
|||
|
|
|
|||
|
|
|
|||
|
|
|
|||
|
|
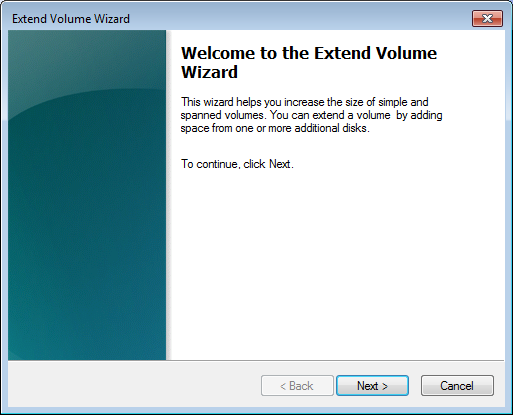
When the Window to the left appears click "Next",
|
|||
|
|
|
|||
|
|

|
|||
|
|
|
|||
|
|
The next screen shows a wizard whereby you can select the disks to expand to and change the size to expand to.
|
|||
|
|
|
|||
|
|
By default the wizard shows the maximum amount of disk space it can claim from unallocated space.
|
|||
|
|
|
|||
|
|
Accept the defaults and click "Next".
|
|||
|
|
|
|||
|
|
|
|||
|
|
|
|||
|
|
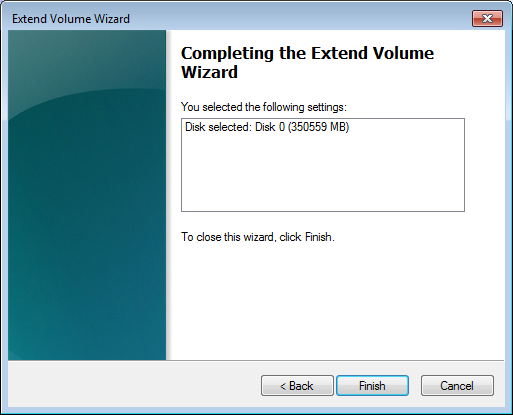
The final screen shows the settings that you chose from the previous screen.
|
|||
|
|
|
|||
|
|
Click "Finish" to expand the disk.
|
|||
|
|
|
|||
|
|

|
|||
|
|
|
|||
|
|
As you can see from the image above my Windows partition now takes up the entire disk (except for the 101 MB that I accidentally created before installing Windows in the first place).
|
|||
|
|
|
|||
|
|
### Summary ###
|
|||
|
|
|
|||
|
|
|
|||
|
|
|
|||
|
|
That is all folks. A site dedicated to Linux has just shown you how to remove Linux and replace it with Windows 7.
|
|||
|
|
|
|||
|
|
Any questions? Use the comments section below.
|
|||
|
|
|
|||
|
|
--------------------------------------------------------------------------------
|
|||
|
|
|
|||
|
|
via: http://www.everydaylinuxuser.com/2015/01/how-to-recover-windows-7-and-delete.html
|
|||
|
|
|
|||
|
|
作者:Gary Newell
|
|||
|
|
译者:[译者ID](https://github.com/译者ID)
|
|||
|
|
校对:[校对者ID](https://github.com/校对者ID)
|
|||
|
|
|
|||
|
|
本文由 [LCTT](https://github.com/LCTT/TranslateProject) 原创翻译,[Linux中国](http://linux.cn/) 荣誉推出
|
|||
|
|
|
|||
|
|
[1]:http://linux.about.com/od/LinuxNewbieDesktopGuide/ss/Create-A-Recovery-Drive-For-All-Versions-Of-Windows.htm
|
|||
|
|
[2]:http://www.amazon.co.uk/gp/product/B0006L2HTK/ref=as_li_qf_sp_asin_il_tl?ie=UTF8&camp=1634&creative=6738&creativeASIN=B0006L2HTK&linkCode=as2&tag=evelinuse-21&linkId=3R363EA63XB4Z3IL
|