2019-02-15 09:52:10 +08:00
|
|
|
|
如何从 Linux 上连接到远程桌面
|
|
|
|
|
|
======
|
|
|
|
|
|
|
2019-02-16 16:01:25 +08:00
|
|
|
|
> Remmina 的极简用户界面使得远程访问 Linux / Windows 10 变得轻松。
|
|
|
|
|
|
|
2019-02-15 09:52:10 +08:00
|
|
|
|

|
|
|
|
|
|
|
2019-02-16 16:01:25 +08:00
|
|
|
|
根据维基百科,[远程桌面][1] 是一种“软件或者操作系统特性,它可以让个人电脑上的桌面环境在一个系统(通常是电脑,但是也可以是服务器)上远程运行,但在另一个分开的客户端设备显示”。
|
2019-02-15 09:52:10 +08:00
|
|
|
|
|
2019-02-16 16:01:25 +08:00
|
|
|
|
换句话说,远程桌面是用来访问在另一台电脑上运行的环境的。比如说 [ManageIQ/Integration tests][2] 仓库的拉取请求 (PR) 测试系统开放了一个虚拟网络计算 (VNC) 连接端口,使得我能够远程浏览正被实时测试的拉取请求。远程桌面也被用于帮助客户解决电脑问题:在客户的许可下,你可以远程建立 VNC 或者远程桌面协议(RDP)连接来查看或者交互式地访问该电脑以寻找并解决问题。
|
2019-02-15 09:52:10 +08:00
|
|
|
|
|
2019-02-16 16:01:25 +08:00
|
|
|
|
运用远程桌面连接软件可以建立这些连接。可供选择的软件有很多,我用 [Remmina][3],因为我喜欢它极简、好用的用户界面 (UI)。它是用 GTK+ 编写的,在 GNU GPL 许可证开源。
|
2019-02-15 09:52:10 +08:00
|
|
|
|
|
|
|
|
|
|
在这篇文章里,我会解释如何使用 Remmina 客户端从一台 Linux 电脑上远程连接到 Windows 10 系统 和 Red Hat 企业版 Linux 7 系统。
|
|
|
|
|
|
|
|
|
|
|
|
### 在 Linux 上安装 Remmina
|
|
|
|
|
|
|
|
|
|
|
|
首先,你需要在你用来远程访问其它电脑的的主机上安装 Remmina。如果你用的是 Fedora,你可以运行如下的命令来安装 Remmina:
|
2019-02-16 16:01:25 +08:00
|
|
|
|
|
2019-02-15 09:52:10 +08:00
|
|
|
|
```
|
|
|
|
|
|
sudo dnf install -y remmina
|
|
|
|
|
|
```
|
|
|
|
|
|
|
2019-02-16 16:01:25 +08:00
|
|
|
|
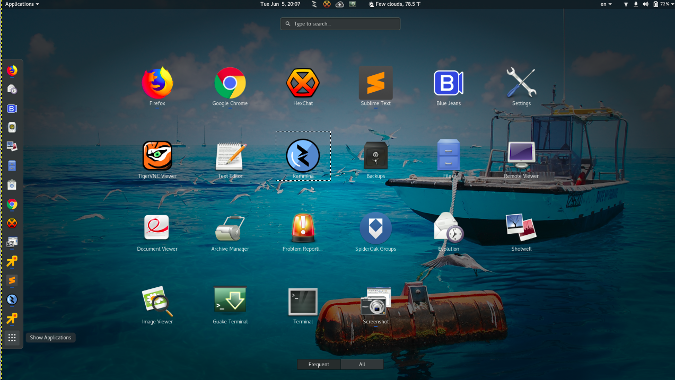
如果你想在一个不同的 Linux 平台上安装 Remmina,跟着 [安装教程][4] 走。然后你会发现 Remmina 正和你其它软件出现在一起(在这张图片里选中了 Remmina)。
|
2019-02-15 09:52:10 +08:00
|
|
|
|
|
|
|
|
|
|
|
|
|
|
|
|
|
|
|
|
|
|
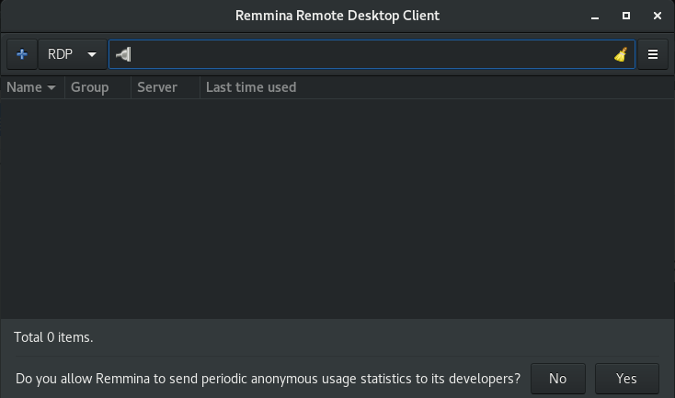
点击图标运行 Remmina,你应该能看到像这样的屏幕:
|
|
|
|
|
|
|
|
|
|
|
|
|
|
|
|
|
|
|
2019-02-16 16:01:25 +08:00
|
|
|
|
Remmina 提供不同种类的连接,其中包括用来连接到 Windows 系统的 RDP 和用来连接到 Linux 系统的 VNC。如你在上图左上角所见的,Remmina 的默认设置是 RDP。
|
2019-02-15 09:52:10 +08:00
|
|
|
|
|
|
|
|
|
|
### 连接到 Windows 10
|
|
|
|
|
|
|
|
|
|
|
|
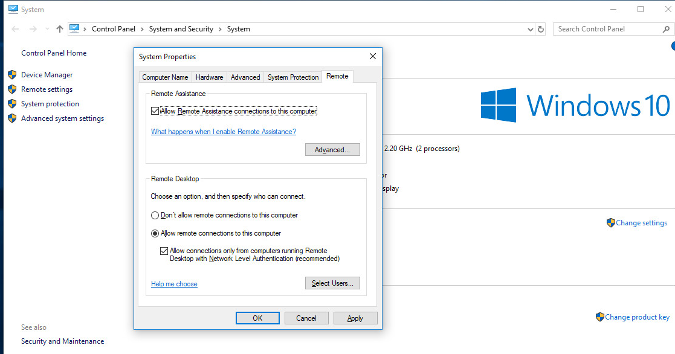
在你通过 RDP 连接到一台 Windows 10 电脑之前,你必须修改权限以允许分享远程桌面并通过防火墙建立连接。
|
|
|
|
|
|
|
2019-02-16 16:01:25 +08:00
|
|
|
|
- [注意: Windows 10 家庭版没有列入 RDP 特性][5]
|
2019-02-15 09:52:10 +08:00
|
|
|
|
|
2019-02-16 16:01:25 +08:00
|
|
|
|
要许可远程桌面分享,在“文件管理器”界面右击“我的电脑 → 属性 → 远程设置”,接着在跳出的窗口中,勾选“在这台电脑上允许远程连接”,再点击“应用”。
|
2019-02-15 09:52:10 +08:00
|
|
|
|
|
|
|
|
|
|
|
|
|
|
|
|
|
2019-02-16 16:01:25 +08:00
|
|
|
|
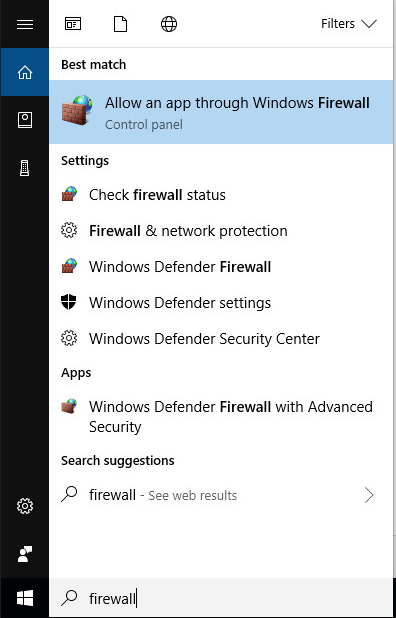
然后,允许远程连接通过你的防火墙。首先在“开始菜单”中查找“防火墙设置”,选择“允许应用通过防火墙”。
|
2019-02-15 09:52:10 +08:00
|
|
|
|
|
|
|
|
|
|
|
|
|
|
|
|
|
2019-02-16 16:01:25 +08:00
|
|
|
|
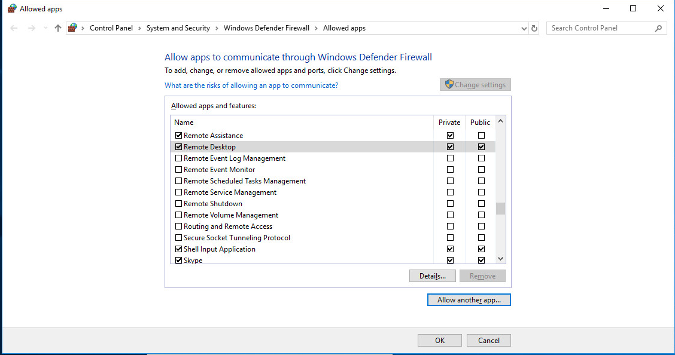
在打开的窗口中,在“允许的应用和特性”下找到“远程桌面”。根据你用来访问这个桌面的网络酌情勾选“隐私”和/或“公开”列的选框。点击“确定”。
|
2019-02-15 09:52:10 +08:00
|
|
|
|
|
|
|
|
|
|
|
|
|
|
|
|
|
2019-02-16 16:01:25 +08:00
|
|
|
|
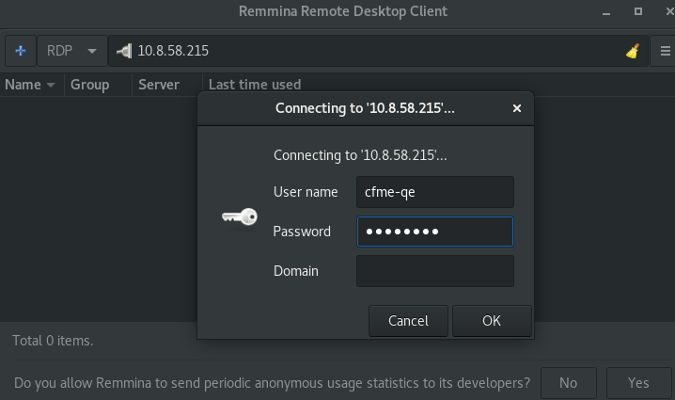
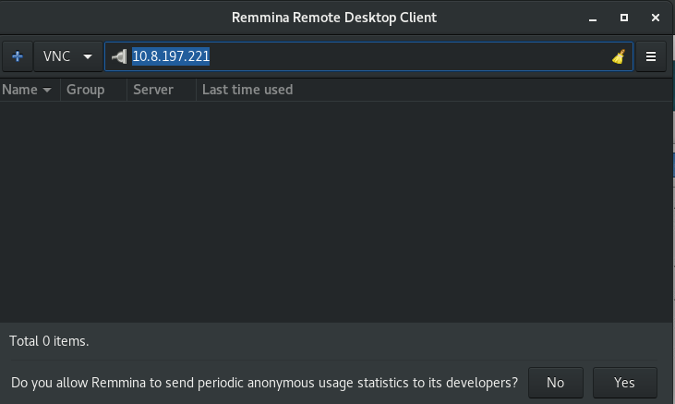
回到你用来远程访问 Windows 主机的 Linux 电脑,打开 Remmina。输入你的 Windows 主机的 IP 地址,敲击回车键。(我怎么在 [Linux][6] 和 [Windws][7] 中确定我的 IP 地址?)看到提示后,输入你的用户名和密码,点击“确定”。
|
2019-02-15 09:52:10 +08:00
|
|
|
|
|
|
|
|
|
|
|
|
|
|
|
|
|
2019-02-16 16:01:25 +08:00
|
|
|
|
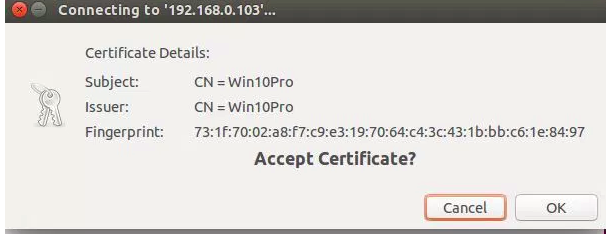
如果你被询问是否接受证书,点击“确定”。
|
2019-02-15 09:52:10 +08:00
|
|
|
|
|
|
|
|
|
|
|
|
|
|
|
|
|
|
|
|
|
|
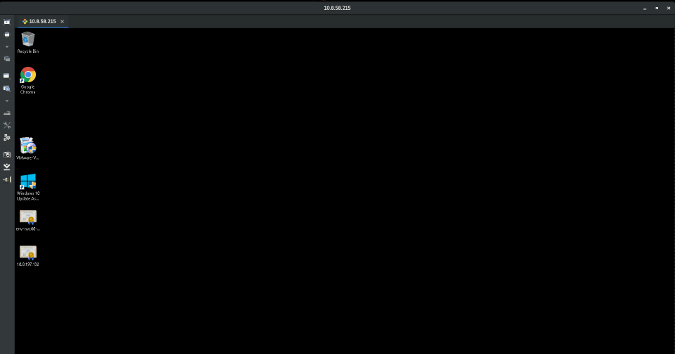
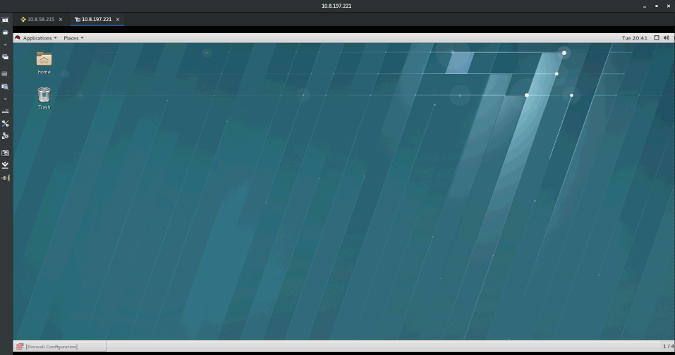
你此时应能看到你的 Windows 10 主机桌面。
|
|
|
|
|
|
|
|
|
|
|
|
|
|
|
|
|
|
|
|
|
|
|
|
### 连接到 Red Hat 企业版 Linux 7
|
|
|
|
|
|
|
2019-02-16 16:01:25 +08:00
|
|
|
|
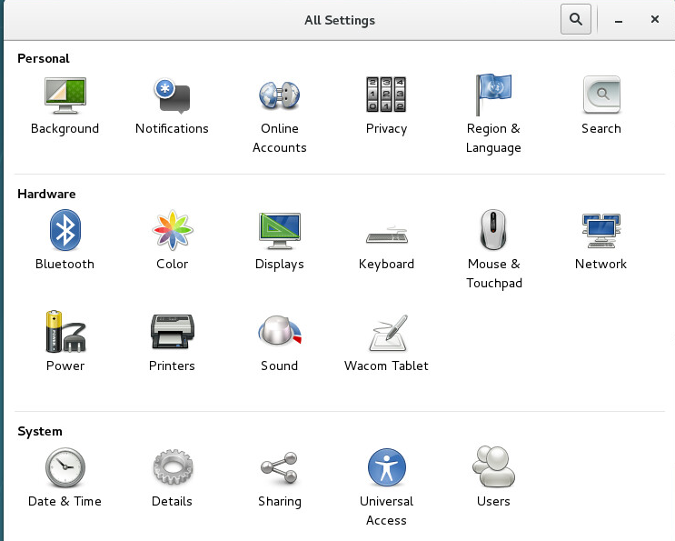
要在你的 RHEL7 电脑上允许远程访问,在 Linux 桌面上打开“所有设置”。
|
2019-02-15 09:52:10 +08:00
|
|
|
|
|
|
|
|
|
|
|
|
|
|
|
|
|
|
|
|
|
|
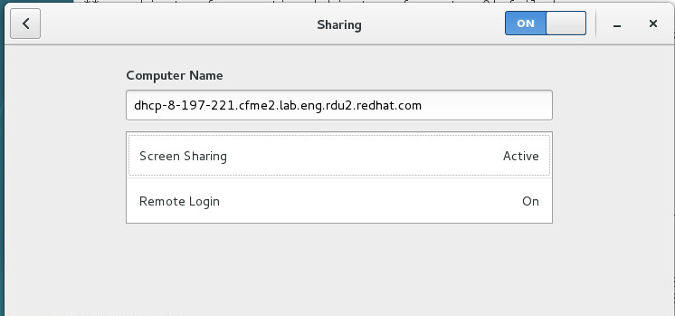
点击分享图标会打开如下的窗口:
|
|
|
|
|
|
|
|
|
|
|
|
|
|
|
|
|
|
|
2019-02-16 16:01:25 +08:00
|
|
|
|
如果“屏幕分享”处于关闭状态,点击一下。一个窗口会弹出,你可以滑动到“打开”的位置。如果你想允许远程控制桌面,将“允许远程控制”调到“打开”。你同样也可以在两种访问选项间选择:一个能够让电脑的主要用户接受或者否绝连接要求,另一个能用密码验证连接。在窗口底部,选择被允许连接的网络界面,最后关闭窗口。
|
2019-02-15 09:52:10 +08:00
|
|
|
|
|
2019-02-16 16:01:25 +08:00
|
|
|
|
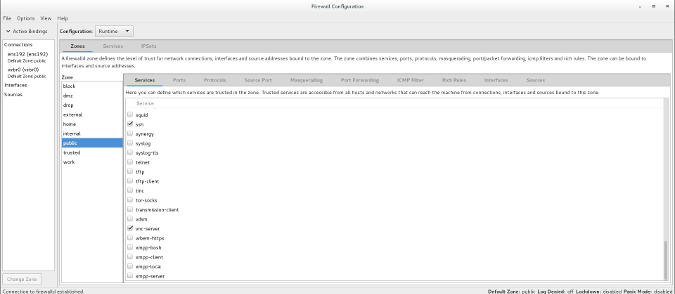
接着,从“应用菜单 → 其它 → 防火墙”打开“防火墙设置”。
|
2019-02-15 09:52:10 +08:00
|
|
|
|
|
|
|
|
|
|
|
|
|
|
|
|
|
2019-02-16 16:01:25 +08:00
|
|
|
|
勾选 “vnc-server”旁边的选框(如下图所示)关闭窗口。接着直接到你远程电脑上的 Remmina,输入你想连接到的 Linux 桌面的 IP 地址,选择 VNC 作为协议,点击回车键。
|
2019-02-15 09:52:10 +08:00
|
|
|
|
|
|
|
|
|
|
|
|
|
|
|
|
|
2019-02-16 16:01:25 +08:00
|
|
|
|
如果你之前选择的验证选项是“新连接必须询问访问许可”,RHEL 系统用户会看到这样的一个弹窗:
|
2019-02-15 09:52:10 +08:00
|
|
|
|
|
|
|
|
|
|
|
|
|
|
|
|
|
2019-02-16 16:01:25 +08:00
|
|
|
|
点击“接受”以成功进行远程连接。
|
2019-02-15 09:52:10 +08:00
|
|
|
|
|
|
|
|
|
|
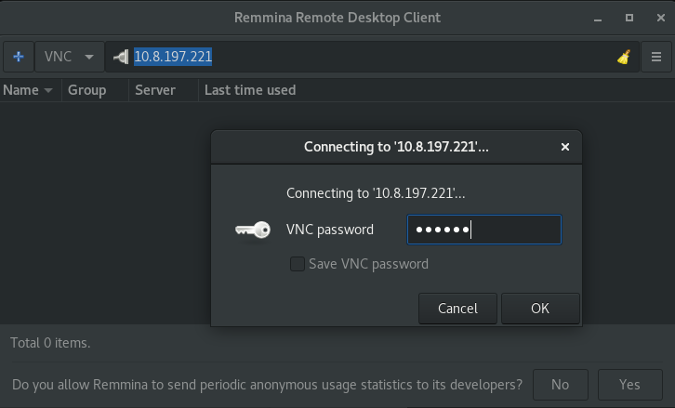
如果你选择用密码验证连接,Remmina 会向你询问密码。
|
|
|
|
|
|
|
|
|
|
|
|
|
|
|
|
|
|
|
2019-02-16 16:01:25 +08:00
|
|
|
|
输入密码然后“确认”,你应该能连接到远程电脑。
|
2019-02-15 09:52:10 +08:00
|
|
|
|
|
|
|
|
|
|
|
|
|
|
|
|
|
|
|
|
|
|
### 使用 Remmina
|
|
|
|
|
|
|
|
|
|
|
|
Remmina 提供如上图所示的标签化的 UI,就好像一个浏览器一样。在上图所示的左上角你可以看到两个标签:一个是之前建立的 WIndows 10 连接,另一个新的是 RHEL 连接。
|
|
|
|
|
|
|
2019-02-16 16:01:25 +08:00
|
|
|
|
在窗口的左侧,有一个有着“缩放窗口”、“全屏模式”、“偏好”、“截屏”、“断开连接”等选项的工具栏。你可以自己探索看那种适合你。
|
2019-02-15 09:52:10 +08:00
|
|
|
|
|
2019-02-16 16:01:25 +08:00
|
|
|
|
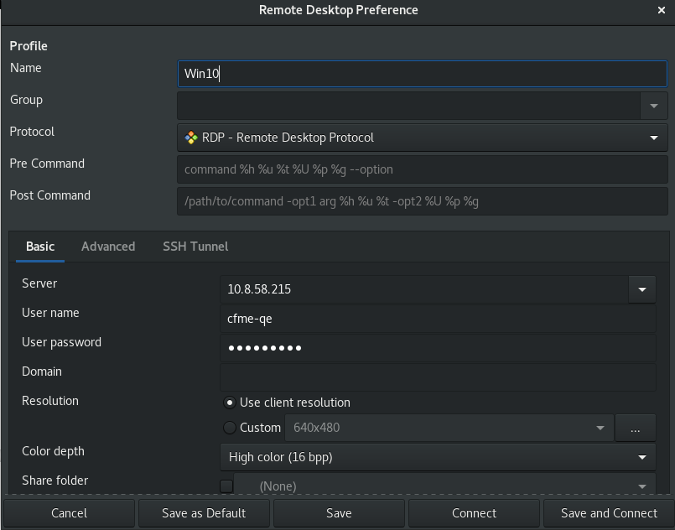
你也可以通过点击左上角的“+”号创建保存过的连接。根据你的连接情况填好表单点击“保存”。以下是一个 Windows 10 RDP 连接的示例:
|
2019-02-15 09:52:10 +08:00
|
|
|
|
|
|
|
|
|
|
|
|
|
|
|
|
|
|
|
|
|
|
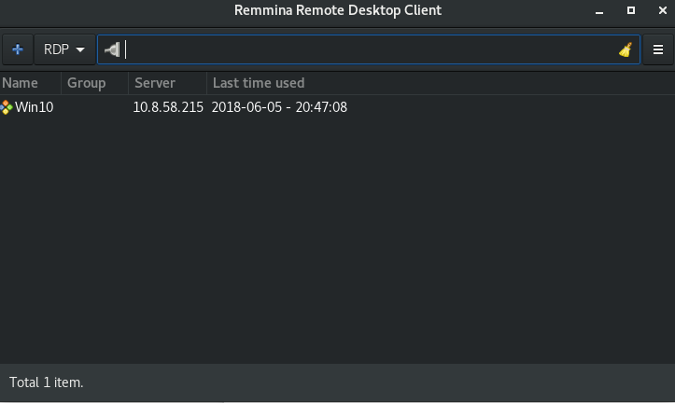
下次你打开 Remmina 时连接就在那了。
|
|
|
|
|
|
|
|
|
|
|
|
|
|
|
|
|
|
|
2019-02-16 16:01:25 +08:00
|
|
|
|
点击一下它,你不用补充细节就可以建立连接了。
|
2019-02-15 09:52:10 +08:00
|
|
|
|
|
|
|
|
|
|
### 补充说明
|
|
|
|
|
|
|
2019-02-16 16:01:25 +08:00
|
|
|
|
当你使用远程桌面软件时,你所有的操作都在远程桌面上消耗资源 —— Remmina(或者其它类似软件)仅仅是一种与远程桌面交互的方式。你也可以通过 SSH 远程访问一台电脑,但那将会让你在那台电脑上局限于仅能使用文字的终端。
|
2019-02-15 09:52:10 +08:00
|
|
|
|
|
|
|
|
|
|
你也应当注意到当你允许你的电脑远程连接时,如果一名攻击者用这种方法获得你电脑的访问权同样会给你带来严重损失。因此当你不频繁使用远程桌面时,禁止远程桌面连接以及其在防火墙中相关的服务是很明智的做法。
|
|
|
|
|
|
|
|
|
|
|
|
--------------------------------------------------------------------------------
|
|
|
|
|
|
|
|
|
|
|
|
via: https://opensource.com/article/18/6/linux-remote-desktop
|
|
|
|
|
|
|
|
|
|
|
|
作者:[Kedar Vijay Kulkarni][a]
|
|
|
|
|
|
选题:[lujun9972](https://github.com/lujun9972)
|
|
|
|
|
|
译者:[tomjlw](https://github.com/tomjlw)
|
2019-02-16 16:01:25 +08:00
|
|
|
|
校对:[wxy](https://github.com/wxy)
|
2019-02-15 09:52:10 +08:00
|
|
|
|
|
|
|
|
|
|
本文由 [LCTT](https://github.com/LCTT/TranslateProject) 原创编译,[Linux中国](https://linux.cn/) 荣誉推出
|
|
|
|
|
|
|
|
|
|
|
|
[a]:https://opensource.com/users/kkulkarn
|
|
|
|
|
|
[1]:https://en.wikipedia.org/wiki/Remote_desktop_software
|
|
|
|
|
|
[2]:https://github.com/ManageIQ/integration_tests
|
|
|
|
|
|
[3]:https://www.remmina.org/wp/
|
|
|
|
|
|
[4]:https://www.tecmint.com/remmina-remote-desktop-sharing-and-ssh-client/
|
|
|
|
|
|
[5]:https://superuser.com/questions/1019203/remote-desktop-settings-missing#1019212
|
|
|
|
|
|
[6]:https://opensource.com/article/18/5/how-find-ip-address-linux
|
|
|
|
|
|
[7]:https://www.groovypost.com/howto/find-windows-10-device-ip-address/
|