mirror of
https://github.com/LCTT/TranslateProject.git
synced 2025-01-07 22:11:09 +08:00
273 lines
12 KiB
Markdown
273 lines
12 KiB
Markdown
|
|
Understanding 7z command switches - part I
|
|||
|
|
============================================================
|
|||
|
|
|
|||
|
|
### On this page
|
|||
|
|
|
|||
|
|
1. [Include files][1]
|
|||
|
|
2. [Exclude files][2]
|
|||
|
|
3. [Set password for your archive][3]
|
|||
|
|
4. [Set output directory][4]
|
|||
|
|
5. [Creating multiple volumes][5]
|
|||
|
|
6. [Set compression level of archive][6]
|
|||
|
|
7. [Display technical information of archive][7]
|
|||
|
|
|
|||
|
|
7z is no doubt a feature-rich and powerful archiver (claimed to offer the highest compression ratio). Here at HowtoForge, we have [already discussed][9] how you can install and use it. But the discussion was limited to basic features that you can access using the 'function letters' the tool provides.
|
|||
|
|
|
|||
|
|
Expanding our coverage on the tool, here in this tutorial, we will be discussing some of the 'switches' 7z offers. But before we proceed, it's worth sharing that all the instructions and commands mentioned in this tutorial have been tested on Ubuntu 16.04 LTS.
|
|||
|
|
|
|||
|
|
**Note**: We will be using the files displayed in the following screenshot for performing various operations using 7zip.
|
|||
|
|
|
|||
|
|
[
|
|||
|
|

|
|||
|
|
][10]
|
|||
|
|
|
|||
|
|
###
|
|||
|
|
Include files
|
|||
|
|
|
|||
|
|
The 7z tool allows you selectively include files in an archive. This feature can be accessed using the -i switch.
|
|||
|
|
|
|||
|
|
Syntax:
|
|||
|
|
|
|||
|
|
-i[r[-|0]]{@listfile|!wildcard}
|
|||
|
|
|
|||
|
|
For example, if you want to include only ‘.txt’ files in your archive, you can use the following command:
|
|||
|
|
|
|||
|
|
$ 7z a ‘-i!*.txt’ include.7z
|
|||
|
|
|
|||
|
|
Here is the output:
|
|||
|
|
|
|||
|
|
[
|
|||
|
|

|
|||
|
|
][11]
|
|||
|
|
|
|||
|
|
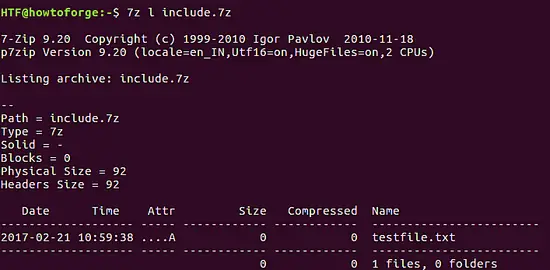
Now, to check whether the newly-created archive file contains only ‘.txt’ file or not, you can use the following command:
|
|||
|
|
|
|||
|
|
$ 7z l include.7z
|
|||
|
|
|
|||
|
|
Here is the output:
|
|||
|
|
|
|||
|
|
[
|
|||
|
|

|
|||
|
|
][12]
|
|||
|
|
|
|||
|
|
In the above screenshot, you can see that only ‘testfile.txt’ file has been added to the archive.
|
|||
|
|
|
|||
|
|
### Exclude files
|
|||
|
|
|
|||
|
|
If you want, you can also exclude the files that you don’t need. This can be done using the -x switch.
|
|||
|
|
|
|||
|
|
Syntax:
|
|||
|
|
|
|||
|
|
-x[r[-|0]]]{@listfile|!wildcard}
|
|||
|
|
|
|||
|
|
For example, if you want to exclude a file named ‘abc.7z’ from the archive that you are going to create, then you can use the following command:
|
|||
|
|
|
|||
|
|
$ 7z a ‘-x!abc.7z’ exclude.7z
|
|||
|
|
|
|||
|
|
Here is the output:
|
|||
|
|
|
|||
|
|
[
|
|||
|
|

|
|||
|
|
][13]
|
|||
|
|
|
|||
|
|
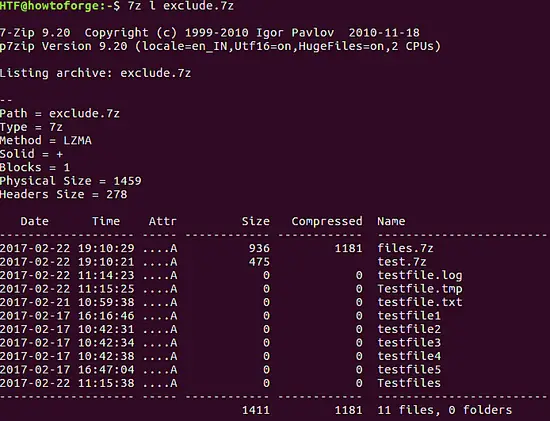
To check whether the resulting archive file has excluded ‘abc.7z’ or not, you can use the following command:
|
|||
|
|
|
|||
|
|
$ 7z l exclude.7z
|
|||
|
|
|
|||
|
|
Here is the output:
|
|||
|
|
|
|||
|
|
[
|
|||
|
|

|
|||
|
|
][14]
|
|||
|
|
|
|||
|
|
In the above screenshot, you can see that ‘abc.7z’ file has been excluded from the new archive file.
|
|||
|
|
|
|||
|
|
**Pro tip**: Suppose the task is to exclude all the .7z files with names starting with letter ‘t’ and include all .7z files with names starting with letter ‘a’ . This can be done by combining both ‘-i’ and ‘-x’ switches in the following way:
|
|||
|
|
|
|||
|
|
$ 7z a '-x!t*.7z' '-i!a*.7z' combination.7z
|
|||
|
|
|
|||
|
|
### Set password for your archive
|
|||
|
|
|
|||
|
|
7z also lets you password protect your archive file. This feature can be accessed using the -p switch.
|
|||
|
|
|
|||
|
|
$ 7z a [archive-filename] -p[your-password] -mhe=[on/off]
|
|||
|
|
|
|||
|
|
**Note**: The -mhe option enables or disables archive header encryption (default is off).
|
|||
|
|
|
|||
|
|
For example:
|
|||
|
|
|
|||
|
|
$ 7z a password.7z -pHTF -mhe=on
|
|||
|
|
|
|||
|
|
Needless to say, when you will extract your password protected archive, the tool will ask you for the password. To extract a password-protected file, use the 'e' function letter. Following is an example:
|
|||
|
|
|
|||
|
|
$ 7z e password.7z
|
|||
|
|
|
|||
|
|
[
|
|||
|
|

|
|||
|
|
][15]
|
|||
|
|
|
|||
|
|
### Set output directory
|
|||
|
|
|
|||
|
|
The tool also lets you extract an archive file in the directory of your choice. This can be done using the -o switch. Needless to say, the switch only works when the command contains either the ‘e’ function letter or the ‘x’ function letter.
|
|||
|
|
|
|||
|
|
$ 7z [e/x] [existing-archive-filename] -o[path-of-directory]
|
|||
|
|
|
|||
|
|
For example, suppose the following command is run in the present working directory:
|
|||
|
|
|
|||
|
|
$ 7z e output.7z -ohow/to/forge
|
|||
|
|
|
|||
|
|
And, as the value passed to the -o switch suggests, the aim is to extract the archive in the ./how/to/forge directory.
|
|||
|
|
|
|||
|
|
Here is the output:
|
|||
|
|
|
|||
|
|
[
|
|||
|
|

|
|||
|
|
][16]
|
|||
|
|
|
|||
|
|
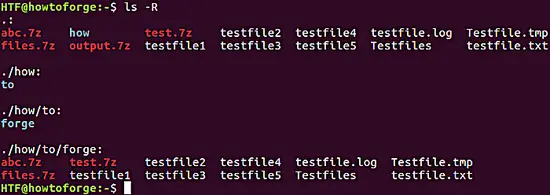
In the above screenshot, you can see that all the contents of existing archive file has been extracted. But where? To check whether or not the archive file has been extracted in the ./how/to/forge directory or not, we can use the ‘ls -R’ command.
|
|||
|
|
|
|||
|
|
[
|
|||
|
|

|
|||
|
|
][17]
|
|||
|
|
|
|||
|
|
In the above screenshot, we can see that all the contents of output.7z have indeed been extracted to ./how/to/forge.
|
|||
|
|
|
|||
|
|
### Creating multiple volumes
|
|||
|
|
|
|||
|
|
With the help of the 7z tool, you can create multiple volumes (smaller sub-archives) of your archive file. This is very useful when transferring large files over a network or in a USB. This feature can be accessed using the -v switch. The switch requires you to specify size of sub-archives.
|
|||
|
|
|
|||
|
|
We can specify size of sub-archives in bytes (b), kilobytes (k), megabytes (m) and gigabytes (g).
|
|||
|
|
|
|||
|
|
$ 7z a [archive-filename] [files-to-archive] -v[size-of-sub-archive1] -v[size-of-sub-archive2] ....
|
|||
|
|
|
|||
|
|
Let's understand this using an example. Please note that we will be using a new directory for performing operations on the -v switch.
|
|||
|
|
|
|||
|
|
Here is the screenshot of the directory contents:
|
|||
|
|
|
|||
|
|
[
|
|||
|
|

|
|||
|
|
][18]
|
|||
|
|
|
|||
|
|
Now, we can run the following command for creating multiple volumes (sized 100b each) of an archive file:
|
|||
|
|
|
|||
|
|
7z a volume.7z * -v100b
|
|||
|
|
|
|||
|
|
Here is the screenshot:
|
|||
|
|
|
|||
|
|
[
|
|||
|
|

|
|||
|
|
][19]
|
|||
|
|
|
|||
|
|
Now, to see the list of sub-archives that were created, use the ‘ls’ command.
|
|||
|
|
|
|||
|
|
[
|
|||
|
|

|
|||
|
|
][20]
|
|||
|
|
|
|||
|
|
As seen in the above screenshot, a total of four multiple volumes have been created - volume.7z.001, volume.7z.002, volume.7z.003, and volume.7z.004
|
|||
|
|
|
|||
|
|
**Note**: You can extract files using the .7z.001 archive. But, for that, all the other sub-archive volumes should be present in the same directory.
|
|||
|
|
|
|||
|
|
### Set compression level of archive
|
|||
|
|
|
|||
|
|
7z also allows you to set compression levels of your archives. This feature can be accessed using the -m switch. There are various compression levels in 7z, such as -mx0, -mx1, -mx3, -mx5, -mx7 and -mx9.
|
|||
|
|
|
|||
|
|
Here's a brief summary about these levels:
|
|||
|
|
|
|||
|
|
-**mx0** = Don't compress at all - just copy the contents to archive.
|
|||
|
|
-**mx1** = Consumes least time, but compression is low.
|
|||
|
|
-**mx3** = Better than -mx1.
|
|||
|
|
-**mx5** = This is default (compression is normal).
|
|||
|
|
-**mx7** = Maximum compression.
|
|||
|
|
-**mx9** = Ultra compression.
|
|||
|
|
|
|||
|
|
**Note**: For more information on these compression levels, head [here][8].
|
|||
|
|
|
|||
|
|
$ 7z a [archive-filename] [files-to-archive] -mx=[0,1,3,5,7,9]
|
|||
|
|
|
|||
|
|
For example, we have a bunch of files and folders in a directory, which we tried compressing using a different compression level each time. Just to give you an idea, here's the command used when the archive was created with compression level '0'.
|
|||
|
|
|
|||
|
|
$ 7z a compression(-mx0).7z * -mx=0
|
|||
|
|
|
|||
|
|
Similarly, other commands were executed.
|
|||
|
|
|
|||
|
|
Here is the list of output archives (produced using the 'ls' command), with their names suggesting the compression level used in their creation, and the fifth column in the output revealing the effect of compression level on their size.
|
|||
|
|
|
|||
|
|
[
|
|||
|
|

|
|||
|
|
][21]
|
|||
|
|
|
|||
|
|
###
|
|||
|
|
Display technical information of archive
|
|||
|
|
|
|||
|
|
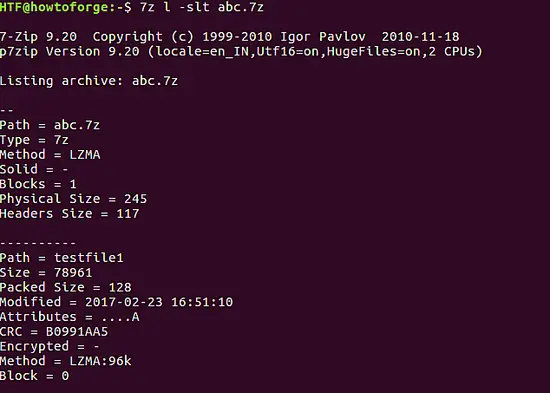
If you want, 7z also lets you display technical information of an archive - it's type, physical size, header size, and so on - on the standard output. This feature can be accessed using the -slt switch. This switch only works with the ‘l’ function letter.
|
|||
|
|
|
|||
|
|
$ 7z l -slt [archive-filename]
|
|||
|
|
|
|||
|
|
For example:
|
|||
|
|
|
|||
|
|
$ 7z l -slt abc.7z
|
|||
|
|
|
|||
|
|
Here is the output:
|
|||
|
|
|
|||
|
|
[
|
|||
|
|

|
|||
|
|
][22]
|
|||
|
|
|
|||
|
|
# Specify type of archive to create
|
|||
|
|
|
|||
|
|
If you want to create a non 7zip archive (which gets created by default), you can specify your choice using the -t switch.
|
|||
|
|
|
|||
|
|
$ 7z a -t[specify-type-of-archive] [archive-filename] [file-to-archive]
|
|||
|
|
|
|||
|
|
The following example shows a command to create a .zip file:
|
|||
|
|
|
|||
|
|
7z a -tzip howtoforge *
|
|||
|
|
|
|||
|
|
The output file produced is 'howtoforge.zip'. To cross verify its type, use the 'file' command:
|
|||
|
|
|
|||
|
|
[
|
|||
|
|

|
|||
|
|
][23]
|
|||
|
|
|
|||
|
|
So, howtoforge.zip is indeed a ZIP file. Similarly, you can create other kind of archives that 7z supports.
|
|||
|
|
|
|||
|
|
# Conclusion
|
|||
|
|
|
|||
|
|
As you would agree, the knowledge of 7z 'function letters' along with 'switches' lets you make the most out of the tool. We aren't yet done with switches - there are some more that will be discussed in part 2.
|
|||
|
|
|
|||
|
|
--------------------------------------------------------------------------------
|
|||
|
|
|
|||
|
|
via: https://www.howtoforge.com/tutorial/understanding-7z-command-switches/
|
|||
|
|
|
|||
|
|
作者:[ Himanshu Arora][a]
|
|||
|
|
译者:[译者ID](https://github.com/译者ID)
|
|||
|
|
校对:[校对者ID](https://github.com/校对者ID)
|
|||
|
|
|
|||
|
|
本文由 [LCTT](https://github.com/LCTT/TranslateProject) 原创编译,[Linux中国](https://linux.cn/) 荣誉推出
|
|||
|
|
|
|||
|
|
[a]:https://www.howtoforge.com/tutorial/understanding-7z-command-switches/
|
|||
|
|
[1]:https://www.howtoforge.com/tutorial/understanding-7z-command-switches/#include-files
|
|||
|
|
[2]:https://www.howtoforge.com/tutorial/understanding-7z-command-switches/#exclude-files
|
|||
|
|
[3]:https://www.howtoforge.com/tutorial/understanding-7z-command-switches/#set-password-for-your-archive
|
|||
|
|
[4]:https://www.howtoforge.com/tutorial/understanding-7z-command-switches/#set-output-directory
|
|||
|
|
[5]:https://www.howtoforge.com/tutorial/understanding-7z-command-switches/#creating-multiple-volumes
|
|||
|
|
[6]:https://www.howtoforge.com/tutorial/understanding-7z-command-switches/#set-compression-level-of-archive
|
|||
|
|
[7]:https://www.howtoforge.com/tutorial/understanding-7z-command-switches/#display-technical-information-of-archive
|
|||
|
|
[8]:http://askubuntu.com/questions/491223/7z-ultra-settings-for-zip-format
|
|||
|
|
[9]:https://www.howtoforge.com/tutorial/how-to-install-and-use-7zip-file-archiver-on-ubuntu-linux/
|
|||
|
|
[10]:https://www.howtoforge.com/images/understanding_7z_command_switches_part_i/big/ls.png
|
|||
|
|
[11]:https://www.howtoforge.com/images/understanding_7z_command_switches_part_i/big/include.png
|
|||
|
|
[12]:https://www.howtoforge.com/images/understanding_7z_command_switches_part_i/big/includelist.png
|
|||
|
|
[13]:https://www.howtoforge.com/images/understanding_7z_command_switches_part_i/big/exclude.png
|
|||
|
|
[14]:https://www.howtoforge.com/images/understanding_7z_command_switches_part_i/big/excludelist.png
|
|||
|
|
[15]:https://www.howtoforge.com/images/understanding_7z_command_switches_part_i/big/password.png
|
|||
|
|
[16]:https://www.howtoforge.com/images/understanding_7z_command_switches_part_i/big/output.png
|
|||
|
|
[17]:https://www.howtoforge.com/images/understanding_7z_command_switches_part_i/big/ls_-R.png
|
|||
|
|
[18]:https://www.howtoforge.com/images/understanding_7z_command_switches_part_i/big/volumels.png
|
|||
|
|
[19]:https://www.howtoforge.com/images/understanding_7z_command_switches_part_i/big/volume.png
|
|||
|
|
[20]:https://www.howtoforge.com/images/understanding_7z_command_switches_part_i/big/volumels2.png
|
|||
|
|
[21]:https://www.howtoforge.com/images/understanding_7z_command_switches_part_i/big/compression.png
|
|||
|
|
[22]:https://www.howtoforge.com/images/understanding_7z_command_switches_part_i/big/slt.png
|
|||
|
|
[23]:https://www.howtoforge.com/images/understanding_7z_command_switches_part_i/big/type.png
|