mirror of
https://github.com/LCTT/TranslateProject.git
synced 2025-01-22 23:00:57 +08:00
253 lines
9.0 KiB
Markdown
253 lines
9.0 KiB
Markdown
|
|
30 Things to Do After Minimal RHEL/CentOS 7 Installation--3
|
|||
|
|
================================================================================
|
|||
|
|
### 12. Install Apache Tomcat ###
|
|||
|
|
|
|||
|
|
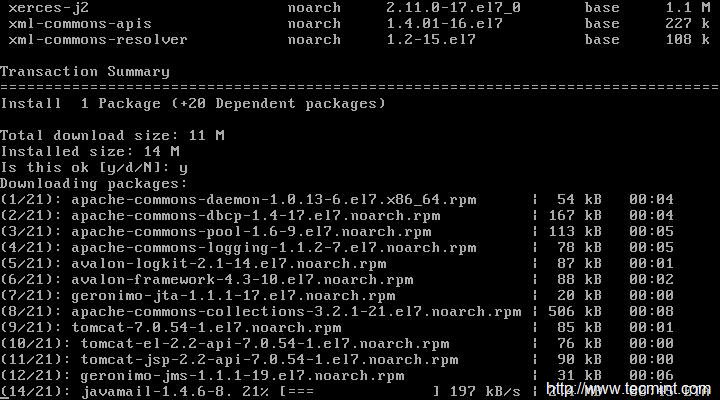
Tomcat is a servlet container designed by Apache to run Java HTTP web server. Install tomcat as below but it is necessary to point out that you must have installed Java prior of installing tomcat.
|
|||
|
|
|
|||
|
|
# yum install tomcat
|
|||
|
|
|
|||
|
|

|
|||
|
|
Install Apache Tomcat
|
|||
|
|
|
|||
|
|
After tomcat has been installed, star the tomcat service.
|
|||
|
|
|
|||
|
|
# systemctl start tomcat
|
|||
|
|
|
|||
|
|
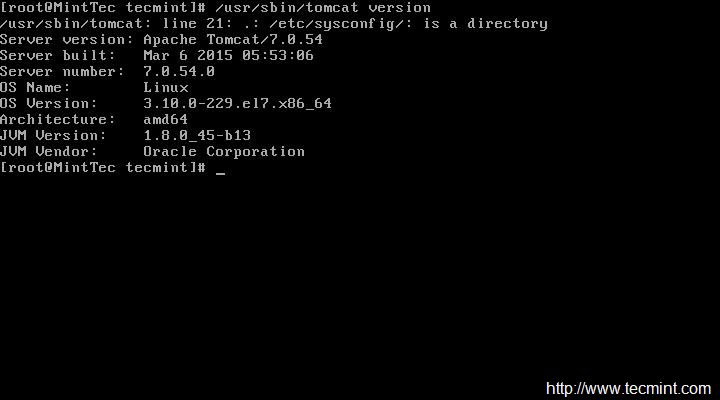
Check Version of tomcat.
|
|||
|
|
|
|||
|
|
# /usr/sbin/tomcat version
|
|||
|
|
|
|||
|
|

|
|||
|
|
Check Tomcat Version
|
|||
|
|
|
|||
|
|
Add service tomcat and default port (8080) through firewall and reload settings.
|
|||
|
|
|
|||
|
|
# firewall-cmd –zone=public –add-port=8080/tcp --permannet
|
|||
|
|
# firewall-cmd –reload
|
|||
|
|
|
|||
|
|
Now it’s time to secure tomcat server, create a user and a password to access and manage. We need to edit file ‘/etc/tomcat/tomcat-users.xml‘. See the section which looks like:
|
|||
|
|
|
|||
|
|
<tomcat-users>
|
|||
|
|
....
|
|||
|
|
</tomcat-users>
|
|||
|
|
|
|||
|
|
|
|||
|
|
<role rolename="manager-gui"/>
|
|||
|
|
<role rolename="manager-script"/>
|
|||
|
|
<role rolename="manager-jmx"/>
|
|||
|
|
<role rolename="manager-status"/>
|
|||
|
|
<role rolename="admin-gui"/>
|
|||
|
|
<role rolename="admin-script"/>
|
|||
|
|
<user username="tecmint" password="tecmint" roles="manager-gui,manager-script,manager-jmx,manager-status,admin-gui,admin-script"/>
|
|||
|
|
</tomcat-users>
|
|||
|
|
|
|||
|
|

|
|||
|
|
Secure Tomcat
|
|||
|
|
|
|||
|
|
Here we added user “tecmint” to administer/manage tomcat using password “tecmint”. Stop and start the service tomcat so that the changes are taken into effect and enable tomcat service to start at system boot.
|
|||
|
|
|
|||
|
|
# systemctl stop tomcat
|
|||
|
|
# systemctl start tomcat
|
|||
|
|
# systemctl enable tomcat.service
|
|||
|
|
|
|||
|
|
Read Also: Installing and Configuring Apache Tomcat 8.0.9 in RHEL/CentOS 7.0/6.x
|
|||
|
|
|
|||
|
|
### 13. Install Nmap to Monitor Open Ports ###
|
|||
|
|
|
|||
|
|
Nmap for Network Mapper creates a map of the network by discovering host on which it is running as well as by analyzing network. nmap is not included in the default installation and you have to install it from repository.
|
|||
|
|
|
|||
|
|
# yum install nmap
|
|||
|
|
|
|||
|
|

|
|||
|
|
Install Nmap Monitoring Tool
|
|||
|
|
|
|||
|
|
List all open ports and corresponding services using them on host.
|
|||
|
|
|
|||
|
|
# namp 127.0.01
|
|||
|
|
|
|||
|
|

|
|||
|
|
Monitor Open Ports
|
|||
|
|
|
|||
|
|
You may also use firewall-cmd to list all the ports, however I find nmap more useful.
|
|||
|
|
|
|||
|
|
# firewall-cmd –list-ports
|
|||
|
|
|
|||
|
|

|
|||
|
|
Check Open Ports in Firewall
|
|||
|
|
|
|||
|
|
Read Also: [29 Useful Nmap Command to Monitor Open Ports][1]
|
|||
|
|
|
|||
|
|
### 14. FirewallD Configuration ###
|
|||
|
|
|
|||
|
|
firewalld is a firewall service which manages the server dynamically. Firewalld removed iptables in CentOS 7. Firewalld is installed by default on RedHat Enterprise Linux and its derivatives by default. With iptables every change in order to be taken into effect needs to flush all the old rules and create new rules.
|
|||
|
|
|
|||
|
|
However with firewalld, no flushing and recreating of new rules required and only changes are applied on the fly.
|
|||
|
|
|
|||
|
|
Check if Firewalld is running or not.
|
|||
|
|
|
|||
|
|
# systemctl status firewalld
|
|||
|
|
OR
|
|||
|
|
# firewall-cmd –state
|
|||
|
|
|
|||
|
|

|
|||
|
|
Check Firewalld Status
|
|||
|
|
|
|||
|
|
Get a list of all the zones.
|
|||
|
|
|
|||
|
|
# firewall-cmd --get-zones
|
|||
|
|
|
|||
|
|

|
|||
|
|
Check Firewalld Zones
|
|||
|
|
|
|||
|
|
To get details on a zone before switching.
|
|||
|
|
|
|||
|
|
# firewall-cmd --zone=work --list-all
|
|||
|
|
|
|||
|
|

|
|||
|
|
Check Zone Details
|
|||
|
|
|
|||
|
|
To get default zone.
|
|||
|
|
|
|||
|
|
# firewall-cmd --get-default-zone
|
|||
|
|
|
|||
|
|

|
|||
|
|
Firewalld Default Zone
|
|||
|
|
|
|||
|
|
To switch to a different zone say ‘work‘.
|
|||
|
|
|
|||
|
|
# firewall-cmd --set-default-zone=work
|
|||
|
|
|
|||
|
|

|
|||
|
|
Swich Firewalld Zones
|
|||
|
|
|
|||
|
|
To list all the services in the zone.
|
|||
|
|
|
|||
|
|
# firewall-cmd --list-services
|
|||
|
|
|
|||
|
|

|
|||
|
|
List Firewalld Zone Services
|
|||
|
|
|
|||
|
|
To add a service say http, temporarily and reload firewalld.
|
|||
|
|
|
|||
|
|
# firewall-cmd --add-service=http
|
|||
|
|
# firewall-cmd –reload
|
|||
|
|
|
|||
|
|
Add http Service Temporarily
|
|||
|
|
|
|||
|
|
Add http Service Temporarily
|
|||
|
|
|
|||
|
|
To add a service say http, permanently and reload firewalld.
|
|||
|
|
|
|||
|
|
# firewall-cmd --add-service=http --permanent
|
|||
|
|
# firewall-cmd --reload
|
|||
|
|
|
|||
|
|

|
|||
|
|
Add http Service Permanent
|
|||
|
|
|
|||
|
|
To remove a service say http, temporarily.
|
|||
|
|
|
|||
|
|
# firewall-cmd --remove-service=http
|
|||
|
|
# firewall-cmd --reload
|
|||
|
|
|
|||
|
|

|
|||
|
|
Remove Firewalld Service Temporarily
|
|||
|
|
|
|||
|
|
To remove a service say http, permanently.
|
|||
|
|
|
|||
|
|
# firewall-cmd --zone=work --remove-service=http --permanent
|
|||
|
|
# firewall-cmd --reload
|
|||
|
|
|
|||
|
|

|
|||
|
|
Remove Service Permanently
|
|||
|
|
|
|||
|
|
To allow a port (say 331), temporarily.
|
|||
|
|
|
|||
|
|
# firewall-cmd --add-port=331/tcp
|
|||
|
|
# firewall-cmd --reload
|
|||
|
|
|
|||
|
|

|
|||
|
|
Open Port Temporarily
|
|||
|
|
|
|||
|
|
To allow a port (say 331), permanently.
|
|||
|
|
|
|||
|
|
# firewall-cmd --add-port=331/tcp --permanent
|
|||
|
|
# firewall-cmd --reload
|
|||
|
|
|
|||
|
|

|
|||
|
|
Open Port Permanently
|
|||
|
|
|
|||
|
|
To block/remove a port (say 331), temporarily.
|
|||
|
|
|
|||
|
|
# firewall-cmd --remove-port=331/tcp
|
|||
|
|
# firewall-cmd --reload
|
|||
|
|
|
|||
|
|

|
|||
|
|
Remove Port Temporarily
|
|||
|
|
|
|||
|
|
To block/remove a port (say 331), permanently.
|
|||
|
|
|
|||
|
|
# firewall-cmd --remove-port=331/tcp --permanent
|
|||
|
|
# firewall-cmd --reload
|
|||
|
|
|
|||
|
|

|
|||
|
|
Remove Port Permanently
|
|||
|
|
|
|||
|
|
To disable firewalld.
|
|||
|
|
|
|||
|
|
# systemctl stop firewalld
|
|||
|
|
# systemctl disable firewalld
|
|||
|
|
# firewall-cmd --state
|
|||
|
|
|
|||
|
|

|
|||
|
|
Disable Firewalld Service
|
|||
|
|
|
|||
|
|
To enable firewalld.
|
|||
|
|
|
|||
|
|
# systemctl enable firewalld
|
|||
|
|
# systemctl start firewalld
|
|||
|
|
# firewall-cmd --state
|
|||
|
|
|
|||
|
|

|
|||
|
|
Enable Firewalld
|
|||
|
|
|
|||
|
|
- [How to Configure ‘FirewallD’ in RHEL/CentOS 7][2]
|
|||
|
|
- [Useful ‘FirewallD’ Rules to Configure and Manage Firewall][3]
|
|||
|
|
|
|||
|
|
### 15. Installing Wget ###
|
|||
|
|
|
|||
|
|
wget is a Linux command line based utility that retrieves (downloads) content from web servers. It is an important tool you must have to retrieve web contents or download any files using wget command.
|
|||
|
|
|
|||
|
|
# yum install wget
|
|||
|
|
|
|||
|
|

|
|||
|
|
Install Wget Tool
|
|||
|
|
|
|||
|
|
For more usage and practical examples on how to use wget command to download files on the terminal, read [10 Wget Command Examples][4].
|
|||
|
|
|
|||
|
|
### 16. Installing Telnet ###
|
|||
|
|
|
|||
|
|
Telnet is a network protocol that enables a user to login into another computer on the same network over TCP/IP. Once connection etablished to the remote computer it becomes a virtual terminal and allow you to communicate with the remote host within your computer as per whatever privileges provided to you.
|
|||
|
|
|
|||
|
|
Telnet also very useful for checking listening ports on remote computer or host.
|
|||
|
|
|
|||
|
|
# yum install telnet
|
|||
|
|
# telnet google.com 80
|
|||
|
|
|
|||
|
|

|
|||
|
|
Telnet Port Checking
|
|||
|
|
|
|||
|
|
--------------------------------------------------------------------------------
|
|||
|
|
|
|||
|
|
via: http://www.tecmint.com/things-to-do-after-minimal-rhel-centos-7-installation/3/
|
|||
|
|
|
|||
|
|
作者:[Avishek Kumar][a]
|
|||
|
|
译者:[译者ID](https://github.com/译者ID)
|
|||
|
|
校对:[校对者ID](https://github.com/校对者ID)
|
|||
|
|
|
|||
|
|
本文由 [LCTT](https://github.com/LCTT/TranslateProject) 原创翻译,[Linux中国](http://linux.cn/) 荣誉推出
|
|||
|
|
|
|||
|
|
[a]:http://www.tecmint.com/author/avishek/
|
|||
|
|
[1]:http://www.tecmint.com/nmap-command-examples/
|
|||
|
|
[2]:http://www.tecmint.com/configure-firewalld-in-centos-7/
|
|||
|
|
[3]:http://www.tecmint.com/firewalld-rules-for-centos-7/
|
|||
|
|
[4]:http://www.tecmint.com/10-wget-command-examples-in-linux/
|