mirror of
https://github.com/LCTT/TranslateProject.git
synced 2025-01-10 22:21:11 +08:00
107 lines
4.9 KiB
Markdown
107 lines
4.9 KiB
Markdown
|
|
[#]: collector: (lujun9972)
|
|||
|
|
[#]: translator: ( )
|
|||
|
|
[#]: reviewer: ( )
|
|||
|
|
[#]: publisher: ( )
|
|||
|
|
[#]: url: ( )
|
|||
|
|
[#]: subject: (How To Boot Into Rescue Mode Or Emergency Mode In Ubuntu 18.04)
|
|||
|
|
[#]: via: (https://www.ostechnix.com/how-to-boot-into-rescue-mode-or-emergency-mode-in-ubuntu-18-04/)
|
|||
|
|
[#]: author: (SK https://www.ostechnix.com/author/sk/)
|
|||
|
|
|
|||
|
|
How To Boot Into Rescue Mode Or Emergency Mode In Ubuntu 18.04
|
|||
|
|
======
|
|||
|
|

|
|||
|
|
|
|||
|
|
As you might already know, **Runlevels** are replaced with **Systemd targets** in many recent Linux distributions like RHEL 7 and Ubuntu 16.04 LTS. For more details about runlevels and systemd target, refer [**this guide**][1]. In this brief tutorial, we are going to see how to boot into **rescue mode** and/or **emergency mode**. This guide is tested in Ubuntu 18.04 LTS, however the steps given below would work on most Linux distributions that uses Systemd as default service manager. Before going further, let me clarify what is rescue mode and emergency mode and what is the purpose of the both modes.
|
|||
|
|
|
|||
|
|
### What is Rescue mode?
|
|||
|
|
|
|||
|
|
The **rescue mode** is equivalent to **single user mode** in Linux distributions that uses **SysV** as the default service manager. In rescue mode, all local filesystems will be mounted, only some important services will be started. However, no normal services (E.g network services) won’t be started. The rescue mode is helpful in situations where the system can’t boot normally. Also, we can perform some important rescue operations, such as [**reset root password**][2], in rescue mode.
|
|||
|
|
|
|||
|
|
### What is Emergency mode?
|
|||
|
|
|
|||
|
|
In contrast to the rescue mode, nothing is started in the **emergency mode**. No services are started, no mount points mounted, no sockets established, nothing. All you will have is just a **raw shell**. Emergency mode is suitable for debugging purposes.
|
|||
|
|
|
|||
|
|
### Boot Into Rescue Mode In Ubuntu 18.04 LTS
|
|||
|
|
|
|||
|
|
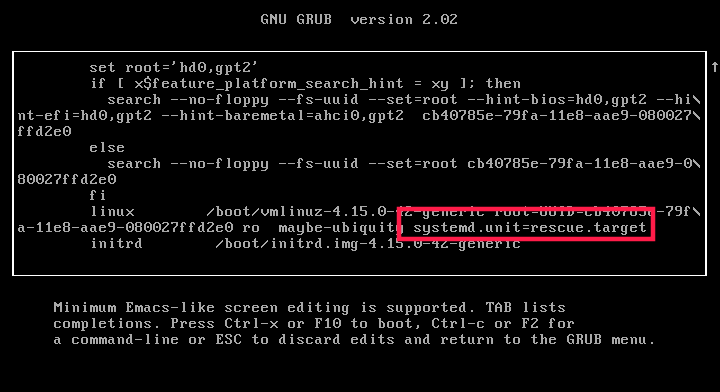
Boot your Ubuntu system. When Grub menu appears, choose the first entry and press **e** to edit.
|
|||
|
|
|
|||
|
|

|
|||
|
|
|
|||
|
|
If you don’t see the Grub menu, just hit ESC key right after the BIOS logo disappears.
|
|||
|
|
|
|||
|
|
Find the line that starts with word **“linux”** and add the following line at the end of that line (To reach the end, just press **CTRL+e** or use END key or LEFT/RIGHT arrows in your keyboard):
|
|||
|
|
|
|||
|
|
```
|
|||
|
|
systemd.unit=rescue.target
|
|||
|
|
```
|
|||
|
|
|
|||
|
|

|
|||
|
|
|
|||
|
|
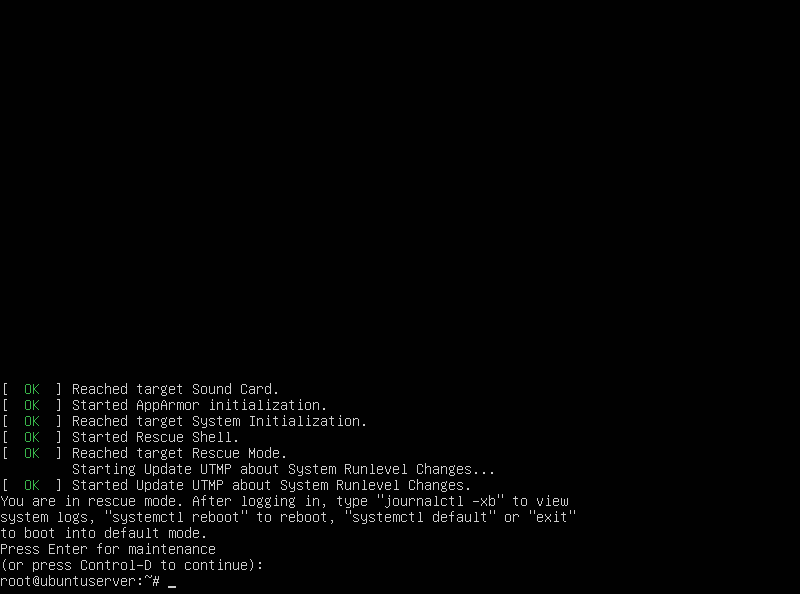
Once you added the above line, just press **CTRL+x** or **F10** to continue to boot into rescue mode. After a few seconds, you will be ended up in the rescue mode (single user mode) as root user. Here is how rescue mode looks like in Ubuntu 18.04 LTS server:
|
|||
|
|
|
|||
|
|

|
|||
|
|
|
|||
|
|
Next, type the following command to mount root (/) file system into read/write mode.
|
|||
|
|
|
|||
|
|
```
|
|||
|
|
mount -n -o remount,rw /
|
|||
|
|
```
|
|||
|
|
|
|||
|
|
### Boot Into Emergency Mode
|
|||
|
|
|
|||
|
|
Booting your Ubuntu into emergency is as same as above method. All you have to do is replace “systemd.unit=rescue.target” with “systemd.unit=emergency.target” when editing grub menu.
|
|||
|
|
|
|||
|
|
[![emergency mode][3]][4]
|
|||
|
|
|
|||
|
|
Once you added “systemd.unit=emergency.target”, press **Ctrl+x** or **F10** to continue booting into emergency mode.
|
|||
|
|
|
|||
|
|

|
|||
|
|
|
|||
|
|
Finally, you can mount root filesystem into read/write mode with command:
|
|||
|
|
|
|||
|
|
```
|
|||
|
|
mount -n -o remount,rw /
|
|||
|
|
```
|
|||
|
|
|
|||
|
|
### Switch between Rescue to Emergency mode and vice versa
|
|||
|
|
|
|||
|
|
If you are in rescue mode, you don’t have to edit the grub boot entry as I mentioned above. Instead, just type the following command to switch to emergency mode instantly:
|
|||
|
|
|
|||
|
|
```
|
|||
|
|
systemctl emergency
|
|||
|
|
```
|
|||
|
|
|
|||
|
|
Similarly, to switch from emergency to rescue mode, type:
|
|||
|
|
|
|||
|
|
```
|
|||
|
|
systemctl rescue
|
|||
|
|
```
|
|||
|
|
|
|||
|
|
You know now what is rescue and emergency modes and how to boot into those modes in Ubuntu 18.04. Like I already mentioned, the steps provided here will work on many recent Linux versions that uses Systemd.
|
|||
|
|
|
|||
|
|
And, that’s all for now. Hope this was useful.
|
|||
|
|
|
|||
|
|
More good stuffs to come. Stay tuned!
|
|||
|
|
|
|||
|
|
Cheers!
|
|||
|
|
|
|||
|
|
|
|||
|
|
|
|||
|
|
--------------------------------------------------------------------------------
|
|||
|
|
|
|||
|
|
via: https://www.ostechnix.com/how-to-boot-into-rescue-mode-or-emergency-mode-in-ubuntu-18-04/
|
|||
|
|
|
|||
|
|
作者:[SK][a]
|
|||
|
|
选题:[lujun9972][b]
|
|||
|
|
译者:[译者ID](https://github.com/译者ID)
|
|||
|
|
校对:[校对者ID](https://github.com/校对者ID)
|
|||
|
|
|
|||
|
|
本文由 [LCTT](https://github.com/LCTT/TranslateProject) 原创编译,[Linux中国](https://linux.cn/) 荣誉推出
|
|||
|
|
|
|||
|
|
[a]: https://www.ostechnix.com/author/sk/
|
|||
|
|
[b]: https://github.com/lujun9972
|
|||
|
|
[1]: https://www.ostechnix.com/check-runlevel-linux/
|
|||
|
|
[2]: https://www.ostechnix.com/how-to-reset-or-recover-root-user-password-in-linux/
|
|||
|
|
[3]: data:image/gif;base64,R0lGODlhAQABAIAAAAAAAP///yH5BAEAAAAALAAAAAABAAEAAAIBRAA7
|
|||
|
|
[4]: http://www.ostechnix.com/wp-content/uploads/2018/12/emergency-mode.png
|