2017-01-06 19:25:57 +08:00
|
|
|
|
使用 Windows 10 的 RSAT 工具来管理 Samba4 活动目录架构 (三)
|
2016-12-31 02:25:06 +08:00
|
|
|
|
============================================================
|
|
|
|
|
|
|
|
|
|
|
|
这一节的[Samba4 AD DC 架构系列文章][8],我们将会讨论如何把 Windows 10 系统的电脑添加到 Samba4 域环境中,以及如何在 Windows 10 系统下管理域环境。
|
|
|
|
|
|
|
|
|
|
|
|
一旦 Windows 10 系统加入到 Samba4 AD DC ,我们就可以在 Windows 10 系统中创建、删除或者禁用域用户和组了,可以创建新的组织单元,创建、编辑和管理域策略,还可以管理 Samba4 域 DNS 服务。
|
|
|
|
|
|
|
|
|
|
|
|
上面所有的功能和其它一些复杂的与域管理相关的工作都可以通过 Windows 环境下的 RSAT 工具来完成—— Microsoft 远程服务器管理工具。
|
|
|
|
|
|
|
|
|
|
|
|
#### 要求
|
|
|
|
|
|
|
2017-01-06 19:25:57 +08:00
|
|
|
|
1、 [在 Ubuntu 系统上使用 Samba4 来创建活动目录架构(一)][1]
|
2016-12-31 02:25:06 +08:00
|
|
|
|
2、 [在 Linux 命令行下管理 Samba4 AD 架构(二)][2]
|
|
|
|
|
|
|
|
|
|
|
|
### 第1步:配置域时间同步
|
|
|
|
|
|
|
|
|
|
|
|
1、在使用 Windows 10 系统的 RSAT 工具来管理 Samba4 ADDC 之前,我们需要了解与活动目录相关的一个很重要的服务,该服务要求[精确的时间同步][9]
|
|
|
|
|
|
|
2017-01-06 19:25:57 +08:00
|
|
|
|
在大多数的 Linux 发行版中,都由 NTP 进程提供时间同步机制。AD 环境默认允许最大的时间差距是 5 分钟。
|
2016-12-31 02:25:06 +08:00
|
|
|
|
|
2017-01-06 19:25:57 +08:00
|
|
|
|
如果时间差距超过 5 分钟,你将会遇到各种各样的异常报错,最严重的会影响到 AD 用户、域成员服务器或共享访问等。
|
2016-12-31 02:25:06 +08:00
|
|
|
|
|
|
|
|
|
|
为了在 Ubuntu 系统中安装网络时间协议进程和 NTP 客户端工具,可执行以下命令:
|
|
|
|
|
|
|
|
|
|
|
|
```
|
|
|
|
|
|
$ sudo apt-get install ntp ntpdate
|
|
|
|
|
|
```
|
|
|
|
|
|
[
|
|
|
|
|
|

|
|
|
|
|
|
][10]
|
|
|
|
|
|
|
2017-01-06 19:25:57 +08:00
|
|
|
|
*在 Ubuntu 系统下安装 NTP 服务*
|
2016-12-31 02:25:06 +08:00
|
|
|
|
|
|
|
|
|
|
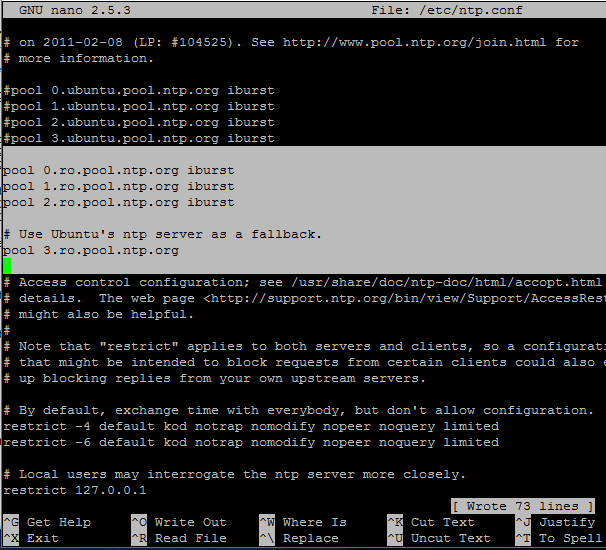
2、下一步,修改 NTP 配置文件,使用一个离你最近的 NTP 服务地址列表替换默认的 NTP 池服务列表。
|
|
|
|
|
|
|
2017-01-06 19:25:57 +08:00
|
|
|
|
NTP 服务器地址列表可以从 NTP 地址库项目官方网站获取:[http://www.pool.ntp.org/en/][11]。
|
2016-12-31 02:25:06 +08:00
|
|
|
|
|
|
|
|
|
|
```
|
|
|
|
|
|
$ sudo nano /etc/ntp.conf
|
|
|
|
|
|
```
|
|
|
|
|
|
|
2017-01-06 19:25:57 +08:00
|
|
|
|
在每一行 `pool` 前添加一个 ‘#’ 符号以注释默认的服务器列表,并替换为适合你的 NTP 服务器地址,如下图所示:
|
2016-12-31 02:25:06 +08:00
|
|
|
|
|
|
|
|
|
|
```
|
|
|
|
|
|
pool 0.ro.pool.ntp.org iburst
|
|
|
|
|
|
pool 1.ro.pool.ntp.org iburst
|
|
|
|
|
|
pool 2.ro.pool.ntp.org iburst
|
|
|
|
|
|
# Use Ubuntu's ntp server as a fallback.
|
|
|
|
|
|
pool 3.ro.pool.ntp.org
|
2017-01-06 19:25:57 +08:00
|
|
|
|
```
|
|
|
|
|
|
|
2016-12-31 02:25:06 +08:00
|
|
|
|
[
|
|
|
|
|
|
|
|
|
|
|
|
][12]
|
|
|
|
|
|
|
2017-01-06 19:25:57 +08:00
|
|
|
|
*在 Ubuntu 系统下配置 NTP 服务*
|
2016-12-31 02:25:06 +08:00
|
|
|
|
|
2017-01-06 19:25:57 +08:00
|
|
|
|
3、此时,先不要关闭该文件。移动光标到文件顶部,在 `driftfile` 参数后面添加下面一行内容。该设置是为了让客户端查询该服务时使用 AD 的 NTP 签署请求。
|
2016-12-31 02:25:06 +08:00
|
|
|
|
|
|
|
|
|
|
```
|
|
|
|
|
|
ntpsigndsocket /var/lib/samba/ntp_signd/
|
|
|
|
|
|
```
|
|
|
|
|
|
[
|
|
|
|
|
|

|
|
|
|
|
|
][13]
|
|
|
|
|
|
|
2017-01-06 19:25:57 +08:00
|
|
|
|
*使用 NTP 来同步 AD*
|
|
|
|
|
|
|
|
|
|
|
|
4、最后,移动光标到文件底部并添加如下一行内容,如截图所示,仅允许网络客户端查询该服务器上的时间。
|
2016-12-31 02:25:06 +08:00
|
|
|
|
|
|
|
|
|
|
```
|
|
|
|
|
|
restrict default kod nomodify notrap nopeer mssntp
|
|
|
|
|
|
```
|
|
|
|
|
|
[
|
|
|
|
|
|

|
|
|
|
|
|
][14]
|
|
|
|
|
|
|
2017-01-06 19:25:57 +08:00
|
|
|
|
*限制 NTP 服务的查询客户端*
|
2016-12-31 02:25:06 +08:00
|
|
|
|
|
2017-01-06 19:25:57 +08:00
|
|
|
|
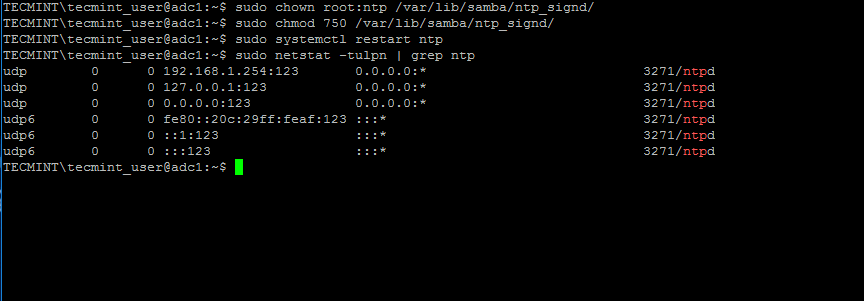
5、设置完成之后,保存并关闭 NTP 配置文件,为了让 NTP 服务读取 `ntp_signed` 目录,需要授予 NTP 服务合适的权限。
|
2016-12-31 02:25:06 +08:00
|
|
|
|
|
2017-01-06 19:25:57 +08:00
|
|
|
|
以下是 Samba NTP socket 的系统路径。之后,重启 NTP 服务以应用更改,并使用 [netstat 命令][15]与[grep 过滤][16]相接合来检查 NTP 服务是否正常。
|
2016-12-31 02:25:06 +08:00
|
|
|
|
|
|
|
|
|
|
```
|
|
|
|
|
|
$ sudo chown root:ntp /var/lib/samba/ntp_signd/
|
|
|
|
|
|
$ sudo chmod 750 /var/lib/samba/ntp_signd/
|
|
|
|
|
|
$ sudo systemctl restart ntp
|
|
|
|
|
|
$ sudo netstat –tulpn | grep ntp
|
|
|
|
|
|
```
|
|
|
|
|
|
[
|
|
|
|
|
|
|
|
|
|
|
|
][17]
|
|
|
|
|
|
|
2017-01-06 19:25:57 +08:00
|
|
|
|
*给 NTP 服务授权*
|
2016-12-31 02:25:06 +08:00
|
|
|
|
|
|
|
|
|
|
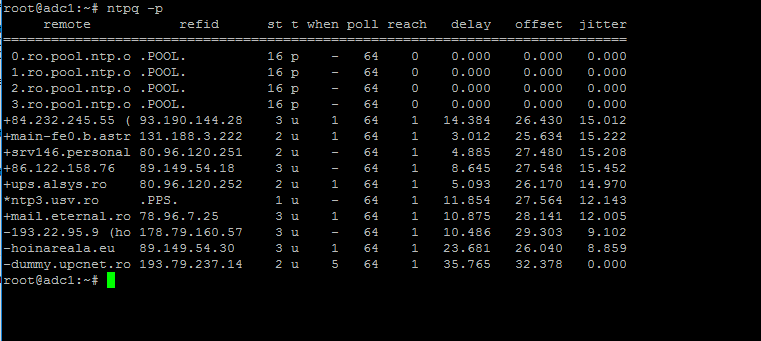
使用 ntpq 命令行工具来监控 NTP 进程,加上 '-p' 参数来显示摘要信息。
|
|
|
|
|
|
|
|
|
|
|
|
```
|
|
|
|
|
|
$ ntpq -p
|
|
|
|
|
|
```
|
|
|
|
|
|
[
|
|
|
|
|
|
|
|
|
|
|
|
][18]
|
|
|
|
|
|
|
2017-01-06 19:25:57 +08:00
|
|
|
|
*监控 NTP 服务器池*
|
2016-12-31 02:25:06 +08:00
|
|
|
|
|
|
|
|
|
|
### 第二步:处理 NTP 时间同步异常问题
|
|
|
|
|
|
|
2017-01-06 19:25:57 +08:00
|
|
|
|
6、有时候 NTP 进程在尝试与上游 ntp 服务端同步时间的计算过程中会卡住,导致客户端使用 `ntpdate` 工具手动强制同步时间时报如下错误:
|
2016-12-31 02:25:06 +08:00
|
|
|
|
|
|
|
|
|
|
```
|
|
|
|
|
|
# ntpdate -qu adc1
|
|
|
|
|
|
ntpdate[4472]: no server suitable for synchronization found
|
|
|
|
|
|
```
|
|
|
|
|
|
[
|
|
|
|
|
|

|
|
|
|
|
|
][19]
|
|
|
|
|
|
|
2017-01-06 19:25:57 +08:00
|
|
|
|
*NTP 时间同步异常*
|
2016-12-31 02:25:06 +08:00
|
|
|
|
|
2017-01-06 19:25:57 +08:00
|
|
|
|
`ntpdate` 命令加上 `-d` 调试选项:
|
2016-12-31 02:25:06 +08:00
|
|
|
|
|
|
|
|
|
|
```
|
|
|
|
|
|
# ntpdate -d adc1.tecmint.lan
|
|
|
|
|
|
Server dropped: Leap not in sync
|
|
|
|
|
|
```
|
|
|
|
|
|
[
|
|
|
|
|
|

|
|
|
|
|
|
][20]
|
|
|
|
|
|
|
2017-01-06 19:25:57 +08:00
|
|
|
|
*NTP Server Dropped Leap Not in Sync*
|
2016-12-31 02:25:06 +08:00
|
|
|
|
|
2017-01-06 19:25:57 +08:00
|
|
|
|
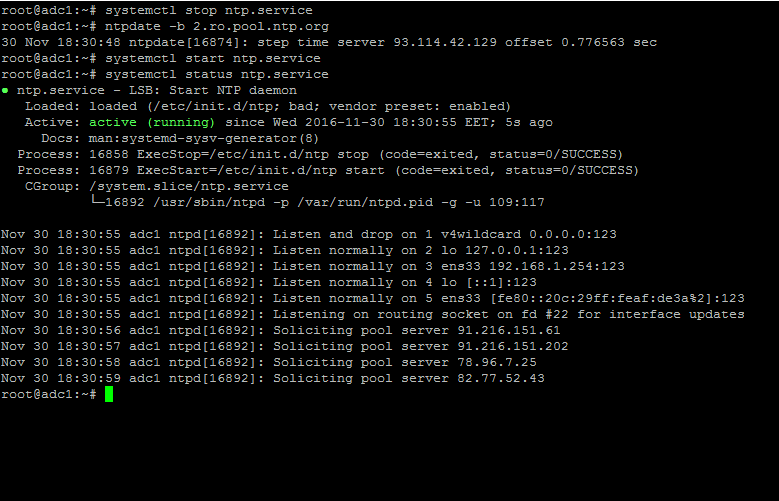
7、为了避免出现该问题,使用下面的方法来解决这个问题:在服务器上停止 NTP 服务,使用 `ntpdate` 客户端工具加上 `-b` 参数指定外部 peer 地址来手动强制同步时间,如下图所示:
|
2016-12-31 02:25:06 +08:00
|
|
|
|
|
|
|
|
|
|
```
|
|
|
|
|
|
# systemctl stop ntp.service
|
2017-01-06 19:25:57 +08:00
|
|
|
|
# ntpdate -b 2.ro.pool.ntp.org [你的 ntp peer]
|
2016-12-31 02:25:06 +08:00
|
|
|
|
# systemctl start ntp.service
|
|
|
|
|
|
# systemctl status ntp.service
|
|
|
|
|
|
```
|
|
|
|
|
|
[
|
|
|
|
|
|
|
|
|
|
|
|
][21]
|
|
|
|
|
|
|
2017-01-06 19:25:57 +08:00
|
|
|
|
*强制 NTP 时间同步*
|
2016-12-31 02:25:06 +08:00
|
|
|
|
|
|
|
|
|
|
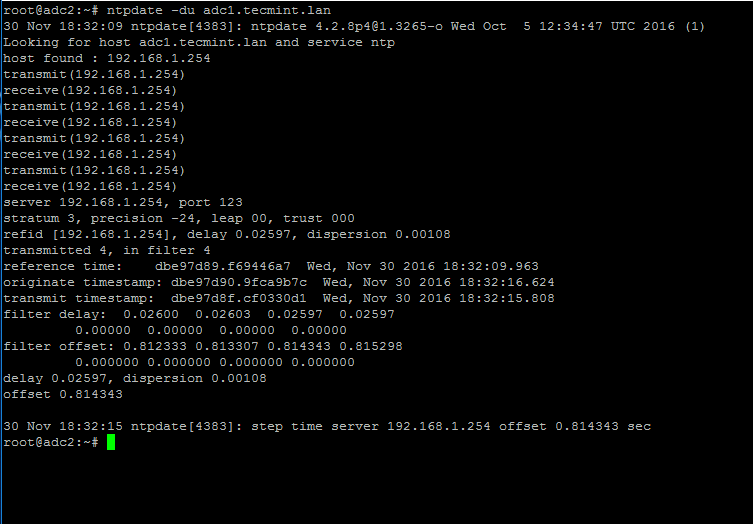
8、当时间正确同步之后,启动服务器上的 NTP 服务,并且在客户端服务器上执行如下命令来验证 NTP 时间同步服务是否可用:
|
|
|
|
|
|
|
|
|
|
|
|
```
|
|
|
|
|
|
# ntpdate -du adc1.tecmint.lan [your_adc_server]
|
|
|
|
|
|
```
|
|
|
|
|
|
[
|
|
|
|
|
|
|
|
|
|
|
|
][22]
|
|
|
|
|
|
|
2017-01-06 19:25:57 +08:00
|
|
|
|
*验证 NTP 时间同步*
|
2016-12-31 02:25:06 +08:00
|
|
|
|
|
|
|
|
|
|
至此, NTP 服务应该已经工作正常了。
|
|
|
|
|
|
|
|
|
|
|
|
### 第 3 步:把 Windows 10 系统加入域环境
|
|
|
|
|
|
|
|
|
|
|
|
9、从我们的前一篇文章可以看出,[Samba4 活动目录可以使用 samba-tool 工具在命令行下管理][23],可以直接在服务器上的 VTY 控制台或者通过 SSH 工具远程连接到服务器上进行管理。
|
|
|
|
|
|
|
|
|
|
|
|
另外,更直观更灵活的方式是使用已加入域的 Windows 电脑中的微软远程服务器管理工具(RSAT)来管理我们的 Samba4 AD 域控制器。这些工具在当前的大多数 Windows 系统中都可以使用。
|
|
|
|
|
|
|
|
|
|
|
|
把 Windows 10 或是之前版本的微软操作系统加入到 Samba4 AD DC 环境中的过程也是非常容易的。首先,确保你的 Windows 10 电脑已经设置了正确的 Samba4 DNS 服务器的 IP 地址,以查询出准确的域解析结果。
|
|
|
|
|
|
|
2017-01-06 19:25:57 +08:00
|
|
|
|
打开“控制面板 -> 网络和 Internet -> 网络和共享中心 -> 网卡设置 -> 属性 -> IPv4 -> 属性 -> 使用下面的 DNS 服务器地址”,并且手动输入 Samba4 AD 服务器的 IP 地址,如下图所示:
|
2016-12-31 02:25:06 +08:00
|
|
|
|
|
|
|
|
|
|
[
|
|
|
|
|
|

|
|
|
|
|
|
][24]
|
|
|
|
|
|
|
2017-01-06 19:25:57 +08:00
|
|
|
|
*把 Windows 10 加入到 Samba4 AD 环境*
|
2016-12-31 02:25:06 +08:00
|
|
|
|
|
|
|
|
|
|
[
|
|
|
|
|
|

|
|
|
|
|
|
][25]
|
|
|
|
|
|
|
2017-01-06 19:25:57 +08:00
|
|
|
|
*添加 DNS 和 Samba4 AD 服务器地址*
|
2016-12-31 02:25:06 +08:00
|
|
|
|
|
2017-01-06 19:25:57 +08:00
|
|
|
|
这里的 `192.168.1.254` 是 Samba4 AD 域控服务器的地址,用于域名解析。相应替换该 IP 地址。
|
2016-12-31 02:25:06 +08:00
|
|
|
|
|
|
|
|
|
|
10、下一步,点击 OK 按钮以应用网络设置,打开 CMD 命令行窗口,通过 ping 域名和 Samba4 服务器的 FQDN 地址来测试通过 DNS 解析到域是否连通。
|
|
|
|
|
|
|
|
|
|
|
|
```
|
|
|
|
|
|
ping tecmint.lan
|
|
|
|
|
|
ping adc1.tecmint.lan
|
|
|
|
|
|
```
|
|
|
|
|
|
[
|
|
|
|
|
|

|
|
|
|
|
|
][26]
|
|
|
|
|
|
|
2017-01-06 19:25:57 +08:00
|
|
|
|
*检查 Windows 和 Samb4 AD 服务器的网络连通性*
|
2016-12-31 02:25:06 +08:00
|
|
|
|
|
|
|
|
|
|
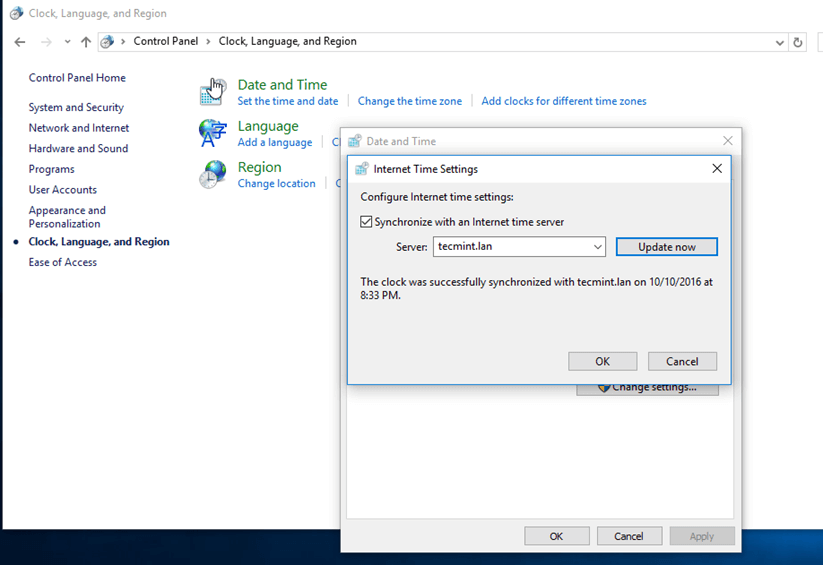
11、如果 Windows 客户端 DNS 查询的结果解析正确,那么,你还需要确认客户端时间是否已跟域环境同步。
|
|
|
|
|
|
|
2017-01-06 19:25:57 +08:00
|
|
|
|
打开“控制面板 -> 时钟、语言和区域 -> 设置时间和日期 -> Internet 时间页 -> 更改设置”,输入你同步时间的域名和 Internet 时间服务器字段。
|
2016-12-31 02:25:06 +08:00
|
|
|
|
|
|
|
|
|
|
点击立即更新按钮来强制与域同步时间,点击 OK 关闭窗口。
|
|
|
|
|
|
|
|
|
|
|
|
[
|
|
|
|
|
|
|
|
|
|
|
|
][27]
|
|
|
|
|
|
|
2017-01-06 19:25:57 +08:00
|
|
|
|
*与 Internet 服务器同步时间*
|
2016-12-31 02:25:06 +08:00
|
|
|
|
|
2017-01-06 19:25:57 +08:00
|
|
|
|
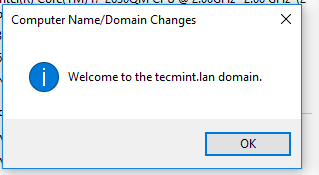
12、最后,通过打开“系统属性 -> 更改 -> 域成员 -> 输入域名”,点击 OK,输入你的域管理员账号和密码,再次点击 OK。
|
2016-12-31 02:25:06 +08:00
|
|
|
|
|
|
|
|
|
|
|
|
|
|
|
|
应该弹出一个新的窗口通知你已经是一个域成员了。点击 OK 关闭弹出窗口,并且重启机器以应用域更改。
|
|
|
|
|
|
|
|
|
|
|
|
下面的截图将说明这些操作步骤。
|
|
|
|
|
|
|
|
|
|
|
|
[
|
|
|
|
|
|

|
|
|
|
|
|
][28]
|
|
|
|
|
|
|
2017-01-06 19:25:57 +08:00
|
|
|
|
*把 Windows 域加入到 Samba4 AD 环境*
|
2016-12-31 02:25:06 +08:00
|
|
|
|
[
|
|
|
|
|
|

|
|
|
|
|
|
][29]
|
|
|
|
|
|
|
2017-01-06 19:25:57 +08:00
|
|
|
|
*输入域管理员账号登录*
|
2016-12-31 02:25:06 +08:00
|
|
|
|
|
|
|
|
|
|
[
|
|
|
|
|
|
|
|
|
|
|
|
][30]
|
|
|
|
|
|
|
2017-01-06 19:25:57 +08:00
|
|
|
|
*确认域已加入到 Samba4 AD 环境*
|
2016-12-31 02:25:06 +08:00
|
|
|
|
|
|
|
|
|
|
[
|
|
|
|
|
|

|
|
|
|
|
|
][31]
|
|
|
|
|
|
|
2017-01-06 19:25:57 +08:00
|
|
|
|
*重启 Windows 服务器以应用更改*
|
2016-12-31 02:25:06 +08:00
|
|
|
|
|
|
|
|
|
|
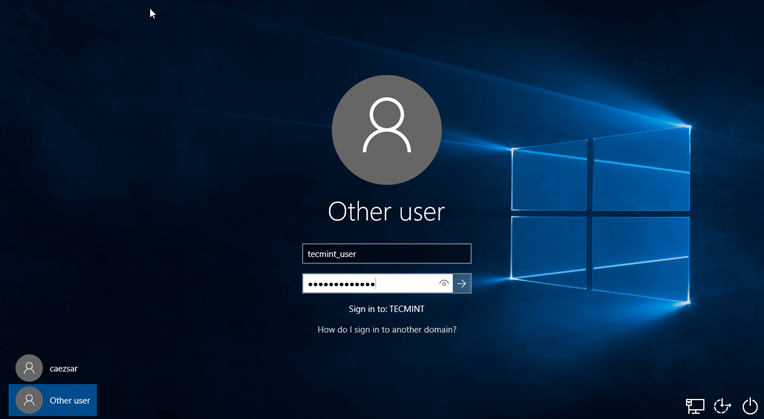
13、重启之后,单击其它用户并且使用具有管理员权限的 Samba4 域账号登录到 Windows 系统,你已经准备好进入到后边几个步骤了。
|
|
|
|
|
|
|
|
|
|
|
|
[
|
|
|
|
|
|
|
|
|
|
|
|
][32]
|
|
|
|
|
|
|
2017-01-06 19:25:57 +08:00
|
|
|
|
*使用 Samba4 AD 账号登录到 Windows*
|
2016-12-31 02:25:06 +08:00
|
|
|
|
|
|
|
|
|
|
#### 第 4 步:使用 RSAT 工具来管理 Samba4 AD DC
|
|
|
|
|
|
|
|
|
|
|
|
14、微软远程服务器管理工具(RSAT)被广泛地用来管理 Samba4 活动目录,你可以根据你的 Windows 系统版本从下面的地址来下载该工具:
|
|
|
|
|
|
|
|
|
|
|
|
1. Windows 10: [https://www.microsoft.com/en-us/download/details.aspx?id=45520][4]
|
|
|
|
|
|
2. Windows 8.1: [http://www.microsoft.com/en-us/download/details.aspx?id=39296][5]
|
|
|
|
|
|
3. Windows 8: [http://www.microsoft.com/en-us/download/details.aspx?id=28972][6]
|
|
|
|
|
|
4. Windows 7: [http://www.microsoft.com/en-us/download/details.aspx?id=7887][7]
|
|
|
|
|
|
|
|
|
|
|
|
一旦 Windows 10 独立安装包下载完成,运行安装包,等待安装完成并重启机器以应用所有更新。
|
|
|
|
|
|
|
2017-01-06 19:25:57 +08:00
|
|
|
|
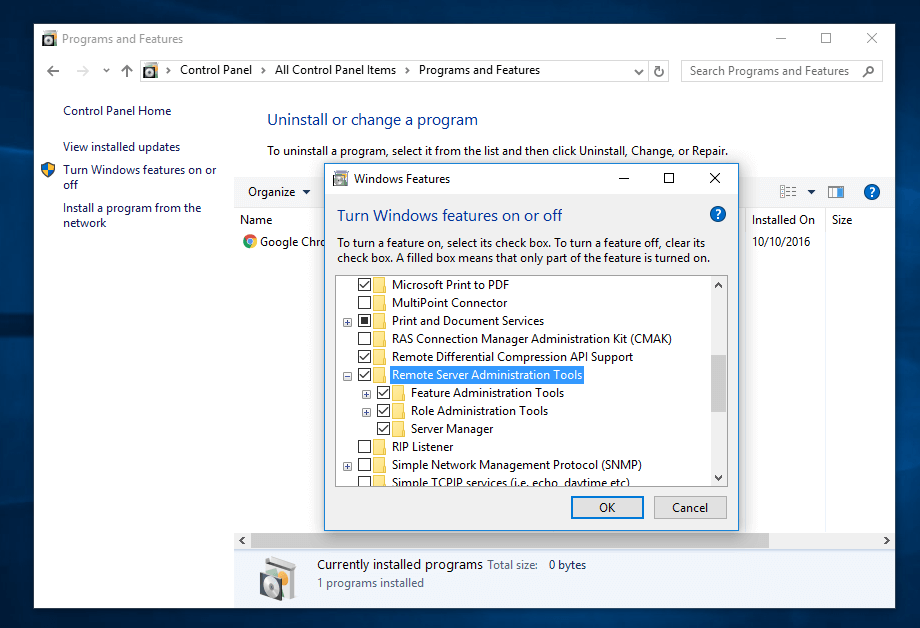
重启之后,打开“控制面板 -> 程序(卸载程序) -> 启用或关闭 Windows 功能”,勾选所有的远程服务器管理工具。
|
2016-12-31 02:25:06 +08:00
|
|
|
|
|
|
|
|
|
|
点击 OK 开始安装,安装完成之后重启系统。
|
|
|
|
|
|
[
|
|
|
|
|
|
|
|
|
|
|
|
][33]
|
|
|
|
|
|
|
2017-01-06 19:25:57 +08:00
|
|
|
|
*从 Windows 系统下管理 Samba4 AD*
|
2016-12-31 02:25:06 +08:00
|
|
|
|
|
2017-01-06 19:25:57 +08:00
|
|
|
|
15、要进入 RSAT 工具集,打开“控制面板 -> 系统和安全 -> 管理工具”。
|
2016-12-31 02:25:06 +08:00
|
|
|
|
|
2017-01-06 19:25:57 +08:00
|
|
|
|
这些工具也可以在开始工菜单的管理工具菜单中找到。另外,你也可以打开 Windows MMC 工具和管理单元,从“文件 -> 添加/删除管理单元”菜单中访问它们。
|
2016-12-31 02:25:06 +08:00
|
|
|
|
|
|
|
|
|
|
[
|
|
|
|
|
|

|
|
|
|
|
|
][34]
|
|
|
|
|
|
|
2017-01-06 19:25:57 +08:00
|
|
|
|
*访问远程服务器管理工具集*
|
2016-12-31 02:25:06 +08:00
|
|
|
|
|
|
|
|
|
|
最常用的工具,比如 AD UC ,DNS 和组策略管理工具可以通过从右键菜单发送到功能来新建快捷方式到桌面直接运行。
|
|
|
|
|
|
|
|
|
|
|
|
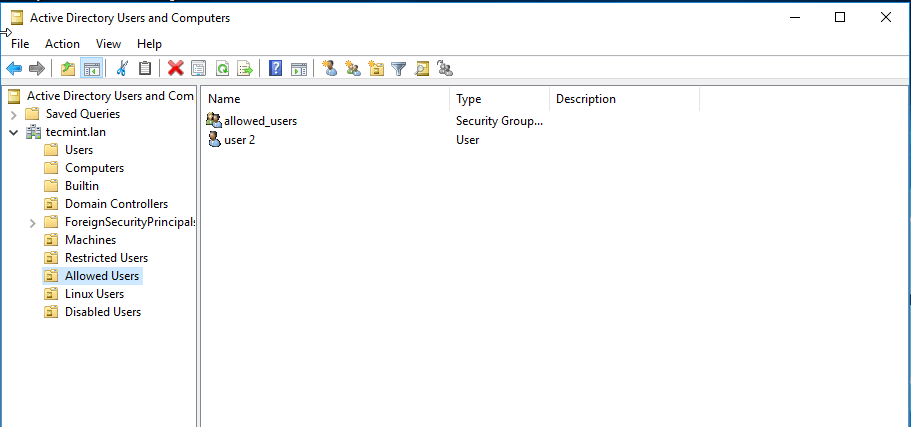
16、你可以通过 AD UC 和列出域里的电脑(新加入的 Windows 机器应该出现在列表中)来验证 RSAT 功能,创建一个组织单元或组。
|
|
|
|
|
|
|
2017-01-06 19:25:57 +08:00
|
|
|
|
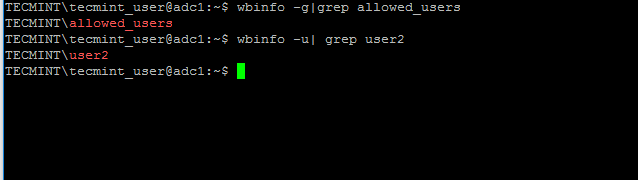
在 Samba4 服务器上使用 `wbinf` 命令来检查用户和组是否已经创建成功。
|
|
|
|
|
|
|
2016-12-31 02:25:06 +08:00
|
|
|
|
[
|
|
|
|
|
|

|
|
|
|
|
|
][35]
|
|
|
|
|
|
|
2017-01-06 19:25:57 +08:00
|
|
|
|
*活动目录用户和计算机*
|
2016-12-31 02:25:06 +08:00
|
|
|
|
|
|
|
|
|
|
[
|
|
|
|
|
|
|
|
|
|
|
|
][36]
|
|
|
|
|
|
|
2017-01-06 19:25:57 +08:00
|
|
|
|
*创建组织单元和新用户*
|
|
|
|
|
|
|
2016-12-31 02:25:06 +08:00
|
|
|
|
[
|
|
|
|
|
|
|
|
|
|
|
|
][37]
|
|
|
|
|
|
|
2017-01-06 19:25:57 +08:00
|
|
|
|
*确认 Samba4 AD 用户*
|
2016-12-31 02:25:06 +08:00
|
|
|
|
|
|
|
|
|
|
就这些吧!该主题的下一篇文章将包含其它 Samba4 活动目录的重要内容,包括通过 RSAT 工具来管理 Samba4 活动目录,比如,如何管理 DNS 服务器,添加 DNS 记录和创建 DNS 解析查询区,如何管理及应用域策略以及域用户如何创建交互式登录提示信息。
|
|
|
|
|
|
|
|
|
|
|
|
------
|
|
|
|
|
|
作者简介:我是一个电脑迷,开源软件及 Linux 系统爱好者,有近4年的 Linux 桌面和服务器系统及 bash 编程经验。
|
|
|
|
|
|
|
|
|
|
|
|
--------------------------------------------------------------------------------
|
|
|
|
|
|
|
|
|
|
|
|
via: http://www.tecmint.com/manage-samba4-ad-from-windows-via-rsat/
|
|
|
|
|
|
|
2017-01-06 19:25:57 +08:00
|
|
|
|
作者:[Matei Cezar][a]
|
2016-12-31 02:25:06 +08:00
|
|
|
|
译者:[rusking](https://github.com/rusking)
|
2017-01-06 19:25:57 +08:00
|
|
|
|
校对:[wxy](https://github.com/wxy)
|
2016-12-31 02:25:06 +08:00
|
|
|
|
|
|
|
|
|
|
本文由 [LCTT](https://github.com/LCTT/TranslateProject) 原创编译,[Linux中国](https://linux.cn/) 荣誉推出
|
|
|
|
|
|
|
|
|
|
|
|
[a]:http://www.tecmint.com/author/cezarmatei/
|
2017-01-06 19:25:57 +08:00
|
|
|
|
[1]:https://linux.cn/article-8065-1.html
|
|
|
|
|
|
[2]:https://linux.cn/article-8070-1.html
|
2016-12-31 02:25:06 +08:00
|
|
|
|
[3]:http://www.tecmint.com/manage-samba4-dns-group-policy-from-windows/
|
|
|
|
|
|
[4]:https://www.microsoft.com/en-us/download/details.aspx?id=45520
|
|
|
|
|
|
[5]:http://www.microsoft.com/en-us/download/details.aspx?id=39296
|
|
|
|
|
|
[6]:http://www.microsoft.com/en-us/download/details.aspx?id=28972
|
|
|
|
|
|
[7]:http://www.microsoft.com/en-us/download/details.aspx?id=7887
|
|
|
|
|
|
[8]:http://www.tecmint.com/category/samba4-active-directory/
|
|
|
|
|
|
[9]:http://www.tecmint.com/how-to-synchronize-time-with-ntp-server-in-ubuntu-linux-mint-xubuntu-debian/
|
|
|
|
|
|
[10]:http://www.tecmint.com/wp-content/uploads/2016/12/Install-NTP-on-Ubuntu.png
|
|
|
|
|
|
[11]:http://www.pool.ntp.org/en/
|
|
|
|
|
|
[12]:http://www.tecmint.com/wp-content/uploads/2016/12/Configure-NTP-Server-in-Ubuntu.png
|
|
|
|
|
|
[13]:http://www.tecmint.com/wp-content/uploads/2016/12/Sync-AD-with-NTP.png
|
|
|
|
|
|
[14]:http://www.tecmint.com/wp-content/uploads/2016/12/Query-Client-to-NTP-Server.png
|
|
|
|
|
|
[15]:http://www.tecmint.com/20-netstat-commands-for-linux-network-management/
|
|
|
|
|
|
[16]:http://www.tecmint.com/12-practical-examples-of-linux-grep-command/
|
|
|
|
|
|
[17]:http://www.tecmint.com/wp-content/uploads/2016/12/Grant-Permission-to-NTP.png
|
|
|
|
|
|
[18]:http://www.tecmint.com/wp-content/uploads/2016/12/Monitor-NTP-Server-Pool.png
|
|
|
|
|
|
[19]:http://www.tecmint.com/wp-content/uploads/2016/12/NTP-Time-Synchronization-Error.png
|
|
|
|
|
|
[20]:http://www.tecmint.com/wp-content/uploads/2016/12/NTP-Server-Dropped-Leap-Not-Sync.png
|
|
|
|
|
|
[21]:http://www.tecmint.com/wp-content/uploads/2016/12/Force-NTP-Time-Synchronization.png
|
|
|
|
|
|
[22]:http://www.tecmint.com/wp-content/uploads/2016/12/Verify-NTP-Time-Synchronization.png
|
2017-01-06 19:25:57 +08:00
|
|
|
|
[23]:https://linux.cn/article-8070-1.html
|
2016-12-31 02:25:06 +08:00
|
|
|
|
[24]:http://www.tecmint.com/wp-content/uploads/2016/12/Join-Windows-to-Samba4-AD.png
|
|
|
|
|
|
[25]:http://www.tecmint.com/wp-content/uploads/2016/12/Add-DNS-and-Samba4-AD-IP-Address.png
|
|
|
|
|
|
[26]:http://www.tecmint.com/wp-content/uploads/2016/12/Check-Samba4-AD-from-Windows.png
|
|
|
|
|
|
[27]:http://www.tecmint.com/wp-content/uploads/2016/12/Synchronize-Time-with-Internet-Server.png
|
|
|
|
|
|
[28]:http://www.tecmint.com/wp-content/uploads/2016/12/Join-Windows-Domain-to-Samba4-AD.png
|
|
|
|
|
|
[29]:http://www.tecmint.com/wp-content/uploads/2016/12/Enter-Domain-Administration-Login.png
|
|
|
|
|
|
[30]:http://www.tecmint.com/wp-content/uploads/2016/12/Domain-Joined-to-Samba4-AD.png
|
|
|
|
|
|
[31]:http://www.tecmint.com/wp-content/uploads/2016/12/Restart-Windows-Server-for-Changes.png
|
|
|
|
|
|
[32]:http://www.tecmint.com/wp-content/uploads/2016/12/Login-to-Windows-Using-Samba4-AD-Account.png
|
|
|
|
|
|
[33]:http://www.tecmint.com/wp-content/uploads/2016/12/Administer-Samba4-AD-from-Windows.png
|
|
|
|
|
|
[34]:http://www.tecmint.com/wp-content/uploads/2016/12/Access-Remote-Server-Administration-Tools.png
|
|
|
|
|
|
[35]:http://www.tecmint.com/wp-content/uploads/2016/12/Active-Directory-Users-and-Computers.png
|
|
|
|
|
|
[36]:http://www.tecmint.com/wp-content/uploads/2016/12/Create-Organizational-Unit-and-Users.png
|
|
|
|
|
|
[37]:http://www.tecmint.com/wp-content/uploads/2016/12/Confirm-Samba4-AD-Users.png
|
|
|
|
|
|
[38]:http://www.tecmint.com/manage-samba4-ad-from-windows-via-rsat/#
|
|
|
|
|
|
[39]:http://www.tecmint.com/manage-samba4-ad-from-windows-via-rsat/#
|
|
|
|
|
|
[40]:http://www.tecmint.com/manage-samba4-ad-from-windows-via-rsat/#
|
|
|
|
|
|
[41]:http://www.tecmint.com/manage-samba4-ad-from-windows-via-rsat/#
|
|
|
|
|
|
[42]:http://www.tecmint.com/manage-samba4-ad-from-windows-via-rsat/#comments
|