2014-10-08 21:47:02 +08:00
|
|
|
|
在Linux中扩展/缩减LVM(第二部分)
|
2014-08-22 09:11:18 +08:00
|
|
|
|
================================================================================
|
|
|
|
|
|
|
|
|
|
|
|
前面我们已经了解了怎样使用LVM创建弹性的磁盘存储。这里,我们将了解怎样来扩展卷组,扩展和缩减逻辑卷。在这里,我们可以缩减或者扩展逻辑卷管理(LVM)中的分区,LVM也可称之为弹性卷文件系统。
|
|
|
|
|
|
|
|
|
|
|
|

|
|
|
|
|
|
|
2014-10-08 21:47:02 +08:00
|
|
|
|
### 前置需求 ###
|
2014-08-22 09:11:18 +08:00
|
|
|
|
|
|
|
|
|
|
- [使用LVM创建弹性磁盘存储——第一部分][1]
|
|
|
|
|
|
|
|
|
|
|
|
#### 什么时候我们需要缩减卷? ####
|
|
|
|
|
|
|
2014-10-08 21:47:02 +08:00
|
|
|
|
或许我们需要创建一个独立的分区用于其它用途,或者我们需要扩展任何空间低的分区。遇到这种情况时,使用 LVM我们可以很容易地缩减大尺寸的分区,以及扩展空间低的分区,只要按下面几个简易的步骤来即可。
|
2014-08-22 09:11:18 +08:00
|
|
|
|
|
|
|
|
|
|
#### 我的服务器设置 —— 需求 ####
|
|
|
|
|
|
|
|
|
|
|
|
- 操作系统 – 安装有LVM的CentOS 6.5
|
|
|
|
|
|
- 服务器IP – 192.168.0.200
|
|
|
|
|
|
|
|
|
|
|
|
### 如何扩展卷组以及缩减逻辑卷 ###
|
|
|
|
|
|
|
|
|
|
|
|
#### 逻辑卷扩展 ####
|
|
|
|
|
|
|
|
|
|
|
|
目前,我们已经有一个PV,VG和2个LV。让我们用下面的命令来列出它们。
|
|
|
|
|
|
|
|
|
|
|
|
# pvs
|
|
|
|
|
|
# vgs
|
|
|
|
|
|
# lvs
|
|
|
|
|
|
|
|
|
|
|
|

|
|
|
|
|
|
|
|
|
|
|
|
逻辑卷扩展
|
|
|
|
|
|
|
|
|
|
|
|
在物理卷和卷组中没有空闲空间可用了,所以,现在我们不能扩展逻辑卷的大小。要扩展,我们需要添加一个物理卷(**PV**),然后通过扩展**vg**来扩展卷组,这样我们就会得到足够大的空间来扩展逻辑卷大小了。所以,首先我们应该去添加一个物理卷。
|
|
|
|
|
|
|
|
|
|
|
|
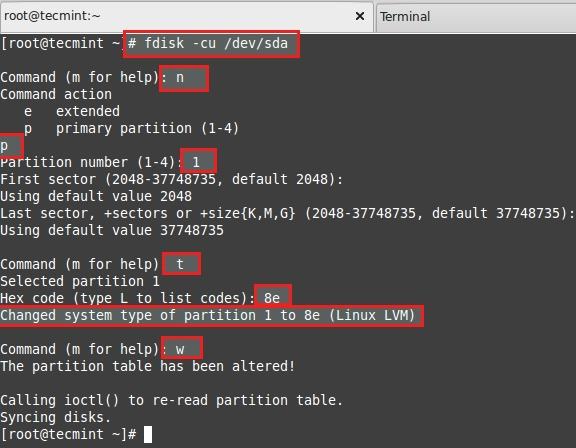
要添加一个新**PV**,我们必须使用fdisk来创建一个LVM分区。
|
|
|
|
|
|
|
|
|
|
|
|
# fdisk -cu /dev/sda
|
|
|
|
|
|
|
|
|
|
|
|
- 选择**n**来创建新分区。
|
|
|
|
|
|
- 选择**p**来创建主分区。
|
|
|
|
|
|
- 选择我们需要创建的分区号。
|
|
|
|
|
|
- 如果有其它可用磁盘,请按**1**。
|
|
|
|
|
|
- 使用**t**来修改分区类型。
|
|
|
|
|
|
- 输入**8e**来将分区类型修改为Linux LVM。
|
|
|
|
|
|
- 使用**p**来打印创建的分区(这里我们没有使用该选项)。
|
|
|
|
|
|
- 按**w**写入修改。
|
|
|
|
|
|
|
|
|
|
|
|
完成后重启系统。
|
|
|
|
|
|
|
|
|
|
|
|
|
|
|
|
|
|
创建LVM分区
|
|
|
|
|
|
|
|
|
|
|
|
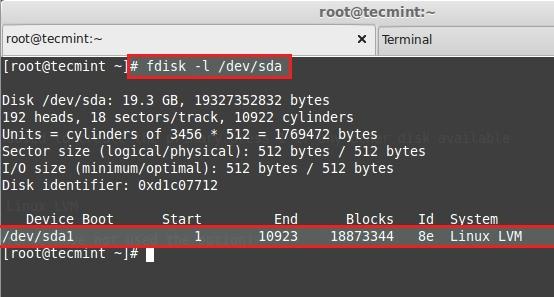
使用fdisk列出并检查我们创建的分区。
|
|
|
|
|
|
|
|
|
|
|
|
# fdisk -l /dev/sda
|
|
|
|
|
|
|
|
|
|
|
|
|
|
|
|
|
|
验证LVM分区
|
|
|
|
|
|
|
|
|
|
|
|
接下来,使用下列命令来创建新**PV**(物理卷)。
|
|
|
|
|
|
|
|
|
|
|
|
# pvcreate /dev/sda1
|
|
|
|
|
|
|
|
|
|
|
|
使用下面的命令来验证pv。
|
|
|
|
|
|
|
|
|
|
|
|
# pvs
|
|
|
|
|
|
|
|
|
|
|
|

|
|
|
|
|
|
|
|
|
|
|
|
创建物理卷
|
|
|
|
|
|
|
|
|
|
|
|
#### 扩展卷组 ####
|
|
|
|
|
|
|
|
|
|
|
|
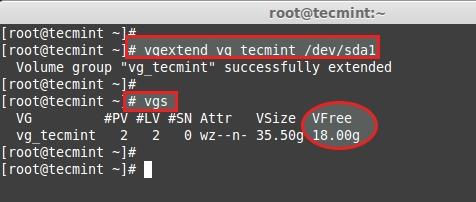
添加该pv到**vg_tecmint**卷组来扩展卷组的大小,以获取更多空间来扩展**lv**。
|
|
|
|
|
|
|
|
|
|
|
|
# vgextend vg_tecmint /dev/sda1
|
|
|
|
|
|
|
|
|
|
|
|
让我们检查现在正在使用的卷组的大小。
|
|
|
|
|
|
|
|
|
|
|
|
# vgs
|
|
|
|
|
|
|
|
|
|
|
|
|
|
|
|
|
|
|
|
|
|
|
|
扩展卷组
|
|
|
|
|
|
|
|
|
|
|
|
我们甚至可以看到哪个**PV**用于创建使用中的特定卷组。
|
|
|
|
|
|
|
|
|
|
|
|
# pvscan
|
|
|
|
|
|
|
|
|
|
|
|

|
|
|
|
|
|
检查卷组
|
|
|
|
|
|
|
|
|
|
|
|
这里,我们可以看到卷组所处的物理卷。我们已经添加了一个pv,而且它完全空着。在扩展逻辑卷之前,让我们先看看我们所拥有的各个卷组的大小。
|
|
|
|
|
|
|
|
|
|
|
|

|
|
|
|
|
|
|
|
|
|
|
|
检查所有逻辑卷
|
|
|
|
|
|
|
|
|
|
|
|
- LogVol00用于Swap。
|
|
|
|
|
|
- LogVol01用于/。
|
|
|
|
|
|
- 现在我们有16.50GB大小的空间用于/(root)。
|
|
|
|
|
|
- 当前有4226物理扩展(PE)可用。
|
|
|
|
|
|
|
|
|
|
|
|
现在,我们打算去扩展/分区**LogVol01**。在扩展后,我们可以像上面那样列出它的大小以确认。我们能可以使用GB或PE来扩展,这一点我已经在LVM第一部分解释过了,这里我使用PE来扩展。
|
|
|
|
|
|
|
|
|
|
|
|
要获取可用的物理扩展大小,运行以下命令。
|
|
|
|
|
|
|
|
|
|
|
|
# vgdisplay
|
|
|
|
|
|
|
|
|
|
|
|

|
|
|
|
|
|
|
|
|
|
|
|
检查可用的物理扩展
|
|
|
|
|
|
|
|
|
|
|
|
总共有**4607**空闲PE可用,亦即有**18GB**空间空间可用。因此,我们可以将我们的逻辑卷扩展到**18GB**这么大。让我们使用PE大小来扩展。
|
|
|
|
|
|
|
|
|
|
|
|
# lvextend -l +4607 /dev/vg_tecmint/LogVol01
|
|
|
|
|
|
|
|
|
|
|
|
使用**+**来添加更多空间。在扩展后,我们需要改变文件系统大小,使用以下命令。
|
|
|
|
|
|
|
|
|
|
|
|
# resize2fs /dev/vg_tecmint/LogVol01
|
|
|
|
|
|
|
|
|
|
|
|

|
|
|
|
|
|
扩展逻辑卷
|
|
|
|
|
|
|
|
|
|
|
|
- 用来使用物理扩展扩展逻辑卷的命令。
|
|
|
|
|
|
- 这里我们可以看到它从16.51GB扩展到了34GB。
|
|
|
|
|
|
- 如果文件系统已被挂载并处于使用中,改变文件系统大小。
|
|
|
|
|
|
- 要扩展逻辑卷,我们不需要卸载文件系统
|
|
|
|
|
|
|
|
|
|
|
|
现在,让我们看看当前使用的改变大小后的逻辑卷。
|
|
|
|
|
|
|
|
|
|
|
|
# lvdisplay
|
|
|
|
|
|
|
|
|
|
|
|

|
|
|
|
|
|
|
|
|
|
|
|
改变逻辑卷大小
|
|
|
|
|
|
|
|
|
|
|
|
- LogVol01用于扩展的卷 /。
|
|
|
|
|
|
- 扩展后,从16.50GB上升到了34.50GB。
|
|
|
|
|
|
- C当前扩展,在扩展前有4226,我们已经添加了4607个扩展,因此现在有8833。
|
|
|
|
|
|
|
|
|
|
|
|
现在,如果我们检查可用的vg的话,空闲PE将会是0。
|
|
|
|
|
|
|
|
|
|
|
|
# vgdisplay
|
|
|
|
|
|
|
|
|
|
|
|
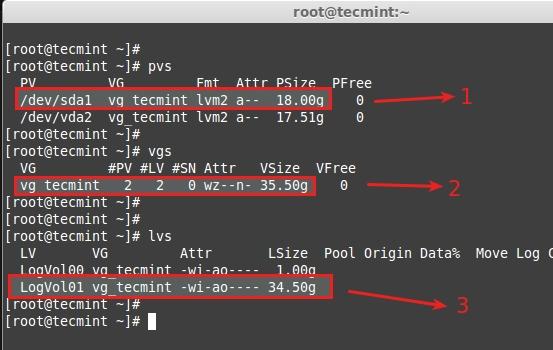
查看扩展的结果。
|
|
|
|
|
|
|
|
|
|
|
|
# pvs
|
|
|
|
|
|
# vgs
|
|
|
|
|
|
# lvs
|
|
|
|
|
|
|
|
|
|
|
|
|
|
|
|
|
|
|
|
|
|
|
|
验证分区大小改变
|
|
|
|
|
|
|
|
|
|
|
|
- 添加的新物理卷。
|
|
|
|
|
|
- 卷组vg_tecmint从17.51GB扩展到了35.50GB。
|
|
|
|
|
|
- 逻辑卷LogVol01从16.51GB扩展到了34.50GB。
|
|
|
|
|
|
|
|
|
|
|
|
这里,我们已经完成扩展卷组和逻辑卷的过程。让我们一起迈向逻辑卷管理中一些有趣的部分。
|
|
|
|
|
|
|
|
|
|
|
|
#### 缩减逻辑卷(LVM) ####
|
|
|
|
|
|
|
|
|
|
|
|
这里,我们将了解如何缩减逻辑卷。人人都说它很危险,在缩减lvm的时候可能会导致灾难。缩减lvm在逻辑卷管理中比其它部分要来得确实有趣得多。
|
|
|
|
|
|
|
|
|
|
|
|
- 在开始之前,备份好数据总是对的,这样如果出错,就不会头痛了。
|
|
|
|
|
|
- 要缩减逻辑卷,需要小心翼翼地完成5个步骤。
|
|
|
|
|
|
- 在扩展一个卷的时候,我们可以在该卷挂载时扩展它(在线),但对于缩减,我们必须在缩减前卸载文件系统。
|
|
|
|
|
|
|
|
|
|
|
|
让我们来了解一下下面这5个步骤。
|
|
|
|
|
|
|
|
|
|
|
|
- 卸载文件系统以便缩减。
|
|
|
|
|
|
- 在卸载后检查文件系统。
|
|
|
|
|
|
- 缩减文件系统。
|
|
|
|
|
|
- 5减少当前逻辑卷大小。
|
|
|
|
|
|
- 再检查文件系统以防出错。
|
|
|
|
|
|
- 将文件系统再次挂载回去。
|
|
|
|
|
|
|
|
|
|
|
|
为了演示,我已经创建了独立的卷组和逻辑卷。这里,我将缩减逻辑卷**tecmint_reduce_test**。现在它有18GB大小,我们需要将它缩减到**10GB**而不丢失数据。也就是说,我们需要从**18GB**中减少**8GB**。卷中已经有**4GB**被使用。
|
|
|
|
|
|
|
|
|
|
|
|
18GB ---> 10GB
|
|
|
|
|
|
|
|
|
|
|
|
在缩减大小的时候,我们只需要缩减8GB,所以在缩减后它总计会有10GB。
|
|
|
|
|
|
|
|
|
|
|
|
# lvs
|
|
|
|
|
|
|
|
|
|
|
|

|
|
|
|
|
|
缩减逻辑卷
|
|
|
|
|
|
|
|
|
|
|
|
这里,我们可以看到文件系统信息。
|
|
|
|
|
|
|
|
|
|
|
|
# df -h
|
|
|
|
|
|
|
|
|
|
|
|

|
|
|
|
|
|
检查文件系统大小
|
|
|
|
|
|
|
|
|
|
|
|
- 卷大小是18GB。
|
|
|
|
|
|
- 它已经使用了3.9GB。
|
|
|
|
|
|
- 可用空间是13GB。
|
|
|
|
|
|
|
|
|
|
|
|
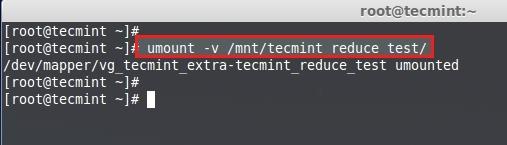
首先,卸载挂载点。
|
|
|
|
|
|
|
|
|
|
|
|
# umount -v /mnt/tecmint_reduce_test/
|
|
|
|
|
|
|
|
|
|
|
|
|
|
|
|
|
|
|
|
|
|
|
|
卸载分区
|
|
|
|
|
|
|
|
|
|
|
|
然后,使用以下命令来检查文件系统错误。
|
|
|
|
|
|
|
|
|
|
|
|
# e2fsck -ff /dev/vg_tecmint_extra/tecmint_reduce_test
|
|
|
|
|
|
|
|
|
|
|
|

|
|
|
|
|
|
扫描分区错误
|
|
|
|
|
|
|
|
|
|
|
|
**注意**:必须通过所有文件系统检查的5个步骤,若未完全通过,则你的文件系统可能存在问题。
|
|
|
|
|
|
|
|
|
|
|
|
接下来,缩减文件系统。
|
|
|
|
|
|
|
|
|
|
|
|
# resize2fs /dev/vg_tecmint_extra/tecmint_reduce_test 8GB
|
|
|
|
|
|
|
|
|
|
|
|

|
|
|
|
|
|
缩减文件系统
|
|
|
|
|
|
|
|
|
|
|
|
使用GB来缩减逻辑卷。
|
|
|
|
|
|
|
|
|
|
|
|
# lvreduce -L -8G /dev/vg_tecmint_extra/tecmint_reduce_test
|
|
|
|
|
|
|
|
|
|
|
|

|
|
|
|
|
|
缩减逻辑分区
|
|
|
|
|
|
|
|
|
|
|
|
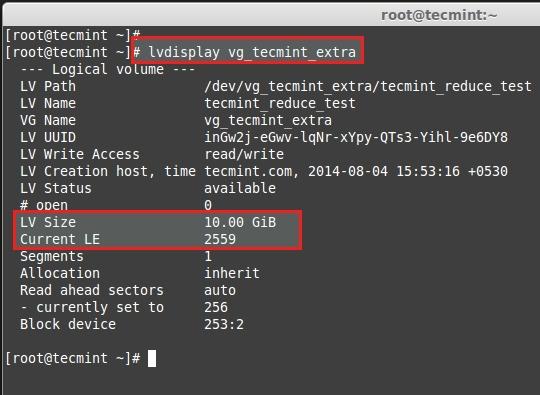
要使用PE来缩减逻辑卷,我们需要知道默认PE大小和卷组的总PE大小,以进行一次小小的计算来得出准确的缩减大小。
|
|
|
|
|
|
|
|
|
|
|
|
# lvdisplay vg_tecmint_extra
|
|
|
|
|
|
|
|
|
|
|
|
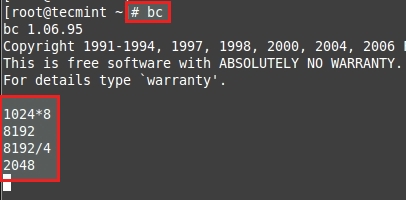
这里,我们需要使用bc命令来做一些小计算来获得10GB的PE大小。
|
|
|
|
|
|
|
|
|
|
|
|
1024MB x 10GB = 10240MB or 10GB
|
|
|
|
|
|
|
|
|
|
|
|
10240MB / 4PE = 2048PE
|
|
|
|
|
|
|
|
|
|
|
|
按**CTRL+D**来退出BC。
|
|
|
|
|
|
|
|
|
|
|
|
|
|
|
|
|
|
|
|
|
|
|
|
计算PE大小
|
|
|
|
|
|
|
|
|
|
|
|
使用PE来缩减大小。
|
|
|
|
|
|
|
|
|
|
|
|
# lvreduce -l -2048 /dev/vg_tecmint_extra/tecmint_reduce_test
|
|
|
|
|
|
|
|
|
|
|
|

|
|
|
|
|
|
使用PE来缩减大小
|
|
|
|
|
|
|
|
|
|
|
|
将文件系统大小调整回去。在这一步中,如果发生任何错误,这就意味着我们已经将文件系统搞乱了。
|
|
|
|
|
|
|
|
|
|
|
|
# resize2fs /dev/vg_tecmint_extra/tecmint_reduce_test
|
|
|
|
|
|
|
|
|
|
|
|

|
|
|
|
|
|
|
|
|
|
|
|
将文件系统挂载回同样的挂载点。
|
|
|
|
|
|
|
|
|
|
|
|
# mount /dev/vg_tecmint_extra/tecmint_reduce_test /mnt/tecmint_reduce_test/
|
|
|
|
|
|
|
|
|
|
|
|

|
|
|
|
|
|
挂载文件系统
|
|
|
|
|
|
|
|
|
|
|
|
检查分区和文件的大小。
|
|
|
|
|
|
|
|
|
|
|
|
# lvdisplay vg_tecmint_extra
|
|
|
|
|
|
|
|
|
|
|
|
这里,我们可以看到最后的结果,逻辑已经被缩减到10GB。
|
|
|
|
|
|
|
|
|
|
|
|
|
|
|
|
|
|
|
|
|
|
|
|
在本文中,我们已经了解了如何来扩增卷组、逻辑卷以及缩减逻辑卷。在下一部分(第三部分)中,我们将了解如何为逻辑卷做快照并将它恢复到更早的状态。
|
|
|
|
|
|
|
|
|
|
|
|
--------------------------------------------------------------------------------
|
|
|
|
|
|
|
|
|
|
|
|
via: http://www.tecmint.com/extend-and-reduce-lvms-in-linux/
|
|
|
|
|
|
|
|
|
|
|
|
作者:[Babin Lonston][a]
|
|
|
|
|
|
译者:[GOLinux](https://github.com/GOLinux)
|
2014-10-08 21:47:02 +08:00
|
|
|
|
校对:[wxy](https://github.com/wxy)
|
2014-08-22 09:11:18 +08:00
|
|
|
|
|
|
|
|
|
|
本文由 [LCTT](https://github.com/LCTT/TranslateProject) 原创翻译,[Linux中国](http://linux.cn/) 荣誉推出
|
|
|
|
|
|
|
|
|
|
|
|
[a]:http://www.tecmint.com/author/babinlonston/
|
2014-10-08 21:47:02 +08:00
|
|
|
|
[1]:http://linux.cn/article-3965-1.html
|