mirror of
https://github.com/LCTT/TranslateProject.git
synced 2025-01-10 22:21:11 +08:00
180 lines
8.3 KiB
Markdown
180 lines
8.3 KiB
Markdown
|
|
在Linux上配置基于web的轻量级系统监控
|
|||
|
|
================================================================================
|
|||
|
|
有时候,我们作为普通用户或者系统管理员,需要知道系统运行是否良好。与系统状态相关的许多问题,都可以通过检查活动服务生成的日志文件来获得答案。然而,即便对于历经数个春秋的系统管理员而言,要检查日志文件的每个细节都不是件容易的事。这也是为什么他们依赖于监控软件的原因,监控软件能够从不同的源收集信息,并以易于理解的格式给出分析报告,如图表、可视化图像、统计数据等。
|
|||
|
|
|
|||
|
|
市面上流传着许多复杂的系统监控软件,诸如[Cacti][1], [Nagios][2], Zabbix, Munin此类。在本文中,我们选取了一个轻量级的监控工具——Monitorix,该工具设计用于在Linux/BSD上监控系统资源和许多熟知的第三方应用程序。由于专为资源有限的嵌入式系统而优化,Monitorix以使用简单,消耗内存资源少而著称。它内建了一个HTTP服务器用于提供web界面,并使用PRDtool来存储时间序列统计数据,该PRDtoo可以很容易地和任何脚本语言整合,如Perl,Python,shell脚本,Ruby等。
|
|||
|
|
### 主要特性 ###
|
|||
|
|
这里列出了Monitorix的主要特性。要查看完整列表,请参阅[官方网站][3]
|
|||
|
|
|
|||
|
|
- 系统负载和系统服务需求
|
|||
|
|
- CPU/GPU温度传感器
|
|||
|
|
- 磁盘温度和健康
|
|||
|
|
- 网络/端口流量和网络状况统计
|
|||
|
|
- 邮件统计
|
|||
|
|
- Web服务器统计(Apache,Nginx,Light图片的)
|
|||
|
|
- MySQL负载和统计
|
|||
|
|
- Squid代理统计
|
|||
|
|
- NFS服务器/客户端统计
|
|||
|
|
- Raspberry Pi传感器统计
|
|||
|
|
- Memcached统计
|
|||
|
|
|
|||
|
|
### 在Fedora, CentOS或者RHEL上安装并配置Monitorix ###
|
|||
|
|
|
|||
|
|
首先,安装需要的软件包。注意,在CentOS上,你需要先设置 [EPEL][4]和[Repoforge][5]仓库。
|
|||
|
|
|
|||
|
|
$ sudo yum install rrdtool rrdtool-perl perl-libwww-perl perl-MailTools perl-MIME-Lite perl-CGI perl-DBI perl-XML-Simple perl-Config-General perl-HTTP-Server-Simple perl-IO-Socket-SSL
|
|||
|
|
|
|||
|
|
完成上一步后,可以通过以下命令来安装Monitorix:
|
|||
|
|
|
|||
|
|
$ sudo yum install monitorix
|
|||
|
|
|
|||
|
|
|
|||
|
|
要配置Monitorix,打开/etc/monitorix/monitorix.conf配置文件,并修改选项。关于Monitorix的配置文件细节,可以查阅[http://www.monitorix.org/documentation.html][6]。
|
|||
|
|
|
|||
|
|
默认情况下,内建的HTTP服务器监听8080端口。因此,确保你的防火墙没有阻止TCP 8080端口。
|
|||
|
|
|
|||
|
|
要启动Monitorix,只需输入以下命令:
|
|||
|
|
|
|||
|
|
$ sudo service monitorix start
|
|||
|
|
|
|||
|
|
启动你喜爱的Web浏览器,然后通过http://<host-ip-address>:8080/monitorix来访问Monitorix的Web界面。
|
|||
|
|
|
|||
|
|
### 在Archlinux上安装并配置Monitorix ###
|
|||
|
|
在Archlinux上,可以从[AUR][7]上下载Monitorix包。
|
|||
|
|
|
|||
|
|
默认情况下,Archlinux上是禁用内建HTTP服务器的。要启用内建的HTTP服务器,请编辑/etc/monitorix.conf文件的如下区块。
|
|||
|
|
|
|||
|
|
<httpd_builtin>
|
|||
|
|
enabled = y
|
|||
|
|
host =
|
|||
|
|
port = 8080
|
|||
|
|
user = nobody
|
|||
|
|
group = nobody
|
|||
|
|
log_file = /var/log/monitorix-httpd
|
|||
|
|
hosts_deny =
|
|||
|
|
hosts_allow =
|
|||
|
|
<auth>
|
|||
|
|
enabled = n
|
|||
|
|
msg = Monitorix: Restricted access
|
|||
|
|
htpasswd = /var/lib/monitorix/htpasswd
|
|||
|
|
</auth>
|
|||
|
|
</httpd_builtin>
|
|||
|
|
|
|||
|
|
最后,启动Monitorix服务。
|
|||
|
|
|
|||
|
|
打开你喜欢的Web浏览器,然后通过http://<host-ip-address>:8080/monitorix来访问Monitorix的Web界面。
|
|||
|
|
|
|||
|
|
### 在Debian和Ubuntu上安装并配置Monitorix ###
|
|||
|
|
对于Debian家族,Monitorix可以通过两种方式安装:手工安装或通过第三方软件仓库。
|
|||
|
|
#### 手工安装(用于Debian) ####
|
|||
|
|
|
|||
|
|
Install all dependent packages first.
|
|||
|
|
首先安装所有依赖包。
|
|||
|
|
|
|||
|
|
$ sudo apt-get install rrdtool perl libwww-perl libmailtools-perl libmime-lite-perl librrds-perl libdbi-perl libxml-simple-perl libhttp-server-simple-perl libconfig-general-perl libio-socket-ssl-perl
|
|||
|
|
|
|||
|
|
从[http://www.monitorix.org/downloads.html][8]下载Monitorix包,并安装。
|
|||
|
|
|
|||
|
|
$ sudo dpkg -i monitorix*.deb
|
|||
|
|
|
|||
|
|
在安装期间,会要求你配置一个后端Web服务器。如果你正是用Apache,确保重启Apache服务来重新加载Apache配置。
|
|||
|
|
|
|||
|
|
$ sudo service apache2 reload
|
|||
|
|
|
|||
|
|
#### 通过软件仓库安装 (用于Ubuntu) ####
|
|||
|
|
在/etc/apt/source.list中添加以下行来启用Izzysoft仓库。
|
|||
|
|
|
|||
|
|
deb http://apt.izzysoft.de/ubuntu generic universe
|
|||
|
|
|
|||
|
|
下载并为软件仓库添加GPG密钥。
|
|||
|
|
|
|||
|
|
$ wget http://apt.izzysoft.de/izzysoft.asc
|
|||
|
|
$ sudo apt-key add izzysoft.asc
|
|||
|
|
|
|||
|
|
使用apt-get安装Monitorix,所有依赖包也将自动安装。
|
|||
|
|
|
|||
|
|
$ sudo apt-get update
|
|||
|
|
$ sudo apt-get install monitorix
|
|||
|
|
|
|||
|
|
最后,启动Monitorix服务。
|
|||
|
|
|
|||
|
|
$ sudo service monitorix start
|
|||
|
|
|
|||
|
|
要配置Monitorix,请使用文本编辑器编辑/etc/monitorix/monitorix.conf,并重启Monitorix服务。
|
|||
|
|
|
|||
|
|
$ sudo service monitorix restart
|
|||
|
|
|
|||
|
|
用于Ubuntu的内建Web服务器默认将被启用。要从Web查看监控结果,在你喜爱的Web浏览器中访问http://<host-ip-address>8080/monitorix。
|
|||
|
|
|
|||
|
|
### 在Raspberry Pi上安装并配置Monitorix ###
|
|||
|
|
如果想要在Raspberry Pi(基于Debian)上安装Monitorix,你不能使用上面提到的Izzysoft仓库,因为它不提供Monitorix的ARM端口。取而代之的是,你可以参照如下基于Debian的手工安装。
|
|||
|
|
|
|||
|
|
首先,安装需要的软件包。
|
|||
|
|
|
|||
|
|
$ sudo apt-get install rrdtool perl libwww-perl libmailtools-perl libmime-lite-perl librrds-perl libdbi-perl libxml-simple-perl libhttp-server-simple-perl libconfig-general-perl libio-socket-ssl-perl
|
|||
|
|
|
|||
|
|
如果某些需要的软件包没有安装,我们需要使用此命令来强制安装。
|
|||
|
|
|
|||
|
|
$ sudo apt-get -f install
|
|||
|
|
|
|||
|
|
从[http://www.monitorix.org/downloads.html][9]下载Monitorix软件包(monitorix_x.x.x-izzy1_all.deb)。
|
|||
|
|
|
|||
|
|
使用下面的命令来安装Monitorix包。
|
|||
|
|
|
|||
|
|
$ sudo dpkg -i monitorix_x.x.x-izzy1_all.deb
|
|||
|
|
|
|||
|
|
安装完成后,我们需要像下面这样对Monitorix配置稍作修改。
|
|||
|
|
|
|||
|
|
用你喜爱的文本编辑器打开/etc/monitorix/monitorix.conf,向下滚动文本直到你找到<graphs enable>。搜索“raspberrypi = n”,并用“y”替换“n”,这将启用对Raspberry Pi时钟频率、温度和电压的监控。
|
|||
|
|
|
|||
|
|
编辑完成后,重启Monitorix服务。
|
|||
|
|
|
|||
|
|
$ sudo service monitorix restart
|
|||
|
|
|
|||
|
|
默认情况下,Monitorix的内建HTTP Web服务器会被启用。要访问Monitorix的Web界面,访问此地址http://<raspberrypi-ip-address>:8080/monitorix。
|
|||
|
|
|
|||
|
|
### Monitorix截图(Raspberry Pi上) ###
|
|||
|
|
|
|||
|
|
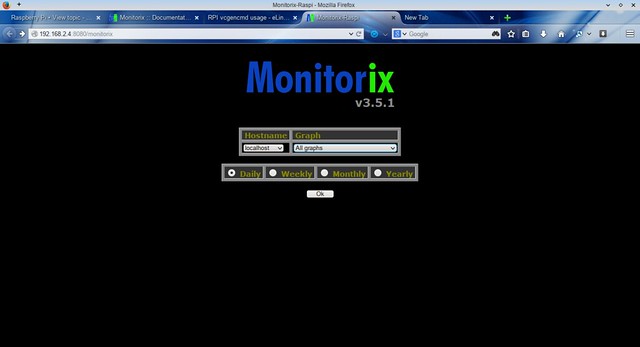
Monitorix主屏幕:
|
|||
|
|
|
|||
|
|
[][10]
|
|||
|
|
|
|||
|
|
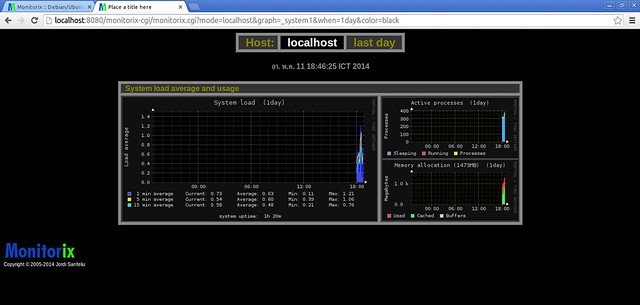
系统平均负载和使用情况图示:
|
|||
|
|
|
|||
|
|
[][11]
|
|||
|
|
|
|||
|
|
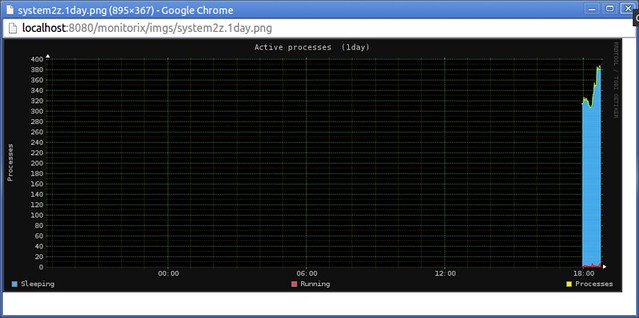
活动进程图示:
|
|||
|
|
|
|||
|
|
[][12]
|
|||
|
|
|
|||
|
|
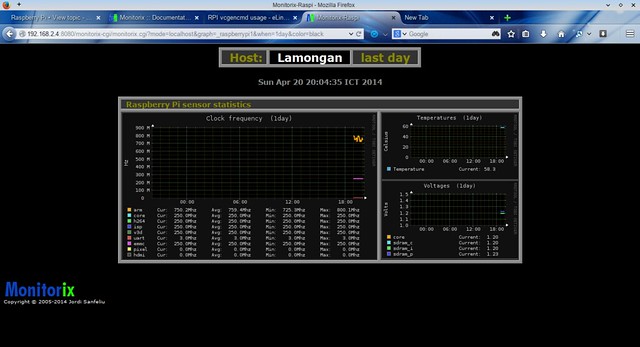
在主屏幕中选择“Raspberry Pi”部分下的“时钟频率”,你会看到[Raspberry Pi][13]的时钟频率、温度和电压的图示:
|
|||
|
|
|
|||
|
|
[][14]
|
|||
|
|
|
|||
|
|
所有监控图示:
|
|||
|
|
|
|||
|
|
[][15]
|
|||
|
|
|
|||
|
|
--------------------------------------------------------------------------------
|
|||
|
|
|
|||
|
|
via: http://xmodulo.com/2014/05/web-based-lightweight-system-monitor-linux.html
|
|||
|
|
|
|||
|
|
译者:[GOLinux](https://github.com/GOLinux) 校对:[校对者ID](https://github.com/校对者ID)
|
|||
|
|
|
|||
|
|
本文由 [LCTT](https://github.com/LCTT/TranslateProject) 原创翻译,[Linux中国](http://linux.cn/) 荣誉推出
|
|||
|
|
|
|||
|
|
[1]:http://xmodulo.com/2013/11/install-configure-cacti-linux.html
|
|||
|
|
[2]:http://xmodulo.com/tag/nagios
|
|||
|
|
[3]:http://www.monitorix.org/features.html
|
|||
|
|
[4]:http://xmodulo.com/2013/03/how-to-set-up-epel-repository-on-centos.html
|
|||
|
|
[5]:http://xmodulo.com/2013/01/how-to-set-up-rpmforge-repoforge-repository-on-centos.html
|
|||
|
|
[6]:http://www.monitorix.org/documentation.html
|
|||
|
|
[7]:http://aur.archlinux.org/packages.php?ID=33911
|
|||
|
|
[8]:http://www.monitorix.org/downloads.html
|
|||
|
|
[9]:http://www.monitorix.org/downloads.html
|
|||
|
|
[10]:https://www.flickr.com/photos/xmodulo/14215953893/
|
|||
|
|
[11]:https://www.flickr.com/photos/xmodulo/14009175290/
|
|||
|
|
[12]:https://www.flickr.com/photos/xmodulo/14195746084/
|
|||
|
|
[13]:http://xmodulo.com/go/raspberrypi
|
|||
|
|
[14]:https://www.flickr.com/photos/xmodulo/14009143189/
|
|||
|
|
[15]:https://www.flickr.com/photos/xmodulo/14192525721/
|