mirror of
https://github.com/LCTT/TranslateProject.git
synced 2025-01-10 22:21:11 +08:00
536 lines
23 KiB
Markdown
536 lines
23 KiB
Markdown
|
|
How to set up a Continuous Integration server for Android development (Ubuntu + Jenkins + SonarQube)
|
|||
|
|
============================================================
|
|||
|
|
|
|||
|
|
I have recently acquired a new MacBook Pro as my main Android development machine and instead of selling or giving away my old Mac BookPro (13", late 2011, 16GB RAM, 500G SSD, Core i5 2,4GHz, 64Bit) I have wiped it out and turned it into a Continuous Integration Server with dual boot MacOS-Ubuntu.
|
|||
|
|
|
|||
|
|
The goal of this article is to summarize the installation steps for me as future reference and for any developer that may be interested in setting up its own CI server, I will explain how to:
|
|||
|
|
|
|||
|
|
* Configure a fresh Ubuntu installation to be able to run the Android SDK.
|
|||
|
|
* Install Jenkins CI as a service to pull, compile, and run tests of an Android multi-module project hosted in GitHub.
|
|||
|
|
* Install Docker to run a MySQL server and SonarQube in their own containers, to perform static code analysis triggered by Jenkins
|
|||
|
|
* Android App configuration requirements.
|
|||
|
|
|
|||
|
|
### Step 1 — Ubuntu Installation:
|
|||
|
|
|
|||
|
|
I’m going to use Ubuntu as the SO of the CI because it has a strong community that will provide you support for any issue you may encounter and my personal recommendation is always to use the last LTS version, currently 16.04 LTS. There are plenty of tutorials about how to install it on virtually any hardware so I’m just providing the link to download it.
|
|||
|
|
|
|||
|
|
[Install Ubuntu Desktop 16.04 LTS][1]
|
|||
|
|
|
|||
|
|
You may wonder why I’m using the Desktop version instead of the pure server version, this is just a matter of personal preference, I’m not worried of losing a bit of performance and available RAM due to be running the desktop interface because I think that the usability that provides de GUI pays off enough in increased productivity.
|
|||
|
|
|
|||
|
|
### Step 2 — Remote access management:
|
|||
|
|
|
|||
|
|
#### SSH-Server:
|
|||
|
|
|
|||
|
|
Ubuntu desktop is not shipped with the ssh server installed by default, so to be able to manage your server remotely through the command line just install it:
|
|||
|
|
|
|||
|
|
```
|
|||
|
|
$ sudo apt-get install openssh-server
|
|||
|
|
```
|
|||
|
|
|
|||
|
|
#### NoMachine Remote Desktop:
|
|||
|
|
|
|||
|
|
Probably your CI is not going to be next to you but closer to your router, other room or even miles away from your current location. I have been dealing with different remote desktop solutions and I have to say that IMHO NoMachine performs the best, it is platform agnostic and works just out of the box just using your ssh credentials. (Obviously you have to install it both in your CI and your machine)
|
|||
|
|
|
|||
|
|
[NoMachine - Free Remote Access For Everybody
|
|||
|
|
Free remote access and desktop sharing software. Access your computer to work on files and transfer documents, watch…www.nomachine.com][2][][3]</section>
|
|||
|
|
|
|||
|
|
|
|||
|
|
### Step 3 — Environment configuration
|
|||
|
|
|
|||
|
|
Here I’m going to install JAVA8, Git and the Android SDK that are required by Jenkins to pull, compile and run android projects.
|
|||
|
|
|
|||
|
|
#### SDKMAN!:
|
|||
|
|
|
|||
|
|
This marvelous command line tool allows you install many popular SDK (eg. Gradle, Groovy, Grails, Kotlin, Scala…), list candidates and switch among different versions in parallel in a really easy and handy way.
|
|||
|
|
|
|||
|
|
[SDKMAN! the Software Development Kit Manager
|
|||
|
|
SDKMAN! is a tool for managing parallel versions of multiple Software Development Kits on most Unix based systems. It…sdkman.io][4][][5]
|
|||
|
|
|
|||
|
|
They have added recently support for JAVA8 so I preferred to install Java using it instead of using the popular webupd8 repository, so it is up to you to choose whether to install SDKMAN! or not but I’m pretty sure it is a tool that you will use in the near future.
|
|||
|
|
|
|||
|
|
Installation of SDKMAN! is as easy as executing the following line:
|
|||
|
|
|
|||
|
|
```
|
|||
|
|
$ curl -s "https://get.sdkman.io" | bash
|
|||
|
|
```
|
|||
|
|
|
|||
|
|
|
|||
|
|
#### Oracle JAVA8:
|
|||
|
|
|
|||
|
|
As we have previously installed SDKMAN! now installing JAVA8 is as easy as:
|
|||
|
|
|
|||
|
|
```
|
|||
|
|
$ sdk install java
|
|||
|
|
```
|
|||
|
|
|
|||
|
|
Or using the webupd8 repository:
|
|||
|
|
|
|||
|
|
[Install Oracle Java 8 In Ubuntu Or Linux Mint Via PPA Repository [JDK8]
|
|||
|
|
Oracle Java 8 is now stable. Below you'll find instructions on how to install it in Ubuntu or Debian via a PPA…www.webupd8.org][6][][7]
|
|||
|
|
|
|||
|
|
#### Git:
|
|||
|
|
|
|||
|
|
Installing git is straight forward, no more comments needed:
|
|||
|
|
|
|||
|
|
```
|
|||
|
|
$ sudo apt install git
|
|||
|
|
```
|
|||
|
|
|
|||
|
|
|
|||
|
|
#### Android SDK:
|
|||
|
|
|
|||
|
|
At the bottom of this page:
|
|||
|
|
|
|||
|
|
[Download Android Studio and SDK Tools | Android Studio
|
|||
|
|
Download the official Android IDE and developer tools to build apps for Android phones, tablets, wearables, TVs, and…developer.android.com][8][][9]
|
|||
|
|
|
|||
|
|
you can find “_Get just the command line tools_”, copy the link e.g:
|
|||
|
|
|
|||
|
|
```
|
|||
|
|
https://dl.google.com/android/repository/tools_r25.2.3-linux.zip
|
|||
|
|
```
|
|||
|
|
|
|||
|
|
Then download and unzip it at /opt/android-sdk-linux
|
|||
|
|
|
|||
|
|
```
|
|||
|
|
$ cd /opt
|
|||
|
|
```
|
|||
|
|
|
|||
|
|
```
|
|||
|
|
$ sudo wget https://dl.google.com/android/repository/tools_r25.2.3-linux.zip
|
|||
|
|
```
|
|||
|
|
|
|||
|
|
```
|
|||
|
|
$ sudo unzip tools_r25.2.3-linux.zip -d android-sdk-linux
|
|||
|
|
```
|
|||
|
|
|
|||
|
|
As we have used root user to create de directory we need to fix folder permissions to make it readable and writable by our main user:
|
|||
|
|
|
|||
|
|
```
|
|||
|
|
$ sudo chown -R YOUR_USERNAME:YOUR_USERNAME android-sdk-linux/
|
|||
|
|
```
|
|||
|
|
|
|||
|
|
Let’s set the SDK environmental variables editing the /.bashrc file:
|
|||
|
|
|
|||
|
|
```
|
|||
|
|
$ cd
|
|||
|
|
$ nano .bashrc
|
|||
|
|
```
|
|||
|
|
|
|||
|
|
Then add at the bottom (but before SDKMAN! config line) these lines:
|
|||
|
|
|
|||
|
|
```
|
|||
|
|
export ANDROID_HOME="/opt/android-sdk-linux"
|
|||
|
|
export PATH="$ANDROID_HOME/tools:$ANDROID_HOME/platform-tools:$PATH"
|
|||
|
|
```
|
|||
|
|
|
|||
|
|
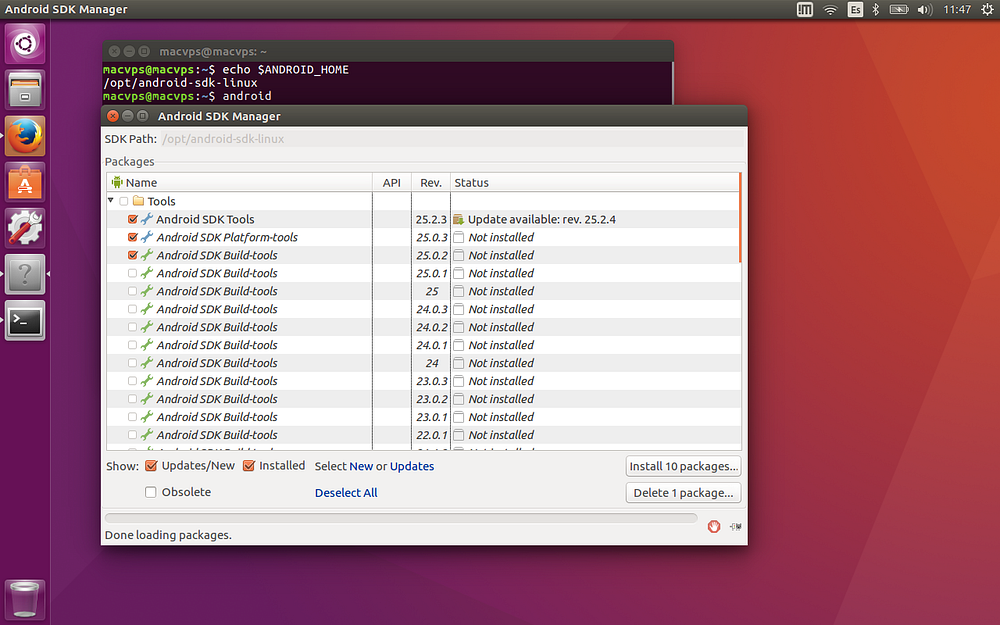
Close the terminal and open a new one to verify that variables have been properly exported:
|
|||
|
|
|
|||
|
|
```
|
|||
|
|
$ echo $ANDROID_HOME
|
|||
|
|
/opt/android-sdk-linux
|
|||
|
|
```
|
|||
|
|
|
|||
|
|
```
|
|||
|
|
$ android
|
|||
|
|
```
|
|||
|
|
|
|||
|
|
|
|||
|
|
|
|||
|
|
Running Android SDK Manager GUI
|
|||
|
|
|
|||
|
|
|
|||
|
|
### Step 4 — Jenkins server:
|
|||
|
|
|
|||
|
|
Here I’m going to describe how to install the server, configure it, create a Jenkins Job to pull, build and test an Android project and how to get to the console output.
|
|||
|
|
|
|||
|
|
#### Jenkins installation:
|
|||
|
|
|
|||
|
|
Jenkins server is available at:
|
|||
|
|
|
|||
|
|
[Jenkins
|
|||
|
|
Jenkins is an open source automation serverjenkins.io][12][][13]
|
|||
|
|
|
|||
|
|
There are many ways to run Jenkins, executing a .war file, as a linux service, as a Docker container, etc….
|
|||
|
|
|
|||
|
|
My first thought was to run it using a Docker container but then I realized that it was a nightmare to properly configure code folders, android-sdk folder visibility and USB visibility of physical devices plug to run Android Tests.
|
|||
|
|
|
|||
|
|
For ease of use I finally decided to use it as service adding the Stable repository key to install and get updates with apt
|
|||
|
|
|
|||
|
|
```
|
|||
|
|
$ wget -q -O - https://pkg.jenkins.io/debian-stable/jenkins.io.key | sudo apt-key add -
|
|||
|
|
```
|
|||
|
|
|
|||
|
|
Edit the sources.list file and add:
|
|||
|
|
|
|||
|
|
```
|
|||
|
|
$ sudo nano /etc/apt/sources.list
|
|||
|
|
```
|
|||
|
|
|
|||
|
|
```
|
|||
|
|
#Jenkin Stable
|
|||
|
|
deb https://pkg.jenkins.io/debian-stable binary/
|
|||
|
|
```
|
|||
|
|
|
|||
|
|
Then install it:
|
|||
|
|
|
|||
|
|
```
|
|||
|
|
sudo apt-get update
|
|||
|
|
sudo apt-get install jenkins
|
|||
|
|
```
|
|||
|
|
|
|||
|
|
Add user _jenkins_ to your username group to allow it to read and write the Android SDK folder
|
|||
|
|
|
|||
|
|
```
|
|||
|
|
$ sudo usermod -a -G YOUR_USERNAME jenkins
|
|||
|
|
```
|
|||
|
|
|
|||
|
|
Jenkins service will always start at boot time and will be available at [http://localhost:8080][15]
|
|||
|
|
|
|||
|
|
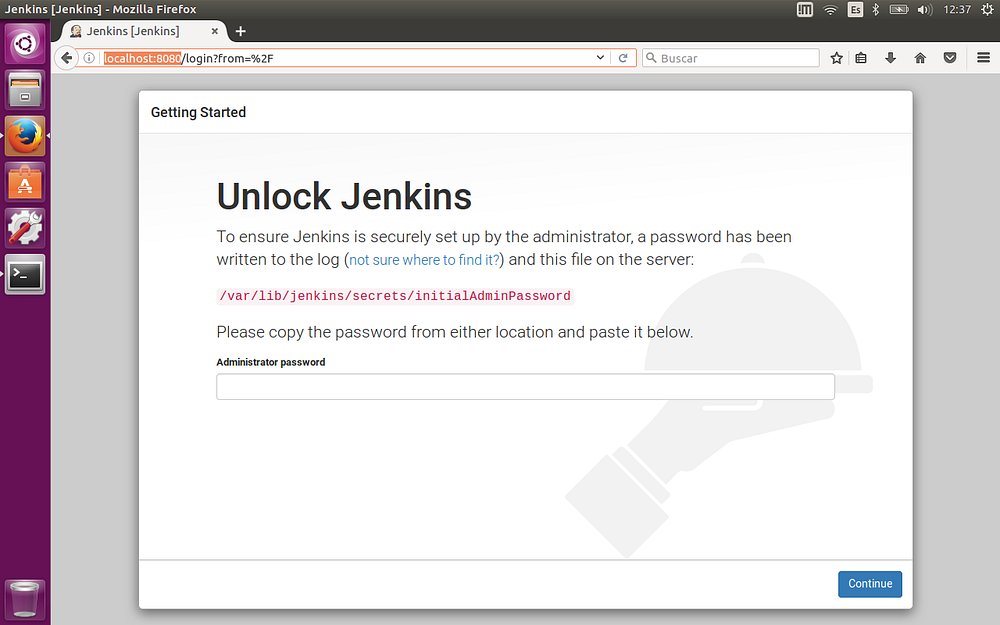
Just after installation due to security reasons this screen is shown, just follow the instructions to finally get your Jenkins instance up and running.
|
|||
|
|
|
|||
|
|
|
|||
|
|
|
|||
|
|
Unlocking a successfully installed Jenkins server
|
|||
|
|
|
|||
|
|
#### Jenkins Configuration:
|
|||
|
|
|
|||
|
|
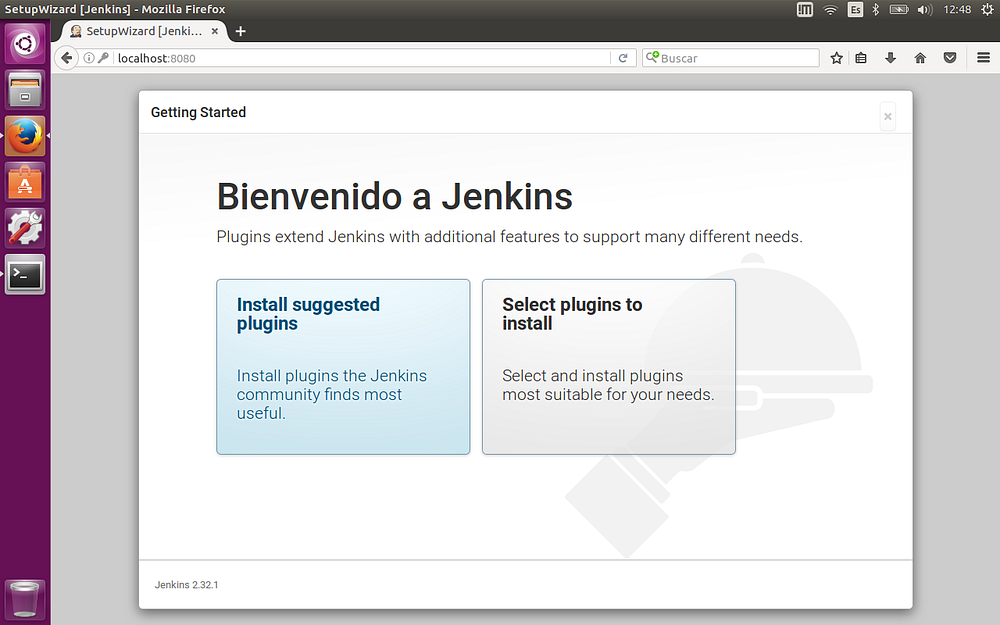
After unlocking Jenkins installation you are prompted to install plugins, click “Select plugins to Install” browse and select the following ones to be installed in addition to suggested plugins:
|
|||
|
|
|
|||
|
|
* JUnit
|
|||
|
|
|
|||
|
|
[JUnit Plugin - Jenkins - Jenkins Wiki
|
|||
|
|
The JUnit plugin provides a publisher that consumes XML test reports generated during the builds and provides some…wiki.jenkins-ci.org][16][][17]
|
|||
|
|
|
|||
|
|
* JaCoCo
|
|||
|
|
|
|||
|
|
[JaCoCo Plugin - Jenkins - Jenkins Wiki
|
|||
|
|
In order to get the coverage data published to Jenkins, you need to add a JaCoCo publisher and configure it so it will…wiki.jenkins-ci.org][18][][19]
|
|||
|
|
|
|||
|
|
* EnvInject
|
|||
|
|
|
|||
|
|
[EnvInject Plugin - Jenkins - Jenkins Wiki
|
|||
|
|
Only previous environment variables are available for polling Some plugins provide polling mechanisms (such as SCM…wiki.jenkins-ci.org][20][][21]
|
|||
|
|
|
|||
|
|
* GitHub plugins
|
|||
|
|
|
|||
|
|
[GitHub Plugin - Jenkins - Jenkins Wiki
|
|||
|
|
This plugin requires that you have an HTTP URL reachable from GitHub, which means it's reachable from the whole…wiki.jenkins-ci.org][22][][23]
|
|||
|
|
|
|||
|
|
|
|||
|
|
|
|||
|
|
|
|||
|
|
Installing Jenkins plugins
|
|||
|
|
|
|||
|
|
Create the admin user and complete installation.
|
|||
|
|
|
|||
|
|
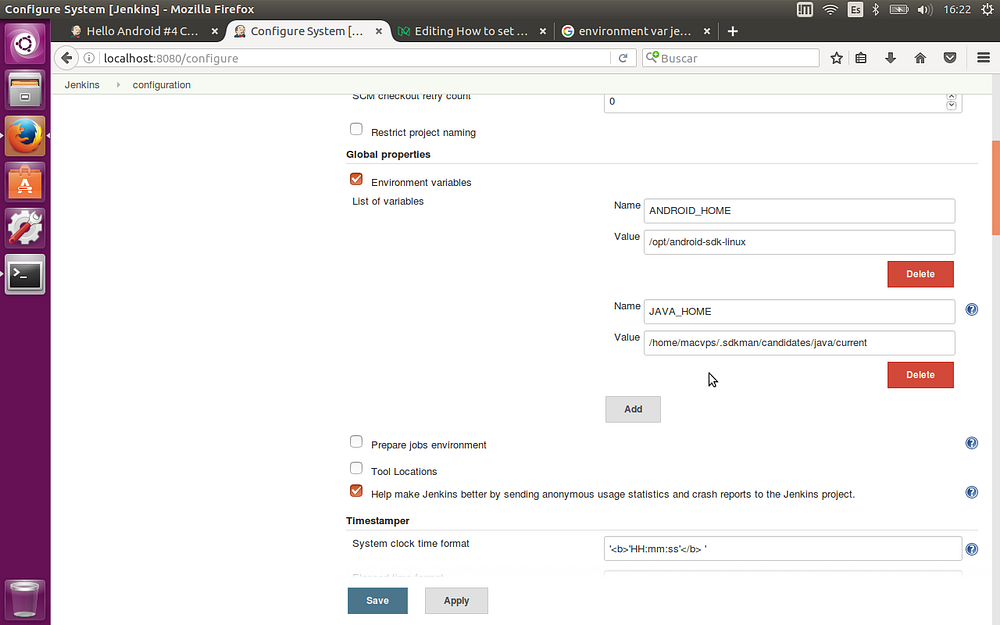
To finish configuration we have to configure ANDROID_HOME and JAVA_HOME environmental variables:
|
|||
|
|
|
|||
|
|
Go to Manage Jenkins > Configure System
|
|||
|
|
|
|||
|
|
Scroll down and at Global properties section check the Environment variables box and add _ANDROID_HOME_ and _JAVA_HOME_
|
|||
|
|
|
|||
|
|
|
|||
|
|
|
|||
|
|
|
|||
|
|
Adding global environmental variables common to all Jenkins jobs
|
|||
|
|
|
|||
|
|
#### Creating a “Jenkins Job”
|
|||
|
|
|
|||
|
|
A Jenkins Job describes a series of steps that are executed consecutively. I have prepared a “Hello Jenkins” Android project in GitHub that you can use to test your Jenkins configuration as you follow this tutorial. It is just a hello world multi-module app with Unit tests, Android tests and includes JaCoCo and SonarQube plugins.
|
|||
|
|
|
|||
|
|
[pamartineza/helloJenkins
|
|||
|
|
helloJenkins - Hello Jenkins project for CI configuration testgithub.com][24][][25]
|
|||
|
|
|
|||
|
|
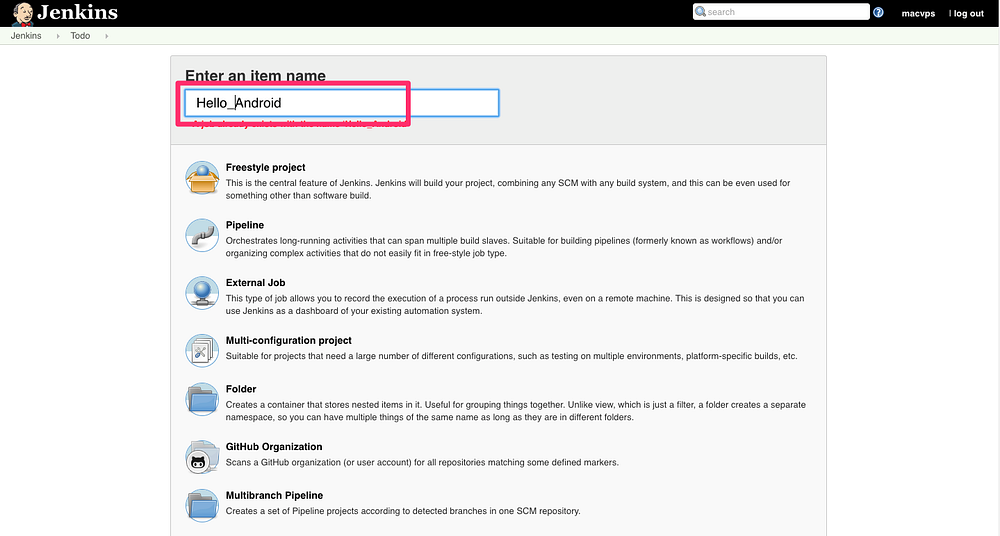
First create a new _Freestyle project Job _and give it a name eg. “_Hello_Android_” (Don’t use spaces in Jenkins Job names to avoid future compatibility problems with SonarQube)
|
|||
|
|
|
|||
|
|
|
|||
|
|
|
|||
|
|
|
|||
|
|
Creating a Freestyle Jenkins Job
|
|||
|
|
|
|||
|
|
Then let’s configure it, I’m going to add screenshots of every section:
|
|||
|
|
|
|||
|
|
General:
|
|||
|
|
|
|||
|
|
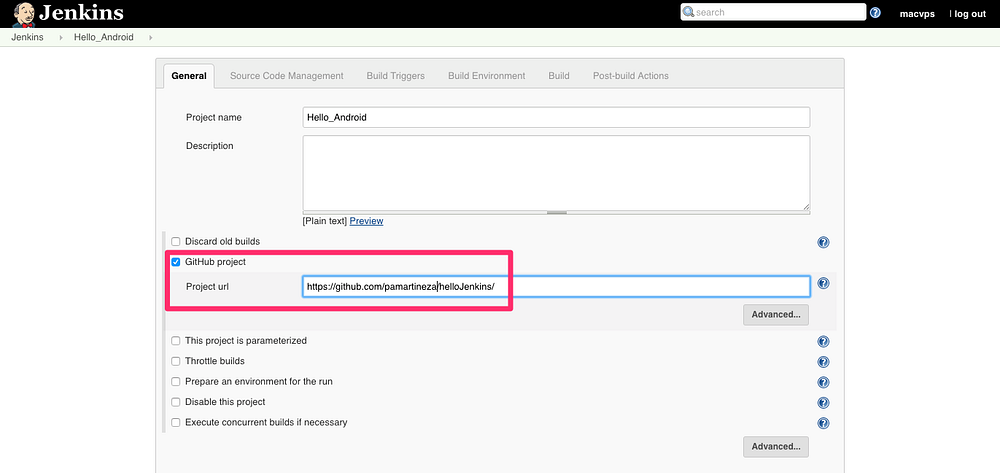
This section is not very interesting for our goals, here you can change the name of the Job, add a description and if using a GitHub project add the project URL, (without *.git, the url of the web not the repo)
|
|||
|
|
|
|||
|
|
|
|||
|
|
|
|||
|
|
|
|||
|
|
Project Url Configuration
|
|||
|
|
|
|||
|
|
Source Code Management:
|
|||
|
|
|
|||
|
|
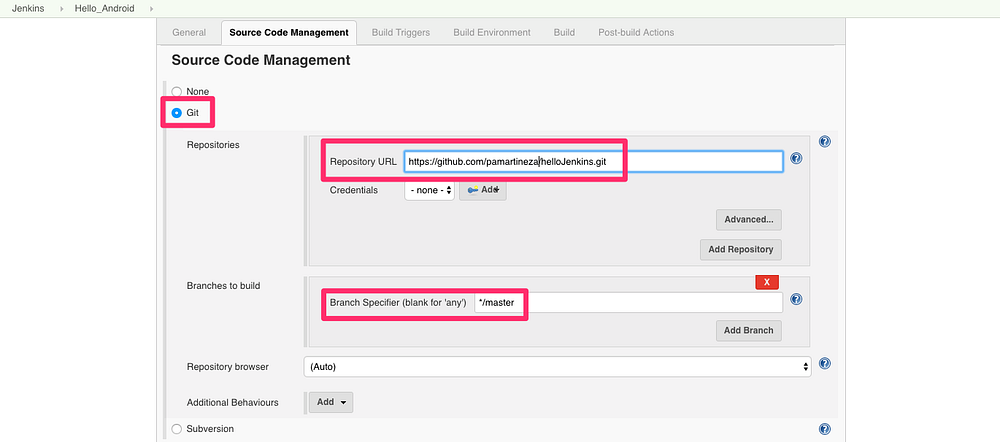
Here is where we have to chose our CVS as Git and add the repository url (this time include *.git) and select the branch to pull. As this is a public GitHub repository you don’t need to add credentials but otherwise you will have to add your user and password.
|
|||
|
|
|
|||
|
|
I recommend you that instead of using your actual GitHub user with full permissions create a new GitHub user with read-only privileges of your private repos to be used exclusively by your Jenkins Jobs.
|
|||
|
|
|
|||
|
|
In addition if you have enabled Two-Factor authentication Jenkins won’t be able to pull code and again having this exclusively created for Jenkins user will be the solution to pull code from private repos.
|
|||
|
|
|
|||
|
|
|
|||
|
|
|
|||
|
|
|
|||
|
|
Repository configuration
|
|||
|
|
|
|||
|
|
Build Triggers:
|
|||
|
|
|
|||
|
|
Builds can be triggered manually, remotely, periodically, after another Job build, when changes are detected, etc…
|
|||
|
|
|
|||
|
|
Ideally the optimal situation is to just trigger a build when a change has been pushed to the repository, GitHub provides a system called Webhooks
|
|||
|
|
|
|||
|
|
[Webhooks | GitHub Developer Guide
|
|||
|
|
Webhooks allow you to build or set up integrations which subscribe to certain events on GitHub.com. When one of those…developer.github.com][26][][27]
|
|||
|
|
|
|||
|
|
that we can configure to send events to the CI server and then trigger the build, but this obviously requires our CI sever to be online and reachable by GitHub servers.
|
|||
|
|
|
|||
|
|
Your CI is going to be probably isolated in a private network for security reasons then the only solution is to poll GitHub periodically. In my personal case I just turn on the CI when I’m working, in the following screenshot I have configured it to poll Github every 15 minutes. Polling times are defined with CRON syntax, if you are not familiar with it, press the help button on the right to get an extensive documentation with examples.
|
|||
|
|
|
|||
|
|
|
|||
|
|

|
|||
|
|
|
|||
|
|
Repository polling configuration
|
|||
|
|
|
|||
|
|
Build Environment:
|
|||
|
|
|
|||
|
|
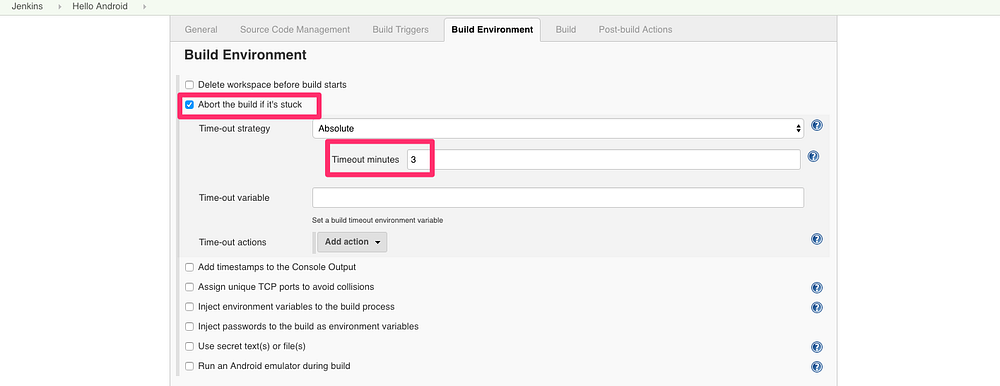
Here I recommend to configure the build _stuck_ timeout to avoid Jenkins blocking memory and CPU if any unexpected error happens. Here also you can Inject environmental variables, passwords, etc…
|
|||
|
|
|
|||
|
|
|
|||
|
|
|
|||
|
|
|
|||
|
|
Build stuck time out
|
|||
|
|
|
|||
|
|
Build:
|
|||
|
|
|
|||
|
|
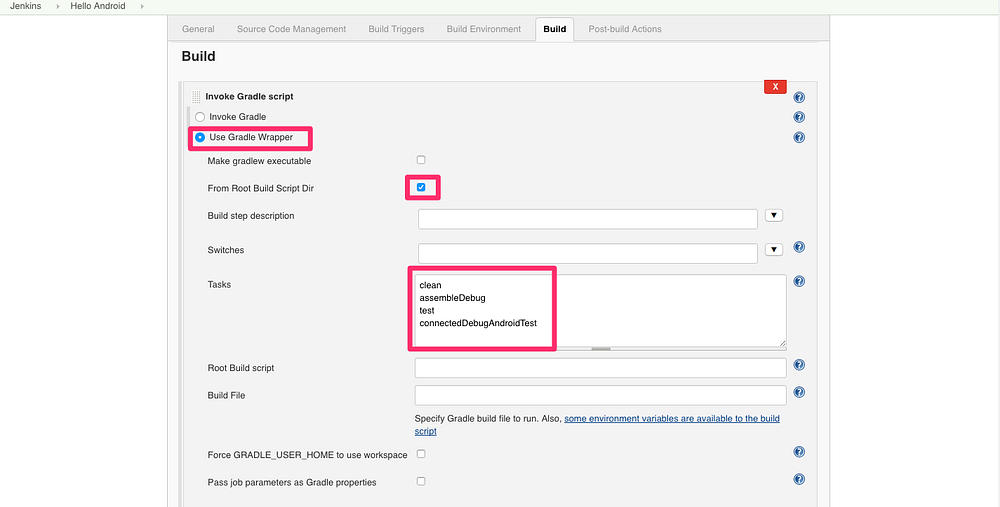
Here is where the magic happens! Add a _Build Step _that _Invokes Gradle Script _select the Gradle Wrapper (Android projects are shipped with a Gradle Wrapper by default, don’t forget to check it into Git) and let’s define which tasks are going to be executed:
|
|||
|
|
|
|||
|
|
1. clean: Deletes all build outputs of previous builds, this ensures nothing is cached and the freshness of this build.
|
|||
|
|
2. assembleDebug: Generates the debug .apk
|
|||
|
|
3. test: executes JUnit tests in all modules
|
|||
|
|
4. connectedDebugAndroidTest: executes Android Tests on actual android devices connected to the CI. (It is also possible to run Android Test against an Android Emulator installing the Android Emulator Jenkins plugin, but it doesn’t support all emulator versions and its configuration is not trivial at all)
|
|||
|
|
|
|||
|
|
|
|||
|
|
|
|||
|
|
|
|||
|
|
Gradle tasks definition
|
|||
|
|
|
|||
|
|
Post-build Actions:
|
|||
|
|
|
|||
|
|
Here we are going to add _Publish JUnit test result report _this step is provided by the JUnit plugin and collects the .XML reports generated with the outcome of the JUnit tests that will generate a fancy chart with the evolution of tests results in time.
|
|||
|
|
|
|||
|
|
The path for debug flavor tests results in our app module is:
|
|||
|
|
|
|||
|
|
app/build/test-results/debug/*.xml
|
|||
|
|
|
|||
|
|
In multi-module projects the path for test results in other “pure” java modules is:
|
|||
|
|
|
|||
|
|
*/build/test-results/*.xml
|
|||
|
|
|
|||
|
|
|
|||
|
|

|
|||
|
|
|
|||
|
|
|
|||
|
|
Also add _Record JaCoCo coverage report _that will create a chart to show the evolution of the code coverage
|
|||
|
|
|
|||
|
|

|
|||
|
|
|
|||
|
|
|
|||
|
|
#### Executing a Jenkins Job
|
|||
|
|
|
|||
|
|
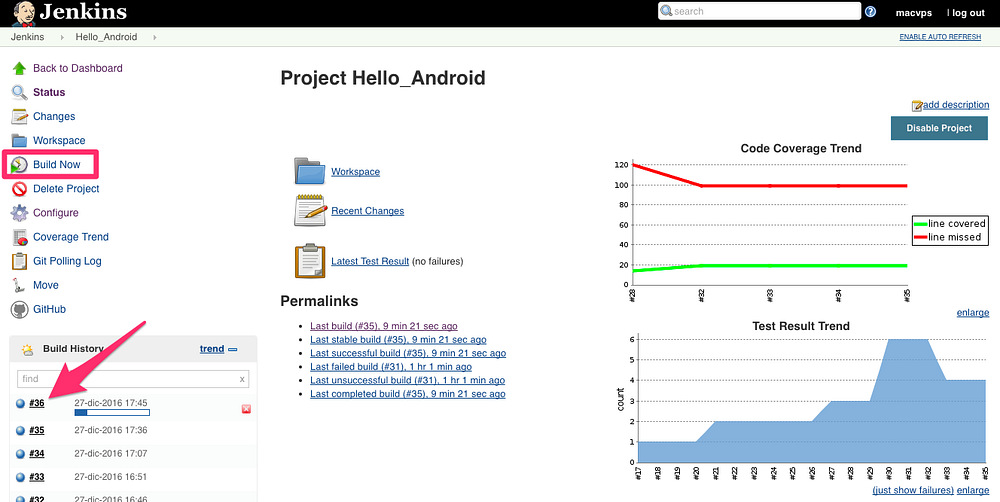
Our Job will execute every 15 minutes if new changes have been pushed to the repository but it can also be triggered manually if you don’t want to wait until next polling or you just want to verify any change in the configuration straight forward. Click _Build Now_ and then current build will be shown in the _Build History _, click on it to see the details.
|
|||
|
|
|
|||
|
|
|
|||
|
|
|
|||
|
|
|
|||
|
|
Manual Job execution
|
|||
|
|
|
|||
|
|
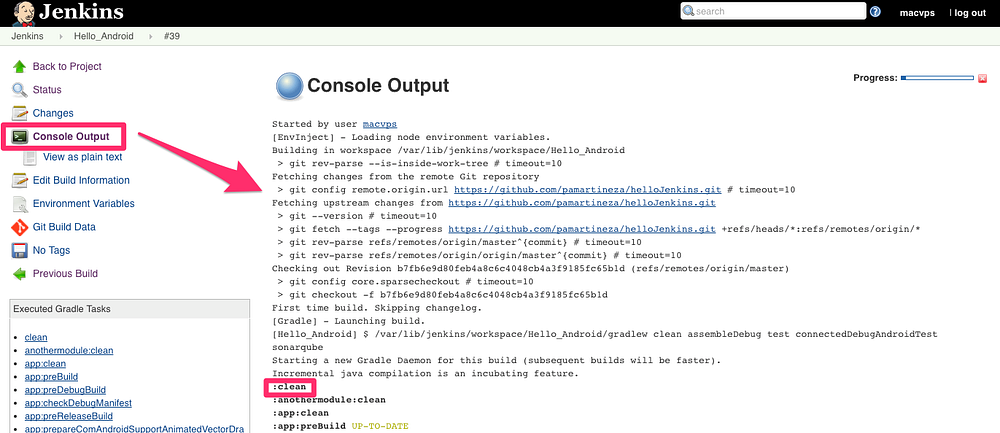
The most interesting part here is the console output, you can see how Jenkins pulls the code and starts executing the Gradle tasks we have previously defined e.g _clean._
|
|||
|
|
|
|||
|
|
|
|||
|
|
|
|||
|
|
|
|||
|
|
Beginning of console output
|
|||
|
|
|
|||
|
|
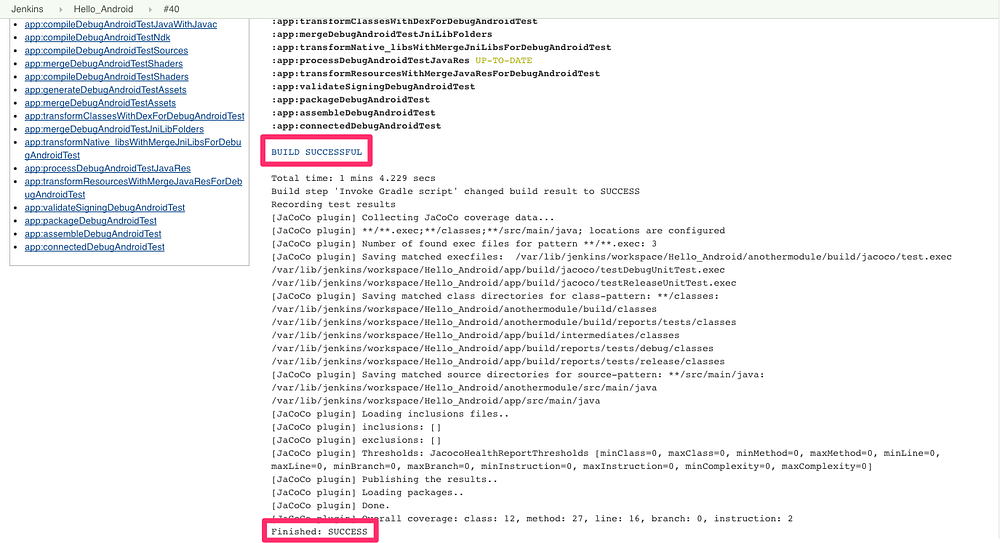
If everything is OK console output will finish as follows (any repository connectivity problem, failing JUnit or Android test failure would make the build to fail)
|
|||
|
|
|
|||
|
|
|
|||
|
|
|
|||
|
|
|
|||
|
|
Yeehaa! build Sucsessful and test results with coverage collected
|
|||
|
|
|
|||
|
|
### Step 5 — SonarQube
|
|||
|
|
|
|||
|
|
In this section I will describe how to install and configure SonarQube and its companion MySQL database using Docker containers.
|
|||
|
|
|
|||
|
|
[Continuous Code Quality | SonarQube
|
|||
|
|
The leading open source platform for continuous code qualitywww.sonarqube.org][28][][29]
|
|||
|
|
|
|||
|
|
SonarQube is a code static analysis tool that helps developers to write cleaner code, detect bugs, learn good practices and it also keeps track of code coverage, tests results, technical debt, etc… all SonarQube detected issues can be imported easily to be fixed into Android Studio/IntelliJ with a plugin:
|
|||
|
|
|
|||
|
|
[JetBrains Plugin Repository :: SonarQube Community Plugin
|
|||
|
|
Edit descriptionplugins.jetbrains.com][30][][31]</section>
|
|||
|
|
|
|||
|
|
|
|||
|
|
#### Installing Docker:
|
|||
|
|
|
|||
|
|
Installation of Docker is pretty straightforward following official Docker documentation:
|
|||
|
|
|
|||
|
|
[Install Docker on Ubuntu
|
|||
|
|
Instructions for installing Docker on Ubuntudocs.docker.com][32][][33]
|
|||
|
|
|
|||
|
|
#### Creating Containers:
|
|||
|
|
|
|||
|
|
MySQL:
|
|||
|
|
Let’s create a MySQL 5.7.17 server container called _mysqlserver, _that will allways start at boot time, with a local volume in your user folder, a password and exposed at localhost:3306 _(replace YOUR_USER and YOUR_MYSQL_PASSWORD with your values)_
|
|||
|
|
|
|||
|
|
```
|
|||
|
|
$ docker run --name mysqlserver --restart=always -v /home/YOUR_USER/mysqlVolume:/var/lib/mysql -e MYSQL_ROOT_PASSWORD=YOUR_MYSQL_PASSWORD -p 3306:3306 -d mysql:5.7.17
|
|||
|
|
```
|
|||
|
|
|
|||
|
|
|
|||
|
|
phpMyAdmin:
|
|||
|
|
To manage the MySQL server I’m used to phpMyAdmin then nothing more easy than creating another container called _phpmyadmin _linked to our _mysqlserver _container, that also starts at boot time, exposed at localhost:9090 and using the last version available.
|
|||
|
|
|
|||
|
|
```
|
|||
|
|
$ docker run --name phpmyadmin --restart=always --link mysqlserver:db -p 9090:80 -d phpmyadmin/phpmyadmin
|
|||
|
|
```
|
|||
|
|
|
|||
|
|
Using the phpMyAdmin interface at localhost:9090 login as _root and YOUR_MYSQL_PASSWORD _andcreate a database called _sonar_ with _utf8_general_ci _collation. Also create a new user _sonar_ with password _YOUR_SONAR_PASSWORD _and give it all privileges on the _sonar_ database.
|
|||
|
|
|
|||
|
|
|
|||
|
|
SonarQube:
|
|||
|
|
Now we are ready to create our SonarQube container called _sonarqube _that starts at boot time, linked to our db, exposed at localhost:9000 and using the 5.6.4 (LTS) version.
|
|||
|
|
|
|||
|
|
```
|
|||
|
|
$ docker run --name sonarqube --restart=always --link mysqlserver:db -p 9000:9000 -p 9092:9092 -e "SONARQUBE_JDBC_URL=jdbc:mysql://db:3306/sonar?useUnicode=true&characterEncoding=utf8&rewriteBatchedStatements=true&useConfigs=maxPerformance" -e "SONARQUBE_JDBC_USER=sonar" -e "SONARQUBE_JDBC_PASSWORD=YOUR_SONAR_PASSWORD" -d sonarqube:5.6.4
|
|||
|
|
```
|
|||
|
|
|
|||
|
|
|
|||
|
|
#### SonarQube Configuration:
|
|||
|
|
|
|||
|
|
If everything is OK browsing to localhost:9000 will lead you to this page:
|
|||
|
|
|
|||
|
|
|
|||
|
|

|
|||
|
|
|
|||
|
|
Now let’s configure necessary plugins and Quality Profiles:
|
|||
|
|
|
|||
|
|
1. Login at the top right corner (Default administrator login is admin/admin)
|
|||
|
|
2. Go to Administration > System > Update Center > Updates Only
|
|||
|
|
|
|||
|
|
* Update Java plugin if necessary
|
|||
|
|
|
|||
|
|
3\. Now switch to Available and install the following plugins:
|
|||
|
|
|
|||
|
|
* Android (provides Android lint rules)
|
|||
|
|
* Checkstyle
|
|||
|
|
* Findbugs
|
|||
|
|
* XML
|
|||
|
|
|
|||
|
|
4\. Scroll back to the top and press restart button to complete the installation
|
|||
|
|
|
|||
|
|
|
|||
|
|
#### SonarQube Profiles:
|
|||
|
|
|
|||
|
|
The plugins that we have installed define profiles that are sets of rules used to evaluate the code quality of a project.
|
|||
|
|
|
|||
|
|
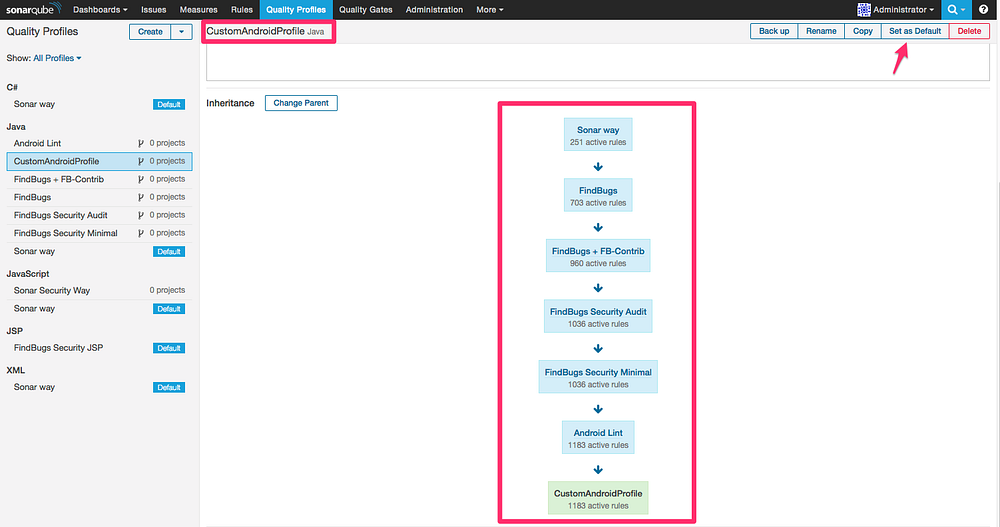
Only 1 profile can be applied to a project at a time but we can make profiles have a parent and therefore inherit rules, so to be able to have all rules evaluated against our project we can create a new custom profile and chain all profiles.
|
|||
|
|
|
|||
|
|
Let’s do it, go to Quality Profiles > Create and give it a name e.g. CustomAndroidProfile
|
|||
|
|
|
|||
|
|
Add Android Lint as parent, then switch to the Android Lint profile and add FindBugs Security Minimal as parent, continue this chain until you get this inheritance schema and set the CustomAndroidProfile as the default one:
|
|||
|
|
|
|||
|
|
|
|||
|
|
|
|||
|
|
|
|||
|
|
|
|||
|
|
#### Executing the SonarQube Analysis:
|
|||
|
|
|
|||
|
|
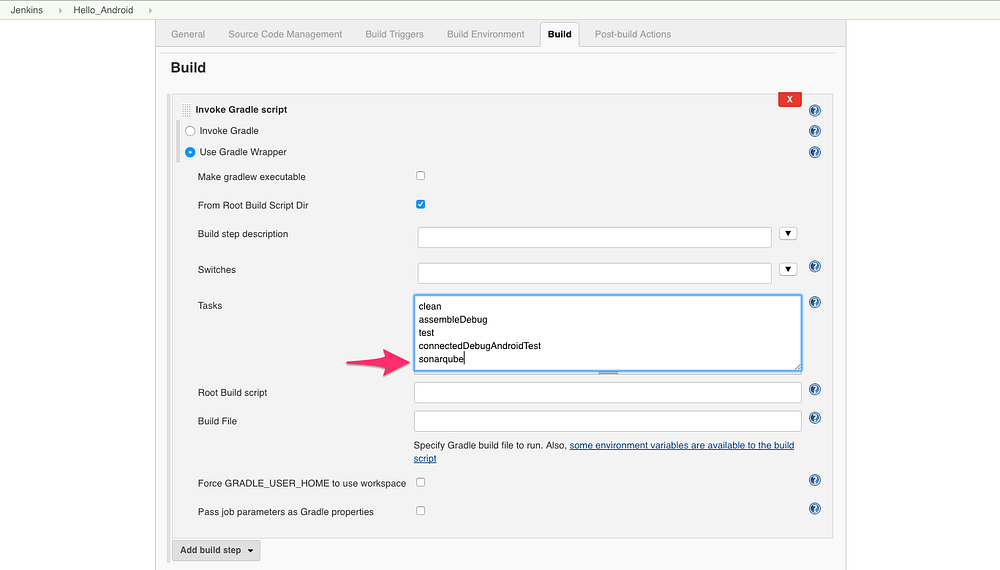
Now that our SonarQube is properly configured we just have to add a new Gradle task, _sonarqube_, to our Jenkins job, that will be executed in last place:
|
|||
|
|
|
|||
|
|
|
|||
|
|
|
|||
|
|
|
|||
|
|
|
|||
|
|
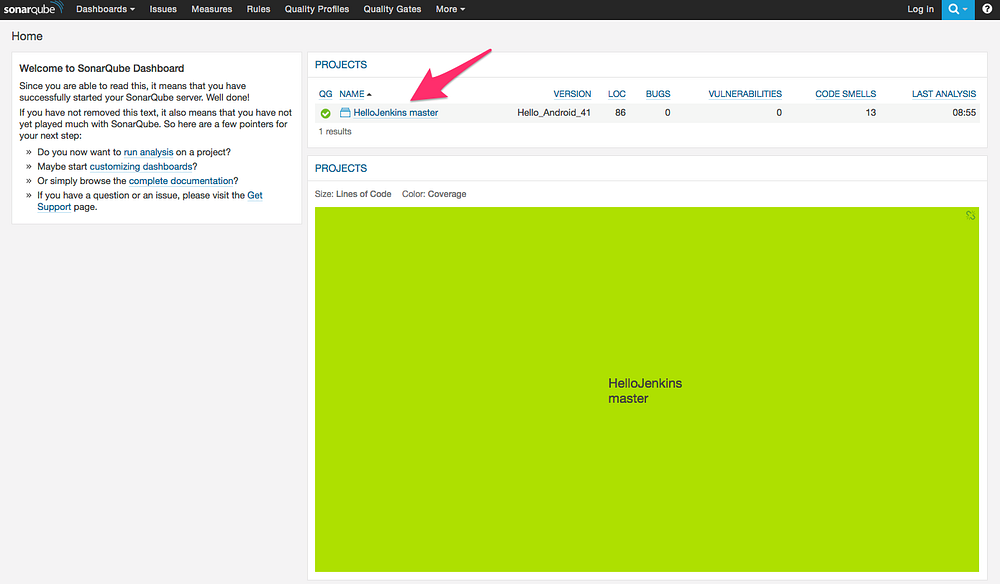
Execute again the Jenkins job and once it has finished let’s see our sonarQube dashboard at localhost:9000 :
|
|||
|
|
|
|||
|
|
|
|||
|
|
|
|||
|
|
|
|||
|
|
Dashboard with Analysis result
|
|||
|
|
|
|||
|
|
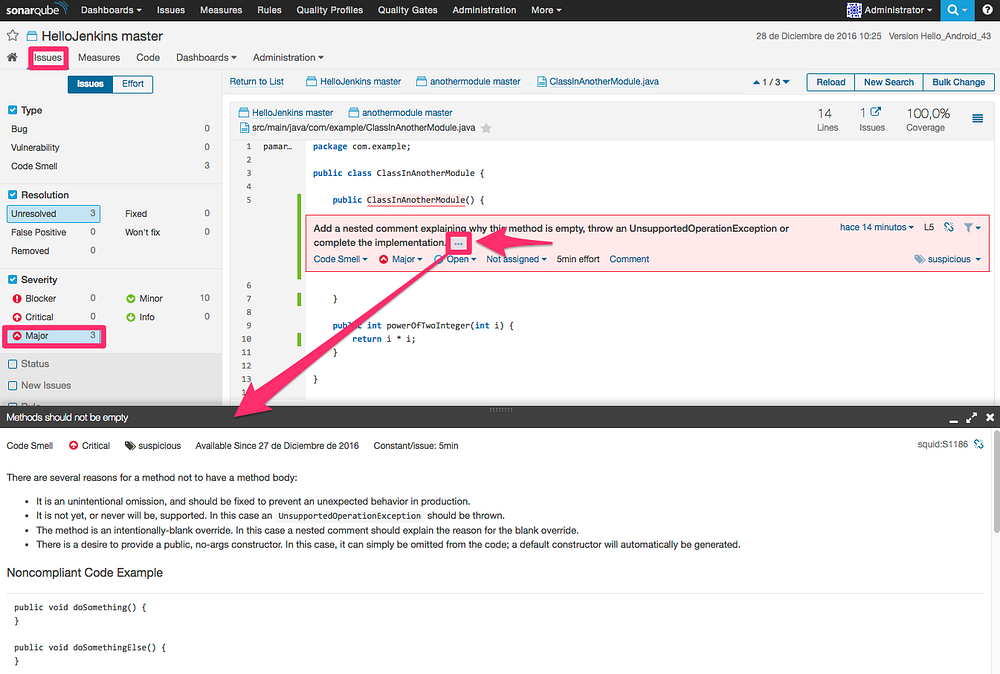
If we press the project name we can navigate different dashboards, with tons of info, the most important one is probably _Issues.
|
|||
|
|
_In the next screenshot I’m showing the detail of a _major _issue that flags an empty constructor method. Here personally what gives me the most important value of using Sonarqube is the explanation shown at the screen bottom when you click on the period … , this is an invaluable way of learning tips and tricks of programming.
|
|||
|
|
|
|||
|
|
|
|||
|
|
|
|||
|
|
|
|||
|
|
Getting the explanation of the issue
|
|||
|
|
|
|||
|
|
### Step 6 — Extra: configuring other Android apps
|
|||
|
|
|
|||
|
|
Configuring an Android app to get coverage and sonarqube results is just having the JaCoCo and SonarQube plugins applied. Again you can find more details at my demo app HelloJenkins:
|
|||
|
|
|
|||
|
|
[pamartineza/helloJenkins
|
|||
|
|
helloJenkins - Hello Jenkins project for CI configuration testgithub.com][34][][35]
|
|||
|
|
|
|||
|
|
### The end!
|
|||
|
|
|
|||
|
|
Yes, you have finally reached the end of this long article! I hope you found it useful. If you find any error or you have any doubt please don’t hesitate to make any comment, I’ll do my best to try to help and if you liked it please share it!
|
|||
|
|
|
|||
|
|
--------------------------------------------------------------------------------
|
|||
|
|
|
|||
|
|
作者简介:
|
|||
|
|
|
|||
|
|

|
|||
|
|
|
|||
|
|
Entrepreneur & CEO at GreenLionSoft · Android Lead @MadridMBC & @Shoptimix · Android, OpenSource and OpenData promoter · Runner · Traveller
|
|||
|
|
|
|||
|
|
--------------------------------------------------------------------------------
|
|||
|
|
|
|||
|
|
via: https://medium.com/@pamartineza/how-to-set-up-a-continuous-integration-server-for-android-development-ubuntu-jenkins-sonarqube-43c1ed6b08d3#.x6jhcpg98
|
|||
|
|
|
|||
|
|
作者:[Pablo A. Martínez][a]
|
|||
|
|
译者:[译者ID](https://github.com/译者ID)
|
|||
|
|
校对:[校对者ID](https://github.com/校对者ID)
|
|||
|
|
|
|||
|
|
本文由 [LCTT](https://github.com/LCTT/TranslateProject) 原创编译,[Linux中国](https://linux.cn/) 荣誉推出
|
|||
|
|
|
|||
|
|
[a]:https://medium.com/@pamartineza
|
|||
|
|
[1]:https://www.ubuntu.com/download/desktop
|
|||
|
|
[2]:https://www.nomachine.com/download
|
|||
|
|
[3]:https://www.nomachine.com/download
|
|||
|
|
[4]:http://sdkman.io/
|
|||
|
|
[5]:http://sdkman.io/
|
|||
|
|
[6]:http://www.webupd8.org/2012/09/install-oracle-java-8-in-ubuntu-via-ppa.html
|
|||
|
|
[7]:http://www.webupd8.org/2012/09/install-oracle-java-8-in-ubuntu-via-ppa.html
|
|||
|
|
[8]:https://developer.android.com/studio/index.html
|
|||
|
|
[9]:https://developer.android.com/studio/index.html
|
|||
|
|
[10]:https://dl.google.com/android/repository/tools_r25.2.3-linux.zip
|
|||
|
|
[11]:https://dl.google.com/android/repository/tools_r25.2.3-linux.zip
|
|||
|
|
[12]:https://jenkins.io/
|
|||
|
|
[13]:https://jenkins.io/
|
|||
|
|
[14]:https://pkg.jenkins.io/debian-stable/jenkins.io.key
|
|||
|
|
[15]:http://localhost:8080/
|
|||
|
|
[16]:https://wiki.jenkins-ci.org/display/JENKINS/JUnit+Plugin
|
|||
|
|
[17]:https://wiki.jenkins-ci.org/display/JENKINS/JUnit+Plugin
|
|||
|
|
[18]:https://wiki.jenkins-ci.org/display/JENKINS/JaCoCo+Plugin
|
|||
|
|
[19]:https://wiki.jenkins-ci.org/display/JENKINS/JaCoCo+Plugin
|
|||
|
|
[20]:https://wiki.jenkins-ci.org/display/JENKINS/EnvInject+Plugin
|
|||
|
|
[21]:https://wiki.jenkins-ci.org/display/JENKINS/EnvInject+Plugin
|
|||
|
|
[22]:https://wiki.jenkins-ci.org/display/JENKINS/GitHub+Plugin
|
|||
|
|
[23]:https://wiki.jenkins-ci.org/display/JENKINS/GitHub+Plugin
|
|||
|
|
[24]:https://github.com/pamartineza/helloJenkins
|
|||
|
|
[25]:https://github.com/pamartineza/helloJenkins
|
|||
|
|
[26]:https://developer.github.com/webhooks/
|
|||
|
|
[27]:https://developer.github.com/webhooks/
|
|||
|
|
[28]:https://www.sonarqube.org/
|
|||
|
|
[29]:https://www.sonarqube.org/
|
|||
|
|
[30]:https://plugins.jetbrains.com/idea/plugin/7238-sonarqube-community-plugin
|
|||
|
|
[31]:https://plugins.jetbrains.com/idea/plugin/7238-sonarqube-community-plugin
|
|||
|
|
[32]:https://docs.docker.com/engine/installation/linux/ubuntulinux/
|
|||
|
|
[33]:https://docs.docker.com/engine/installation/linux/ubuntulinux/
|
|||
|
|
[34]:https://github.com/pamartineza/helloJenkins
|
|||
|
|
[35]:https://github.com/pamartineza/helloJenkins
|