Previously we have seen how to create a flexible disk storage using LVM. Here, we are going to see how to extend volume group, extend and reduce a logical volume. Here we can reduce or extend the partitions in Logical volume management (LVM) also called as flexible volume file-system.

### Requirements ###
- [Create Flexible Disk Storage with LVM – Part I][1]
注:两篇都翻译完了的话,发布的时候将这个链接做成发布的中文的文章地址
#### When do we need to reduce volume? ####
May be we need to create a separate partition for any other use or we need to expand the size of any low space partition, if so we can reduce the large size partition and we can expand the low space partition very easily by the following simple easy steps.
#### My Server Setup – Requirements ####
- Operating System – CentOS 6.5 with LVM Installation
- Server IP – 192.168.0.200
### How to Extend Volume Group and Reduce Logical Volume ###
#### Logical Volume Extending ####
Currently, we have One PV, VG and 2 LV. Let’s list them one by one using following commands.
There are no free space available in Physical Volume and Volume group. So, now we can’t extend the lvm size, for extending we need to add one physical volume (**PV**), and then we have to extend the volume group by extending the **vg**. We will get enough space to extend the Logical volume size. So first we are going to add one physical volume.
For adding a new **PV** we have to use fdisk to create the LVM partition.
# fdisk -cu /dev/sda
- To Create new partition Press **n**.
- Choose primary partition use **p**.
- Choose which number of partition to be selected to create the primary partition.
- Press **1** if any other disk available.
- Change the type using **t**.
- Type **8e** to change the partition type to Linux LVM.
- Use **p** to print the create partition ( here we have not used the option).
Here, we can see which Volume groups are under Which Physical Volumes. We have just added one pv and its totally free. Let us see the size of each logical volume we have currently before expanding it.

Check All Logical Volume
- LogVol00 defined for Swap.
- LogVol01 defined for /.
- Now we have 16.50 GB size for / (root).
- Currently there are 4226 Physical Extend (PE) available.
Now we are going to expand the / partition **LogVol01**. After expanding we can list out the size as above for confirmation. We can extend using GB or PE as I have explained it in LVM PART-I, here I’m using PE to extend.
For getting the available Physical Extend size run.
# vgdisplay

Check Available Physical Size
There are **4607** free PE available = **18GB** Free space available. So we can expand our logical volume up-to **18GB** more. Let us use the PE size to extend.
# lvextend -l +4607 /dev/vg_tecmint/LogVol01
Use **+** to add the more space. After Extending, we need to re-size the file-system using.
- Volume group vg_tecmint extended from 17.51GB to 35.50GB.
- Logical volume LogVol01 extended from 16.51GB to 34.50GB.
Here we have completed the process of extending volume group and logical volumes. Let us move towards some interesting part in Logical volume management.
#### Reducing Logical Volume (LVM) ####
Here we are going to see how to reduce the Logical Volumes. Everyone say its critical and may end up with disaster while we reduce the lvm. Reducing lvm is really interesting than any other part in Logical volume management.
- Before starting, it is always good to backup the data, so that it will not be a headache if something goes wrong.
- To Reduce a logical volume there are 5 steps needed to be done very carefully.
- While extending a volume we can extend it while the volume under mount status (online), but for reduce we must need to unmount the file system before reducing.
Let’s wee what are the 5 steps below.
- unmount the file system for reducing.
- Check the file system after unmount.
- Reduce the file system.
- Reduce the Logical Volume size than Current size.
- Recheck the file system for error.
- Remount the file-system back to stage.
For demonstration, I have created separate volume group and logical volume. Here, I’m going to reduce the logical volume **tecmint_reduce_test**. Now its 18GB in size. We need to reduce it to **10GB** without data-loss. That means we need to reduce **8GB** out of **18GB**. Already there is **4GB** data in the volume.
18GB ---> 10GB
While reducing size, we need to reduce only 8GB so it will roundup to 10GB after the reduce.
To Reduce Logical volume using PE Size we need to Know the size of default PE size and total PE size of a Volume Group to put a small calculation for accurate Reduce size.
# lvdisplay vg_tecmint_extra
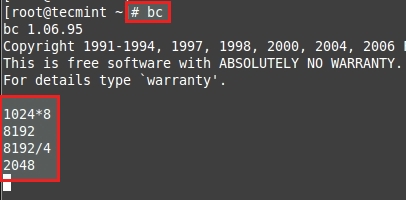
Here we need to do a little calculation to get the PE size of 10GB using bc command.
1024MB x 10GB = 10240MB or 10GB
10240MB / 4PE = 2048PE
Press **CRTL+D** to exit from BC.
In this article, we have seen how to extend the volume group, logical volume and reduce the logical volume. In the next part (Part III), we will see how to take a Snapshot of logical volume and restore it to earlier stage.