2019-08-16 11:37:55 +08:00
|
|
|
|
[#]: collector: (lujun9972)
|
|
|
|
|
|
[#]: translator: (wxy)
|
|
|
|
|
|
[#]: reviewer: (wxy)
|
2019-08-16 12:00:46 +08:00
|
|
|
|
[#]: publisher: (wxy)
|
|
|
|
|
|
[#]: url: (https://linux.cn/article-11234-1.html)
|
2019-08-16 11:37:55 +08:00
|
|
|
|
[#]: subject: (Getting started with Prometheus)
|
|
|
|
|
|
[#]: via: (https://opensource.com/article/18/12/introduction-prometheus)
|
|
|
|
|
|
[#]: author: (Michael Zamot https://opensource.com/users/mzamot)
|
|
|
|
|
|
|
|
|
|
|
|
Prometheus 入门
|
|
|
|
|
|
======
|
|
|
|
|
|
|
|
|
|
|
|
> 学习安装 Prometheus 监控和警报系统并编写它的查询。
|
|
|
|
|
|
|
|
|
|
|
|

|
|
|
|
|
|
|
|
|
|
|
|
[Prometheus][1] 是一个开源的监控和警报系统,它直接从目标主机上运行的代理程序中抓取指标,并将收集的样本集中存储在其服务器上。也可以使用像 `collectd_exporter` 这样的插件推送指标,尽管这不是 Promethius 的默认行为,但在主机位于防火墙后面或位于安全策略禁止打开端口的某些环境中它可能很有用。
|
|
|
|
|
|
|
|
|
|
|
|
Prometheus 是[云原生计算基金会(CNCF)][2]的一个项目。它使用<ruby>联合模型<rt>federation model</rt></ruby>进行扩展,该模型使得一个 Prometheus 服务器能够抓取另一个 Prometheus 服务器的数据。这允许创建分层拓扑,其中中央系统或更高级别的 Prometheus 服务器可以抓取已从下级实例收集的聚合数据。
|
|
|
|
|
|
|
|
|
|
|
|
除 Prometheus 服务器外,其最常见的组件是[警报管理器][3]及其输出器。
|
|
|
|
|
|
|
|
|
|
|
|
警报规则可以在 Prometheus 中创建,并配置为向警报管理器发送自定义警报。然后,警报管理器处理和管理这些警报,包括通过电子邮件或第三方服务(如 [PagerDuty][4])等不同机制发送通知。
|
|
|
|
|
|
|
|
|
|
|
|
Prometheus 的输出器可以是库、进程、设备或任何其他能将 Prometheus 抓取的指标公开出去的东西。 这些指标可在端点 `/metrics` 中获得,它允许 Prometheus 无需代理直接抓取它们。本文中的教程使用 `node_exporter` 来公开目标主机的硬件和操作系统指标。输出器的输出是明文的、高度可读的,这是 Prometheus 的优势之一。
|
|
|
|
|
|
|
|
|
|
|
|
此外,你可以将 Prometheus 作为后端,配置 [Grafana][5] 来提供数据可视化和仪表板功能。
|
|
|
|
|
|
|
|
|
|
|
|
### 理解 Prometheus 的配置文件
|
|
|
|
|
|
|
|
|
|
|
|
抓取 `/metrics` 的间隔秒数控制了时间序列数据库的粒度。这在配置文件中定义为 `scrape_interval` 参数,默认情况下设置为 60 秒。
|
|
|
|
|
|
|
|
|
|
|
|
在 `scrape_configs` 部分中为每个抓取作业设置了目标。每个作业都有自己的名称和一组标签,可以帮助你过滤、分类并更轻松地识别目标。一项作业可以有很多目标。
|
|
|
|
|
|
|
|
|
|
|
|
### 安装 Prometheus
|
|
|
|
|
|
|
|
|
|
|
|
在本教程中,为简单起见,我们将使用 Docker 安装 Prometheus 服务器和 `node_exporter`。Docker 应该已经在你的系统上正确安装和配置。对于更深入、自动化的方法,我推荐 Steve Ovens 的文章《[如何使用 Ansible 与 Prometheus 建立系统监控][6]》。
|
|
|
|
|
|
|
|
|
|
|
|
在开始之前,在工作目录中创建 Prometheus 配置文件 `prometheus.yml`,如下所示:
|
|
|
|
|
|
|
|
|
|
|
|
```
|
|
|
|
|
|
global:
|
|
|
|
|
|
scrape_interval: 15s
|
|
|
|
|
|
evaluation_interval: 15s
|
|
|
|
|
|
|
|
|
|
|
|
scrape_configs:
|
|
|
|
|
|
- job_name: 'prometheus'
|
|
|
|
|
|
|
|
|
|
|
|
static_configs:
|
|
|
|
|
|
- targets: ['localhost:9090']
|
|
|
|
|
|
|
|
|
|
|
|
- job_name: 'webservers'
|
|
|
|
|
|
|
|
|
|
|
|
static_configs:
|
|
|
|
|
|
- targets: ['<node exporter node IP>:9100']
|
|
|
|
|
|
```
|
|
|
|
|
|
|
|
|
|
|
|
通过运行以下命令用 Docker 启动 Prometheus:
|
|
|
|
|
|
|
|
|
|
|
|
```
|
|
|
|
|
|
$ sudo docker run -d -p 9090:9090 -v
|
|
|
|
|
|
/path/to/prometheus.yml:/etc/prometheus/prometheus.yml
|
|
|
|
|
|
prom/prometheus
|
|
|
|
|
|
```
|
|
|
|
|
|
|
|
|
|
|
|
默认情况下,Prometheus 服务器将使用端口 9090。如果此端口已在使用,你可以通过在上一个命令的后面添加参数 `--web.listen-address="<IP of machine>:<port>"` 来更改它。
|
|
|
|
|
|
|
|
|
|
|
|
在要监视的计算机中,使用以下命令下载并运行 `node_exporter` 容器:
|
|
|
|
|
|
|
|
|
|
|
|
```
|
|
|
|
|
|
$ sudo docker run -d -v "/proc:/host/proc" -v "/sys:/host/sys" -v
|
|
|
|
|
|
"/:/rootfs" --net="host" prom/node-exporter --path.procfs
|
|
|
|
|
|
/host/proc --path.sysfs /host/sys --collector.filesystem.ignored-
|
|
|
|
|
|
mount-points "^/(sys|proc|dev|host|etc)($|/)"
|
|
|
|
|
|
```
|
|
|
|
|
|
|
|
|
|
|
|
出于本文练习的目的,你可以在同一台机器上安装 `node_exporter` 和 Prometheus。请注意,生产环境中在 Docker 下运行 `node_exporter` 是不明智的 —— 这仅用于测试目的。
|
|
|
|
|
|
|
|
|
|
|
|
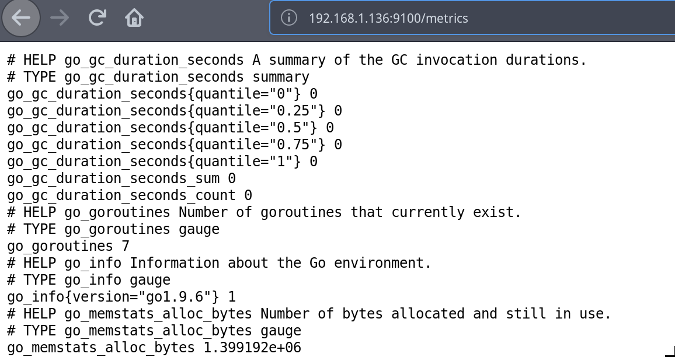
要验证 `node_exporter` 是否正在运行,请打开浏览器并导航到 `http://<IP of Node exporter host>:9100/metrics`,这将显示收集到的所有指标;也即是 Prometheus 将要抓取的相同指标。
|
|
|
|
|
|
|
|
|
|
|
|

|
|
|
|
|
|
|
|
|
|
|
|
要确认 Prometheus 服务器安装成功,打开浏览器并导航至:<http://localhost:9090>。
|
|
|
|
|
|
|
|
|
|
|
|
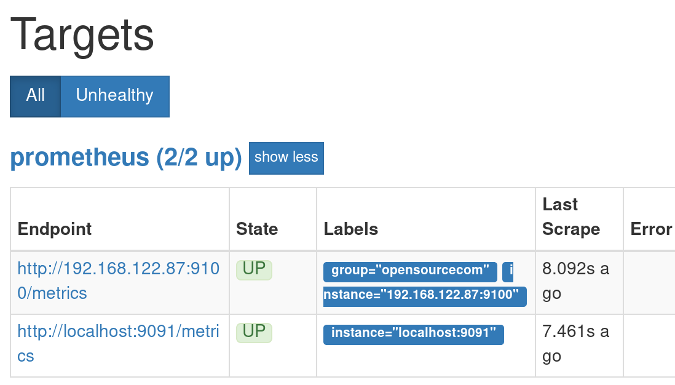
你应该看到了 Prometheus 的界面。单击“Status”,然后单击“Targets”。在 “Status” 下,你应该看到你的机器被列为 “UP”。
|
|
|
|
|
|
|
|
|
|
|
|

|
|
|
|
|
|
|
|
|
|
|
|
### 使用 Prometheus 查询
|
|
|
|
|
|
|
|
|
|
|
|
现在是时候熟悉一下 [PromQL][7](Prometheus 的查询语法)及其图形化 Web 界面了。转到 Prometheus 服务器上的 `http://localhost:9090/graph`。你将看到一个查询编辑器和两个选项卡:“Graph” 和 “Console”。
|
|
|
|
|
|
|
|
|
|
|
|
Prometheus 将所有数据存储为时间序列,使用指标名称标识每个数据。例如,指标 `node_filesystem_avail_bytes` 显示可用的文件系统空间。指标的名称可以在表达式框中使用,以选择具有此名称的所有时间序列并生成即时向量。如果需要,可以使用选择器和标签(一组键值对)过滤这些时间序列,例如:
|
|
|
|
|
|
|
|
|
|
|
|
```
|
|
|
|
|
|
node_filesystem_avail_bytes{fstype="ext4"}
|
|
|
|
|
|
```
|
|
|
|
|
|
|
|
|
|
|
|
过滤时,你可以匹配“完全相等”(`=`)、“不等于”(`!=`),“正则匹配”(`=~`)和“正则排除匹配”(`!~`)。以下示例说明了这一点:
|
|
|
|
|
|
|
|
|
|
|
|
要过滤 `node_filesystem_avail_bytes` 以显示 ext4 和 XFS 文件系统:
|
|
|
|
|
|
|
|
|
|
|
|
```
|
|
|
|
|
|
node_filesystem_avail_bytes{fstype=~"ext4|xfs"}
|
|
|
|
|
|
```
|
|
|
|
|
|
|
|
|
|
|
|
要排除匹配:
|
|
|
|
|
|
|
|
|
|
|
|
```
|
|
|
|
|
|
node_filesystem_avail_bytes{fstype!="xfs"}
|
|
|
|
|
|
```
|
|
|
|
|
|
|
|
|
|
|
|
你还可以使用方括号得到从当前时间往回的一系列样本。你可以使用 `s` 表示秒,`m` 表示分钟,`h` 表示小时,`d` 表示天,`w` 表示周,而 `y` 表示年。使用时间范围时,返回的向量将是范围向量。
|
|
|
|
|
|
|
|
|
|
|
|
例如,以下命令生成从五分钟前到现在的样本:
|
|
|
|
|
|
|
|
|
|
|
|
```
|
|
|
|
|
|
node_memory_MemAvailable_bytes[5m]
|
|
|
|
|
|
```
|
|
|
|
|
|
|
|
|
|
|
|
Prometheus 还包括了高级查询的功能,例如:
|
|
|
|
|
|
|
|
|
|
|
|
```
|
|
|
|
|
|
100 * (1 - avg by(instance)(irate(node_cpu_seconds_total{job='webservers',mode='idle'}[5m])))
|
|
|
|
|
|
```
|
|
|
|
|
|
|
|
|
|
|
|
请注意标签如何用于过滤作业和模式。指标 `node_cpu_seconds_total` 返回一个计数器,`irate()`函数根据范围间隔的最后两个数据点计算每秒的变化率(意味着该范围可以小于五分钟)。要计算 CPU 总体使用率,可以使用 `node_cpu_seconds_total` 指标的空闲(`idle`)模式。处理器的空闲比例与繁忙比例相反,因此从 1 中减去 `irate` 值。要使其为百分比,请将其乘以 100。
|
|
|
|
|
|
|
|
|
|
|
|

|
|
|
|
|
|
|
|
|
|
|
|
### 了解更多
|
|
|
|
|
|
|
|
|
|
|
|
Prometheus 是一个功能强大、可扩展、轻量级、易于使用和部署的监视工具,对于每个系统管理员和开发人员来说都是必不可少的。出于这些原因和其他原因,许多公司正在将 Prometheus 作为其基础设施的一部分。
|
|
|
|
|
|
|
|
|
|
|
|
要了解有关 Prometheus 及其功能的更多信息,我建议使用以下资源:
|
|
|
|
|
|
|
|
|
|
|
|
+ 关于 [PromQL][8]
|
|
|
|
|
|
+ 什么是 [node_exporters 集合][9]
|
|
|
|
|
|
+ [Prometheus 函数][10]
|
|
|
|
|
|
+ [4 个开源监控工具] [11]
|
|
|
|
|
|
+ [现已推出:DevOps 监控工具的开源指南] [12]
|
|
|
|
|
|
|
|
|
|
|
|
--------------------------------------------------------------------------------
|
|
|
|
|
|
|
|
|
|
|
|
via: https://opensource.com/article/18/12/introduction-prometheus
|
|
|
|
|
|
|
|
|
|
|
|
作者:[Michael Zamot][a]
|
|
|
|
|
|
选题:[lujun9972][b]
|
|
|
|
|
|
译者:[wxy](https://github.com/wxy)
|
|
|
|
|
|
校对:[wxy](https://github.com/wxy)
|
|
|
|
|
|
|
|
|
|
|
|
本文由 [LCTT](https://github.com/LCTT/TranslateProject) 原创编译,[Linux中国](https://linux.cn/) 荣誉推出
|
|
|
|
|
|
|
|
|
|
|
|
[a]: https://opensource.com/users/mzamot
|
|
|
|
|
|
[b]: https://github.com/lujun9972
|
|
|
|
|
|
[1]: https://prometheus.io/
|
|
|
|
|
|
[2]: https://www.cncf.io/
|
|
|
|
|
|
[3]: https://prometheus.io/docs/alerting/alertmanager/
|
|
|
|
|
|
[4]: https://en.wikipedia.org/wiki/PagerDuty
|
|
|
|
|
|
[5]: https://grafana.com/
|
|
|
|
|
|
[6]: https://opensource.com/article/18/3/how-use-ansible-set-system-monitoring-prometheus
|
|
|
|
|
|
[7]: https://prometheus.io/docs/prometheus/latest/querying/basics/
|
|
|
|
|
|
[8]: https://prometheus.io/docs/prometheus/latest/querying/basics/
|
|
|
|
|
|
[9]: https://github.com/prometheus/node_exporter#collectors
|
|
|
|
|
|
[10]: https://prometheus.io/docs/prometheus/latest/querying/functions/
|
|
|
|
|
|
[11]: https://opensource.com/article/18/8/open-source-monitoring-tools
|
|
|
|
|
|
[12]: https://opensource.com/article/18/8/now-available-open-source-guide-devops-monitoring-tools
|