mirror of
https://github.com/LCTT/TranslateProject.git
synced 2025-01-07 22:11:09 +08:00
79 lines
3.5 KiB
Markdown
79 lines
3.5 KiB
Markdown
|
|
Install The Latest Linux Kernel in Ubuntu Easily via A Script
|
|||
|
|
================================================================================
|
|||
|
|

|
|||
|
|
|
|||
|
|
Want to install the latest Linux Kernel? A simple script can always do the job and make things easier in Ubuntu.
|
|||
|
|
|
|||
|
|
Michael Murphy has created a script makes installing the latest RC, stable, or lowlatency Kernel easier in Ubuntu. The script asks some questions and automatically downloads and installs the latest Kernel packages from [Ubuntu kernel mainline page][1].
|
|||
|
|
|
|||
|
|
### Install / Upgrade Linux Kernel via the Script: ###
|
|||
|
|
|
|||
|
|
1. Download the script from the right sidebar of the [github page][2] (click the “Download Zip” button).
|
|||
|
|
|
|||
|
|
2. Decompress the Zip archive by right-clicking on it in your user Downloads folder and select “Extract Here”.
|
|||
|
|
|
|||
|
|
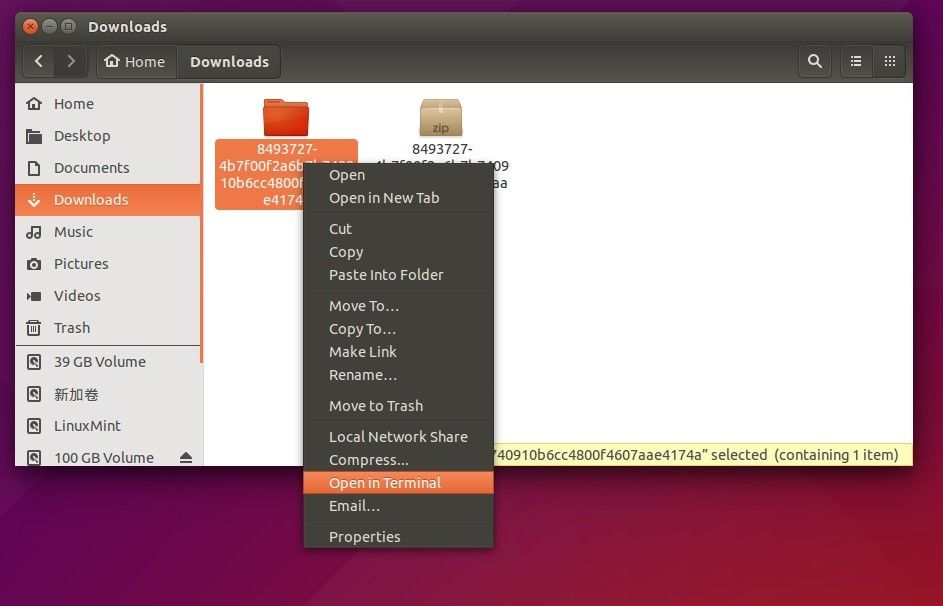
3. Navigate to the result folder in terminal by right-clicking on that folder and select “Open in Terminal”:
|
|||
|
|
|
|||
|
|

|
|||
|
|
|
|||
|
|
It opens a terminal window and automatically navigates into the result folder. If you **DON’T** find the “Open in Terminal” option, search for and install `nautilus-open-terminal` in Ubuntu Software Center and then log out and back in (or run `nautilus -q` command in terminal instead to apply changes).
|
|||
|
|
|
|||
|
|
4. When you’re in terminal, give the script executable permission for once.
|
|||
|
|
|
|||
|
|
chmod +x *
|
|||
|
|
|
|||
|
|
FINALLY run the script every time you want to install / upgrade Linux Kernel in Ubuntu:
|
|||
|
|
|
|||
|
|
./*
|
|||
|
|
|
|||
|
|

|
|||
|
|
|
|||
|
|
I use * instead of the SCRIPT NAME in both commands since it’s the only file in that folder.
|
|||
|
|
|
|||
|
|
If the script runs successfully, restart your computer when done.
|
|||
|
|
|
|||
|
|
### Revert back and Uninstall the new Kernel: ###
|
|||
|
|
|
|||
|
|
To revert back and remove the new kernel for any reason, restart your computer and select boot with the old kernel entry under **Advanced Options** menu when you’re at Grub boot-loader.
|
|||
|
|
|
|||
|
|
When it boots up, see below section.
|
|||
|
|
|
|||
|
|
### How to Remove the old (or new) Kernels: ###
|
|||
|
|
|
|||
|
|
1. Install Synaptic Package Manager from Ubuntu Software Center.
|
|||
|
|
|
|||
|
|
2. Launch Synaptic Package Manager and do:
|
|||
|
|
|
|||
|
|
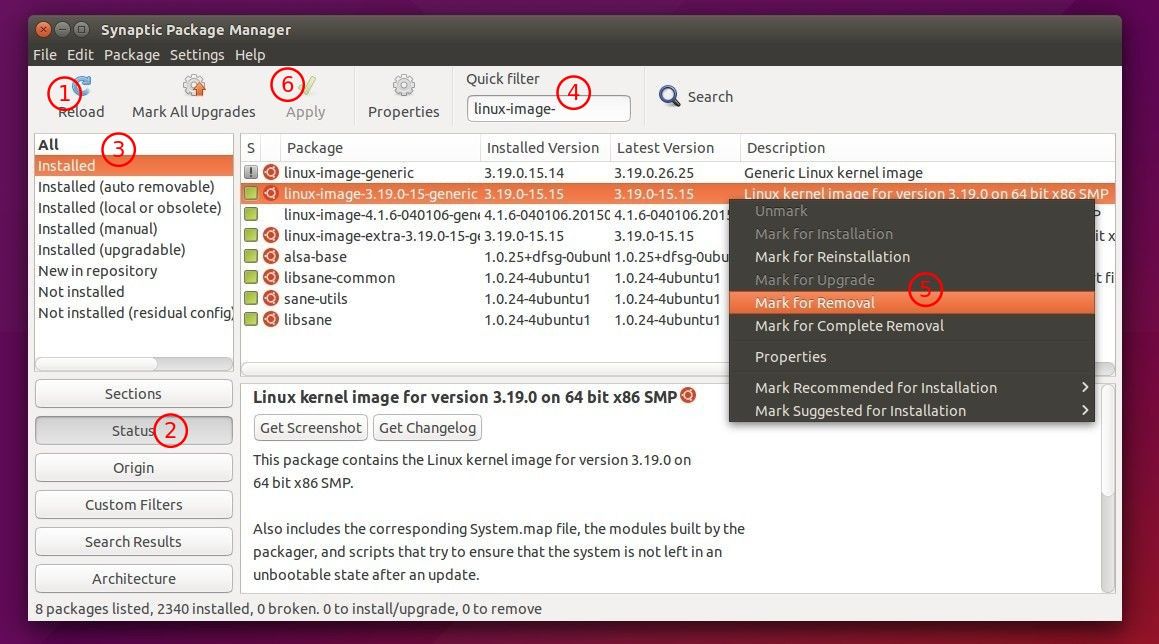
- click the **Reload** button in case you want to remove the new kernel.
|
|||
|
|
- select **Status -> Installed** on the left pane to make search list clear.
|
|||
|
|
- search **linux-image**- using Quick filter box.
|
|||
|
|
- select a kernel image “linux-image-x.xx.xx-generic” and mark for (complete) removal
|
|||
|
|
- finally apply changes
|
|||
|
|
|
|||
|
|

|
|||
|
|
|
|||
|
|
Repeat until you removed all unwanted kernels. DON’T carelessly remove the current running kernel, check it out via `uname -r` (see below pic.) command.
|
|||
|
|
|
|||
|
|
For Ubuntu Server, you may run below commands one by one:
|
|||
|
|
|
|||
|
|
uname -r
|
|||
|
|
|
|||
|
|
dpkg -l | grep linux-image-
|
|||
|
|
|
|||
|
|
sudo apt-get autoremove KERNEL_IMAGE_NAME
|
|||
|
|
|
|||
|
|

|
|||
|
|
|
|||
|
|
--------------------------------------------------------------------------------
|
|||
|
|
|
|||
|
|
via: http://ubuntuhandbook.org/index.php/2015/08/install-latest-kernel-script/
|
|||
|
|
|
|||
|
|
作者:[Ji m][a]
|
|||
|
|
译者:[译者ID](https://github.com/译者ID)
|
|||
|
|
校对:[校对者ID](https://github.com/校对者ID)
|
|||
|
|
|
|||
|
|
本文由 [LCTT](https://github.com/LCTT/TranslateProject) 原创编译,[Linux中国](https://linux.cn/) 荣誉推出
|
|||
|
|
|
|||
|
|
[a]:http://ubuntuhandbook.org/index.php/about/
|
|||
|
|
[1]:http://kernel.ubuntu.com/~kernel-ppa/mainline/
|
|||
|
|
[2]:https://gist.github.com/mmstick/8493727
|