mirror of
https://github.com/LCTT/TranslateProject.git
synced 2025-01-16 22:42:21 +08:00
293 lines
12 KiB
Markdown
293 lines
12 KiB
Markdown
|
|
Linux 平台下 Python 脚本编程入门(二)
|
|||
|
|
======================================================================================
|
|||
|
|
|
|||
|
|
在“[Linux 平台下 Python 脚本编程入门][1]”系列之前的文章里,我们向你介绍了 Python 的简介,它的命令行 shell 和 IDLE(LCTT 译注:python 自带的一个 IDE)。我们也演示了如何进行算术运算、如何在变量中存储值、还有如何打印那些值到屏幕上。最后,我们通过一个练习示例讲解了面向对象编程中方法和属性概念。
|
|||
|
|
|
|||
|
|

|
|||
|
|
|
|||
|
|
*在 Python 编程中写 Linux Shell 脚本*
|
|||
|
|
|
|||
|
|
本篇中,我们会讨论控制流(根据用户输入的信息、计算的结果,或者一个变量的当前值选择不同的动作行为)和循环(自动重复执行任务),接着应用我们目前所学东西来编写一个简单的 shell 脚本,这个脚本会显示操作系统类型、主机名、内核版本、版本号和机器硬件架构。
|
|||
|
|
|
|||
|
|
这个例子尽管很基础,但是会帮助我们证明,比起使用一般的 bash 工具,我们通过发挥 Python 面向对象的特性来编写 shell 脚本会更简单些。
|
|||
|
|
|
|||
|
|
换句话说,我们想从这里出发:
|
|||
|
|
|
|||
|
|
```
|
|||
|
|
# uname -snrvm
|
|||
|
|
```
|
|||
|
|
|
|||
|
|

|
|||
|
|
|
|||
|
|
*检查 Linux 的主机名*
|
|||
|
|
|
|||
|
|
到
|
|||
|
|
|
|||
|
|

|
|||
|
|
|
|||
|
|
*用 Python 脚本来检查 Linux 的主机名*
|
|||
|
|
|
|||
|
|
或者
|
|||
|
|
|
|||
|
|

|
|||
|
|
|
|||
|
|
*用脚本检查 Linux 系统信息*
|
|||
|
|
|
|||
|
|
看着不错,不是吗?那我们就挽起袖子,开干吧。
|
|||
|
|
|
|||
|
|
### Python 中的控制流
|
|||
|
|
|
|||
|
|
如我们刚说那样,控制流允许我们根据一个给定的条件,选择不同的输出结果。在 Python 中最简单的实现就是一个 `if`/`else` 语句。
|
|||
|
|
|
|||
|
|
基本语法是这样的:
|
|||
|
|
|
|||
|
|
```
|
|||
|
|
if 条件:
|
|||
|
|
# 动作 1
|
|||
|
|
else:
|
|||
|
|
# 动作 2
|
|||
|
|
```
|
|||
|
|
|
|||
|
|
当“条件”求值为真(true),下面的代码块就会被执行(`# 动作 1`代表的部分)。否则,else 下面的代码就会运行。
|
|||
|
|
“条件”可以是任何表达式,只要可以求得值为真或者假。
|
|||
|
|
|
|||
|
|
举个例子:
|
|||
|
|
|
|||
|
|
1. `1 < 3` # 真
|
|||
|
|
2. `firstName == "Gabriel"` # 对 firstName 为 Gabriel 的人是真,对其他不叫 Gabriel 的人为假
|
|||
|
|
|
|||
|
|
- 在第一个例子中,我们比较了两个值,判断 1 是否小于 3。
|
|||
|
|
- 在第二个例子中,我们比较了 firstName(一个变量)与字符串 “Gabriel”,看在当前执行的位置,firstName 的值是否等于该字符串。
|
|||
|
|
- 条件和 else 表达式都必须跟着一个冒号(`:`)。
|
|||
|
|
- **缩进在 Python 中非常重要**。同样缩进下的行被认为是相同的代码块。
|
|||
|
|
|
|||
|
|
请注意,`if`/`else` 表达式只是 Python 中许多控制流工具的一个而已。我们先在这里了解以下,后面会用在我们的脚本中。你可以在[官方文档][2]中学到更多工具。
|
|||
|
|
|
|||
|
|
### Python 中的循环
|
|||
|
|
|
|||
|
|
简单来说,一个循环就是一组指令或者表达式序列,可以按顺序一直执行,只要条件为真,或者对列表里每个项目执行一一次。
|
|||
|
|
|
|||
|
|
Python 中最简单的循环,就是用 for 循环迭代一个给定列表的元素,或者对一个字符串从第一个字符开始到执行到最后一个字符结束。
|
|||
|
|
|
|||
|
|
基本语句:
|
|||
|
|
|
|||
|
|
```
|
|||
|
|
for x in example:
|
|||
|
|
# do this
|
|||
|
|
```
|
|||
|
|
|
|||
|
|
这里的 example 可以是一个列表或者一个字符串。如果是列表,变量 x 就代表列表中每个元素;如果是字符串,x 就代表字符串中每个字符。
|
|||
|
|
|
|||
|
|
```
|
|||
|
|
>>> rockBands = []
|
|||
|
|
>>> rockBands.append("Roxette")
|
|||
|
|
>>> rockBands.append("Guns N' Roses")
|
|||
|
|
>>> rockBands.append("U2")
|
|||
|
|
>>> for x in rockBands:
|
|||
|
|
print(x)
|
|||
|
|
或
|
|||
|
|
>>> firstName = "Gabriel"
|
|||
|
|
>>> for x in firstName:
|
|||
|
|
print(x)
|
|||
|
|
```
|
|||
|
|
|
|||
|
|
上面例子的输出如下图所示:
|
|||
|
|
|
|||
|
|

|
|||
|
|
|
|||
|
|
*学习 Python 中的循环*
|
|||
|
|
|
|||
|
|
### Python 模块
|
|||
|
|
|
|||
|
|
很明显,必须有个办法将一系列的 Python 指令和表达式保存到文件里,然后在需要的时候取出来。
|
|||
|
|
|
|||
|
|
准确来说模块就是这样的。比如,os 模块提供了一个到操作系统的底层的接口,可以允许我们做许多通常在命令行下执行的操作。
|
|||
|
|
|
|||
|
|
没错,os 模块包含了许多可以用来调用的方法和属性,就如我们之前文章里讲解的那样。不过,我们需要使用 `import` 关键词导入(或者叫包含)模块到运行环境里来:
|
|||
|
|
|
|||
|
|
```
|
|||
|
|
>>> import os
|
|||
|
|
```
|
|||
|
|
|
|||
|
|
我们来打印出当前的工作目录:
|
|||
|
|
|
|||
|
|
```
|
|||
|
|
>>> os.getcwd()
|
|||
|
|
```
|
|||
|
|
|
|||
|
|

|
|||
|
|
|
|||
|
|
*学习 Python 模块*
|
|||
|
|
|
|||
|
|
现在,让我们把这些结合在一起(包括之前文章里讨论的概念),编写需要的脚本。
|
|||
|
|
|
|||
|
|
### Python 脚本
|
|||
|
|
|
|||
|
|
以一段声明文字开始一个脚本是个不错的想法,它可以表明脚本的目的、发布所依据的许可证,以及一个列出做出的修改的修订历史。尽管这主要是个人喜好,但这会让我们的工作看起来比较专业。
|
|||
|
|
|
|||
|
|
这里有个脚本,可以输出这篇文章最前面展示的那样。脚本做了大量的注释,可以让大家可以理解发生了什么。
|
|||
|
|
|
|||
|
|
在进行下一步之前,花点时间来理解它。注意,我们是如何使用一个 `if`/`else` 结构,判断每个字段标题的长度是否比字段本身的值还大。
|
|||
|
|
|
|||
|
|
基于比较结果,我们用空字符去填充一个字段标题和下一个之间的空格。同时,我们使用一定数量的短线作为字段标题与其值之间的分割符。
|
|||
|
|
|
|||
|
|
```
|
|||
|
|
#!/usr/bin/python3
|
|||
|
|
# 如果你没有安装 Python 3 ,那么修改这一行为 #!/usr/bin/python
|
|||
|
|
|
|||
|
|
# Script name: uname.py
|
|||
|
|
# Purpose: Illustrate Python's OOP capabilities to write shell scripts more easily
|
|||
|
|
# License: GPL v3 (http://www.gnu.org/licenses/gpl.html)
|
|||
|
|
|
|||
|
|
# Copyright (C) 2016 Gabriel Alejandro Cánepa
|
|||
|
|
# Facebook / Skype / G+ / Twitter / Github: gacanepa
|
|||
|
|
# Email: gacanepa (at) gmail (dot) com
|
|||
|
|
|
|||
|
|
# This program is free software: you can redistribute it and/or modify
|
|||
|
|
# it under the terms of the GNU General Public License as published by
|
|||
|
|
# the Free Software Foundation, either version 3 of the License, or
|
|||
|
|
# (at your option) any later version.
|
|||
|
|
|
|||
|
|
# This program is distributed in the hope that it will be useful,
|
|||
|
|
# but WITHOUT ANY WARRANTY; without even the implied warranty of
|
|||
|
|
# MERCHANTABILITY or FITNESS FOR A PARTICULAR PURPOSE. See the
|
|||
|
|
# GNU General Public License for more details.
|
|||
|
|
|
|||
|
|
# You should have received a copy of the GNU General Public License
|
|||
|
|
# along with this program. If not, see .
|
|||
|
|
|
|||
|
|
# REVISION HISTORY
|
|||
|
|
# DATE VERSION AUTHOR CHANGE DESCRIPTION
|
|||
|
|
# ---------- ------- --------------
|
|||
|
|
# 2016-05-28 1.0 Gabriel Cánepa Initial version
|
|||
|
|
|
|||
|
|
### 导入 os 模块
|
|||
|
|
import os
|
|||
|
|
|
|||
|
|
### 将 os.uname() 的输出赋值给 systemInfo 变量
|
|||
|
|
### os.uname() 会返回五个字符串元组(sysname, nodename, release, version, machine)
|
|||
|
|
### 参见文档:https://docs.python.org/3.2/library/os.html#module-os
|
|||
|
|
systemInfo = os.uname()
|
|||
|
|
|
|||
|
|
### 这是一个固定的数组,用于描述脚本输出的字段标题
|
|||
|
|
headers = ["Operating system","Hostname","Release","Version","Machine"]
|
|||
|
|
|
|||
|
|
### 初始化索引值,用于定义每一步迭代中
|
|||
|
|
### systemInfo 和字段标题的索引
|
|||
|
|
index = 0
|
|||
|
|
|
|||
|
|
### 字段标题变量的初始值
|
|||
|
|
caption = ""
|
|||
|
|
|
|||
|
|
### 值变量的初始值
|
|||
|
|
values = ""
|
|||
|
|
|
|||
|
|
### 分隔线变量的初始值
|
|||
|
|
separators = ""
|
|||
|
|
|
|||
|
|
### 开始循环
|
|||
|
|
for item in systemInfo:
|
|||
|
|
if len(item) < len(headers[index]):
|
|||
|
|
### 一个包含横线的字符串,横线长度等于item[index] 或 headers[index]
|
|||
|
|
### 要重复一个字符,用引号圈起来并用星号(*)乘以所需的重复次数
|
|||
|
|
separators = separators + "-" * len(headers[index]) + " "
|
|||
|
|
caption = caption + headers[index] + " "
|
|||
|
|
values = values + systemInfo[index] + " " * (len(headers[index]) - len(item)) + " "
|
|||
|
|
else:
|
|||
|
|
separators = separators + "-" * len(item) + " "
|
|||
|
|
caption = caption + headers[index] + " " * (len(item) - len(headers[index]) + 1)
|
|||
|
|
values = values + item + " "
|
|||
|
|
### 索引加 1
|
|||
|
|
index = index + 1
|
|||
|
|
### 终止循环
|
|||
|
|
|
|||
|
|
### 输出转换为大写的变量(字段标题)名
|
|||
|
|
print(caption.upper())
|
|||
|
|
|
|||
|
|
### 输出分隔线
|
|||
|
|
print(separators)
|
|||
|
|
|
|||
|
|
# 输出值(systemInfo 中的项目)
|
|||
|
|
print(values)
|
|||
|
|
|
|||
|
|
### 步骤:
|
|||
|
|
### 1) 保持该脚本为 uname.py (或任何你想要的名字)
|
|||
|
|
### 并通过如下命令给其执行权限:
|
|||
|
|
### chmod +x uname.py
|
|||
|
|
### 2) 执行它;
|
|||
|
|
### ./uname.py
|
|||
|
|
```
|
|||
|
|
|
|||
|
|
如果你已经按照上述描述将上面的脚本保存到一个文件里,并给文件增加了执行权限,那么运行它:
|
|||
|
|
|
|||
|
|
```
|
|||
|
|
# chmod +x uname.py
|
|||
|
|
# ./uname.py
|
|||
|
|
```
|
|||
|
|
|
|||
|
|
如果试图运行脚本时你得到了如下的错误:
|
|||
|
|
|
|||
|
|
```
|
|||
|
|
-bash: ./uname.py: /usr/bin/python3: bad interpreter: No such file or directory
|
|||
|
|
```
|
|||
|
|
|
|||
|
|
这意味着你没有安装 Python3。如果那样的话,你要么安装 Python3 的包,要么替换解释器那行(如果如之前文章里概述的那样,跟着下面的步骤去更新 Python 执行文件的软连接,要特别注意并且非常小心):
|
|||
|
|
|
|||
|
|
```
|
|||
|
|
#!/usr/bin/python3
|
|||
|
|
```
|
|||
|
|
|
|||
|
|
为
|
|||
|
|
|
|||
|
|
```
|
|||
|
|
#!/usr/bin/python
|
|||
|
|
```
|
|||
|
|
|
|||
|
|
这样会通过使用已经安装好的 Python 2 去执行该脚本。
|
|||
|
|
|
|||
|
|
**注意**:该脚本在 Python 2.x 与 Pyton 3.x 上都测试成功过了。
|
|||
|
|
|
|||
|
|
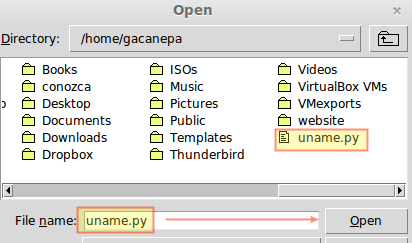
尽管比较粗糙,你可以认为该脚本就是一个 Python 模块。这意味着你可以在 IDLE 中打开它(File → Open… → Select file):
|
|||
|
|
|
|||
|
|

|
|||
|
|
|
|||
|
|
*在 IDLE 中打开 Python*
|
|||
|
|
|
|||
|
|
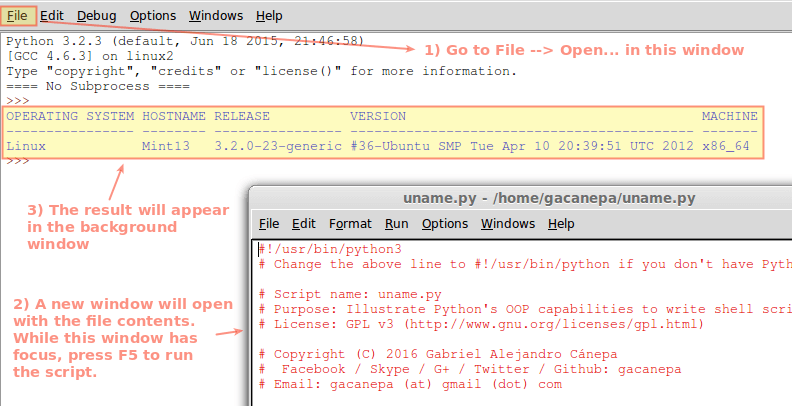
一个包含有文件内容的新窗口就会打开。然后执行 Run → Run module(或者按 F5)。脚本的输出就会在原始的 Shell 里显示出来:
|
|||
|
|
|
|||
|
|

|
|||
|
|
|
|||
|
|
*执行 Python 脚本*
|
|||
|
|
|
|||
|
|
如果你想纯粹用 bash 写一个脚本,也获得同样的结果,你可能需要结合使用 [awk][3]、[sed][4],并且借助复杂的方法来存储与获得列表中的元素(不要忘了使用 tr 命令将小写字母转为大写)。
|
|||
|
|
|
|||
|
|
另外,在所有的 Linux 系统版本中都至少集成了一个 Python 版本(2.x 或者 3.x,或者两者都有)。你还需要依赖 shell 去完成同样的目标吗?那样你可能需要为不同的 shell 编写不同的版本。
|
|||
|
|
|
|||
|
|
这里演示了面向对象编程的特性,它会成为一个系统管理员得力的助手。
|
|||
|
|
|
|||
|
|
**注意**:你可以在我的 Github 仓库里获得 [这个 python 脚本][5](或者其他的)。
|
|||
|
|
|
|||
|
|
### 总结
|
|||
|
|
|
|||
|
|
这篇文章里,我们讲解了 Python 中控制流、循环/迭代、和模块的概念。我们也演示了如何利用 Python 中面向对象编程的方法和属性来简化复杂的 shell 脚本。
|
|||
|
|
|
|||
|
|
你有任何其他希望去验证的想法吗?开始吧,写出自己的 Python 脚本,如果有任何问题可以咨询我们。不必犹豫,在分割线下面留下评论,我们会尽快回复你。
|
|||
|
|
|
|||
|
|
--------------------------------------------------------------------------------
|
|||
|
|
|
|||
|
|
via: http://www.tecmint.com/learn-python-programming-to-write-linux-shell-scripts/
|
|||
|
|
|
|||
|
|
作者:[Gabriel Cánepa][a]
|
|||
|
|
译者:[wi-cuckoo](https://github.com/wi-cuckoo)
|
|||
|
|
校对:[wxy](https://github.com/wxy)
|
|||
|
|
|
|||
|
|
本文由 [LCTT](https://github.com/LCTT/TranslateProject) 原创编译,[Linux中国](https://linux.cn/) 荣誉推出
|
|||
|
|
|
|||
|
|
[a]: http://www.tecmint.com/author/gacanepa/
|
|||
|
|
[1]: http://www.tecmint.com/learn-python-programming-and-scripting-in-linux/
|
|||
|
|
[2]: http://please%20note%20that%20the%20if%20/%20else%20statement%20is%20only%20one%20of%20the%20many%20control%20flow%20tools%20available%20in%20Python.%20We%20reviewed%20it%20here%20since%20we%20will%20use%20it%20in%20our%20script%20later.%20You%20can%20learn%20more%20about%20the%20rest%20of%20the%20tools%20in%20the%20official%20docs.
|
|||
|
|
[3]: http://www.tecmint.com/use-linux-awk-command-to-filter-text-string-in-files/
|
|||
|
|
[4]: http://www.tecmint.com/sed-command-to-create-edit-and-manipulate-files-in-linux/
|
|||
|
|
[5]: https://github.com/gacanepa/scripts/blob/master/python/uname.py
|
|||
|
|
|