2015-02-23 08:31:19 +08:00
如何在树莓派上使用图片特效
2015-01-21 16:18:33 +08:00
================================================================================
2015-02-23 08:31:19 +08:00
现在使用[树莓派摄像头模组][1]("raspi cam"),也可以像使用卡片相机那样,给拍摄的照片增加各种各样的图片特效。 raspistill命令行工具, ,
2015-01-21 16:18:33 +08:00
2015-02-23 08:31:19 +08:00
你可以用[这3个命令行工具][2]来[抓取raspicam拍摄的照片或者视频][3], , : ( ) ( ) ( ) ( ) ( ) ( )
2015-01-21 16:18:33 +08:00
2015-02-23 08:31:19 +08:00
在这篇文章中, ,
2015-01-21 16:18:33 +08:00
2015-02-23 08:31:19 +08:00
Python脚本很简单,
2015-01-21 16:18:33 +08:00
#!/usb/bin/python
import os
import time
import subprocess
list_ex=['auto','night']
list_awb=['auto','cloud',flash']
list_ifx=['blur','cartoon','colourswap','emboss','film','gpen','hatch','negative','oilpaint','posterise','sketch','solarise','watercolour']
x=0
for ex in list_ex:
for awb in list_awb:
for ifx in list_ifx:
x=x+1
filename='img_'+ex+'_'+awb+'_'+ifx+'.jpg'
cmd='raspistill -o '+filename+' -n -t 1000 -ex '+ex+' -awb '+awb+' -ifx '+ifx+' -w 640 -h 480'
pid=subprocess.call(cmd,shell=True)
print "["+str(x)+"]-"+ex+"_"+awb+"_"+ifx+".jpg"
time.sleep(0.25)
print "End of image capture"
The Python script operates as follows. First, create three array/list variable for the exposure, AWB and image effects. In the example, we use 2 types of exposure, 3 types of AWB, and 13 types of image effects values. Then make nested loops for applying the value of the three variables that we have. Inside the nested loop, execute the raspistill application. We specify (1) the output filename; (2) exposure value; (3) AWB value; (4) image effect value; (5) the time to take a photo, which is set to 1 second; and (6) the size of the photo, which is set to 640x480px. This Python script will create 78 different versions of a captured photo with a combination of 2 types of exposure, 3 types of AWB, and 13 types of image effects.
2015-02-23 08:31:19 +08:00
这个脚本完成了以下几个工作。首先, , , , , : ( ) ; ( ) ; ( ) ; ( ) ; ( ) , ; ( ) , ,
执行这个脚本也很简单,只需键入下面的命令行:
2015-01-21 16:18:33 +08:00
$ python name_of_this_script.py
2015-02-23 08:31:19 +08:00
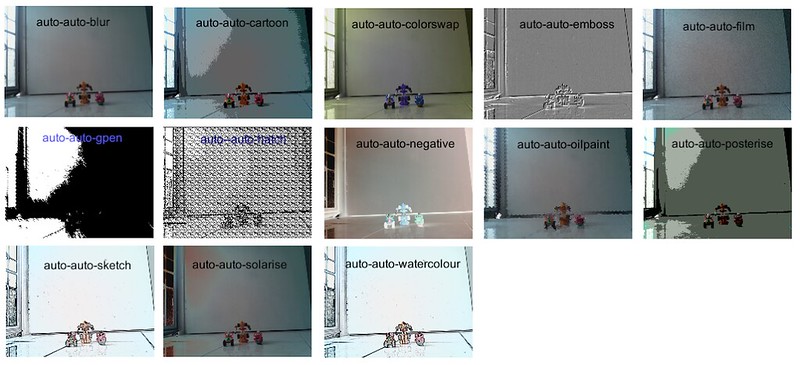
下面是抓取到一些样张。
2015-01-21 16:18:33 +08:00

2015-02-23 08:31:19 +08:00
### 小福利 ###
2015-01-21 16:18:33 +08:00
2015-02-23 08:31:19 +08:00
除了使用raspistill命令行工具来操控raspicam摄像模组以外, , , , , ,
2015-01-21 16:18:33 +08:00
2015-02-23 08:31:19 +08:00
首先, ,
2015-01-21 16:18:33 +08:00
2015-02-23 08:31:19 +08:00
然后,
2015-01-21 16:18:33 +08:00
$ sudo pip install picamera
2015-02-23 08:31:19 +08:00
picamera的使用说明可以查阅[官方文档][7]。
2015-01-21 16:18:33 +08:00
--------------------------------------------------------------------------------
via: http://xmodulo.com/apply-image-effects-pictures-raspberrypi.html
作者:[Kristophorus Hadiono][a]
2015-02-23 08:31:19 +08:00
译者:[coloka](https://github.com/coloka)
2015-01-21 16:18:33 +08:00
校对:[校对者ID](https://github.com/校对者ID)
本文由 [LCTT ](https://github.com/LCTT/TranslateProject ) 原创翻译,[Linux中国](http://linux.cn/) 荣誉推出
[a]:http://xmodulo.com/author/kristophorus
[1]:http://xmodulo.com/go/picam
[2]:http://www.raspberrypi.org/documentation/usage/camera/raspicam/
[3]:http://xmodulo.com/install-raspberry-pi-camera-board.html
[4]:https://pypi.python.org/pypi/picamera
[5]:http://xmodulo.com/go/raspberrypi
[6]:http://ask.xmodulo.com/install-pip-linux.html
[7]:http://picamera.readthedocs.org/