mirror of
https://github.com/LCTT/TranslateProject.git
synced 2025-02-28 01:01:09 +08:00
258 lines
12 KiB
Markdown
258 lines
12 KiB
Markdown
|
|
Create an Active Directory Infrastructure with Samba4 on Ubuntu – Part 1
|
|||
|
|
============================================================
|
|||
|
|
在 Ubuntu 系统上使用 Samba4 软件来创建活动目录架构 —— 第一节
|
|||
|
|
|
|||
|
|
Samba 是一个免费的开源软件套件,用于实现 Windows 主机与 Linux/Unix 服务器之间的无缝连接及共享资源。
|
|||
|
|
|
|||
|
|
Samba 不仅可以通过 SMB/CIFS 协议组件来为 Windows 与 Linux 系统之间提供独立的文件及打印机共享服务,它还能实现活动目录域控制器的功能,或者让 Linux 主机加入到域环境中作为域成员服务器。当前的 Samba4 版本实现的 AD DC 域及林功能级别可以取代 Windows 2008 R2 系统的域相关功能。
|
|||
|
|
|
|||
|
|
该序列的文章的主要内容是使用 Samba4 软件来配置活动目录域控制器,包括与 Ubuntu,CentOS 和 Windows 系统相关的以下主题:
|
|||
|
|
|
|||
|
|
第 1 节:在 Ubuntu 系统上使用 Samba4 软件来创建活动目录架构
|
|||
|
|
第 2 节:[在 Linux 命令行下管理 Samba4 AD 架构][4]
|
|||
|
|
第 3 节:在 Windows 10 操作系统上安装 RSAT 工具来管理 Samba4 AD
|
|||
|
|
第 4 节:使用 Sysvol Replication 复制功能把 Samba 4 DC 加入到已有的 AD
|
|||
|
|
第 5 节:从 Linux DC 服务器通过GOP来添加一个共享磁盘并映射到 AD
|
|||
|
|
第 6 节:把 Ubuntu 16.04 系统主机作为域成员服务器添加到 AD
|
|||
|
|
第 7 节:把 CenterOS 7 系统主机作为域成员服务器添加到 AD
|
|||
|
|
第 8 节:在 AD Intranet 区域创建使用kerberos认证的 Apache Website
|
|||
|
|
|
|||
|
|
该向导将阐明在 Ubuntu 16.04 和 Ubuntu 14.04 操作系统上安装配置 Samba4 作为域控服务器组件的过程中,你需要注意的每一个步骤。
|
|||
|
|
|
|||
|
|
This configuration will provide a central management point for users, machines, volume shares, permissions and other resources in a mixed-up Windows – Linux infrastructure.
|
|||
|
|
以下安装配置文档将会说明在 Windows 和 Linux 的混合系统环境中,关于用户,机器,共享磁盘,权限及其它资源信息的主要配置点。
|
|||
|
|
|
|||
|
|
#### 环境要求:
|
|||
|
|
|
|||
|
|
1. [Ubuntu 16.04 服务器安装Server Installation][1].
|
|||
|
|
2. [Ubuntu 14.04 服务器安装Server Installation][2].
|
|||
|
|
3. 为你的 AD DC 服务器[设置静态IP地址][3]
|
|||
|
|
|
|||
|
|
### Step 1: 初始化 Samba4 安装环境
|
|||
|
|
|
|||
|
|
1. 在开始安装 Samba4 AD DC 之前,咱们先运行一些先决条件的检查步骤。首先运行以下命令来确保系统已更新了最新的安全特性,内核及其它补丁:
|
|||
|
|
|
|||
|
|
```
|
|||
|
|
$ sudo apt-get update
|
|||
|
|
$ sudo apt-get upgrade
|
|||
|
|
$ sudo apt-get dist-upgrade
|
|||
|
|
```
|
|||
|
|
|
|||
|
|
2. 其次,打开服务器上的 /etc/fstab 文件,确保文件系统分区的 ACL 已经设置为 enabled ,如下图所示。
|
|||
|
|
|
|||
|
|
通常情况下,当前常见的 Linux 文件系统,比如 ext3,ext4,xfs 或 btrfs 都默认支持并已经设置 ACL 为enabled 。如果未设置,则打开并编辑 /etc/fstab 文件,在第三列添加 'acl',然后重启系统以使用修改的配置生效。
|
|||
|
|
|
|||
|
|
[
|
|||
|
|

|
|||
|
|
][5]
|
|||
|
|
|
|||
|
|
启动 Linux 文件系统的 ACL 功能
|
|||
|
|
|
|||
|
|
3. 最后使用一个具有描述性的名称来[设置主机名][6] ,比如这往篇文章所使用的 ‘adc1'。通过编辑 /etc/hostname 文件或使用使用下图所示的命令来设置主机名。
|
|||
|
|
|
|||
|
|
```
|
|||
|
|
$ sudo hostnamectl set-hostname adc1
|
|||
|
|
```
|
|||
|
|
|
|||
|
|
为了使修改的主机名生效必须重启服务器。
|
|||
|
|
|
|||
|
|
### Step 2: 为 Samba4 AD DC 服务器安装必需的软件包
|
|||
|
|
|
|||
|
|
4. 为了让你的服务器转变为域控服务器,你需要在服务器上使用具有 root 权限的账号执行以下命令来安装 Samba 套件及所有必需的软件包。
|
|||
|
|
|
|||
|
|
```
|
|||
|
|
$ sudo apt-get install samba krb5-user krb5-config winbind libpam-winbind libnss-winbind
|
|||
|
|
```
|
|||
|
|
[
|
|||
|
|

|
|||
|
|
][7]
|
|||
|
|
|
|||
|
|
在Ubuntu系统上安装 Samba套件
|
|||
|
|
|
|||
|
|
5. 安装包在执行的过程中将会询问你一系列的问题以便完成域控制器的配置。
|
|||
|
|
|
|||
|
|
在第一个截图中你需要为 Kerberos 添加一个默认的大写的名字 ’REALM‘。输入你的域环境中需要使用的大写的域名,然后单击 Enter 继续。
|
|||
|
|
[
|
|||
|
|

|
|||
|
|
][8]
|
|||
|
|
|
|||
|
|
配置 Kerosene 认证服务
|
|||
|
|
|
|||
|
|
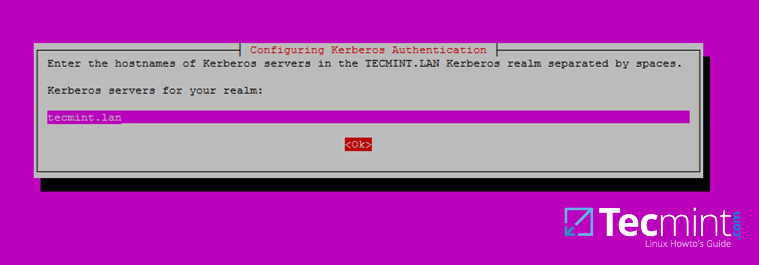
6. 下一步,输入当前域中 Kerberos 服务器的主机名。使用跟域或相同的名字,这一次使用小写,然后单击 Enter 继续。
|
|||
|
|
|
|||
|
|
[
|
|||
|
|

|
|||
|
|
][9]
|
|||
|
|
|
|||
|
|
设置 Kerberos 服务器的主机名
|
|||
|
|
|
|||
|
|
7. Finally, specify the hostname for the administrative server of your Kerberos realm. Use the same as your domain and hit Enter to finish the installation.最后,指定 Kerberos realm 管理服务器的主机名。使用跟域名相同的名字,单击 Enter 后安装完成。
|
|||
|
|
|
|||
|
|
[
|
|||
|
|

|
|||
|
|
][10]
|
|||
|
|
|
|||
|
|
Set Hostname Administrative Server
|
|||
|
|
设置管理服务器的主机名
|
|||
|
|
|
|||
|
|
### Step 3: 为你的域环境开启 Samba AD DC 服务
|
|||
|
|
|
|||
|
|
8. 在为域服务器配置 Samba 服务之前,先运行如下命令来停止并禁用所有 Samba 进程。
|
|||
|
|
|
|||
|
|
```
|
|||
|
|
$ sudo systemctl stop samba-ad-dc.service smbd.service nmbd.service winbind.service
|
|||
|
|
$ sudo systemctl disable samba-ad-dc.service smbd.service nmbd.service winbind.service
|
|||
|
|
```
|
|||
|
|
|
|||
|
|
9. 下一步,重命名或删除 Samba 原始配置文件。在开启 Samba 服务之前,必须执行这一步操作,因为在开启服务的过程中 Samba 将会创建一个新的配置文件,如果检测到原有的 ’smb.conf' 配置文件则会报错。
|
|||
|
|
|
|||
|
|
```
|
|||
|
|
$ sudo mv /etc/samba/smb.conf /etc/samba/smb.conf.initial
|
|||
|
|
```
|
|||
|
|
|
|||
|
|
10. 现在,使用 root 权限的账号并接受 Samba 提示的默认选项,以交互试方式启动 domain provision。
|
|||
|
|
|
|||
|
|
还有,输入正确的 DNS 服务器地址并且为 Administrator 账号设置强密码。如果使用的是弱密码,则 domain provison 过程会失败。
|
|||
|
|
|
|||
|
|
```
|
|||
|
|
$ sudo samba-tool domain provision --use-rfc2307 –interactive
|
|||
|
|
```
|
|||
|
|
[
|
|||
|
|

|
|||
|
|
][11]
|
|||
|
|
|
|||
|
|
Samba Domain Provisioning
|
|||
|
|
|
|||
|
|
11. 最后,使用以下命令重命名或删除 Kerberos 认证在 /etc 目录下的主配置文件,并且把 Samba 新生成的 Kerberos 配置文件创建一个软链接指向 /etc 目录。
|
|||
|
|
|
|||
|
|
```
|
|||
|
|
$ sudo mv /etc/krb6.conf /etc/krb5.conf.initial
|
|||
|
|
$ sudo ln –s /var/lib/samba/private/krb5.conf /etc/
|
|||
|
|
```
|
|||
|
|
[
|
|||
|
|

|
|||
|
|
][12]
|
|||
|
|
|
|||
|
|
创建 Kerberos 配置文件
|
|||
|
|
|
|||
|
|
12. 启动并开启 Samba 活动目录域控制器后台进程
|
|||
|
|
|
|||
|
|
```
|
|||
|
|
$ sudo systemctl start samba-ad-dc.service
|
|||
|
|
$ sudo systemctl status samba-ad-dc.service
|
|||
|
|
$ sudo systemctl enable samba-ad-dc.service
|
|||
|
|
```
|
|||
|
|
[
|
|||
|
|

|
|||
|
|
][13]
|
|||
|
|
|
|||
|
|
开启 Samba 活动目录域控制器服务
|
|||
|
|
|
|||
|
|
13. 下一步,[使用 netstat 命令][14] 来验证活动目录启动的服务是否正常。
|
|||
|
|
|
|||
|
|
```
|
|||
|
|
$ sudo netstat –tulpn| egrep ‘smbd|samba’
|
|||
|
|
```
|
|||
|
|
[
|
|||
|
|

|
|||
|
|
][15]
|
|||
|
|
|
|||
|
|
验证 Samba 活动目录
|
|||
|
|
|
|||
|
|
### Step 4: Samba 最后的配置
|
|||
|
|
|
|||
|
|
14. 此刻,Samba 应该跟你想像的一样,完全运行正常。Samba 现在实现的域功能级别可以完全跟 Windows AD DC 2008 R2 相媲美。
|
|||
|
|
|
|||
|
|
可以使用 samba-tool 工具来验证 Samba 服务是否正常
|
|||
|
|
|
|||
|
|
```
|
|||
|
|
$ sudo samba-tool domain level show
|
|||
|
|
```
|
|||
|
|
[
|
|||
|
|

|
|||
|
|
][16]
|
|||
|
|
|
|||
|
|
验证 Samba 域服务级别
|
|||
|
|
|
|||
|
|
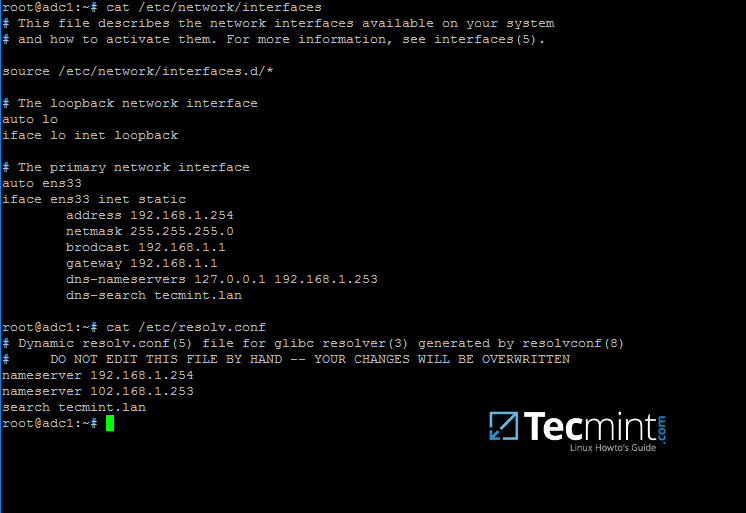
15. 为了满足 DNS 本地解析的需求,你可以编辑网卡配置文件,修改 dns-nameservers 参数的值为域控制器地址(使用 127.0.0.1作为本地 DNS 解析地址),并且设置 dns-search 参数为你的 realm 值。
|
|||
|
|
|
|||
|
|
```
|
|||
|
|
$ sudo cat /etc/network/interfaces
|
|||
|
|
$ sudo cat /etc/resolv.conf
|
|||
|
|
```
|
|||
|
|
[
|
|||
|
|

|
|||
|
|
][17]
|
|||
|
|
|
|||
|
|
为 Samba 配置 DNS 服务器地址
|
|||
|
|
|
|||
|
|
设置完成后,重启服务并检查解析文件是否指向正确的 DNS 服务器地址。
|
|||
|
|
|
|||
|
|
16. 最后,通过 ping 命令查询结果来检查某些重要的 AD DC 记录是否正常,使用类似下面的命令,替换对应的域名。
|
|||
|
|
|
|||
|
|
```
|
|||
|
|
$ ping –c3 tecmint.lan #Domain Name
|
|||
|
|
$ ping –c3 adc1.tecmint.lan #FQDN
|
|||
|
|
$ ping –c3 adc1 #Host
|
|||
|
|
```
|
|||
|
|
[
|
|||
|
|

|
|||
|
|
][18]
|
|||
|
|
|
|||
|
|
检查 Samba AD DNS Records
|
|||
|
|
|
|||
|
|
执行下面的一些查询命令来检查 Samba 活动目录域控制器是否正常。
|
|||
|
|
```
|
|||
|
|
$ host –t A tecmint.lan
|
|||
|
|
$ host –t A adc1.tecmint.lan
|
|||
|
|
$ host –t SRV _kerberos._udp.tecmint.lan # UDP Kerberos SRV record
|
|||
|
|
$ host -t SRV _ldap._tcp.tecmint.lan # TCP LDAP SRV record
|
|||
|
|
```
|
|||
|
|
|
|||
|
|
17. 并且,通过请求一个域管理员账号的票据来列出缓存的票据信息以验证 Kerberos 认证是否正常。注意域名部分使用大写。
|
|||
|
|
|
|||
|
|
```
|
|||
|
|
$ kinit administrator@TECMINT.LAN
|
|||
|
|
$ klist
|
|||
|
|
```
|
|||
|
|
[
|
|||
|
|

|
|||
|
|
][19]
|
|||
|
|
|
|||
|
|
检查域环境中的 Kerberos 认证是否正确
|
|||
|
|
|
|||
|
|
至此! 你当前的网络环境中已经完全运行着一个 AD 域控制器,你现在可以把 Windows 或 Linux 系统的主机集成到 Samba AD 中了。
|
|||
|
|
|
|||
|
|
在下一期的文章中将会包括其它Samba AD 域的主题,比如,在 Samba 命令行下如何管理你的域控制器,如何把 Windows 10 系统主机添加到同一个域环境中,如何使用 RSAT 工具远程管理 Samba AD 域,以及其它重要的主题。
|
|||
|
|
|
|||
|
|
--------------------------------------------------------------------------------
|
|||
|
|
|
|||
|
|
via: http://www.tecmint.com/install-samba4-active-directory-ubuntu/
|
|||
|
|
|
|||
|
|
作者:[Matei Cezar ][a]
|
|||
|
|
译者:[译者ID](https://github.com/rusking)
|
|||
|
|
校对:[校对者ID](https://github.com/校对者ID)
|
|||
|
|
|
|||
|
|
本文由 [LCTT](https://github.com/LCTT/TranslateProject) 原创编译,[Linux中国](https://linux.cn/) 荣誉推出
|
|||
|
|
|
|||
|
|
[a]:http://www.tecmint.com/author/cezarmatei/
|
|||
|
|
[1]:http://www.tecmint.com/installation-of-ubuntu-16-04-server-edition/
|
|||
|
|
[2]:http://www.tecmint.com/ubuntu-14-04-server-installation-guide-and-lamp-setup/
|
|||
|
|
[3]:http://www.tecmint.com/set-add-static-ip-address-in-linux/
|
|||
|
|
[4]:http://www.tecmint.com/manage-samba4-active-directory-linux-command-line/
|
|||
|
|
[5]:http://www.tecmint.com/wp-content/uploads/2016/11/Enable-ACL-on-Linux-Filesystem.png
|
|||
|
|
[6]:http://www.tecmint.com/set-hostname-permanently-in-linux/
|
|||
|
|
[7]:http://www.tecmint.com/wp-content/uploads/2016/11/Install-Samba-on-Ubuntu.png
|
|||
|
|
[8]:http://www.tecmint.com/wp-content/uploads/2016/11/Configuring-Kerberos-Authentication.png
|
|||
|
|
[9]:http://www.tecmint.com/wp-content/uploads/2016/11/Set-Hostname-Kerberos-Server.png
|
|||
|
|
[10]:http://www.tecmint.com/wp-content/uploads/2016/11/Set-Hostname-Administrative-Server.png
|
|||
|
|
[11]:http://www.tecmint.com/wp-content/uploads/2016/11/Samba-Domain-Provisioning.png
|
|||
|
|
[12]:http://www.tecmint.com/wp-content/uploads/2016/11/Create-Kerberos-Configuration.png
|
|||
|
|
[13]:http://www.tecmint.com/wp-content/uploads/2016/11/Enable-Samba-AD-DC.png
|
|||
|
|
[14]:http://www.tecmint.com/20-netstat-commands-for-linux-network-management/
|
|||
|
|
[15]:http://www.tecmint.com/wp-content/uploads/2016/11/Verify-Samba-Active-Directory.png
|
|||
|
|
[16]:http://www.tecmint.com/wp-content/uploads/2016/11/Verify-Samba-Domain-Level.png
|
|||
|
|
[17]:http://www.tecmint.com/wp-content/uploads/2016/11/Configure-DNS-for-Samba-AD.png
|
|||
|
|
[18]:http://www.tecmint.com/wp-content/uploads/2016/11/Check-Samba-AD-DNS-Records.png
|
|||
|
|
[19]:http://www.tecmint.com/wp-content/uploads/2016/11/Check-Kerberos-Authentication-on-Domain.png
|