mirror of
https://github.com/LCTT/TranslateProject.git
synced 2025-01-22 23:00:57 +08:00
197 lines
12 KiB
Markdown
197 lines
12 KiB
Markdown
|
|
How to install Suricata intrusion detection system on Linux
|
||
|
|
================================================================================
|
||
|
|
With incessant security threats, intrusion detection system (IDS) has become one of the most critical requirements in today's data center environments. However, as more and more servers upgrade their NICs to 10GB/40GB Ethernet, it is increasingly difficult to implement compute-intensive intrusion detection on commodity hardware at line rates. One approach to scaling IDS performance is **multi-threaded IDS**, where CPU-intensive deep packet inspection workload is parallelized into multiple concurrent tasks. Such parallelized inspection can exploit multi-core hardware to scale up IDS throughput easily. Two well-known open-source efforts in this area are [Suricata][1] and [Bro][2].
|
||
|
|
|
||
|
|
In this tutorial, I am going to demonstrate **how to install and configure Suricata IDS on Linux server**.
|
||
|
|
|
||
|
|
### Install Suricata IDS on Linux ###
|
||
|
|
|
||
|
|
Let's build Suricata from the source. You first need to install several required dependencies as follows.
|
||
|
|
|
||
|
|
#### Install Dependencies on Debian, Ubuntu or Linux Mint ####
|
||
|
|
|
||
|
|
$ sudo apt-get install wget build-essential libpcre3-dev libpcre3-dbg automake autoconf libtool libpcap-dev libnet1-dev libyaml-dev zlib1g-dev libcap-ng-dev libjansson-dev
|
||
|
|
|
||
|
|
#### Install Dependencies on CentOS, Fedora or RHEL ####
|
||
|
|
|
||
|
|
$ sudo yum install wget libpcap-devel libnet-devel pcre-devel gcc-c++ automake autoconf libtool make libyaml-devel zlib-devel file-devel jansson-devel nss-devel
|
||
|
|
|
||
|
|
Once you install all required packages, go ahead and install Suricata as follows.
|
||
|
|
|
||
|
|
First, download the latest Suricata source code from [http://suricata-ids.org/download/][3], and build it. As of this writing, the latest version is 2.0.8.
|
||
|
|
|
||
|
|
$ wget http://www.openinfosecfoundation.org/download/suricata-2.0.8.tar.gz
|
||
|
|
$ tar -xvf suricata-2.0.8.tar.gz
|
||
|
|
$ cd suricata-2.0.8
|
||
|
|
$ ./configure --sysconfdir=/etc --localstatedir=/var
|
||
|
|
|
||
|
|
Here is the example output of configuration.
|
||
|
|
|
||
|
|
Suricata Configuration:
|
||
|
|
AF_PACKET support: yes
|
||
|
|
PF_RING support: no
|
||
|
|
NFQueue support: no
|
||
|
|
NFLOG support: no
|
||
|
|
IPFW support: no
|
||
|
|
DAG enabled: no
|
||
|
|
Napatech enabled: no
|
||
|
|
Unix socket enabled: yes
|
||
|
|
Detection enabled: yes
|
||
|
|
|
||
|
|
libnss support: yes
|
||
|
|
libnspr support: yes
|
||
|
|
libjansson support: yes
|
||
|
|
Prelude support: no
|
||
|
|
PCRE jit: yes
|
||
|
|
LUA support: no
|
||
|
|
libluajit: no
|
||
|
|
libgeoip: no
|
||
|
|
Non-bundled htp: no
|
||
|
|
Old barnyard2 support: no
|
||
|
|
CUDA enabled: no
|
||
|
|
|
||
|
|
Now compile and install it.
|
||
|
|
|
||
|
|
$ make
|
||
|
|
$ sudo make install
|
||
|
|
|
||
|
|
Suricata source code comes with default configuration files. Let's install these default configuration files as follows.
|
||
|
|
|
||
|
|
$ sudo make install-conf
|
||
|
|
|
||
|
|
As you know, Suricata is useless without IDS rule sets. Conveniently, the Makefile comes with IDS rule installation option. To install IDS rules, run the following command.
|
||
|
|
|
||
|
|
$ sudo make install-rules
|
||
|
|
|
||
|
|
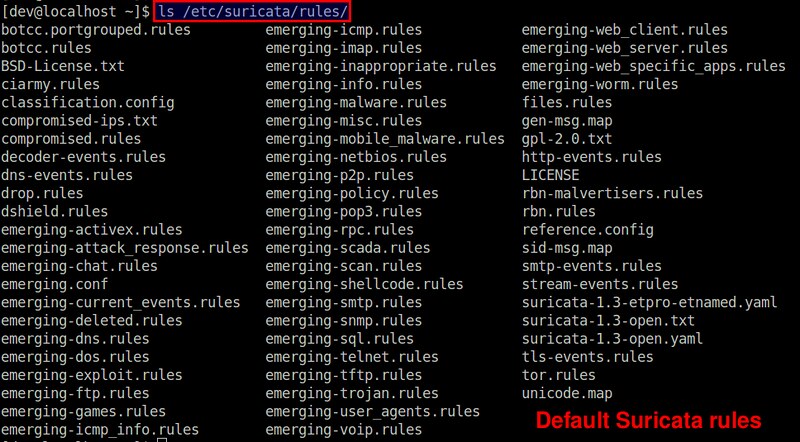
The above rule installation command will download the current snapshot of community rulesets available from [EmergingThreats.net][4], and store them under /etc/suricata/rules.
|
||
|
|
|
||
|
|

|
||
|
|
|
||
|
|
### Configure Suricata IDS the First Time ###
|
||
|
|
|
||
|
|
Now it's time to configure Suricata. The configuration file is located at **/etc/suricata/suricata.yaml**. Open the file with a text editor for editing.
|
||
|
|
|
||
|
|
$ sudo vi /etc/suricata/suricata.yaml
|
||
|
|
|
||
|
|
Here are some basic setup for you to get started.
|
||
|
|
|
||
|
|
The "default-log-dir" keyword should point to the location of Suricata log files.
|
||
|
|
|
||
|
|
default-log-dir: /var/log/suricata/
|
||
|
|
|
||
|
|
Under "vars" section, you will find several important variables used by Suricata. "HOME_NET" should point to the local network to be inspected by Suricata. "!$HOME_NET" (assigned to EXTERNAL_NET) refers to any other networks than the local network. "XXX_PORTS" indicates the port number(s) use by different services. Note that Suricata can automatically detect HTTP traffic regardless of the port it uses. So it is not critical to specify the HTTP_PORTS variable correctly.
|
||
|
|
|
||
|
|
vars:
|
||
|
|
HOME_NET: "[192.168.122.0/24]"
|
||
|
|
EXTERNAL_NET: "!$HOME_NET"
|
||
|
|
HTTP_PORTS: "80"
|
||
|
|
SHELLCODE_PORTS: "!80"
|
||
|
|
SSH_PORTS: 22
|
||
|
|
|
||
|
|
The "host-os-policy" section is used to defend against some well-known attacks which exploit the behavior of an operating system's network stack (e.g., TCP reassembly) to evade detection. As a counter measure, modern IDS came up with so-called "target-based" inspection, where inspection engine fine-tunes its detection algorithm based on a target operating system of the traffic. Thus, if you know what OS individual local hosts are running, you can feed that information to Suricata to potentially enhance its detection rate. This is when "host-os-policy" section is used. In this example, the default IDS policy is Linux; if no OS information is known for a particular IP address, Suricata will apply Linux-based inspection. When traffic for 192.168.122.0/28 and 192.168.122.155 is captured, Suricata will apply Windows-based inspection policy.
|
||
|
|
|
||
|
|
host-os-policy:
|
||
|
|
# These are Windows machines.
|
||
|
|
windows: [192.168.122.0/28, 192.168.122.155]
|
||
|
|
bsd: []
|
||
|
|
bsd-right: []
|
||
|
|
old-linux: []
|
||
|
|
# Make the default policy Linux.
|
||
|
|
linux: [0.0.0.0/0]
|
||
|
|
old-solaris: []
|
||
|
|
solaris: ["::1"]
|
||
|
|
hpux10: []
|
||
|
|
hpux11: []
|
||
|
|
irix: []
|
||
|
|
macos: []
|
||
|
|
vista: []
|
||
|
|
windows2k3: []
|
||
|
|
|
||
|
|
Under "threading" section, you can specify CPU affinity for different Suricata threads. By default, [CPU affinity][5] is disabled ("set-cpu-affinity: no"), meaning that Suricata threads will be scheduled on any available CPU cores. By default, Suricata will create one "detect" thread for each CPU core. You can adjust this behavior by specifying "detect-thread-ratio: N". This will create N*M detect threads, where M is the total number of CPU cores on the host.
|
||
|
|
|
||
|
|
threading:
|
||
|
|
set-cpu-affinity: no
|
||
|
|
detect-thread-ratio: 1.5
|
||
|
|
|
||
|
|
With the above threading settings, Suricata will create 1.5*M detection threads, where M is the total number of CPU cores on the system.
|
||
|
|
|
||
|
|
For more information about Suricata configuration, you can read the default configuration file itself, which is heavily commented for clarity.
|
||
|
|
|
||
|
|
### Perform Intrusion Detection with Suricata ###
|
||
|
|
|
||
|
|
Now it's time to test-run Suricata. Before launching it, there's one more step to do.
|
||
|
|
|
||
|
|
When you are using pcap capture mode, it is highly recommended to turn off any packet offloead features (e.g., LRO/GRO) on the NIC which Suricata is listening on, as those features may interfere with live packet capture.
|
||
|
|
|
||
|
|
Here is how to turn off LRO/GRO on the network interface eth0:
|
||
|
|
|
||
|
|
$ sudo ethtool -K eth0 gro off lro off
|
||
|
|
|
||
|
|
Note that depending on your NIC, you may see the following warning, which you can ignore. It simply means that your NIC does not support LRO.
|
||
|
|
|
||
|
|
Cannot change large-receive-offload
|
||
|
|
|
||
|
|
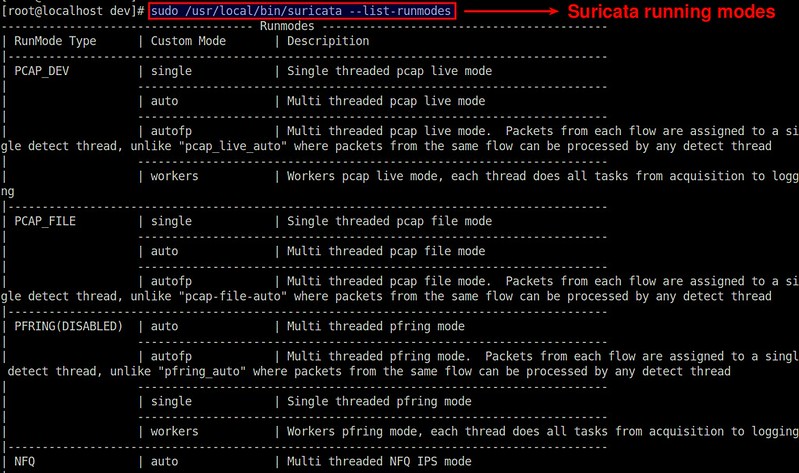
Suricata supports a number of running modes. A runmode determines how different threads are used for IDS. The following command lists all [available runmodes][6].
|
||
|
|
|
||
|
|
$ sudo /usr/local/bin/suricata --list-runmodes
|
||
|
|
|
||
|
|

|
||
|
|
|
||
|
|
The default runmode used by Suricata is autofp (which stands for "auto flow pinned load balancing"). In this mode, packets from each distinct flow are assigned to a single detect thread. Flows are assigned to threads with the lowest number of unprocessed packets.
|
||
|
|
|
||
|
|
Finally, let's start Suricata, and see it in action.
|
||
|
|
|
||
|
|
$ sudo /usr/local/bin/suricata -c /etc/suricata/suricata.yaml -i eth0 --init-errors-fatal
|
||
|
|
|
||
|
|

|
||
|
|
|
||
|
|
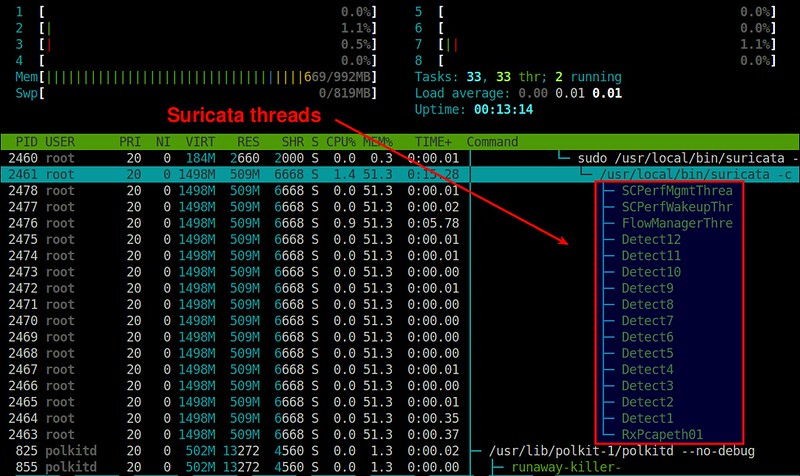
In this example, we are monitoring a network interface eth0 on a 8-core system. As shown above, Suricata creates 13 packet processing threads and 3 management threads. The packet processing threads consist of one PCAP packet capture thread, and 12 detect threads (equal to 8*1.5). This means that the packets captured by one capture thread are load-balanced to 12 detect threads for IDS. The management threads are one flow manager and two counter/stats related threads.
|
||
|
|
|
||
|
|
Here is a thread-view of Suricata process (plotted by [htop][7]).
|
||
|
|
|
||
|
|

|
||
|
|
|
||
|
|
Suricata detection logs are stored in /var/log/suricata directory.
|
||
|
|
|
||
|
|
$ tail -f /var/log/suricata/fast.log
|
||
|
|
|
||
|
|
----------
|
||
|
|
|
||
|
|
04/01/2015-15:47:12.559075 [**] [1:2200074:1] SURICATA TCPv4 invalid checksum [**] [Classification: (null)] [Priority: 3] {TCP} 172.16.253.158:22 -> 172.16.253.1:46997
|
||
|
|
04/01/2015-15:49:06.565901 [**] [1:2200074:1] SURICATA TCPv4 invalid checksum [**] [Classification: (null)] [Priority: 3] {TCP} 172.16.253.158:22 -> 172.16.253.1:46317
|
||
|
|
04/01/2015-15:49:06.566759 [**] [1:2200074:1] SURICATA TCPv4 invalid checksum [**] [Classification: (null)] [Priority: 3] {TCP} 172.16.253.158:22 -> 172.16.253.1:46317
|
||
|
|
|
||
|
|
For ease of import, the log is also available in JSON format:
|
||
|
|
|
||
|
|
$ tail -f /var/log/suricata/eve.json
|
||
|
|
|
||
|
|
----------
|
||
|
|
{"timestamp":"2015-04-01T15:49:06.565901","event_type":"alert","src_ip":"172.16.253.158","src_port":22,"dest_ip":"172.16.253.1","dest_port":46317,"proto":"TCP","alert":{"action":"allowed","gid":1,"signature_id":2200074,"rev":1,"signature":"SURICATA TCPv4 invalid checksum","category":"","severity":3}}
|
||
|
|
{"timestamp":"2015-04-01T15:49:06.566759","event_type":"alert","src_ip":"172.16.253.158","src_port":22,"dest_ip":"172.16.253.1","dest_port":46317,"proto":"TCP","alert":{"action":"allowed","gid":1,"signature_id":2200074,"rev":1,"signature":"SURICATA TCPv4 invalid checksum","category":"","severity":3}}
|
||
|
|
|
||
|
|
### Conclusion ###
|
||
|
|
|
||
|
|
In this tutorial, I demonstrated how you can set up Suricata IDS on a multi-core Linux server. Unlike single-threaded [Snort IDS][8], Suricata can easily benefit from multi-core/many-core hardware with multi-threading. There is great deal of customization in Suricata to maximize its performance and detection coverage. Suricata folks maintain [online Wiki][9] quite well, so I strongly recommend you check it out if you want to deploy Suricata in your environment.
|
||
|
|
|
||
|
|
Are you currently using Suricata? If so, feel free to share your experience.
|
||
|
|
|
||
|
|
--------------------------------------------------------------------------------
|
||
|
|
|
||
|
|
via: http://xmodulo.com/install-suricata-intrusion-detection-system-linux.html
|
||
|
|
|
||
|
|
作者:[Dan Nanni][a]
|
||
|
|
译者:[译者ID](https://github.com/译者ID)
|
||
|
|
校对:[校对者ID](https://github.com/校对者ID)
|
||
|
|
|
||
|
|
本文由 [LCTT](https://github.com/LCTT/TranslateProject) 原创编译,[Linux中国](https://linux.cn/) 荣誉推出
|
||
|
|
|
||
|
|
[a]:http://xmodulo.com/author/nanni
|
||
|
|
[1]:http://suricata-ids.org/
|
||
|
|
[2]:https://www.bro.org/
|
||
|
|
[3]:http://suricata-ids.org/download/
|
||
|
|
[4]:http://rules.emergingthreats.net/
|
||
|
|
[5]:http://xmodulo.com/run-program-process-specific-cpu-cores-linux.html
|
||
|
|
[6]:https://redmine.openinfosecfoundation.org/projects/suricata/wiki/Runmodes
|
||
|
|
[7]:http://ask.xmodulo.com/view-threads-process-linux.html
|
||
|
|
[8]:http://xmodulo.com/how-to-compile-and-install-snort-from-source-code-on-ubuntu.html
|
||
|
|
[9]:https://redmine.openinfosecfoundation.org/projects/suricata/wiki
|