2014-11-26 10:40:16 +08:00
Linux问答时间--如何在CentOS上安装phpMyAdmin
2014-11-18 16:38:19 +08:00
================================================================================
2014-11-26 10:40:16 +08:00
> **问题**:我正在CentOS上运行一个MySQL/MariaDB服务, ?
2014-11-18 16:38:19 +08:00
2014-11-27 18:01:21 +08:00
phpMyAdmin是一款以PHP为基础, / , ,
2014-11-18 16:38:19 +08:00
2014-11-26 17:39:50 +08:00
### 前提 ###
2014-11-18 16:38:19 +08:00
2014-11-27 18:01:21 +08:00
在CentOS上安装phpMyAdmin, , ,
2014-11-18 16:38:19 +08:00
2014-11-27 18:01:21 +08:00
另一个要求是允许在你的CentOS上安装EPEL库。如果你还没设置过请[猛戳这里][4]。
2014-11-18 16:38:19 +08:00
2014-11-27 18:01:21 +08:00
### 在CentOS6或7上安装phpMyAdmin ###
2014-11-18 16:38:19 +08:00
2014-11-27 18:01:21 +08:00
一旦你设置了EPEL库,
2014-11-18 16:38:19 +08:00
2014-11-27 18:01:21 +08:00
在CentOS 7上:
2014-11-18 16:38:19 +08:00
$ sudo yum install phpmyadmin
2014-11-27 18:01:21 +08:00
在CentOS 7上:
2014-11-18 16:38:19 +08:00
$ sudo yum install phpmyadmin php-mcrypt
2014-11-27 18:01:21 +08:00
### 在CentOS 7上配置phpMyAdmin ###
2014-11-18 16:38:19 +08:00
2014-11-28 17:35:37 +08:00
默认情况下,
2014-11-18 16:38:19 +08:00
2014-11-28 17:35:37 +08:00
用文本编辑器打开phpMyAdmin的配置文件(路径:/etc/httpd/conf.d/phpMyAdmin.conf),找出并注释掉带有"Require ip XXXX"字样的代码行。会有四处这样的代码行,用"Require all granted"取而代之。重新改动过的配置文件如下所示。
2014-11-18 16:38:19 +08:00
$ sudo vi /etc/httpd/conf.d/phpMyAdmin.conf
----------
. . . . .
< Directory / usr / share / phpMyAdmin / >
AddDefaultCharset UTF-8
< IfModule mod_authz_core . c >
# Apache 2.4
< RequireAny >
#Require ip 127.0.0.1
#Require ip ::1
Require all granted
< / RequireAny >
< / IfModule >
< IfModule ! mod_authz_core . c >
# Apache 2.2
Order Deny,Allow
Deny from All
Allow from 127.0.0.1
Allow from ::1
< / IfModule >
< / Directory >
< Directory / usr / share / phpMyAdmin / setup / >
< IfModule mod_authz_core . c >
# Apache 2.4
< RequireAny >
#Require ip 127.0.0.1
#Require ip ::1
Require all granted
< / RequireAny >
< / IfModule >
< IfModule ! mod_authz_core . c >
# Apache 2.2
Order Deny,Allow
Deny from All
Allow from 127.0.0.1
Allow from ::1
< / IfModule >
< / Directory >
. . . . .
2014-11-28 17:35:37 +08:00
最后,
2014-11-18 16:38:19 +08:00
$ sudo systemctl restart httpd
2014-11-28 17:35:37 +08:00
### 在CentOS 6上配置phpMyAdmin ###
2014-11-18 16:38:19 +08:00
2014-11-28 17:35:37 +08:00
默认情况下, ,
2014-11-18 16:38:19 +08:00
2014-11-28 17:35:37 +08:00
用文本编辑器打开phpMyAdmin的配置文件(路径:/etc/httpd/conf.d/phpMyAdmin.conf),找出并注释掉"Deny from all"字样的代码行。然后把"Allow from 127.0.0.1"字样的代码行改成"Allow from 0.0.0.0"。重新改动过的配置文件如下所示。
2014-11-18 16:38:19 +08:00
$ sudo vi /etc/httpd/conf.d/phpmyadmin.conf
----------
< Directory " / usr / share / phpmyadmin " >
Order Deny,Allow
# Deny from all
Allow from 0.0.0.0
< / Directory >
2014-11-28 17:35:37 +08:00
下一步是将phpMyAdmin的配置文件用blowfish加密工具加密。这一步需要加密cookie里的密码来作为基于cookie的部分认证。
2014-11-18 16:38:19 +08:00
2014-11-28 17:35:37 +08:00
用文本编辑器打开如下路径所示的文件并且用blowfish设置一个随机密码,
2014-11-18 16:38:19 +08:00
$ sudo vi /usr/share/phpmyadmin/config.inc.php
----------
$cfg['blowfish_secret'] = 'kd5G}d33aXDc50!'; /* YOU MUST FILL IN THIS FOR COOKIE AUTH! */
2014-11-28 17:35:37 +08:00
最后,
2014-11-18 16:38:19 +08:00
$ sudo service httpd restart
2014-11-28 17:35:37 +08:00
### 测试phpMyAdmin ###
2014-11-18 16:38:19 +08:00
2014-11-28 17:35:37 +08:00
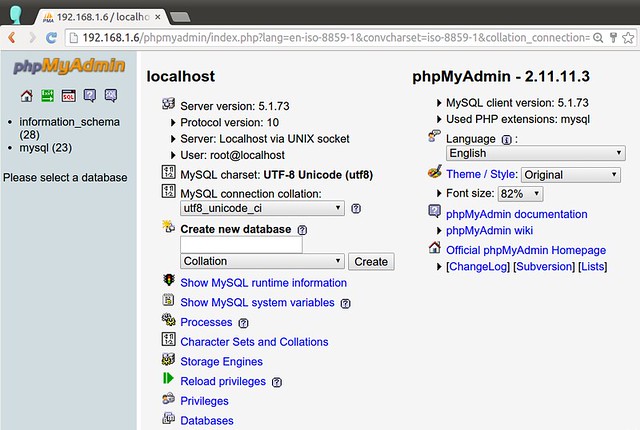
测试phpMyAdmin是否设置成功, : < web-server-ip-addresss > /phpmyadmin
2014-11-18 16:38:19 +08:00

2014-11-28 17:35:37 +08:00
你应该能通过Web界面来记录下任何MySQL用户(比如root)和管理MySQL/MariaDB的数据库/表。
2014-11-18 16:38:19 +08:00

2014-11-28 17:35:37 +08:00
### 疑难解答 ###
2014-11-18 16:38:19 +08:00
Here are a few troubleshooting tips during phpMyAdmin installation on CentOS.
1. When you are trying to access phpMyAdmin page in web browser, you are getting "403 Forbidding" error with:
You don't have permission to access /phpMyAdmin on this server.
This error is happening because the default setting of phpMyAdmin blocks access from a remote IP address. To fix this error, you need to edit its configuration to allow remote access. See the above for more detail.
2. When you access phpMyAdmin page, you are seeing "The configuration file now needs a secret passphrase (blowfish_secret)." message, and you cannot login.
To fix this error, you need to edit /usr/share/phpmyadmin/config.inc.php to add a random blowfish password as follows, and restart httpd.
$cfg['blowfish_secret'] = 'kd5G}d33aXDc50!'; /* YOU MUST FILL IN THIS FOR COOKIE AUTH! */
----------
$ sudo service httpd restart (CentOS 6)
$ sudo systemctl restart httpd (CentOS 7)
3. When you access phpMyAdmin page, you are getting "Cannot load mcrypt extension. Please check your PHP configuration" error message.
To solve this error, install the following package:
$ sudo yum install php-mcrypt
and restart httpd:
$ sudo service httpd restart (CentOS 6)
$ sudo systemctl restart httpd (CentOS 7)
--------------------------------------------------------------------------------
via: http://ask.xmodulo.com/install-phpmyadmin-centos.html
2014-11-26 10:40:16 +08:00
译者:[ZTinoZ](https://github.com/ZTinoZ)
2014-11-18 16:38:19 +08:00
校对:[校对者ID](https://github.com/校对者ID)
本文由 [LCTT ](https://github.com/LCTT/TranslateProject ) 原创翻译,[Linux中国](http://linux.cn/) 荣誉推出
[1]:http://xmodulo.com/set-web-based-database-management-system-adminer.html
[2]:http://xmodulo.com/install-lamp-stack-centos.html
[3]:http://xmodulo.com/install-lemp-stack-centos.html
[4]:http://xmodulo.com/how-to-set-up-epel-repository-on-centos.html
[5]:
[6]:
[7]:
[8]:
[9]:
[10]:
[11]:
[12]:
[13]:
[14]:
[15]:
[16]:
[17]:
[18]:
[19]:
2014-11-22 20:57:33 +08:00
[20]: